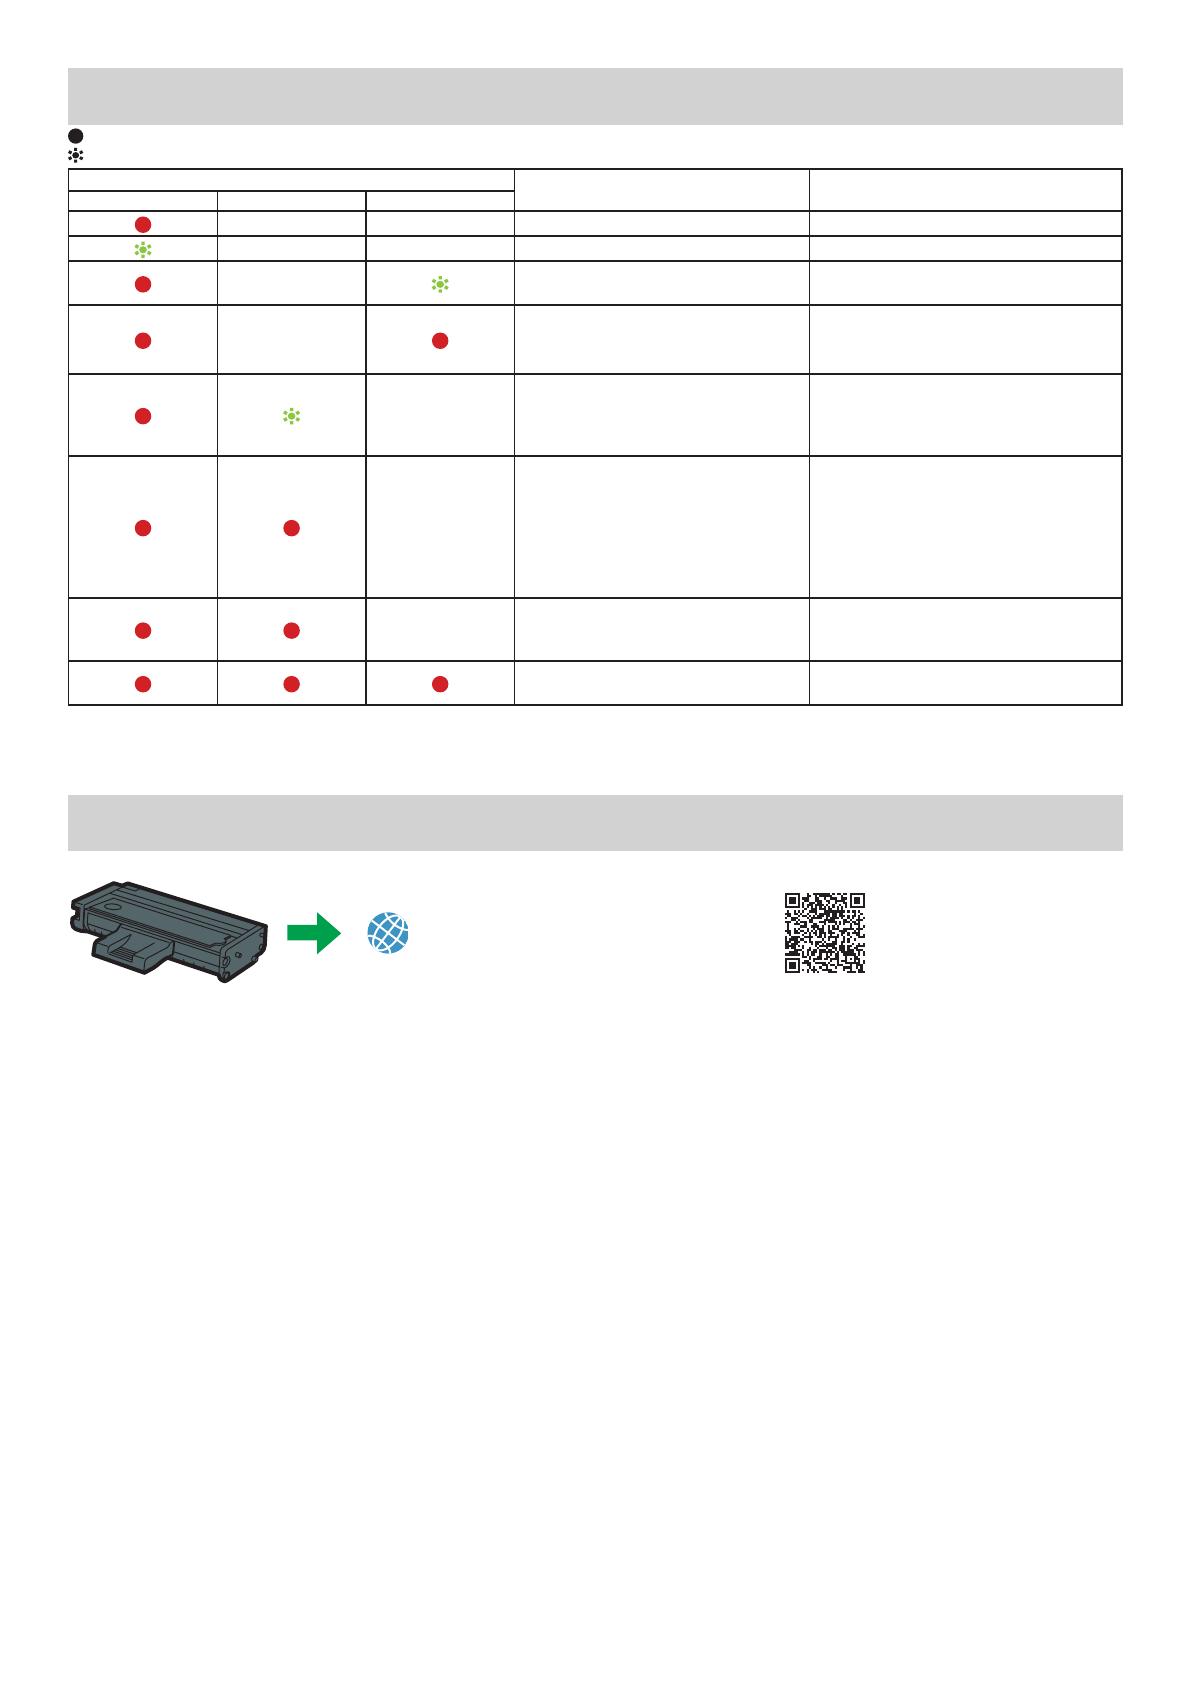
Ricoh SP 220Nw Installation guide

Type
Installation guide

This manual is also suitable for

Ricoh SP 220Nw is a versatile and user-friendly printer designed to meet your everyday printing needs. With its compact size and wireless connectivity, this printer is perfect for home offices or small businesses. The SP 220Nw allows you to print from various devices, including smartphones and tablets, making it a convenient choice for mobile professionals.

Ricoh SP 220Nw is a versatile and user-friendly printer designed to meet your everyday printing needs. With its compact size and wireless connectivity, this printer is perfect for home offices or small businesses. The SP 220Nw allows you to print from various devices, including smartphones and tablets, making it a convenient choice for mobile professionals.

Setup Guide
1
Setting Up the Machine
2
Installing the Software
LED Status
How to purchase consumables
2
1
1
1. Setting Up the Machine
Power Source / Stromquelle /
Source d’alimentation / Alimentazione /
Strømkilde / Fuente de alimentación /
Stroombron / Strømkilde / Fonte de alimentação /
Fonte de energia / Virtalähde / Strömkälla /
Zdroj napájení / Áramforrás / Źródło zasilania /
ç Kaynağı / Источник питания / Қуат көзі /
/
120 V, 60 Hz, 8 A
220 - 240 V, 50/60 Hz, 5A
110 V, 60 Hz, 8 A
10
50
15
80
32
89.6
20 cm
(7.9 inches)
40 cm
(15.8inches)
45 cm
(17.7 inches)
10 cm
(4.0 inches)
10 cm
(4.0 inches)
DSH050
DSH052
DSH053
DSH054
DSH055
DSH056
DSH057
DSH058
DSH011
DSH059
DSH055
DSH060
DSH014
2
DSH015
DSH017
DSH018
DSH061
DSH062
DSH063
DSH067
1
2
DSH068
Go to page 3 “Installing the Software. For OS X, see User’s Guide in the
provided CD-ROM or our website (http://www.ricoh.com/printers/sp200/support/
gateway/).
For safe and correct use, please be sure to read the Safety Information before using the machine.
3
2. Installing the Software
Check how the computer is connected
Specify how to connect to your computer according to the communication environment of your system.
Go to page 4 "Connecting the Machine (USB/Network)".
DSH084
connect by
USB interface cable
connect by
Ethernet interface cable
use router (access point)?
Yes
No
connect by wireless?
connect by wired?
connect via Wi-Fi Direct
See Wi-Fi Direct Guide in our website
(http://www.ricoh.com/printers/sp200/
support/gateway/).
connect using CD-ROM
Go to page 5 "Easy Setup
Using the CD-ROM".
To connect using the WPS button, go to page 6 “Easy Setup Using the WPS Button”.
To connect using a PIN code, go to page 7 “Easy Setup Using a PIN Code”.
To set up manually, see User’s Guide in the provided CD-ROM or our website (http://www.ricoh.com/printers/sp200/support/gateway/).
When the Wi-Fi Direct function is enabled, a Wi-Fi Direct compliant device is recognized as a router (access point), and direct
communication among Wi-Fi Direct-compliant devices becomes possible.
When communicating using the Wi-Fi Direct function, you cannot connect to the Internet at the same time.
Use the machine from a smart device
Android iOS
How to use the machine from a
smart device
For information about using the machine from a
smart device, see the following website or scan
the following QR code from your smart device.
DSH069
How to use the NFC tag
(Android smart devices only)
When using Android smart devices, download
and install the RICOH SP 200 series SOM from
the following website or QR code, and then touch
the NFC tag on the machine with the device.
http://www.ricoh.com/printers/
sp200/support/gateway/
4
Connecting the Machine (USB/Network) Windows
DSH072
The following items are necessary to set up a wired
connection.
USB interface cable or Ethernet interface cable
CD-ROM supplied with the machine
1. Turn on your computer..
2. Insert the provided CD-ROM into the CD-ROM drive of the
computer.
If your computer does not have a CD-ROM drive, download a
setup file from our website (http://www.ricoh.com/printers/sp200/
support/gateway/).
or
3. Click [Quick Install].
4. The software license agreement appears in the [Software
License Agreement] dialog box. After reading the agreement,
click [Yes].
5. Select [USB Connection] or [Network Connection] according
to communication environment or your device.
6. Follow the instructions in the setup wizard.
7. Click [Finish] in the [Setup Complete] dialog box. If the
installer prompt you to restart Windows, reboot your
computer.
Setup is completed.
5
Connecting the Machine via Wi-Fi Windows
Easy Setup Using the CD-ROM
The following items are necessary to set up a wireless
connection.
USB interface cable or Ethernet interface cable
Router (access point)
CD-ROM supplied with the machine
1. Turn on your computer.
2. Insert the provided CD-ROM into the CD-ROM drive of the
computer.
If your computer does not have a CD-ROM drive, download a
setup file from our website (http://www.ricoh.com/printers/sp200/
support/gateway/).
or
3. Click [Quick Install].
4. The software license agreement appears in the [Software
License Agreement] dialog box. After reading the agreement,
click [Yes].
5. Select [Wireless Connection].
6. Follow the instructions in the setup wizard.
7. Click [Finish] in the [Setup Complete] dialog box. If the
installer prompt you to restart Windows, reboot your
computer.
Setup is completed.
To connect using the WPS button, go to page 6 “Easy
Setup Using the WPS Button.
To connect using a PIN Code, go to page 7 “Easy Setup
Using a PIN Code”.
To connect using Wi-Fi Direct, see Wi-Fi Direct Guide in
our website (http://www.ricoh.com/printers/sp200/support/
gateway/).
6
Easy Setup Using the WPS Button
Before doing the following procedure, install the printer
driver according to the procedure on page 4
"Connecting the Machine (USB/Network)".
Make sure the Ethernet cable is not connected to the
machine.
In Steps 10 to 11, congure each setting within two
minutes.
The following item is necessary to set up a wireless
connection.
Router (access point)
1. Check that the router (access point) is working correctly.
2. On the [Start] menu in your computer, point to [All
Programs], click [SP 220 Series Software Utilities], and then
click [Smart Organizing Monitor for SP 220 Series].
3. Click [User Tools] tab.
4. Click [Printer Configuration].
5. Enter the access code, and then click [OK].
The default access code is “Admin”.
6. On the [Network 1] tab, select [Active] for [Wireless
Function:].
7. Click [Apply], and then click [OK].
The machine restarts.
8. Repeat steps 3 to 5 to open the [Printer Configuration]
screen.
9. On the [Wireless] tab, select [Setup with WPS] for
[Configuration Method].
10. Click [Connect].
11. Press the WPS button on the router (access point) within
two minutes.
WPS
CHV607
For details about how to use the WPS button, refer to the
manuals for the router (access point).
12. Check the result.
Connection has succeeded:
The Power indicator lights up.
Connection has failed:
All the indicators start to flash simultaneously, and after
30 seconds, only the Power indicator lights up. Try the
connection again.
13. Configuring the Wi-Fi settings is complete.
7
Easy Setup Using a PIN Code
Before doing the following procedure, install the printer
driver according to the procedure on page 4
"Connecting the Machine (USB/Network)".
Make sure the Ethernet cable is not connected to the
machine.
In Steps 12 to 15, congure each setting within two
minutes.
To establish a connection using the PIN code, use a
computer that is connected to the router (access point).
The following item is necessary to set up a wireless
connection.
Router (access point)
1. Check that the router (access point) is working correctly.
2. Open the PIN code configuration window (web page) for the
router (access point) on your computer.
3. On the [Start] menu in your computer, point to [All
Programs], click [SP 220 Series Software Utilities], and then
click [Smart Organizing Monitor for SP 220 Series].
4. Click [User Tools] tab.
5. Click [Printer Configuration].
6. Enter the access code, and then click [OK].
The default access code is “Admin”.
7. On the [Network 1] tab, select [Active] for [Wireless
Function:].
8. Click [Apply], and then click [OK].
The machine restarts.
9. Repeat steps 4 to 6 to open the [Printer Configuration]
screen.
10. On the [Wireless] tab, select [Setup with WPS] for
[Configuration Method].
11. Select [Wi-Fi Protected Setup with PIN Code] for [One-
Touch Connection Setting (WPS)].
12. Click [Get PIN Code] and check the PIN code.
Write down the PIN code in case you might forget it.
8
13. Enter the machine’s PIN code (8 digits) on the router (access
point)’s web page.(The web page accessed in Step 2)
14. Execute WPS (PIN system) from the router (access point)’s
web page.
15. Click [Connect].
16. Check the result.
Connection has succeeded:
The Power indicator lights up.
Connection has failed:
All the indicators start to flash simultaneously, and
after 30 seconds, only the Power indicator lights up.
Try the connection again.
17. Configuring the Wi-Fi settings is complete.
9
LED Status
: On
: Flashing (on for one second and off for one second)
LED Status Solution
Power Alarm Toner / Paper End
- - The power is on. The status is normal.
- - Importing data. The status is normal.
-
The print cartridge is almost empty. Replace the print cartridge before it
becomes empty.
-
The print cartridge is empty.
The print cartridge is not set correctly.
The tray has run out of paper.
Replace the print cartridge.
Set the print cartridge again correctly.
Load paper into the tray.
-
A paper jam has occurred in the
machine.
Use Web Image Monitor or Smart
Organizing Monitor to determine where
the paper jam is, and then remove the
jammed paper.
-
The size of paper to print on and the
size of the paper loaded in the tray do
not match.
A cover is open.
Use Web Image Monitor or Smart
Organizing Monitor to check the paper
size settings, and then change either the
size of paper to print on or the size of
paper loaded in the tray.
Confirm that all the covers are closed
completely.
-
Another type of error has occurred. Use Web Image Monitor or Smart
Organizing Monitor to check the error, and
then take appropriate measures.
A malfunction has occurred. Contact your sales or service
representative.
For details, see “Error and Status Indicate on the Control Panel, User’s Guide.
How to purchase the consumables
For information about consumables, see the following website or scan the following QR code from your smart device.
http://www.ricoh.com/printers/
sp200/support/gateway/
© 2016
Trademark
Android is a trademark of Google Inc.
IOS is a trademark or registered trademark of Cisco in the U.S. and other
countries and is used under license.
Wi-Fi, Wi-Fi Direct, Wi-Fi Protected Setup, WPA, Wi-Fi Protected Access,
WPA2, and Wi-Fi Protected Access 2 are registered trademarks of Wi-Fi
Alliance.
Linux is a registered trademark of Linus Torvalds in the United States and
other countries.
Mac OS is a trademarks or registered trademarks of Apple Inc., in the
United States and other countries.
Microsoft
®
, Windows
®
, Windows Server
®
and Windows Vista
®
are either
registered trademarks or trademarks of Microsoft Corporation in the United
States and/or other countries/regions.
Red Hat and Red Hat Enterprise Linux are trademarks of Red Hat, Inc.,
registered in the United States and other countries.
SUSE is a registered trademark of SUSE Linux AG.
SUSE and openSUSE are registered trademarks of Novell, Inc.
Ubuntu and Canonical are registered trademarks of Canonical Ltd.
Other product names used in this manual are for identification purposes only
and may be trademarks of their respective companies.
We do not have any or all rights to these marks.
All Microsoft product screenshots are reprinted with permission from the
Microsoft Corporation.
M0A4-8602
GB
EN
• Manual
• Software
• Linux driver
• Information on con-
sumables
http://www.ricoh.com/printers/
sp200/support/gateway/
  • Page 1 1
  • Page 2 2
  • Page 3 3
  • Page 4 4
  • Page 5 5
  • Page 6 6
  • Page 7 7
  • Page 8 8
  • Page 9 9
  • Page 10 10
  • Page 11 11
  • Page 12 12
  • Page 13 13

Ricoh SP 220Nw Installation guide

Type
Installation guide
This manual is also suitable for

Ricoh SP 220Nw is a versatile and user-friendly printer designed to meet your everyday printing needs. With its compact size and wireless connectivity, this printer is perfect for home offices or small businesses. The SP 220Nw allows you to print from various devices, including smartphones and tablets, making it a convenient choice for mobile professionals.

Ask a question and I''ll find the answer in the document

Finding information in a document is now easier with AI