Page is loading ...

Page 23
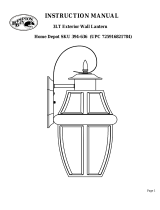
INSTALLATION:
Page 2
Thank you for purchasing this Hampton Bay exterior wall lantern. This
product has been manufactured with the highest standards of safety and
quality. The finish of this lantern is weather resistant but over time will
naturally weather and fade. This fixture is equipped with an energy saving
compact fluorescent light bulb and a dusk-to-dawn photocell. If the power is
left on, the fixture will automatically turn on at dusk and off at dawn.
FEATURES:
1. One-light exterior wall lantern in oil rubbed bronze finish and frosted glass.
2. Energy saving fixture conserves energy by automatically turning light on
at dusk and off at dawn.
3. For further energy savings, this fixture has been engineered to safely use a
GU24 compact fluorescent light bulb (included) (do not exceed 13 watts).
(this bulb meets the Energy Star requirements and is suitable for an
exterior and damp environment.)
4. The dusk-to-dawn feature automatically illuminates your home at night for
added security.
QUESTIONS, PROBLEMS, MISSING PARTS:
Before returning to your local The Home Depot, please call our Customer
Service Team at 1-877-527-0313 or visit www.homedepot.com. Please
reference your SKU 395-250 or UPC 6940500311029.

Page 3
CAUTION:
1. Before starting installation of this fixture or removal of a previous fixture,
disconnect the power by turning off the circuit breaker or by removing the
fuse at the fuse box.
2. CONSULT A QUALIFIED ELECTRICIAN IF YOU HAVE ANY
ELECTRICAL QUESTIONS.
3. The GU-24 compact fluorescent light bulb included with this fixture is not
dimmable. Do not use any dimming device to control this fixture.
4. If you have any non-electrical questions about this fixture, please contact
our Customer Service Team at 1-877-527-0313 or visit
www.homedepot.com. Please reference your SKU 395-250 or UPC
6940500311029.
5. Keep your receipt and these Instructions for Proof of Purchase.
TOOLS REQUIRED FOR ASSEMBLY & INSTALLATION
(not included):
Light Bulb (included) Safety Goggles Ladder Gloves Wire Strippers
(13 watt maximum)
Flathead Screwdriver Phillips Screwdriver Electrical Tape Wire Cutters Silicon Rubber Sealant
for exterior use
Page 22
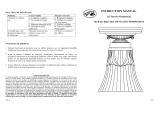
PIECES INCLUSES POUR L'INSTALLATION (les pièces ne sont pas à l'échelle):
2x Écrou de Verrouillage (#5) 3x Serre-Fils (#8) 1x Entretoise (#9)
2x Vis Boîte de Sortie (#10) 1x Vis Terre (#11) 2x Vis de Montage (#12)
INSTRUCTIONS D'INSTALLATION:
1. Visser les deux Vis de Montage (#12) sur la Entretoise (#9). Fixer la Entretoise (#9) sur la Boîte
de Sortie (#7) grâce aux deux Vis de Boîte de Sortie (#10). [S'assurer que le filetage des Vis de
Montage (#12) fait face à l'extérieur quand la Entretoise (#9) est attachée à la Boîte de Sortie
(#7).]
2. Enrouler le câble électrique de terre du luminaire autour de la Vis de Terre (#11) présente sur la
Sangle de Montage (#9), et puis connecter le câble électrique de terre du luminaire à celui de la
Boîte de Sortie (#7). Connecter le câble sans marque écrite (avec des nervures en relief) du
luminaire au câble blanc de la Boîte de Sortie (#7), Connecter le câble avec une marque écrite du
luminaire au câble noir de la Boîte de Sortie (#7). Couvrir les connecteurs grâce aux Serre-Fils
(#8). Envelopper les connexions des câbles avec du ruban adhésif isolant pour une meilleure
connexion. Placer les câbles à l'intérieur de la Boîte de Sortie (#7). Note: Si vous avez des
questions relatives à l'électricité, consultez votre code électrique local concernant les méthodes
de mise à terre en vigueur.
3. Installer le corps du luminaire au mur en faisant passer complètement les Vis de Montage (#12)
protubérantes par les trous de la Plaque de Mur (#1). Veillez à ne pas pincer les câbles situés entre
le luminaire et la Boîte de Sortie (#7). Bien fixer le luminaire au mur en vissant les deux Ecrous
de Verrouillage (#5) sur les deux Vis de Montage (#12).
4. Une fois le luminaire installé sur le mur, colmater l'espace entre le mur et les 3/4 supérieurs
de la Plaque Murale (#1) pour empêcher l'eau de filtrer dans la Boîte de Sortie (#7). Laisser
le 1/4 inférieur non colmaté pour pouvoir évacuer toute eau ayant pu pénétrer dans le
boîtier.
5. Avant de continuer l'Installation, veuillez consulter à nouveau les Instructions
d'Assemblage #3.
6. L'installation est achevée. Remettre le courant au disjoncteur ou à la boîte à fusible.
Appuyez sur l'interrupteur de lumière pour allumer le luminaire.
7. L'ampoule ne s'allumera pas s'il fait jour. Pour tester le luminaire, recouvrir la Cellule
Photo (#2) avec du ruban isolant afin d'allumer l'ampoule. Enlever le ruban isolant après
s'être assuré que l'ampoule s'allume.

Page 21
ASSEMBLAGE:
Page 4
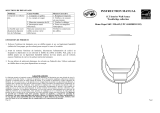
ASSEMBLY INSTRUCTIONS:
1. Carefully unpack the fixture. Lay out all parts on a clean surface.
2. Before continuing Assembly, please proceed to the Installation Instructions.
3. Install the GU24 compact fluorescent light Bulb (#6) (included) in the
Socket (#3) in the Fixture Frame (#4). To install the Bulb (#6), line up the
prongs on the base of the Bulb (#6) with the matching holes in the Socket
(#3) and insert the Bulb (#6) into the Socket (#3). Next, twist the base of
the Bulb (#6) clockwise until the Bulb (#6) locks into place (about 1/4 to
1/2 turn).

Page 19
AVERTISSEMENT:
1. Avant de commencer à installer ce luminaire ou d'enlever l'ancien luminaire,
déconnectez le courant en éteignant le disjoncteur ou en enlevant le fusible
correspondant du coffret à fusibles.
2.
CONSULTER UN ELECTRICIEN QUALIFIE POUR TOUTE
QUESTION RELATIVE A L'ELECTRICITE.
3.
La luminosité de l’ampoule électrique fluorescente compacte GU-24
fournie avec ce luminaire n’est pas modulable. Ne pas utiliser de dispositif
de modulation de luminosité avec ce luminaire.
4.
En cas de questions non relatives à l'électricité à propos de ce luminaire,
veuillez contacter notre centre de Service à la Clientèle au 1-877-527-0313
ou visiter www.homedepot.com. Veuillez indiquer votre
UGS
395-250 ou
UPC 6940500311029.
5.
Conserver votre reçu et ces Instructions comme Preuve d'Achat.
OUTILS REQUIS POUR L'ASSEMBLAGE & L'INSTALLATION
(non inclus):
Ampoule ( inclus) Lunettes de Protection Echelle Gants Dénudeur de câbles
(13 watts maxima) électriques
Tournevis à tête Plate Tournevis à croisillon Ruban adhésif Pince pour Joint en Caoutchouc Silicone
isolant câbles électriques pour un usage extérieur
Page 6
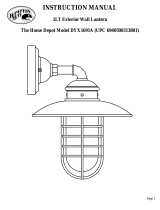
PARTS INCLUDED FOR INSTALLATION (parts are not to scale):
2ea Lock Nuts (#5) 3ea Wire Connectors (#8) 1ea Cross Bar (#9)
2ea Outlet Box Screws (#10) 1ea Ground Screw (#11) 2ea Mounting Screws (#12)
INSTALLATION INSTRUCTIONS:
1. Screw the two Mounting Screws (#12) into the Cross Bar (#9). Mount the Cross Bar (#9) to
the Outlet Box (#7) using the two Outlet Box Screws (#10). [Make sure the threads of the
Mounting Screws (#12) are facing outside when the Cross Bar (#9) is attached to the Outlet
Box (#7).]
2. Wrap the ground wire from the fixture around the Ground Screw (#11) on the Cross Bar (#9),
and then connect the ground wire from the fixture to the ground wire from the Outlet Box (#7).
Connect the white wire from the fixture to the white wire from the Outlet Box (#7), and the
black wire from the fixture to the black wire from the Outlet Box (#7). Cover the three wire
connections using the three Wire Connectors (#8). Wrap the three wire connections with
electrical tape for a more secure connection. Position the wires back inside the Outlet Box
(#7). Note: If you have questions, consult your local electrical code for approved grounding
methods.
3. Mount the body of the fixture on the wall by aligning the protruding Mounting Screws (#12)
all the way through the holes in the Wall Plate (#1). Be careful not to pinch any of the wires
between the fixture and the Outlet Box (#7). Tighten the fixture to the wall by screwing the
two Lock Nuts (#5) onto the two protruding Mounting Screws (#12).
4. Once the fixture is mounted on the wall, caulk the space between the wall and the upper 3/4
area of the Wall Plate (#1) to prevent water seeping into the Outlet Box (#7). Leave the
bottom 1/4 area uncaulked for drainage of any water which might leak into the enclosure.
5. Before completing Installation, please return to the Assembly Instruction #3.
6. Installation is complete. Turn on the power at the circuit breaker or fuse box. Turn the light
switch on to activate the fixture.
7. If it is daylight, the light bulb will not illuminate. To test the fixture, cover the Photocell (#2)
with electrical tape to illuminate the light bulb. Once you confirm the light bulb illuminates,
remove the electrical tape.

Page 17
MANUEL D'INSTRUCTIONS
Lanterne Murale d'Extérieur 1LM
avec Cellule Photo
The Home Depot UGS 395-250 (UPC 6940500311029)
Page 8
Problem Possible Cause Corrective Action
1. Bulb is burned
out.
1. Replace light bulb.
2. Power is off.
2. Make sure power supply is on.
3. Faulty wire
connection.
3. Check wiring.
4. Faulty switch. 4. Test or replace switch.
Bulb will not light.
5. Photocell.
5. If daylight, cover photocell
with hand or electrical tape.
Fuse blows or circuit
breaker trips when
light is turned on.
Crossed wires or
power wire is
grounding out.
Check wire connections.
PRODUCT MAINTENANCE:
1. To clean the outside of the fixture, use a dry or slightly dampened clean cloth (use clean
water, never a solvent) to wipe the glass and surface of the fixture.
2. To clean the inside of the fixture, first disconnect power to the fixture by turning off the
circuit breaker or by removing the fuse at the fuse box. Next, use a dry or slightly
dampened clean cloth (use clean water, never a solvent) to wipe the inside glass and
interior surface of the fixture.
3. Do not use any cleaners with chemicals, solvents or harsh abrasives. Use only a dry soft
cloth to dust or wipe carefully.
LIMITED WARRANTY
The manufacturer warrants this lighting fixture to be free from defects in materials and workmanship for a period
of three (3) years from date of purchase. The bulb warranty is two (2) years. This warranty applies only to the
original consumer purchaser and only to products used in normal use and service. If this product is found to be
defective, the manufacturer’s only obligation, and your exclusive remedy, is the repair or replacement of the
product at the manufacturer’s discretion, provided that the product has not been damaged through misuse, abuse,
accident, modifications, alterations, neglect or mishandling. This warranty shall not apply to any product that is
found to have been improperly installed, set-up, or used in any way not in accordance with the instructions
supplied with the product. This warranty shall not apply to a failure of the product as a result of an accident,
misuse, abuse, negligence, alteration, or faulty installation, or any other failure not relating to faulty material or
workmanship. This warranty shall not apply to the finish on any portion of the product, such as surface and/or
weathering, as this is considered normal wear and tear. The manufacturer does not warrant and specially
disclaims any warranty, whether express or implied, of fitness for a particular purpose, other than the
warranty contained herein. The manufacturer specifically disclaims any liability and shall not be liable for
any consequential or incidental loss or damage, including but not limited to any labor / expense costs
involved in the replacement or repair of said product.
TROUBLESHOOTING:
/