Bosch Dishwasher User manual

Category
Dishwashers
Type
User manual
   

   
en
Index
Safety instructions 4 . . . . . . . . . . . . .
Getting to know your appliance 6 . .
Adding rinse aid 7 . . . . . . . . . . . . . . .
Not suitable for the dishwasher 8 . .
Detergents 11 . . . . . . . . . . . . . . . . . . .
Programme overview 13 . . . . . . . . . .
Washing dishes 14 . . . . . . . . . . . . . . .
Additional functions * 15 . . . . . . . . . . .
Maintenance and care 16 . . . . . . . . . .
Fault finding 18 . . . . . . . . . . . . . . . . . .
Customer Service 21 . . . . . . . . . . . . .
Information 21 . . . . . . . . . . . . . . . . . . .
Installation 22 . . . . . . . . . . . . . . . . . . . .
Waste disposal 23 . . . . . . . . . . . . . . . .
en
4
Safety instructions
Delivery
Immediately check the packaging and
dishwasher for any damage which may
have been caused in transit. Do not use
a damaged appliance, but consult your
supplier.
Please dispose of packaging material
properly.
Installation
Install and connect the appliance
according to the installation and
assembly instructions.
The dishwasher must NOT be
connected to the power supply during
installation.
Ensure that the protective conductor
system of the domestic electricity
supply has been installed correctly.
Electrical connection conditions must
correspond with the specifications on
the rating plate of the dishwasher.
If the dishwasher is to be installed
in a high-sided unit, ensure that the unit
is attached properly and also at the
rear.
Built-under and built-in appliances
should always be installed under a
continuous work surface which is
attached to the adjacent cupboards, in
order to ensure that the appliance is
entirely stable.
After the appliance has been installed,
the mains plug should still be easily
accessible.
Not on all models:
The plastic housing on the water input
contains an electrically operated valve.
The connecting wires are inside the
inlet hose. Do not cut through this hose
and do not immerse the plastic housing
in water.
Warning
For safety reasons, if the appliance is not
fitted in a recess, thereby making a side
wall accessible, the door hinge area
should be covered at the side.
(Risk of injury)
Covers are available as optional
accessories from customer services or
specialist stores.
en
Caution modification
This appliance is not intended for use by
young children or infirm persons unless
they have been adequately supervised by
a responible person to ensure that they
can use the appliance safely.
Young children should be supervised to
ensure that they do not play with the
appliance.
en
5
In daily use
Warning
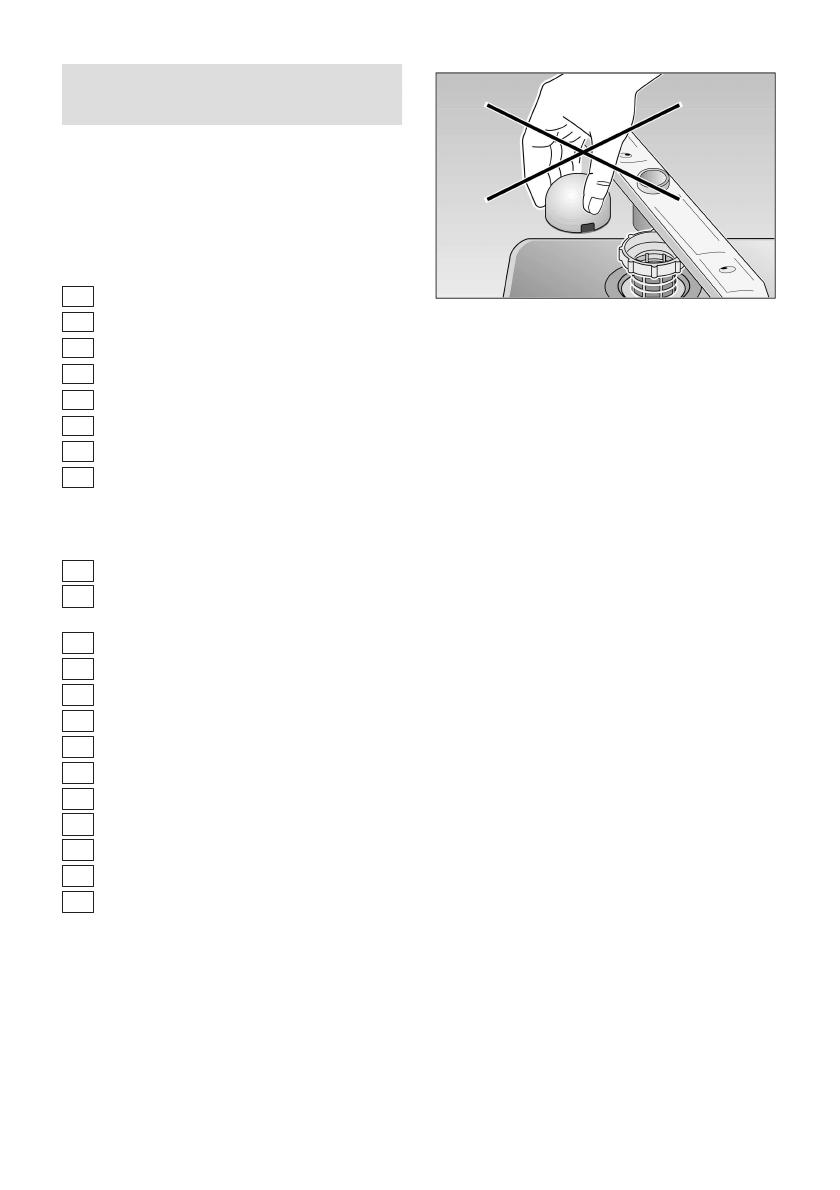
Knives and other sharp-pointed utensils
must be placed with the points down
in the cutlery basket or horizontally in
the utensils basket.
Use the dishwasher only in the
household and only for its designed
purpose, i.e. for washing domestic
dishes.
Do not lean or sit on the open door.
The appliance could tip.
Please note that free-standing
appliances may tip over if the baskets
are overloaded.
The water in the appliance is not
drinking water.
Do not add any solvents to the washing
chamber. Danger of explosion!
Open the door carefully when
the programme is still running. There
is a risk of hot water spraying out of
the appliance.
To prevent injuries, e.g. caused
by stumbling, open the dishwasher
only briefly in order to load and unload
the dishwasher.
Read and observe the safety
nformation and instructions for use on
the packaging for cleaning and rinsing
agents.
Children in the household
If fitted, use the childproof lock. An
exact description can be found in the
back of the envelope.
Do not allow children to play with
or operate the appliance.
Keep children away from detergents
and rinse aid. These may cause
chemical burns in the mouth, throat and
eyes or asphyxiation.
Keep children away from an open
dishwasher. There could still be
detergent residue inside.
If the appliance is installed at eye-level,
ensure when opening and closing the
door that children are not caught
or crushed between the appliance door
and the cupboard door situated below.
Damage
The appliance may be repaired and
opened up by a technician only. First
disconnect the appliance from the
power supply. Pull out the mains plug
(do not tug the power cord!) or switch
off the fuse. Turn off the tap.
Disposal
Make redundant appliances unusable
to prevent subsequent accidents.
Dispose of the appliance in an
environmentally friendly manner.
Warning
Children could get locked in the appliance
(risk of suffocation) or get stuck in other
positions.
Therefore: Remove the mains plug, cut the
mains wire and set aside. Damage the
door lock so that the door can no longer
be closed.
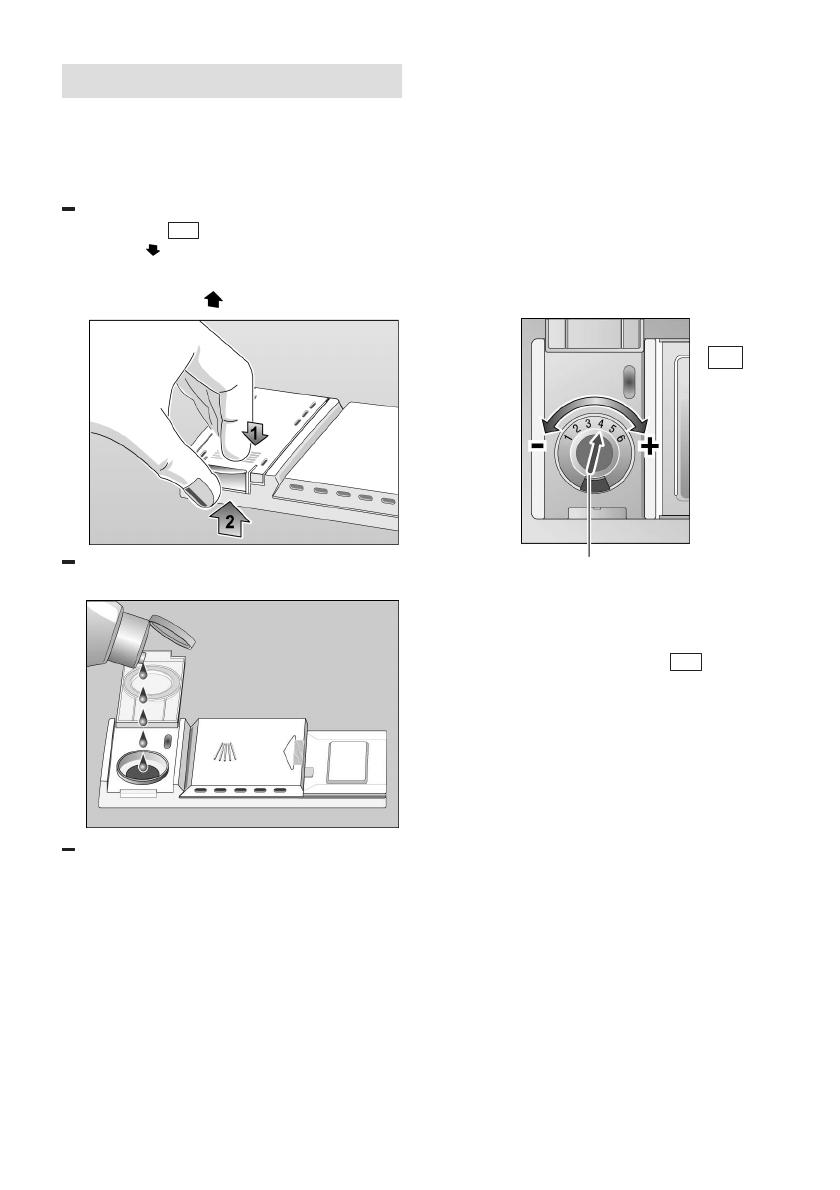
Before using for the first time
The appliance was checked before it left
the works. In order to remove possible
water test remains, use the appliance for
the first time without any dishes, using
the highest temperature. Also fill salt, rinse
aid and detergent in the filling
compartments.
en
6
Getting to know your
appliance
Diagrams of the control panel and the
interior of the appliance can be found
in the envelope at the front.
Individual positions are referred to in
the text.
Control panel
1
Main switch
2
Door Opener
3
Programme selector (retractable*)
4
Additional options*
5 “Check water supply” display
6 Programme sequence display
7 “End of programme” display
8
Rinse-aid refill indicator
* some models
Appliance interior
20
Top basket
21
Additional cutlery basket for the top
basket *
22
Top spray arm
23
Additional cup rack *
24
Bottom spray arm
25
Float **
26
Bottom basket
27
Filters
28
Cutlery basket
29
Dispenser for rinse aid
30
Detergent dispenser
31
Catch
32
Rating plate
* some models
** The float ensures that the appliance
interior is not overfilled. Only customer
service may maintain, remove and install
the float.
You will need to purchase the
following before using the
dishwasher for the first time:
detergent
– rinse-aid
Only use products, which are suitable for
dishwashers.
en
7
Adding rinse aid
The rinse aid is required for stain-free
utensils and clear glasses.
Use only rinse aid for domestic
dishwashers.
Open the cover on the rinse-aid
dispenser
29 . To do this, press the
mark (1
) on the cover and
simultaneously lift the cover on the
control plate (2
).
Carefully pour in the rinse aid to just
below the edge of the filler opening.
Close the lid, ensuring that you hear it
snap closed.
To prevent excessive foam formation
during the next rinse cycle, remove any
rinse aid which has run over with a cloth.
Adjusting the amount of
rinse-aid
The amount of rinse-aid added to the
water can be varied by adjusting the
stepless control. The rinse-aid control has
been set to ”4” in the factory.
Do not alter the setting of the rinse-aid
control unless streaks (turn knob towards
”–”) or water marks (turn knob towards ”+”)
are left on the dishes.
29
Rinse aid controller
Rinse-aid refill indicator
As soon as the rinse-aid refill indicator
lights up on the control panel
8
,
refill with rinse aid.
en
8
Not suitable for
the dishwasher
The following should not be
cleaned in the dishwasher:
Wooden cutlery and utensils – these
will leach out and become unsightly;
even the utilised stickers are not
suitable for the temperatures which
occur.
Sensitive ornamental glasses, craft
utensil and vases, special antique
or irretrievable utensils. These
ornaments are not dishwasher-proof.
Plastic parts sensitive to hot water.
Copper and tin utensils.
Utensils which are soiled with ash, wax,
lubricating grease or ink.
Absorbent materials such as sponges
and cloths.
Aluminium and silver parts have
a tendency to discolour and fade during
the wash cycle. Even some types of glass
(e.g. crystal glass objects) may turn cloudy
after many wash cycles.
Recommendation:
In future buy utensils which are identified
as dishwasher-proof.
Damage to glassware and other
dishes
Possible causes:
type of glass or manufacturing process
chemical composition of detergent
water temperature and duration of
dishwasher programme.
Suggested remedy:
Use glassware or porcelain dishes that
have been marked ’dishwasher–proof
by the manufacturer.
Use a mild detergent that is described
as ’kind to dishes’. If necessary, seek
further information from detergent
manufacturers.
Select a programme with as low a
temperature and as short a duration as
possible.
To prevent damage, take glass and
cutlery out of the dishwasher as soon
as possible after the programme has
ended.
Loading the dishwasher
It is not necessary to rinse them off
under running water.
When loading the dishwasher, ensure
that
D
all utensils are secure and cannot
fall over.
D
the openings of all receptacles are
face down.
D
curved or indented utensils are at
an incline, allowing water to drain.
D
the two spray arms can rotate freely.
Very small items should not be washed in
the dishwasher as they could easily fall out
of the baskets.
Removing the dishes
To prevent water dripping from the top
basket onto the dishes in the lower basket,
we recommend that you empty the lower
basket first and then the top basket.
Cups and glasses
Upper basket
20
* on applicable models
en
9
Pots and pans
Lower basket
26
Cutlery
Cutlery should be placed in the
dishwasher always unsorted and with the
eating surface pointing downwards. The
spray jet is then better able to reach the
individual parts.
To prevent injuries, place long, pointed
accessories and knives on the étagère
(some models) or on the knife shelf
(available as an accessory).
Folding spikes *
* on applicable models
To improve stacking of pots and pans, the
spikes can be folded down.
Shelf *
* not on all models
Lean tall glasses and those with long
stems against the shelf – not against other
items to be washed.
The cup shelf can be inserted into either
position 1 or 2 as shown in diagram.
Note: With the cup shelf in position 2, the
top basket must be locked into the upper
position to prevent interference with each
other.
Long items such as serving utensils,
kitchen knives, etc should be place on the
shelf and not in the cutlery baskets so they
do not obstruct the rotation of the spray
arms. When not in use the shelf can be
fold back.
en
10
Small accessories holder*
* some models
Light-weight plastic accessories, e.g. cups,
lids, etc. can be held securely in the small
accessories holder.
Adjusting the height
of the basket *
* some models
If required, the height of the upper utensils
basket can be adjusted to provide more
space for tall utensils either in the upper
or lower basket.
Appliance height in cm
81 86
Max. ø in cm upper 20/25* 20/25*
max. ø in cm lower 30/25* 34/29*
Select one of the two following procedures
according to the design of the top basket
for your appliance model:
Top basket with upper and
lower roller pairs
Pull out the top basket.
Remove the top basket and re-attach
it to the upper or lower rollers.
Top basket with side levers
(Rackmatic)
Pull out the top basket.
To lower the basket, press in one lever
and then the other situated on the left
and right of the basket exterior, holding
the basket firmly on the sides of the
upper edge to prevent it from falling
down.
To raise the basket, hold the basket on
the sides of the upper edge and lift it
up.
Before re-inserting the basket again,
ensure that it is at the same height
on both sides. Otherwise, the appliance
door cannot be closed and the upper
spray arm will not be connected to
the water circuit.
en
11
Detergents
Information about detergents
You can use any brand of liquid or powder
detergent, as well as tablets, that have
been specifically designed for use in
domestic dishwashers. (Do not use normal
washing-up liquid!)
Nowadays there are three types of
dishwasher detergent available:
1. those containing phosphates and
chlorine,
2. those containing phosphates but no
chlorine,
3. those containing neither phosphates
nor chlorine.
When a phosphate-free detergent is used
in conjunction with hard water, there is a
greater possibility that white marks will be
left behind on crockery and glasses, etc.
These can be avoided by pouring an
increased amount of detergent into the
dispenser.
Chlorine-free detergents have a reduced
bleaching effect. This can mean that tea
stains are not completely removed or
plastic items become discoloured.
This can be resolved by:
D
selecting a higher temperature
programme, or
D
increasing the amount of detergent,
or
D
using a detergent that contains
chlorine.
Check the label on the detergent
packaging to determine whether a
particular product is suitable for use with
silverware.
If you have any further questions, we
recommend that you contact the customer
advice departments of the various
detergent manufacturers.
Detergent compartment with
measuring marks
The side of the detergent compartment is
marked with lines to help you determine
how much powder to add.
The capacity of the detergent container is
15 ml up to the bottom line and 25 ml up to
the middle line. When the compartment is
full it contains 40 ml.
If the detergent dispenser 30 is still
closed, press the lock
32 to open the
detergent dispenser.
Adding detergent
Fill the dispenser 30 with detergent.
Please observe the manufacturer’s
instructions printed on the detergent
packaging when determining the
correct dosage.
Important
Due to the different solvency properties of
the detergent tablets supplied by various
manufacturers, the cleaning efficiency of
the detergent may not be fully utilised by
short programmes. It is recommended to
use washing powder for these
programmes.
If using the “Intensive” programme
(some models), also pour approx.
10–15 ml of detergent onto
the appliance door. If using tablets,
also place a tablet on the appliance
door.
en
12
Reduce costs!
If your dishes are only
moderately dirty, you may be
able to use less detergent than
recommended.
Close the lid on the detergent
compartment.
Press down the lid (1) until it clicks
shut (2).
If you are using detergent in tablet form,
read the manufacturer’s
recommendations on the packaging in
order to
determine where the tablets should be
placed inside the dishwasher (e.g. in
cutlery basket, detergent compartment,
etc.).
Make sure that the lid on the detergent
compartment is closed, even if you are
using tablets.
CAUTION
IMPORTANT NOTE
ON THE USE OF
COMBINED CLEANING
PRODUCTS
Please note the following when using
”combined cleaning products” which
eliminate the need for a rinsing agent or
salt, for example:
Some products with a built-in rinsing
agent are only used to their full effect in
certain programmes.
This type of product does not generally
produce the desired effect with
automatic programmes.
Products which eliminate the need for
regeneration salt can only be used
within a certain water hardness range.
If you wish to use these combined
products, please read the instructions
carefully and heed any notes on the
packaging.
Contact the manufacturer of the cleaning
agent if you have any questions,
particularly if:
the crockery is very wet once the
programme has finished.
limescale deposits are formed.
Any problems which arise as a direct
result of the use of these products are not
covered by our warranty.
en
13
Programme overview
This overview lists the max. possible number of programmes. The programmes supplied with your
appliance are indicated on the fascia.
138
1,65
140
0,85
30
0,80
16 13,6 10
delicateNon-
delicate
Mixed
Mixed
Normal
45_
Quick
45_
Intensive
65_
Pots and
Pants
70_
Pre-rinse
Programme-
sequence
Wash
programme
Drying
Rinse aid
70_
First
rinse
Wash
70_
Pre-rinse
50_
Second
rinse
19
0,05
4
Programme
details
Laboratory measured value in accordance with AS/NZS 2007
Duration in minutes
Electricity
consumption in kWh
Water consumption
in litres
with Aquasensor
very littlea littlea lot
stuck on hard
loosely attached
Drying
Rinse aid
70_
First
rinse
Wash
65_
Pre-rinse
Second
rinse
Drying
Rinse aid
55_
Main
rinse
Wash
45_
Pre-rinse
Rinse aid
55_
Main
rinse
Wash
45_
Pre-rinse
Type of crockery
e.g. china,
pots/pans,
cutlery,
glasses,
etc.
Type of food
remains
Amount of
food remains
Condition of
food remains
Soups, casseroles,
sauces, potatoes,
pasta, rice, eggs,
roast or fried food
Soups, potatoes,
pasta, rice, eggs,
roast or fried food
Coffee, cakes,
milk, sausage,
cold drinks,
salads
Rinse off if
the dishes
have been
stacked for
several days
in the
dishwasher
prior to
washing.
140
1,60
16
en
14
Washing dishes
Reduce costs!
If only a small number of
dishes have been loaded into
the dishwasher, selecting a
programme that operates at
the next lowest temperature
will usually suffice.
Programme data
The programme data (duration, energy
and water consumption) can be found in
the summary of instructions and refers to
standard conditions. Greater deviations
may be caused by:
different quantities of utensils
inlet temperature of the water
water pressure
ambient temperature
mains voltage tolerances
and appliance-specific tolerances
(e.g. temperature, water flow rate, etc.)
The water consumption values refer
to water hardness value 2.
Switching on the appliance
Close the door.
Turn on the tap fully.
Rotate programme selector
3
to the
required programme.
Switch on the main switch
1
.
The programme sequence display
6
lights up, the programme sequence starts
automatically.
End of programme
The programme ends when
the Programme progress indicator
6
has gone out and
the End-of-programme indicator
7
illuminates. When the programme
ends, the ”Top basket washing” function
is de-activated if required (only some
models).
Several minutes after the programme has
ended:
Open the appliance door.
Wait until the dishes have cooled down
and then remove.
When the programme has ended, you can
either switch off the appliance or restart it
with the same or another programme.
Switching off the appliance
Several minutes after the end
of the programme:
Switch off the main switch
1
.
”End of programme” display
7
goes out.
Turn off the tap
(does not apply to Aqua Stop).
It is not necessary to adjust the
programme selector.
Remove the utensils when they have
cooled down.
Warning
At the end of the programme please open
the door fully and not partially when
emptying the dishwasher. Any escaping
water vapour could damage sensitive
worktops.
en
15
Interrupting the programme
Set the main switch
1
to OFF.
Indicator lights extinguish.
If the hot water was switched ON or the
appliance has already heated up and then
the appliance door opened, leave the door
ajar for several minutes and then close.
Otherwise, the appliance door may fly
open due to expansion.
In order to resume the programme, set
the main switch to ON again.
Terminating the programme
(Reset)
Only when the main switch is on:
Rotate programme selector to the
Reset position.
The programme sequence lasts
approx. 1 min.
When the programme has run,
switch off the main switch
1
.
To restart, rotate the programme selector
3
to the required programme. Switch on
the main switch
1
. The programme
sequence starts automatically.
Changing the programme
It is possible to change the programme
within 2 minutes after you have switched
the dishwasher on.
Should it be necessary to change the
programme after this period, the
programme cycle that has already been
begun (e.g. washing) will be completed
first of all.
Note
If the power supply is
disconnected while the appliance
is operating, e.g. by switching off
the appliance or due to a power
failure, all settings remain stored.
Operation continues automatically
as soon as the power supply is
restored.
Additional functions *
* on some models additional functions
4
can be set with the buttons.
Pre-Soak *
The Pre-Soak programme option serves to
perform a pre-soak cycle before the main
programme. This cycle enables cookware,
e.g. pans, bowls, etc. to be pre-soaked
and pre-rinsed in the lower rack. If you
wish to pre-soak the dishes, this
programme option must be selected by
pressing the “Pre-Soak” button before the
programme starts. The recommended
detergent amount is approx. 5 g poured
onto the inside of the door.
Time reduction/ time saving *
Pressing the “Time reduction/time saving”
button provides a short wash cycle by
curtailing the drying phase and the
washing time. The washing and drying
performance will be reduced with the Time
reduction/time saving programme option.
Half load*
If you have only a few items to wash (e.g.
glasses, cups, plates), you can switch to
“Half load”. The “half load” additional
function saves water, energy and time. It is
recommended to put a little less detergent
in the detergent dispenser than for a full
load.
Extra dry*
If you press the “Extra dry” button, you
will receive a higher temperature in all
programmes in the final rinse and
therefore an improved drying result.
(please note that higher temperatures
might have an effect on delicate items).
en
16
Maintenance and care
A regular inspection and maintenance
of your machine will help to prevent faults.
This saves time and prevents problems.
Therefore you should occasionally have
a careful look inside your dishwasher.
Overall condition
of the machine
Check spray arm for grease and
limescale deposits.
If you find such deposits:
Fill the detergent dispenser with
detergent, start the appliance without
utensils in the programme which has
the highest wash temperature.
Clean the appliance with detergents/
appliance cleaners which are particularly
suitable for use with dishwashers.
Regularly wipe the door seal with
a damp cloth to remove deposits.
Never use a steam cleaner to clean your
dishwasher. The manufacturer is not liable
for any consequential damage.
Attention!
Never use other chlorinated household
detergents! Health hazard!
Rinse-aid
As soon as the rinse-aid refill indicator
lights up on the control panel
8
,
refill with rinse aid.
Filters
Waste which is deposited on the filters
27 may result in a blockage.
After each washing cycle check the
filters for residue.
Unscrew the filter cylinder and remove
the filters. The filters are permanently
attached to each other and cannot be
dismantled.
Remove large foreign objects. Clean
the filters under running water.
Re-installation:
Insert the filters and screw the filter
cylinder tight.
en
17
Spray arms
Lime and remnants of food in the washing
water can block the nozzles in the spray
arms
22 and 24 and the arm
mountings .
Inspect the nozzles in the spray arms
for blocked holes due to remnants of
food.
If necessary, pull the lower arm 24
upwards and lift it off.
Unscrew the upper spray arm 22 .
Clean both spray arms under running
water.
Refit the spray arms. Ensure that the
lower arm has locked into place and the
upper one is screwed tight.
Spray arms
Waste water pump *
* some models
Large food remnants in the rinsing water
not retained by the filters may block the
waste water pump. The rinsing water is
then not pumped out and covers the filter.
In this case:
Set the main switch
1
to OFF.
Scoop out any water.
Remove the filters 27 .
Remove the cover.
en
18
Check the inner compartment for
foreign objects and, if required,
remove foreign objects.
Re-insert the cover.
Re-insert the filters and screw
into position.
2
click
3
Fault finding
Resolving minor problems
yourself
Experience has shown that you can
resolve most problems that arise during
normal daily usage yourself, without
having to call out a service engineer. Not
only does this save costs, but it also
means that the appliance is available for
use again that much sooner. The following
list of common occurrences and their
remedies should help you identify the
causes of most problems.
Problems ...
Attention
Remember: Repairs may be
carried out by a technician only.
If a component has to be replaced,
ensure that only original spare
parts are used. Improper repairs
or use of non-original spare parts
may cause considerable damage
and put the user at considerable
risk.
en
19
... when the appliance
is switched on
The appliance does not start.
The mains fuse has tripped.
The appliance plug has not been
inserted.
The appliance door has not been
shut properly.
The tap has not been turned on.
The filter on the water supply hose
is blocked.
Switch off the appliance and pull
out the mains plug. Turn off the
tap. Then clean the filter which is
situated at the connection of the
supply hose. Finally, restore the
power, turn on the tap and switch
on the appliance.
... with the appliance itself
Lower spray arm rotates with
difficulty
Spray arm is blocked by small
items or food remains.
Lid in detergent compartment
cannot be closed
Detergent compartment has been
overfilled.
Mechanism is clogged with
remnants of detergent.
Indicator lamps do not extinguish
after washing has finished.
Indicator lights flash after
the programme has started.
No programme selected.
Indicator lamps do not extinguish
after washing has finished
Main switch is still set to ON.
Remnants of detergent stuck inside
dispenser
Compartment was damp when it
was filled up with detergent.
Compartment must be dry before
detergent is added.
“Check water supply” display
5
lights up.
Tap turned off.
Water supply interrupted.
Filter in the water supply blocked.
Supply hose kinked.
Pump is jammed.
Water remains inside appliance
after programme has ended
Blockage or kink in drainage hose.
Pump is jammed.
Filters are blocked.
The programme is still running.
Wait for the programme to end.
Perform “Reset” function.
... during washing
Unusual amount of foam is created
Normal washing up liquid has
been poured into the rinse-aid
container.
Remove any spilled rinse aid with
a cloth as it could otherwise lead
to excessive foaming during the
next washing cycle.
Appliance stops suddenly while
washing is taking place
Cut in electricity supply to
appliance.
Water supply has been
interrupted.
Implement the “RESET” function.
Knocking sound can be heard
while washing is taking place
A spray arm is knocking against
the dishes inside the appliance.
en
20
Rattling sound can be heard while
washing is taking place
Crockery has not been stacked
properly inside the appliance.
Knocking sound coming from inlet
valves
This is caused by the way the
water pipes have been laid and it
has no effect upon the way the
appliance functions. There is no
remedy for this.
... with the dishes, cutlery, etc.
Remnants of food are stuck to the
dishes, cutlery, etc.
Dishwasher was not loaded
properly. Jets of water could not
reach all parts of the dishes, etc.
Too many items in the rack.
Items in the rack were touching
each other.
Not enough detergent was added
to dispenser.
Selected wash programme was
not intensive enough.
Rotation of spray arm was
obstructed by dish, etc.
Nozzles in spray arm are blocked
by remnants of food.
Filters are blocked.
Filters have been incorrectly fitted.
Waste-water pump is jammed.
Plastic items are discoloured
Not enough detergent was added
to dispenser.
White stains are left on crockery,
glasses have a milky appearance
Not enough detergent was added
to input compartment.
Amount of rinse-aid was set too
low.
If you used a phosphate-free
detergent, try a detergent
containing phosphates and
compare results.
Dishes, cutlery, etc. have not been
dried
Selected programme did not
include drying function.
Amount of rinse-aid was set too
low.
Items were removed from
dishwasher too soon.
Glasses have a dull appearance
Amount of rinse-aid was set too
low.
Tea stains or traces of lipstick have
not been completely removed
Detergent does not have a
sufficient bleaching effect.
Washing temperature was set too
low.
Traces of rust on cutlery
Cutlery is not sufficiently rustproof.
Glasses become clouded and
discoloured; coating cannot be
wiped off
Unsuitable detergent was used.
Glasses are not dishwasher-proof.
Smears left behind on glasses and
cutlery; glasses have acquired a
metallic appearance
Amount of rinse-aid set too high.
  • Page 1 1
  • Page 2 2
  • Page 3 3
  • Page 4 4
  • Page 5 5
  • Page 6 6
  • Page 7 7
  • Page 8 8
  • Page 9 9
  • Page 10 10
  • Page 11 11
  • Page 12 12
  • Page 13 13
  • Page 14 14
  • Page 15 15
  • Page 16 16
  • Page 17 17
  • Page 18 18
  • Page 19 19
  • Page 20 20
  • Page 21 21
  • Page 22 22
  • Page 23 23
  • Page 24 24
  • Page 25 25
  • Page 26 26
  • Page 27 27
  • Page 28 28

Bosch Dishwasher User manual

Category
Dishwashers
Type
User manual

Ask a question and I''ll find the answer in the document

Finding information in a document is now easier with AI