The Outdoor GreatRoom Company UPT-1242-IRO User manual

Type
User manual

The Outdoor GreatRoom Company UPT-1242-IRO fire pit table combines the beauty of a natural wood top with the convenience of a gas-powered fire pit. It features a sturdy steel construction with a stone-like concrete top, providing both durability and a stylish appearance. The unit includes a Crystal Fire® Plus burner, which offers reliable ignition and adjustable flame height. The fire pit table is designed for outdoor use and can be easily assembled with the included tools. It comes with a one-year manufacturer's warranty.

The Outdoor GreatRoom Company UPT-1242-IRO fire pit table combines the beauty of a natural wood top with the convenience of a gas-powered fire pit. It features a sturdy steel construction with a stone-like concrete top, providing both durability and a stylish appearance. The unit includes a Crystal Fire® Plus burner, which offers reliable ignition and adjustable flame height. The fire pit table is designed for outdoor use and can be easily assembled with the included tools. It comes with a one-year manufacturer's warranty.

1 | P a g e
Uptown Fire Pit Table
Installation Instructions for UPT-1242-IRO
2 | P a g e
Contents
Required Tools…………………………………………...2
Placing and assembling the Table…….……..…3
CF-SPARKER Installation……………………..…….6
Gas Connections…………….…………………...……...6
Thermocouple Installation…………………….….7
Electrode Installation………………………….……...7
Locating Propane tank……………………..……...8
Locating Natual Gas Line.………………….………..9
Wood Care……………………………………..…….….9
Fire Media Installation…………………..…..…10
Required Tools
Utility Knife - To cut and remove packaging
Phillips Screwdriver To attach support base to top
Leather Gloves - To protect hands from rough edges found
on the coffee table.
One (1) AAA Battery (not included) - Required for
piezoelectric igniter installation.
Do not attempt to perform installation by yourself. This fire
pit table is constructed of steel and heavy stone products.
Have at least one other person help you.
01.18.2023
3 | P a g e
Placing and Assembling the Fire Pit table
1. Remove all components from packaging.
2. Move the base sections to desired location and set
into place spaced approximately 28 ½” from each
other.
3. When locating your table, refer to the Crystal Fire®
Plus manual and maintain clearance to combustibles.
Burner neck
towards tank base
Smooth
side out
4 | P a g e
4. Place tank base in desired location, then adjust
leveling legs on bottom to ensure tank door operates
smoothly.
5. Use Phillips screwdriver and supplied bolts (6) to
attach wood top to tank base.
6. Using a Philips screwdriver and supplied bolts (4),
attach the support base to the top as shown in the
image below. Top may be needed to be lifted to help
position support base.
5 | P a g e
7. Align concrete top to be centered on tank base &
overhanging rear to match sides.
*DO NOT SLIDE SUPERCAST ON WOOD TOP*
*May have to adjust level legs to get supercast top to sit flat*
Read and understand your Crystal Fire® Plus owner’s manual
before installing burner or operating the device.
If the table is relocated, remove Supercast top while moving.
Failure to do so may result in the wood frame warping.
5/8”
6 | P a g e
CF-SPARKER Installation
Remove CF-SPARKER cap and hex nut. Insert AAA battery (not included)
with + end out.
Install CF-SPARKER into control panel as shown below.
Depress CF-SPARKER button to test your sparker.
Gas Connections
See Crystal Fire Plus® instructions for burner installation.
Locate and orient
sparker box on
control panel as
shown. Sparker box
must be installed
before burner valve.
7 | P a g e
Thermocouple Installation
Refer to Crystal Fire® Plus instruction manual for detailed
attachment of thermocouple.
Attach thermocouple to burner valve as shown below.
Electrode Installation
Connect igniter and ground wire to sparker box. Both wires can connect
to either connection point. The unit will operate in either configuration.
Test system by pushing the button on the ignitor. Consult the
troubleshooting section of the Crystal Fire® Plus Burner Owner’s
Manual, if the spark is weak, intermittent, or not present.
8 | P a g e
NOTE: Over time the bearings
in the door glides may require
re-greasing. Any spray
lubricant, such as WD-40, may
be used to lubricate drawer
glides. Perform annually or on
an as needed basis to maintain
smooth operation.
Locating your Tank
(If applicable)
Tilt your propane tank into the slide out tank drawer.
With the propane tank and control
valve in the OFF position, connect the
Regulator Hose, included with the
Crystal Fire® Plus burner, to your
propane tank. Hand tighten connection,
do not use tools to tighten this
connection.
Slide tank drawer in. Ensure that the
Gas hose does not get pinched in the process of sliding the tank
drawer.
9 | P a g e
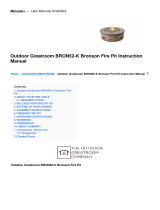
Locating Natural Gas Line
(If applicable)
Top View of Base with Door
Locate natural gas stub inside of the red outline to avoid clearance
issues with the door for natural gas installations.
Wood Care
Annual maintenance: To maintain the natural wood top,
it is recommended to clean with an exterior wood
cleaner and apply oil (Cabot Australian Timber Oil,
Natural color). Natural wood will darken over time, with
proper maintenance. If not maintained, the wood may
stain, or discoloration may appear. If you choose not to
maintain your wood, it will gradually change color over
time depending on exposure to the outdoor elements.
During this aging process slight surface cracking may be expected as the
wood is drying out. However, this is a purely natural outcome and should
not be considered a structural defect.
Regular cleaning: As with all wood furniture, regular cleaning is essential to
keep the wood free from pollen and dirt. When cleaning, do not pressure
wash the wood, wipe with a damp cloth minding the direction of the wood
grain. Cover or store indoors when not in use.
17-3/4 x 4
QR
CODE
10 | P a g e
Fire Media Installation
Scatter all included glass beads, lava rock, or other approved fire media
evenly across entire burner surface.
IMPORTANT
Please consult your Crystal Fire® Plus instruction manual for detailed
instructions and important information related to connecting your
linear burner, including safety information, proper tightening of
connections and full burner installation and lighting instructions.
DO NOT ATTEMPT TO INSTALL CFP1242 BURNER WITHOUT FIRST
CONSULTING THE MANUAL. IF YOU ARE UNSURE OF HOW TO
COMPLETE THE STEPS OUTLINED, CONSULT A QUALIFIED
TECHNICIAN
WARNING
After consulting the manual and following instructions, remember; before operating,
all gas connections must be fully checked for leaks
DO NOT BURN WITHOUT GLASS OR OTHER APPROVED
DECORATIVE FIRE MEDIA
DO NOT BURN WITH GLASS COVER INSTALLED
11 | P a g e
Warranty: Fire pit tables are covered under a 1-year
manufacturer’s warranty. Please visit
https://www.outdoorrooms.com/product-registration
to register your product.
Thank you for purchasing an Outdoor
GreatRoom Company product! This
fire pit was made with pride in the
USA.
12 | P a g e
Service Parts
Refer to Crystal Fire® Plus instruction manual for burner
service parts
Part
Part number
Supercast
2554-1254-LIN
Top Assembly
UPTOWN-IRO-TOP
Tank Base Assembly
(Includes door assembly)
UPTOWN-BASE-TANK-IRO
Small Pedestal Assembly
UPTOWN-BASE-IRO
Glass Burner Cover
1242-GREY-GLASS-COVER
9583 217th St. W. Lakeville, MN 55044
Toll Free: 1-866-303-4028 Sales@OutdoorRooms.com
  • Page 1 1
  • Page 2 2
  • Page 3 3
  • Page 4 4
  • Page 5 5
  • Page 6 6
  • Page 7 7
  • Page 8 8
  • Page 9 9
  • Page 10 10
  • Page 11 11
  • Page 12 12

The Outdoor GreatRoom Company UPT-1242-IRO User manual

Type
User manual

The Outdoor GreatRoom Company UPT-1242-IRO fire pit table combines the beauty of a natural wood top with the convenience of a gas-powered fire pit. It features a sturdy steel construction with a stone-like concrete top, providing both durability and a stylish appearance. The unit includes a Crystal Fire® Plus burner, which offers reliable ignition and adjustable flame height. The fire pit table is designed for outdoor use and can be easily assembled with the included tools. It comes with a one-year manufacturer's warranty.

Ask a question and I''ll find the answer in the document

Finding information in a document is now easier with AI