


0
2
.
5
W
5
5
W
5
5
1
0
W
0
0
2
0
W
0
0
8
O
h
m

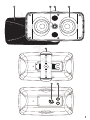
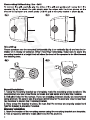
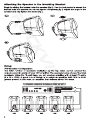
These speakers can be mounted horizontally (fig c) or vertically (fig d) and can be in-
stalled on a variety of surfaces. When mounting horizontally, make sure to place the
mounting bracket at a height that will allow the front of the speaker to be tilted toward
the listening area.
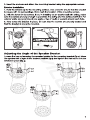
Drywall Installation
1. Using the mounting bracket as a template, mark the mounting screw locations. We
recommend you use a stud finder to locate the wall studs and mark their location.
2. Drill pilot holes for the screws. If you are installing between studs, we recommend
using anchors. Be sure to use the proper drill bit size for the anchors. Use no less than
two anchors to secure the mounting bracket.
3. Now screw the bracket in place. Be sure that the screws are properly seated and
that the bracket is securely mounted.
Masonry Installation
1. Mark the location of the mounting screws using the mounting bracket as a template.
2. Use a masonry drill bit to make pilot holes for the anchors.


8
O
h
m
8
O
h
m
8
O
h
m
8
O
h
m
8
O
h
m
COM (Negative)
70V


-
 1
1
-
 2
2
-
 3
3
-
 4
4
-
 5
5
-
 6
6
-
 7
7
-
 8
8
-
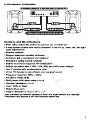 9
9
-
 10
10
-
 11
11
-
 12
12


Ask a question and I''ll find the answer in the document
Finding information in a document is now easier with AI
Related papers
Other documents
-
 SunSetter 900XT Owner's Manual & Installation Instructions
-
AWNTECH KWR8-BRNT User manual
-
Russound AW70V6mk2 70V/100V Surface Mount Speaker White User manual
-
-
OmniMount 30.0 WA User manual
-
-
GE ZX83012 Installation guide
-
Kanto FMC4 User manual
-
Peerless PLAV70-UNL-S Specification
-
 Arizona Shower Door SCI60303072BNCL Installation guide

