Surface Mount Grid System
CeilingMAX
Sound Ideas. Proven Products.
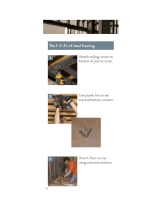
4 easy steps
Attach
top hangers
after wall
brackets
are installed
Install
cross
tees
Snap
runners
into top
hangers
Tilt to insert
ceiling tiles
of choice
Surface Mount Grid System
Saves up to 6" of ceiling height
No wires to hang or leveling
Doesn’t rust or show scratches
Works with 2' x 2' or 2' x 4' ceiling tiles
Can be installed by one person
Available in a wide range of colors
and finishes
8' sections are easy to get home
Ceiling tiles are removable
Use any lighting that can be
installed on a drywall ceiling
Class A fire rating
Fastens directly to joists, plaster
or drywall
Easy to determine how many of
each component to buy
High-grade PVC plastic simple to
cut and use
Questions?
1.800.558.0615 www.acpideas.com
CeilingMAX
Suspended
Metal Grid
Compare
CeilingMAX
to any suspended
metal grid system
Installs Easily & Maximizes Your Headroom
Easy-to-follow instructions on back
Covers old plaster
or drywall
Apply to joists
(REV: 03.09) C13-99
Use over 12˝ x 12˝ stapled
or glued tile ceilings
Examples of where to use
CeilingMAX
Works with 2' x 2' or 2' x 4' ceiling tiles
CAUTION: Although CeilingMAX is “Class A” fire rated, it can deform with exposure to excessive
heat. Never allow direct exposure to heat exceeding 140˚F.
F
or successful results, read and follow the
detailed instructions on back or view the
installation video online at acpideas.com.
To calculate how much
CeilingMAX
you'll need, see the back of this sheet
or ask a sales associate for assistance.

FASTENING TOP HANGERS
The Top Hanger is 8' long and is fastened to joists or existing ceiling.
C
UTTING & PLACING BORDER CEILING TILES
Beginning where the first Top Hanger was installed, cut ceiling tiles to fit each location
and slide into the Wall Bracket. Rock the Cross Tee slightly as you insert the tile. When
the end ceiling tile is correctly cut to size and in place, install the final Cross Tee.
ATTACHING THE WALL BRACKET
The Wall Bracket is 8' long and is installed
around the perimeter of the room.
(Read Tip 3) Using screws, install the Wall Brackets
around the perimeter of the room, directly beneath the joists or
finished ceiling. Drywall screws can be installed into the ceiling,
joists or wall, and should be spaced 16" to 24" apart.
INSTALLING TOP HANGERS & CROSS TEES
The Cross Tee is 23" and is installed perpendicular
to the Top Hanger to create grid support.
Using the pre-cut Top Hangers from
Step 2, align the first notch with the
Cross Tee dryline. Using an uncut Cross Tee as a spacer, place one
end in the notch of the previously installed Top Hanger. Place the
other end in the matching notch of the next Top Hanger. Make
certain that both ends of the Cross Tee fit snugly into the notches,
then attach Top Hanger using screws. Continue to install uncut
Cross Tees parallel to the previous row. Cut the last Top Hanger to fit into Wall Bracket.
Continue installation of rows. When all the rows are installed, measure, cut and install
the first and last row of Cross Tees, resting the cut ends in the wall bracket. Do not
install the last Cross Tee in the border rows until Step 5.
Surface Mount Grid System
CeilingMAX
Easy-to-Follow Instructions
Divide the perimeter of the room by 8 and round up to the nearest whole number.
Divide the square footage of the room by 16 and round up to the nearest whole number.
Divide the square footage of the room by 16 and round up to the nearest whole number.
For 2'x4' ceiling tiles, divide the square footage of the room by 8 and round up
to the nearest whole number.
For 2'x2' ceiling tiles, divide the square footage of the room by 4 and round up
to the nearest whole number.
Wall Bracket
Top Hanger
Runner
Cross Tee
&
Ceiling Tiles
Tech Support
1-800-558-0615
acpideas.com
Formula:
• Measure room in one direction 17' 6"
• Round down to closest even number of feet 16'
• Subtract those numbers 1' 6"
or 18"
• Add 24" 42"
• Divide by 2 to get border tile size 21"
(See Installation Tips 3 & 5)
Establish your string (or dryline) at this measurement.
Repeat these same steps for the other direction.
Insert
Cross Tee
To Top
Hanger Notch
String or
Chalk Line
Drill with
Phillips Tip
Tape
Measure
Tin Snips
Quantity of 1"
Drywall Screws
Tools you will need
Step 1
Room Planning
Step 2
ESTABLISHING ALIGNMENT
To ensure professional looking results, the room layout should be balanced with equal
size border panels used on opposite sides of the room, as shown below.
Step 3
Step 4
Step 5
LOCKING IN THE RUNNER
The Runner is 8' long and snaps into the Top Hanger, locking the
grid system and ceiling tiles.
Install full ceiling tiles in the remaining rows by rocking the Cross
Tee and placing each tile in the grid system. As each row of ceiling
tiles is put into place, finish the installation by snapping the
Runners into the Top Hangers as shown below. Cut the last row
of Runners as required.
Snap the runner into the Top Hanger
Wall Bracket Ceiling Panel
Top Hangers will be installed either perpendicular to exposed joists or across the
longest dimension. Using a string or chalk line, establish the drylines as determined
above. The first row of Top Hangers & Cross Tees will be centered over these drylines.
NOTE: Be sure the intersection of drylines is square.
Measure and cut your first Top Hanger so
the notch is aligned over the Cross Tee
dryline, with the cut end resting in the
Wall Bracket.
NOTE: If your measurement from the chalk line to wall is less than 12", use the first notch on the Top
Hanger to measure from. If greater than 12", measure from the second notch to make your cut.
Repeat this step for as many rows as needed and set aside for Step 4.
Using a drill with Phillips tip, attach the first row of Top
Hangers to the joist or current ceiling with screws,
placing one screw in each joist, alternating sides as
shown. If joists are not exposed, screws should be no
more than 16"- 24" apart.
To install additional Top Hangers in line, cut a 6" section of Runner and use it as a
temporary splice to connect the installed Top Hanger to the one to be hung. When the
first row is complete, cut the last Top Hanger in the row so it fits into the Wall Bracket.
For the amount of CeilingMAX needed, measure the room’s perimeter and calculate square footage
# of Pieces
Your Project
Example
INSTALLATION TIPS
TIP 1: Before you begin, box in any ducts, piping or window
openings as shown at right.
TIP 2: Light fixtures can be installed or adjusted to align with
the CeilingMAX grid system. Make sure to provide adequate
space (1/4" preferred) between the outer dimensions of the
fixture and the ceiling tile. This is especially important when
lighting is recessed incandescent. NOTE: If you plan to use lighting designed for use with suspended
ceiling systems, be certain the fixture is supported by the joists, not the CeilingMAX grid system.
TIP 3: If starting a room with a full sized tile, instead of border tile, order 25" cross tees from the
manufacturer.
TIP 4: To accommodate 1/2" conduit or pipes, notch the vertical portion of the Cross Tee or Runner.
TIP 5: If using 2' x 4' tile, round the 4' tile side of room measurement down to nearest number
divisible by 4. Add 48" to remainder and divide by 2 to determine border tile size.
TIP 6: If your existing ceiling is not level you may need to furr the ceiling or place shims behind the
Top Hangers to level. If the adjustment is minimal, you can back out the screws in the Top Hangers.
For Additional Tips and Information visit acpideas.com
= Border Panels
Sound Ideas. Proven Products.
(REV: 03.09) C13-99
Patent # 5,611,185
Drive one
screw on
left side of
top hanger
Drive the next screw
on the right side.
Continue to alternate
on successive joists
/