

2
WARNING: TO PREVENT FIRE OR SHOCK HAZARD, DO NOT EXPOSE THIS APPLIANCE TO RAIN OR MOISTURE.
CAUTION: TO REDUCE THE RISK OF ELECTRIC SHOCK, DO NOT REMOVE COVER (OR BACK). NO USER-
SERVICEABLE PARTS INSIDE. REFER SERVICING TO QUALIFIED SERVICE PERSONNEL.
Y
E
R
THE EXCLAMATION POINT WITHIN AN EQUILATERAL TRIANGLE IS INTENDED TO ALERT THE USER TO THE PRESENCE OF IMPORTANT
OPERATING AND MAINTENANCE (SERVICING) INSTRUCTIONS IN THE LITERATURE ACCOMPANYING THE APPLIANCE.
THE LIGHTNING FLASH WITH ARROWHEAD SYMBOL, WITHIN AN EQUILATERAL TRIANGLE, IS INTENDED TO ALERT THE USER TO THE
PRESENCE OF UNINSULATED "DANGEROUS VOLTAGE" WITHIN THE PRODUCT’S ENCLOSURE THAT MAY BE OF SUFFICIENT MAGNITUDE TO
CONSTITUTE A RISK OF ELECTRIC SHOCK TO PERSONS.
AC POWER CORD CONNECTION
CAUTION:
TO PREVENT ELECTRIC SHOCK, MATCH WIDE BLADE OF PLUG
TO WIDE SLOT, FULLY INSERT.
CORDE DE CONNEXION CA
ATTENTION:
POUR ÉVITER LES CHOCS ÉLECTRIQUES, INTRODUIRE LA LAME
LA PLUS LARGE DE LA FICHE DANS LA BORNE
CORRESPONDANTE DE LA PRISE ET POUSSER JUSQU’AU FOND.
For CANADA
Pour le CANADA
Optical pickup :
Type : HOP-1000
Manufacturer : Hitachi Media Electronics Co., Ltd.
Laser output : Less than 0.5 mW on the objective lens
Wavelength : 770 - 810 nm (CD), 635 - 665 nm (DVD)
CAUTION
<
DO NOT REMOVE THE PROTECTIVE HOUSING USING
SCREWDRIVER.
<
USE OF CONTROLS OR ADJUSTMENTS OR PERFORMANCE OF
PROCEDURES OTHER THAN THOSE SPECIFIED HEREIN MAY
RESULT IN HAZARDOUS RADIATION EXPOSURE.
<
IF THIS PRODUCT DEVELOPS TROUBLE, MAKE A CONTACT WITH
OUR SERVICEMAN, AND DO NOT USE THE PRODUCT IN A
TROUBLED STATE.
TO THE USER
This equipment has been tested and found to comply with the limits for a Class B digital device, pursuant to Part 15 of the FCC Rules. These
limits are designed to provide reasonable protection against interference in a residential area. This device generates and uses radio
frequency energy and if not installed and used in accordance with the instructions, it may cause interference to radio or TV reception. If
this unit does cause interference with TV or radio reception you can try to correct the interference by one or more of the following
measures :
a) Reorient or relocate the receiving antenna.
b) Increase the separation between the equipment and the receiver.
c) Plug the equipment into a different outlet so that it is not on the same circuit as the receiver. If necessary, consult the dealer or an
experienced radio/TV technician for additional suggestions.
CAUTION
Changes or modifications to this equipment not expressly approved by TEAC CORPORATION for compliance could void the user's authority
to operate this equipment.
For U.S.A.
Important Safety Instructions
This product has been designed and manufactured according to
FDA regulations “title 21, CFR, chapter 1, subchapter J, based on the
Radiation Control for Health and Safety Act of 1968“, and is
classified as class 1 laser product. There is not hazardous invisible
laser radiation during operation because invisible laser radiation
emitted inside of this product is completely confined in the
protective housings.
The label required in this regulation is shown
①
.
For U.S.A.
①
Downloaded From TheatreSystem-Manual.com Manuals

3
CAUTION
< Read all of these Instructions.
<
Save these Instructions for later use.
<
Follow all Warnings and Instructions marked on the audio equipment.
1) Read Instructions — All the safety and operating instructions should
be read before the product is operated.
2) Retain Instructions — The safety and operating instructions should
be retained for future reference.
3) Heed Warnings — All warnings on the product and in the operating
instructions should be adhered to.
4) Follow Instructions — All operating and use instructions should be
followed.
5) Cleaning — Unplug this product from the wall outlet before cleaning.
Do not use liquid cleaners or aerosol cleaners. Use a damp cloth for
cleaning.
6) Attachments — Do not use attachments not recommended by the
product manufacturer as they may cause hazards.
7) Water and Moisture — Do not use this product near water — for
example, near a bath tub, wash bowl, kitchen sink, or laundry tub; in a
wet basement; or near a swimming pool; and the like.
8) Accessories — Do not place this product on an unstable cart, stand,
tripod, bracket, or table. The product may fall, causing serious injury to
a child or adult, and serious damage to the product. Use only with a
cart, stand, tripod, bracket, or table recommended by the manufacturer,
or sold with the product. Any mounting of the product should follow the
manufacturer’s instructions, and should use a
mounting accessory recommended by the
manufacturer.
9) A product and cart combination should be
moved with care. Quick stops, excessive force,
and uneven surfaces may cause the product and
cart combination to overturn.
10) Ventilation — Slots and openings in the cabinet are provided for
ventilation and to ensure reliable operation of the product and to
protect it from overheating, and these openings must not be blocked or
covered. The openings should never be blocked by placing the product
on a bed, sofa, rug, or other similar surface. This product should not be
placed in a built-in installation such as a bookcase or rack unless
proper ventilation is provided or the manufacturer’s instructions have
been adhered to.
11) Power Sources — This product should be operated only from the
type of power source indicated on the marking label. If you are not sure
of the type of power supply to your home, consult your product dealer
or local power company. For products intended to operate from battery
power, or other sources, refer to the operating instructions.
12) Grounding or Polarization — This product may be equipped with a
polarized alternating-current line plug (a plug having one blade wider
than the other). This plug will fit into the power outlet only one way. This
is a safety feature. If you are unable to insert the plug fully into the
outlet, try reversing the plug. If the plug should still fail to fit, contact
your electrician to replace your obsolete outlet. Do not defeat the safety
purpose of the polarized plug.
13) Power-Cord Protection — Power-supply cords should be routed so
that they are not likely to be walked on or pinched by items placed upon
or against them, paying particular attention to cords at plugs,
convenience receptacles, and the point where they exit from the
product.
14) Outdoor Antenna Grounding — If an outside antenna or cable
system is connected to the product, be sure the antenna or cable
system is grounded so as to provide some protection against voltage
surges and built-up static charges. Article 810 of the National Electrical
Code, ANSI/NFPA 70, provides information with regard to proper
grounding of the mast and supporting structure, grounding of the lead-
in wire to an antenna discharge unit, size of grounding conductors,
location of antenna-discharge unit, connection to grounding electrodes,
and requirements for the grounding electrode.
Note to CATV system installer:
This reminder is provided to call the CATV system installer’s attention to
Section 820-40 of the NEC which provides guidelines for proper
grounding and, in particular, specifies that the cable ground shall be
connected to the grounding system of the building, as close to the point
of cable entry as practical."
15) Lightning — For added protection for this product during a lightning
storm, or when it is left unattended and unused for long periods of time,
unplug it from the wall outlet and disconnect the antenna or cable
system. This will prevent damage to the product due to lightning and
power-line surges.
16) Power Lines — An outside antenna system should not be located in
the vicinity of overhead power lines or other electric light or power
circuits, or where it can fall into such power lines or circuits. When
installing an outside antenna system, extreme care should be taken to
keep from touching such power lines or circuits as contact with them
might be fatal.
17) Overloading — Do not overload wall outlets, extension cords, or
integral convenience receptacles as this can result in risk of fire or
electric shock.
18) Object and Liquid Entry — Never push objects of any kind into this
product through openings as they may touch dangerous voltage points
or short-out parts that could result in a fire or electric shock. Never spill
liquid of any kind on the product.
19) Servicing — Do not attempt to service this product yourself as
opening or removing covers may expose you to dangerous voltage or
other hazards. Refer all servicing to qualified service personnel.
20) Damage Requiring Service — Unplug this product from the wall
outlet and refer servicing to qualified service personnel under the
following conditions:
a ) when the power-supply cord or plug is damaged.
b ) if liquid has been spilled, or objects have fallen into the product.
c ) if the product has been exposed to rain or water.
d)if the product does not operate normally by following the operating
instructions. Adjust only those controls that are covered by the
operating instructions as an improper adjustment of other controls may
result in damage and will often require extensive work by a qualified
technician to restore the product to its normal operation.
e) if the product has been dropped or damaged in any way.
f)when the product exhibits a distinct change in performance _ this
indicates a need for service.
21) Replacement Parts — When replacement parts are required, be
sure the service technician has used replacement parts specified by
the manufacturer or have the same characteristics as the original part.
Unauthorized substitutions may result in fire, electric shock, or other
hazards.
22) Safety Check — Upon completion of any service or repairs to this
product, ask the service technician to perform safety checks to
determine that the product is in proper operating condition.
23) Wall or Ceiling Mounting — The product should be mounted to a
wall or ceiling only as recommended by the manufacturer.
24) Heat — The product should be situated away from heat sources
such as radiators, heat registers, stoves, or other products (including
amplifiers) that produce heat.
ANTENNA
LEAD IN
WIRE
ANTENNA
DISCHARGE UNIT
(NEC SECTION 810-20)
GROUNDING CONDUCTORS
(NEC SECTION 810-21)
GROUND CLAMPS
POWER SERVICE GROUNDING
ELECTRODE SYSTEM
(NEC ART 250. PART H)
NEC - NATIONAL ELECTRICAL CODE
ELECTRIC
SERVICE
EQUIPMENT
Example of Antenna Grounding
as per National Electrical
Code, ANSI/NFPA 70
GROUND
CLAMP
Important Safety Instructions
Downloaded From TheatreSystem-Manual.com Manuals

Avant utilisation.......................................... 6
Connexions ................................................ 20
Raccordement d'antenne........................ 26
Télécommande.......................................... 30
Index des pièces et contrôles................ 32
Branchement de base ............................. 40
Lecture de disques .................................. 58
Réglages .................................................... 86
Fonctions spéciales .............................. 104
Autre fonctions ....................................... 116
Dépannage .............................................. 125
Glossaire ................................................. 131
Spécifications ........................................ 136
Contents Sommaire
ENGLISH FRANÇAIS
4
Before Use.................................................... 6
Connection................................................. 20
Connecting Antennas............................... 26
Remote Control Unit ................................. 30
Name of Each Control .............................. 32
Basic Setup ............................................... 40
Playing Discs ............................................ 58
Settings & Adjustments .......................... 86
Special Functions .................................. 104
Other Functions ...................................... 116
Troubleshooting ..................................... 124
Grossary ................................................... 130
Specifications ........................................ 135
IMPORTANT(for U.K.Customers)
DO NOT cut off the mains plug from this
equipment. If the plug fitted is not suitable
for the power points in your home or the
cable is too short to reach a power point,
then obtain an appropriate safety approved
extension lead or consult your dealer.
If nonetheless the mains plug is cut off,
remove the fuse and dispose of the plug
immediately, to avoid a possible shock
hazard by inadvertent connection to the
mains supply.
If this product is not provided with a mains
plug, or one has to be fitted, then follow the
instructions given below:
IMPORTANT. DO NOT make any
connection to the larger terminal which is
marked with the letter E or by the safety
earth symbol |
or coloured GREEN or
GREEN-and-YELLOW.
The wires in the mains lead on this product
are coloured in accordance with the
following code:
BLUE : NEUTRAL
BROWN : LIVE
As these colours may not correspond with
the coloured markings identifying the
terminals in your plug proceed as follows:
The wire which is coloured BLUE must be
connected to the terminal which is marked
with the letter N or coloured BLACK.
The wire which is coloured BROWN must
be connected to the terminal which is
marked with the letter L or coloured RED.
When replacing the fuse only a correctly
rated approved type should be used and be
sure to re-fit the fuse cover.
IF IN DOUBT — CONSULT A COMPETENT
ELECTRICIAN.
VARING: APPARATEN INNEHÅLLER LASER
KOMPONENT MED STRÅLNING
ÖVERSTIGANDE KLASS 1.
"ADVARSEL: USYNLIG LASERSTRÅLING VED
ÅBNING NAR SIKKERHEDSAFBRYDERE ER
UDE AF FUNKTION. UNDGÅ UDSAETTELSE
FOR STRÅLING"
"VAROITUS! SUOJAKOTELOA EI SAA AVATA.
LAITE SISÄLTÄÄ LASERDIODIN. JOKA
LÄHETTÄ (NÄKYMÄTÖNTÄ) SILMILLE
VAARALLISTA LASERSÄTEILYÄ".
ADVARSEL: USYNLIG LASERBESTRÅLING
NÅR DENNE DELEN ER ÅPEN OG
SIKKERHETSSPERREN ER UTKOBLET
UNNGÅ UTSETTELSE FOR STRÅLING.
Thanks for buying a TEAC. Read this manual
carefully to get the best performance from
this unit.
Nous vous remercions pour l’achat d’un
appareil TEAC. Lire ce manuel avec
attention pour obtenir les meilleures
performances possibles de cet appareil.
Downloaded From TheatreSystem-Manual.com Manuals
Page is loading ...

ENGLISH FRANÇAIS
Before Use (1) Avant l'utilisation (1)
6
Important Safeguards and
Precautions
Power Cord Protection
To avoid any malfunctions of the unit, and to
protect against electric shock, fire or
personal injury, please observe the
following:
<
Hold the plug firmly when connecting or
disconnecting the AC power cord.
<
Keep the AC power cord away from the
heating appliances.
<
Never put any heavy object on the AC
power cord.
<
Do not attempt to repair or reconstruct the
AC power cord in any way.
Location and Handling
< Air vents are provided in the cabinet to
prevent excessive tempratures inside the
unit. Do not place this unit in closed
spaces, cover it, or otherwise block the
vents.
<
The ventilation holes should not be
covered. Make sure there is at least 50 cm
of space above and at least 10 cm of
space on each side of this unit. Do not
place a CD player or other equipment on
top of this unit.
<
Do not place this unit in direct sunlight, or
near heat sources.
<
Keep this unit away from strong magnetic
objects.
<
Do not insert or drop anything into this unit
through the air vents as this could cause
serious damage, possibly resulting in fire.
<
Do not place any object containing water
or other liquids on this unit. In the event
that liquid should enter the cabinet,
unplug this unit immediately and contact
the retailer or service centre immediately.
<
Do not remove the cabinet. Touching parts
inside the cabinet could result in electric
shock and / or damage to the unit.
<
Do not use the unit in a car. The operation
can not guaranteed.
<
This unit generates heat during operation.
Do NOT place anything on top of this unit.
<
Place the unit in a horizontal position, and
do not place anything heavy on it.
Nonuse Periods
< When the unit is not being used, turn the
unit off.
<
When left unused for a long perid of time,
the unit should be unplugged from the
household AC outlet.
No Fingers or Other Objects Inside
Do not put any foreign object on the disc
tray.
This unit has a lot of LSI (Large Scale
Integration) devices and ICs (Integrated
Circuits) inside; and on rare occasions it
malfunctions because of static electricity,
electric noise, irregularities in the power
supply, etc.
If something goes wrong with the unit, we
suggest turning it off and on again.
Précautions et sauveguardes
importantes
Protection du cordon d’alimentation
Afin d’éviter tout mauvais fonctionnment de
l’appareil et pour une protection contre des
chocs électriques, feu ou blessures, veuller
suivre les consignes suivantes:
<
Tenir la prise fermement quand vous
branchez ou débranchez le cordon
d’alimentation
<
Tenir le cordon d’alimentation loin de source
de chaleur
<
Ne jamais placer un object lourd sur le
cordon d’alimentation
<
Ne pas essayer de réparer ou reconstruire
le cordon d’alimentation de n’importe qu’elle
façon.
Emplacement et manutention
< Le cabinet est muni de fentes de ventilation
afin de prévenir une hausse excessive de
température à l’intérieur du cabinet. Ne pas
placer cet appareil dans des espaces
constraints, le couvrir ou boucher les fentes.
<
Les trous de ventilation ne doivent pas être
couverts. S'assurer qu'il y a un espace d'au
moins 10 cm au dessus et un espace d'au
moins 50 cm à côté de cet appareil. Ne pas
placer un lecteur CD ou un autre appareil sur
le dessus cet appareil.
<
Ne pas exposer cet appareil aux rayons
solaires directs, ou près de sources de
chaleur.
<
Tenir éloigner d’objets magnétisés
puissants.
<
Ne pas insérer ou échapper quelque chose
dans cet appareil à travers les fentes, cela
peut occasionner des dommages sérieux et
peut-être des incendies.
<
Ne jamais placer un object contenant de
l’eau ou d’autre liquides sur cet appareil. Si
un liquide pénètre l’appareil, le débrancher
immédiatement et contacter votre
dépositaire ou dépot de service.
<
Ne pas enlever le cabinet. Si vous touchez
des pièces à l’intérieur du cabinet, vous
risquez un choc électrique et / ou
d’endommager l’appareil.
<
Ne pas utiliser cet appareil dans une
automobile. Son opération n’est pas
garantie.
<
Cet appareil produit une chaleur quand il est
en fonction. Jamais placer quelque chose
sur le dessus.
<
Installer l’appareil dans une position
horizontale et ne pas mettre aucun object
pesant au dessus.
Période de non-utilisation
< Si l’appareil n’est pas utilisé, l’éteindre
<
Si l’appareil n’est pas utilisé pour une
période prolongée, le débrancher.
Aucun object ou doigts à l’intérieur
Ne pas déposer aucun object sur le tirroir du
disque
Cet appareil est équipé de composants LSI
(large scale integration: intégration à
grande échelle) et IC (circuit intégré)
incorporés; et il est possible que rarement il
ne se comporte pas comme il faut à cause
d’une charge statique, d’un bruit électrique,
d’une irrégularité de l’alimentation de
courant, etc.
Si quelque chose ne semble pas aller bien,
mettre l’appareil hors tension et ensuite le
remettre sous tension.
CAUTION Regarding Placement
To maintain proper ventilation, be sure to
leave a space around the unit (from the
largest outer dimensions including
projections) equal to, or greater than,
shown below.
Left and Right Panels : 10 cm
Rear Panel : 10 cm
Top Panel : 50 cm
Downloaded From TheatreSystem-Manual.com Manuals
Page is loading ...

ENGLISH FRANÇAIS
Before Use (2) Avant l'utilisation (2)
8
Condensation
Moisture may form on the pickup lens in
the following conditions:
< Immediately after a heater has been
turned on.
<
In a steamy or very humid room.
<
When the unit is suddenly moved from a
cold environment to a warm one.
If moisture forms inside this unit, it may not
operate properly. In this case, turn on the
power and wait about one hour for the
moisture to evaporate.
On adjusting volume
Do not turn up the volume while listening to
a portion with very low level inputs or no
audio signals. If you do, the speakes may be
damaged when a peak level portion is
played.
If There is Noise Interference on the TV
While a Broadcast is being Received
Depending on the reception condition of the
TV, interference may appear on the TV
monitor while you watch a TV broadcast and
the unit is left on. This is not a malfunction of
the unit or the TV. To watch a TV broadcast,
turn off the unit.
Service
< Do not attempt to service the unit yourself.
<
Please refer any service to the nearest
service centre.
Copyright
Audio-visual material may consist of
copyrighted works which must not be
recorded without the authority of the owner
of the copyright. Please refer to relevant
laws in your country.
Copy protection
This DVD player supports Macrovision copy
protection.
On DVD discs that include a copy protection
code, if the contents of the DVD disc are
copied using a VCR, the copy protection
code prevents the videotape copy from
playing normally.
Recommended Measures for Optimum
Picture Excellence
This unit is a precision device that is
constructed using extremely accurate
technology.
Soiling or friction affecting the pickup lens
or disc drive can impair the image quality. At
the worst, neither video nor audio will be
played back. To obtain optimum picture
quality, the player should be checked
(cleaning and replacement of some parts)
every 1,000 hours. Note that this period
varies depending on the environment
(temperature, humidity, dust, ect.) in which
the player is used.
Do not attempt to clean the pickup lens
yourself.
Condensation
De la condensation peut se former sur la
lentille du laser sous les conditions
suivantes:
<
Immédiatement après qu’une chaufferette
est allumée.
<
Dans une pièce embué ou très humide.
<
Si l’appareil est soudainement transporter
d’un endroit froid à un endroit chaud.
Si de la condensation se forme à l’intérieur de
l’appareil, il est possible qu’il ne fonctionne
pas correctement. Dans ce cas, allumer
l’appareil et attendre pour environ une heure
pour que la condensation s’évapore.
Sur le réglage du volume
Ne pas augmenter le volume quand vous
écoutez une section ayant des niveaux
faibles ou non existants. Sinon, les haut-
parleurs risquent d’être endommager quand
une section à haut niveau joue.
Si il y a de l’interérence sur le téléviseur
durant l’écoute d’une diffusion
Dépendemment des conditions de réception
du téléviseur, il peut avoir de l’interférence
sur la diffusion quand l’appareil est allumé.
Cela n’est pas un mauvais fonctionnement
de l’appareil ou du téléviseur. Pour regarder
une diffusion, éteindre l’appareil.
Service
< Ne pas essayer de réparer l’appareil
vous-même.
<
Veuillez reférer tout service à du
personnel qualifié.
Droits d’auteurs
Le matériel audio-visual peut se comprendre
de matériaux ayant des droits d’auteurs
vous empechant de les enregistrer sans la
permission du détenteur des droits. Reférez
vous aux lois pertinantes de votre pays.
Protecteur de copiage
Ce lecteur DVD supporte la prévention de
copiage Macrovision. Sur les disques qui
possèdent un code de protection du
copiage, si le contenu de ces disques DVD
sont copiés à un magnétophone vidéo, le
code de prévention de copiage empêche le
magnétophone de jouer correctement.
Procédures recommendées pour une
image optimale
Cet appareil est un appareil de précision
construit utilisant une technologie
extrèmement précise.
La saleté ou friction affectant la lentille du
laser ou son mécanisme peut affecter la
qualité de l’image. Au pire, ni le vidéo et ni
l’audio vont joués. Pour une qualité de
l’image optimale, le lecteur devrait être
vérifier (nettoyage et remplacement de
certaine pièces) tous les 1.000 heures.
Prendre note que cette période varie selon
l’environnement (température, humidité,
poussière etc…) où l’appareil est utilisé.
Ne pas essayer de nettoyer la lentille du
laser vous même.
Downloaded From TheatreSystem-Manual.com Manuals
Page is loading ...

ENGLISH FRANÇAIS
Before Use (3) Avant l'utilisation (3)
10
Features of This System
< DVD player built-in DTS*
1
and Dolby
Digital*
2
decorder, supporting Dolby Pro
Logic and Virtual Surround.
<
5-channel amplifiers attached with active
subwoofer.
<
Conforming DVD, SVCD, VCD1.1, VCD2.0,
MP3, CDR, CDRW and CD-DA discs.
<
DVD navigation and SVCD, VCD 2.0 PBC
controlling functions.
<
OSD menu display.
*1 Manufactured under license from Digital
Theater System, Inc. US Pat. No.
5,451,942 and other worldwide patents
issued and pending. “DTS” and “DTS
Digital Surround” are trandemarks of
Digital Theater Systemsm, Inc. ©1996
Digital Theater Systems, Inc. All rights
reserved.
*2 Manufactured under license from Dolby
Laboratories. “Dolby”, “AC-3”, “Pro
Logic” and the double-D symbol are
trademarks of Dolby Laboratories.
Confidential Unpublished Works. ©1992-
1997 Dolby Laboratories, Inc. All rights
reserved.
Conventions about This Manual
< Instructions in this manual describe the
controls on the system. You can also use
the controls on the remote control if they
have the same or similar names as those
on the system.
<
The types of functions and operations that
can be used for a particular disc vary
depending on the features of that disc. In
some cases, these functions and
operations may differ from the
descriptions given in this Owner's
Manual. In this event, follow the
instructions given on the screen. This
Owner's Manual only covers basic disc
operations.
<
For some operations, the icon may
appear on the the screen. This indicates
that the operation described in this
Owner's Manual is not permitted for the
current disc.
<
The drawings about the TV screen and
front panel display used in this Owner's
Manual are purely for the purposes of
explanation. The actual displays may
differ slightly from what are shown here.
Caractérisques du système
< Lecteur DVD incorporant décodeurs DTS*
1
et Dolby Digital*
2
, supportant Dolby Pro
Logic et ambiance virtuelle.
<
Amplificateurs 5 canaux avec subwoofer
actif.
<
Se conforme aux disques DVD,
SVCD,VCD1,1 VCD2,0, MP3, CDR, CDRW et
CD-DA.
<
Navigation DVD et fonctions de controles
PBC SVCD, VCD 2,0.
<
Afficheur de menu OSD.
*1 Fabriquer sous license par Digital
Theater System, Inc. par Digital Theater
System, Inc. US Pat. No. 5.451.942 et
autre brevets internationaux émis ou en
suspens. “DTS” et “DTS Digital
Surround” sont des marques déposées
de Digital Theater Systems, Inc. © 1996
Digital Thater systems, Inc. Tous droits
reservés.
*2 Fabriquer sous license par Dolby
Laboratories. “Dolby”, “AC-3”, “Pro
Logic” et le symbol double D sont des
marques déposées de Dolby
Laboratories. Traités confidentiels et
non-publiés. © 1992-1997 Dolby
Laboratories, Inc. Tous droits réservés.
Conventions de ce livret
< Les instructions dans ce livret décrivent
les controles du système. Vous pouvez
aussi utiliser les controles de la
télécommande si ils ont la même
nomenclature ou une nomenclature
semblable à ceux du système.
<
Le genre de fonctions et opérations qui
peuvent être utiliser pour un disque en
particulier diffère selon les
caractéristiques de ce disque. Dans
certain cas, ces fonctions et opérations
peuvent différer des discriptions données
dans ce livret d’instruction. Dans ce cas,
suivre les instructions données sur
l’écran. Ce livret d’instruction couvre
seulement les fonctions de base du
disque.
<
Pour certaines opérations, l’icone peut
apparaitre sur l’écran. Cela indique que
l’opération décrite dans ce livret
d’instruction n’est pas permise pour le
disque courant.
<
Les desseins à propos de l’écran du
téléviseur et l’afficheur du panneau avant
utilisés dans ce livret d’instruction sont
strictement pour vous renseigner.
L’affichage réel peut différer légèrement
de ceux illustrées.
Downloaded From TheatreSystem-Manual.com Manuals
Page is loading ...

ENGLISH FRANÇAIS
Before Use (4) Avant l'utilisation (4)
12
Type of Disc That Can be Played
on This System
This player can playback discs bearing any
of the following marks:
Note-1
< DVD players and discs are designed with
region numbers which dictate the regions
in which a disc can be played. If the
region number on the disc you want to
play does not match the region number in
your DVD player, you will not be able to
play the disc. If you try to play the DVD,
the message “WRONG REGION” will
appear on OSD.
On the rear panel of the unit has a region
code printed.
Note-2
< The specific playback functionality for
some DVD and video CD discs is
determined by the disc manufacturer.
Because this DVD player plays disc data
in accordance with the disc
manufacturer’s guidelines, some functions
may not be available on some discs. Be
sure to read the instructions provided with
the disc.
The “Prohibited” icon displayed
during DVD player operation indicates
that such manufacturer imposed
restrictions apply.
Note-3
< The audio on a DVD disc recorded in
MPEG version 2.0 format maybe cannot be
played (image only).
Sample disc display:
Disc playable in all regions
12cm disc / 8cm disc
Video CDs
12cm disc / 8cm disc
12cm disc / 8cm disc
Audio CDs
See Note-1
See Note-2
See Note-2
See Note-3
•
Supports version
until version 2.0
• Supports MP3
DVDs
Genre de disques qui peuvent
être jouer sur ce système
Ce lecteur peut jouer des disques qui
portent n’importe quel des identifications
suivantes:
Remarque-1
< Les lecteurs et disques DVD sont conçus
avec des numéros régionnaux qui
controlent les régions où les disques
peuvent être jouer. Si le numéro régional
sur le disque que vous désirez jouer ne
correspond pas au numéro régional de
votre lecteur DVD, vous ne pourrez pas le
jouer. Si vous essayez de jouer le DVD, le
message “WRONG REGION” est affiché.
Un code régional est imprimé sur le panneau
arrière de cet apparail.
Remarque-2
< La fonctionnalité de lecture spécifique pour
certain DVD et vidéo est déterminée par le
manufacturier du disque. Parce que ce
lecteur DVD joue les disques selon les
consignes du manufacturier, certaines
fonctions ne sont pas disponible sur certain
disques. Assurez-vous de lire les instructions
fournies avec le disque.
L’icone “Prohibited” est affiché
durant l’opération du
lecteur indicant que le manufacturier a
imposé des restrictions.
Remarque-3
< Il est possible que l’audio d’un disque
enregistré avec MPEG version 2.0 ne joue
pas (image seulement).
Disques qui ne jouent pas
Échantillonage d’un disque:
Disque jouable dans toute les régions
disque 12cm /
disque 8cm
CDs Vidéo
disque 12cm /
disque 8cm
disque 12cm /
disque 8cm
CDs Audio
Voir remarque-1
Voir remarque-2
Voir remarque-2
Voir remarque-3
•
Soutien jusqu’à
la version 2,0
• Soutien pour MP3
DVDs
Downloaded From TheatreSystem-Manual.com Manuals
Page is loading ...

ENGLISH FRANÇAIS
Before Use (5) Avant l'utilisation (5)
14
Discs that Cannot be Played
< You cannot play CD-G, CD-EXTRA, PHOTO
CD, CD-ROM and DVD-ROM discs.
<
You cannot play illegally produced discs.
<
You cannot play scratched discs.
<
You cannot play disc that are dusty, soiled
or marked with fingerprints.
Warning:
<
If you attempt to play back such discs,
there is a risk that noise can blast over the
speakers at full volume and cause
damage to the speakers and human ears.
About CD-R/CD-RW
Depending on the quality of the disc and/or
the condition of the recording, some CD-R &
CD-RW discs may not be playable.
Icons used on DVD discs
Sample Icons:
Glossary of Disc Terms
< Title (DVD)
The longest sections of a picture or a
music piece on a DVD; a movie, ect., for a
picture piece on a video software; or an
album, etc., for a music piece on and
audio software. Each title is assigned a
title number enabling you to locate the
title you want.
<
Chapter (DVD)
Sections of a picture or a music piece that
are smaller than titles. A title is composed
of several chapters. Each chapter is
assigned a chapter number enabling you
to locate the chapter you want.
Depending on the disc, no chapters may
be recorded.
<
Track (Video or audio CD)
Sections of a picture or a music piece on
a VIDEO or a CD. Each track is assigned a
track number enabling you to locate the
track you want.
< Vous ne pouvez pas jouer les disques CD-G,
CD-EXTRA, PHOTO CD, CD-ROM et DVD-
ROM
<
Vous ne pouvez pas jouer des disqus
illégaux.
<
Vous ne pouvez pas jouer des disques
égratignés
<
Vous ne pouvez pas jouer des disques
poussièreux, sales ou ayant des empreintes
digitales.
Attention:
< Si l’on tente de lire les disques de ce type
malgré tout, on risque d’endommager les
haut-parleurs ou les oreilles humaines.
Disques CD-R/CD-RW
Parmi les disques CD-R/CD-RW il y en a qui ne
peuvent pas être lus par cet appareil selon la
qualité des disques propres ou l’état des
données imprimées sur eux.
Icones utilisés sur les disques DVD
Examples:
Lexique de la terminologie des disques
< Titre (DVD)
Les parties les plus longues d’une image ou
pièce musicale sur un DVD; un film, etc., pour
une section d’image sur un logiciel vidéo; ou
un album, etc., pour une pièce musicale sur
et logiciel audio. Chaque titre est assigné un
numéro de titre vous permettant de trouver le
titre que vous désirez.
<
Chapitre (DVD)
Sections d’une image ou pièce musicale qui
sont plus courts qu’un titre. A titre est
composé de plusieurs chapitres. Chaque
chapitre est assigné un numéro de chapitre
vous permettant de trouver le chapitre que
vous désirez. Dépendemment du disque, il est
possible qu’aucun chapitre est enregistré.
<
Piste (Disque Vidéo ou audio)
Sections d’une image ou une pièce musicale
sur un VIDEO ou un CD. Chaque piste est
assignée un numéro de piste vous
permettant de trouver la piste que vous
désirez.
Downloaded From TheatreSystem-Manual.com Manuals
Page is loading ...

ENGLISH FRANÇAIS
Before Use (6) Avant l'utilisation (6)
16
Notes on Discs
Disc handling precautions
< To keep the disc clean, handle the disc by
its edge. Do not touch the surface.
<
Do not stick paper or tape on the disc.
If there is glue (or a similar substance) on
the disc, remove the glue completely
before using the disc.
<
Do not expose the disc to direct sunlight
or sources such as hot air ducts, or leave
it in a car parked in direct sunlight as
there can be considerable rise in
temperature inside the car.
<
After playing, store the disc in its case.
<
Do not write on the label side with a ball-
point pen or other writing utensils.
<
Be careful not to drop or bend the disc.
Disc cleaning precautions
< Before playing, clean the disc with a
cleaning cloth. Wipe the disc from the
center out.
<
Do not use solvents such as benzine,
thinner, commerically avaiable cleaners
or anti-static spray intended for vinyl LPs.
Disc installing precautions
< Do not install more than 1 disc on disc
tray.
<
Do not place the disc on the tray up-side
down.
<
Do not try to close the disc tray when the
disc is not installed properly.
Remarques sur les disques
Précautions sur la manipulation des
disques
< Afin de conserver vos disques propres,
manipuler les disques par les bords. Ne
pas toucher la surface.
<
Ne pas coller du papier ou ruban sur le
disque.
Si il y a de la colle (ou substance
semblable) sur le disque, enlever la colle
complètement avant d’utiliser le disque.
<
Ne pas exposer le disque aux rayons
solaires directs ou sources tel que
conduits d’air chaud, ou le laisser dans
une automobile stationnée exposé
directement au soleil , sela peut engendré
une hausse de température considérable
à l’intérieur de l’automobile.
<
Après la lecture entreposer le disque dans
son étui.
<
Ne pas écrire sur le coté étiquette du
disque avec un stylo bille ou autre
instrument pour écrire.
<
Faire attention de ne pas échapper ou
plier le disque.
Précautions sur le nettoyage de disque
< Avant la lecture, nettoyer le disque avec
un chffon propre. Essuyer à partir du
centre vers l’extérieur.
<
Ne pas utiliser des dissolvants tel que
benzine, diluant, nettoyeurs commerciaux
ou aérosol anti-statique pour long jeux.
Précautions sur l’utilisation des disques
< Ne pas insérer plus d’un disque dans le
tirroir
<
Ne pas insérer le disque dans le tirroir à
l’envers
<
Ne pas essayer de fermer le tirroir si le
disque n’est pas insérer correctement
Disc tray
Tirroir
Diskschublade
Cassetto
Bandeja
Disc
Disque
Disk
Disco
Disco
Downloaded From TheatreSystem-Manual.com Manuals
Page is loading ...

ENGLISH FRANÇAIS
Before Use (7) Avant l'utilisation (7)
18
Choisir le disque pour le
téléviseur branché
Les disques DVD et vidéo sont enregistrés
avec le système PAL et NTSC. Reférez-vous
à la charte suivante pour choisir le bon
système selon le téléviseur branché.
Branchement à un téléviseur à système
multiple
Branchement à un téléviseur NTSC
Branchement à un téléviseur PAL
Remarque
< Si le genre de disque ne correspond pas
au genre de téléviseur branché, vous
pouvez aussi jouer le disque normalement
en réglant le genre de téléviseur dans le
menu de réglage. Pour les détails voir la
page 42.
Disque Téléviseur
Joue sur le système PAL
L’utilisation d’un téléviseur
à système multiple est
PAL recommendé.
Joue sur le système NTSC
L’utilisation d’un téléviseur
à système multiple est
NTSC recommendé.
Disque Téléviseur
Sur un téléviseur 4:3, les
images sont compressées
PAL horizontalement
Ne peut pas être utiliser.
Les images sont repro-
NTSC duites en noir et blanc.
Disque Téléviseur
Ne peut pas être utiliser.
Les images sont reproduites
en noir et blanc. Les images
peuvent être aussi
PAL distortionnées ou peuvent se
chevaucher au bas de l’écran.
Lecture avec le système
NTSC.
Spécifier le réglage pour le
NTSC genre de téléviseur branché
(4:3, 16:9).
Selecting the Type of Disc for
the Connected TV
Both DVD discs and video CDs have the
material recorded in the PAL and NTSC
systems. Refer to the table below to select
the correct disc type for the type of
connected TV.
Connecting to the Multi-system TV
Connecting to NTSC TV
Connecting to PAL TV
Note
< If the type of disc does not match the type
of connected TV, you can also play the
disc normally by setting the TV type in the
SETUP menu. For details, see page 42.
Disc TV Monitor
Played in the PAL system.
The use of a multi-system
PAL TV is recommended.
Played in the NTSC system.
The use of a multi-system
NTSC TV is recommended.
Disc TV Monitor
Can not be used.
Images playback in black
and white. The images may
also be distorted or may
PAL overlap at the bottom of the
screen.
Played in the NTSC system.
Specify the settings for the
type of TV connected (4:3,
NTSC 16:9).
Disc TV Monitor
When viewed on a 4:3 TV,
the images appear
PAL compressed horizontally.
Can not be used.
Images play back in black
NTSC and white.
Downloaded From TheatreSystem-Manual.com Manuals
Page is loading ...

20
Connection (Speakers)
Raccordement (haut-parleurs)
CAUTION
Turn off the power of all the equipment before making connections.
Read instructions of each component you intend to use with this
unit.
Be sure to insert each plug securely. To prevent hum and noise, do
not bundle the connection cords with the power cord or speaker
cord.
How to connect :
Press the lever, insert the stripped and
twisted end of the cord, then release the
lever. Make sure it is fastened securely by
pulling the cord lightly.
a SPEAKERS
< Connect the provided speaker cables (or other suitable cables)
from the speaker terminals to the terminals of the amplifier. Be
sure to match the color of the cables with the color of the
terminals.
<
Be sure that the positive + terminal of the speaker is connected
to the corresponding +
terminal of the amplifier, and that
negative _
matches _.
<
When connecting to an amplifier having an output higher than the
maximum rated input of the speaker, be careful not to exceed the
speaker’s maximum input, otherwise it will damage the speaker.
b SUBWOOFER PRE OUT jack
Connect the component with an RCA cable.
c Power cord
< Be sure to connect the power cord to an AC outlet which supplies
the correct voltage.
<
Hold the power plug when plugging or unplugging the power
cord.
<
When the cord is plugged in, a small amount of current continues
to flow to the unit, even when the power is turned off. Unplug the
power cord from the AC outlet when the unit isn't in use for some
time.
ATTENTION
Mettre hors tension tous les appareils avant de faire des
branchements. Lire les instructions de chaque appareil que vous
avez l’intention d’utiliser avec cet appareil.
S’assurer d’enfoncer chaque fiche bien à fond. Pour éviter le
renfolement, éloigner les câbles de raccordement du courant
d’alimenation et des câbles des haut-parleurs.
Branchement correct:
Pousser le levier, introduire le bout du câble
dénudé et tressé, et relâcher le levier. Tirer un
peu sur le câble pour assurer qu’il est bien tenu
en place.
a Haut-parleurs
< Au moyen des câbles de haut-parleur fournis (ou d’autres câbles
appropriés), raccorder les bornes des haut-parleurs aux bornes
de l’amplificateur. Identifier les câbles par leurs couleurs.
<
S’assurer de brancher la borne positive des haut-parleurs sur les
bornes positives de l’amplificateur; et les bornes négatives sur les
bornes négatives.
<
Si la sortie de votre amplificateur est plus puissante que l’entrée
prévue des haut-parleurs, faire attention à ne pas alimenter les
haut-parleurs en dépassant leur entrée maximale admissible.
Sinon, ils en seront endommagés.
b Prise SUBWOOFER PRE OUT
On n’y branche le subwoofer au moyen d’un câble muni d’une
prise RCA.
c Cordon d’alimentation
< S’assurer de raccorder le cordon d’alimentation sur une prise de
courant qui fournit la tension correcte.
<
Tenir la fiche d’alimentation en branchant ou débranchant le
cordon d’alimentation. Ne pas tirer sur le cordon lui-même.
<
Quand le cordon d’alimentation se trouve branché, un faible
courant continue à entrer dans cet appareil même si celui-ci est
mis hors tension. Débrancher le cordon d’alimentation quand
vous avez l’intention de ne pas utiliser cet appareil longtemps.
ENGLISH FRANÇAIS
a
b
c
Downloaded From TheatreSystem-Manual.com Manuals
Page is loading ...

22
Connection (TV) Raccordement (TV)
Connect one of the following jacks to your TV or monitor.
Select the proper video output mode in accordance with your
connection. (see page46)
<
COMPONENT VIDEO connection or S-VIDEO connection is
recommended for a clearer picture.
<
Connect this unit to a TV directly. If you connect the TV through a
video cassette recorder and play a copy protected DVD disc, the
playback picture might be distorted.
d VIDEO or S-VIDEO jacks
Connect the component with an RCA cable.
VIDEO OUT (PL-D2000) w VIDEO IN (TV)
By connecting S-VIDEO jacks, you can enjoy a clearer picture. If
the component has a S-VIDEO jack, connect them with a S-VIDEO
cord.
S-VIDEO OUT (PL-D2000) w S-VIDEO IN (TV)
When S-VIDEO jacks are connected, you don't have to connect
VIDEO jacks.
e COMPONENT VIDEO OUT jack
(General Export Model only)
By connecting COMPONENT VIDEO jacks, you can enjoy a
clearer picture. If your TV or monitor has COMPONENT VIDEO IN
jack, connect them with a component video cable.
f AV CONNECTOR jack (European Model only)
Use a 21-pin SCART cable to connect to a TV or monitor
compatible with this type of connection.
<
Both audio and video signals are output from this jack. When AV
CONNECTOR jacks are connected, do not connect other video
and audio jacks.
En ce qui concerne le branchement d’un téléviseur ou moniteur,
quelques possibilités (ci-dessous) s’offrent à vous.
Il vous faut régler la sortie branchée sur un mode approprié. (Voir
page 46)
<
Le branchement COMPONENT VIDEO ou S-VIDEO est préférable
en termes de qualité d’image.
<
Brancher cet appareil directement sur le téléviseur. S’il y a un
enregistreur cassette vidéo branché entre cet appareil et le
téléviseur, l’image sera déformée à la lecture des disques DVD
protégés contre doublage.
d Prises VIDEO ou S-VIDEO
On y branche un téléviseur au moyen d’un câble muni d’une prise
RCA.
VIDEO OUT (PL-D2000) w VIDEO IN (TV)
Le raccordement entre deux prises S-VIDEO assure une meilleure
qualité d’image. Si votre téléviseur est muni d’une prise S-VIDEO,
en profiter au moyen d’un câble fabriqué pour cet effet.
S-VIDEO OUT (PL-D2000) w S-VIDEO IN (TV)
Quand le raccordement entre deux prises S-VIDEO est achevé, il
est inutile de brancher la sortie VEDIO (sans S) en entrée VIDEO.
e Prise COMPONENT VIDEO OUT (sur le modèle
d’exportation générale uniquement)
Le raccordement entre deux prises COMPONENT VIDEO assure
une meilleure qualité d’image. Si votre téléviseur ou moniteur est
muni d’une prise COMPONENT VIDEO IN, brancher cet appareil
sur elle au moyen d’un câble fabriqué pour cet effet.
f Prise AV CONNECTOR(Sur le modèle européen
uniquement)
Utiliser un câble SCART à 21 broches si votre téléviseur ou
moniteur est muni d’une prise de ce type.
<
Le signal vidéo et celui audio tous deux se véhiculent par cette
prise AC CONNECTOR. Tout raccordement entre d’autres prises
est inutile.
ENGLISH FRANÇAIS
de
f
Downloaded From TheatreSystem-Manual.com Manuals
Page is loading ...

24
Connection (CD-R, MD, etc.)
Raccordement (CD-R, MD, etc.)
Select the proper audio output mode in accordance with your
connection. (see page 44)
g AUDIO IN/OUT jacks
Connect the component with RCA pin cords.
AUDIO IN (PL-D2000) w LINE OUT (CD-R, MD, TAPE, etc)
AUDIO OUT (PL-D2000) w
LINE IN (CD-R, MD, TAPE, etc)
Make sure to connect :
white plug w white jack(L:left)
red plug w
red jack(R:right)
h DIGITAL OUT jacks
Connect the component with a coaxial cable or an optical cable.
DIGITAL OUT (PL-D2000) w DIGITAL IN (CD-R, MD, DAT, etc.)
<
Connect either OPTICAL or COAXIAL.
<
When using DIGITAL OUT OPTICAL terminals, remove the caps
from the terminals. When you do not use them, leave the caps in
place.
<
If the ANALOG is selected in AUDIO OUTPUT mode, or the
headphones are pluged, the COAXIAL and OPTICAL will not have
audio outputs.
<
The 5.1CH SPEAKER and 2CH MIX outputs are not available at the
same time. When the 5.1CH SPEAKER output is activated, no
audio is available at AUDIO OUT. To let the 5.1-channel audio
have access to AUDIO OUT, select MIX DOWN from the SETUP
menu. (When you plug in a set of headphones, AUDIO OUT
automatically switches into the 2-channel mix down mode.)
Choisir un mode de sortie audio approprié à votre raccordement.
(voir page 44)
g Prises AUDIO IN/OUT
Utiliser un câble muni d’une prise RCA pour le raccordement sur
ces prises.
AUDIO IN (PL-D2000) w LINE OUT (CD-R, MD, TAPE, etc)
AUDIO OUT (PL-D2000) w
LINE IN (CD-R, MD, TAPE, etc)
Attention à la couleur des câbles:
white plug w white jack(L:left)
red plug w
red jack(R:right)
h Prises DIGITAL OUT
Le raccordement sur ces prises exige l’emploi d’un câble coaxial
ou optique.
DIGITAL OUT (PL-D2000) w DIGITAL IN (CD-R, MD, DAT, etc.)
<
Deux possibilités de raccordement (optique ou coaxial) vous sont
offertes.
<
Choisir la sortie OPTICAL ou celle COAXIAL.
<
Si vous optez pour la sortie OPTICAL, enlever le capuchon de la
prise. S’assurer qu’il est en place quand la sortie optique n’est
pas utilisée.
<
Si le réglage AIDIO OUT est en ANALOG, ou si le casque d’écoute
est branché, ni la sortie optique ni la sortie coaxiale ne véhiculent
de signal audio.
<
La sortie 5.1CH SPEAKER et celle 2CH MIX ne sont pas
disponibles en même temps. Et puis, quand la sortie 5.1CH
SPEAKER est en usage, aucun son audio n’alimente la sortie
AUDIO OUT. Pour que le son 5.1 canaux donne accès à la sortie
AUDIO OUT, choisir MIX DOWN sur le menu SETUP. (Au
branchement d’un casque d’écoute, la sortie AUDIO OUT se
commute automatiquement en mixage en 2 canaux.
ENGLISH FRANÇAIS
h
g
Downloaded From TheatreSystem-Manual.com Manuals
Page is loading ...

26
ENGLISH FRANÇAIS
Connecting Antennas (1) Raccordements d'antenne (1)
AM Indoor Loop Antenna
A high-performance AM loop antenna
provided with the receiver is sufficient for
good reception in most areas.
Connect the loop antenna's wires to the AM
antenna terminals as shown.
Place the antenna on a shelf, for example, or
hang it on a window frame, etc., in the
direction which gives the best reception, as
far away as possible from the entire system,
speaker cords and the power cord, to
prevent unwanted noise.
How to connect
Press the lever, insert the stripped and
twisted end (approx. 10 mm) of the cord,
then release the lever.
Make sure it is fastened securely by pulling
the cord lightly.
AM Outdoor Antenna
If the AM loop antenna provided does not
deliver sufficient reception (because you are
too far from the transmitter or in a concrete
building, etc.), it may be necessary to use an
outdoor AM antenna.
Use an insulated wire more than 15 ft (5 m)
long, strip one end, and connect this to the
terminal as shown.
The antenna wire should be strung outdoors
or indoors near a window.
For better reception, connect the GND
terminal to a reliable ground.
Note:
< Even when using an outdoor AM antenna,
do not disconnect the AM loop antenna.
Antenne-cadre intérieure AM
L'antenne cadre AM haute performance,
fournie avec le récepteur permet une très
bonne réception dans la plupart des régions.
Raccorder les fils de l'antenne-cadre aux
bornes d'antenne AM comme décrit. Placer
l'antenne sur une étagère, par exemple, ou
la suspendre dans un encadrement de
fenêtre, etc., en l'orientant de façon à
obtenir la meilleure réception possible, et
aussi loin que possible de la chaîne, des fils
de raccordement des haut-parleurs et du
cordon d'alimentation, afin d'éviter tout bruit
indésirable.
Branchement des enceintes
Appuyer sur le levier, introduire l'extrémité
dénudée et torsadée (10 mm environ) du fil,
puis relâcher le levier.
Assurez-vous que le fil est bien fixé en place
en tirant légèrement sur le cordon.
Antenne extérieure AM
Si l'antenne cadre AM fournie ne permet
pas une réception satisfaisante (du fait que
vous êtes situé trop loin d'un émetteur ou
que vous habitez dans un bâtiment en béton,
etc.), il peut être nécessaire d'utiliser une
antenne AM extérieure. Utilisez un fil isolé
d'une longueur supérieure à 5 m, dénudez
l'une de ses extrémités et raccordez la à la
borne, comme décrit sur le schéma.
Le fil d'antenne doit être tendu à l'extérieur
ou à l'intérieur à proximité d'une fenêtre.
Pour une meilleure réception, raccordez la
prise de terre à une masse fiable.
Remarque:
< Même si vous utilisez une antenne
extérieure AM, ne débranchez pas
l'antenne-cadre AM.
To stand the antenna on a surface, fix the
claw to the slot.
Pour poser l'antenne sur une surface, fixer
la griffe dans la rainure.
Befestigen Sie die Kralle in dem Schlitz, um
die Antenne auf eine Fläche zu stellen.
Per appoggiare quest'antenna su una
superficie, fissare l'attacco di presa alla
fessura.
Para poner la antena en posición vertical en
una superficie, fije la mordaza a la ranura.
1
2
3
AM Loop Antenna (provided)
Antenne cadre AM (MW) (fournie)
AM-Rahmenantenne (mitgeliefert)
Antenna AM (MW) a telaio
(in dotazione)
Antena de cuadro de AM (MW)
(suministrado)
AM Outdoor Antenna
Antenne AM (MW) extérieure
AM-Außenantenne
Antenna AM (MW) esterna
Antena externa de AM (MW)
Downloaded From TheatreSystem-Manual.com Manuals
Page is loading ...

ENGLISH FRANÇAIS
28
Connecting Antennas (2) Raccordements d'antenne (2)
FM Indoor Antenna
(General Export Model)
In an area with strong FM signals, the "T"-
type FM antenna provided is sufficient.
Extend this into a "T" shape and connect the
two wires at the base of the "T" to the
terminals. Extend the top of the "T" and fix
with thumb tacks, or the like, to a wall or
window frame for the best possible
reception.
FM Indoor Antenna
(European Model)
If you live reasonably close to a transmitter
and want to use the provided lead-type FM
antenna, you will have to connect it direct to
the "FM 75Ω" socket.
Fit the metal sleeve of the lead-type antenna
over the core (center) conductor of the "FM
75Ω" socket, extend the lead and fix it to a
window frame or wall with thumbtacks, or
the like, where reception is best.
FM Outdoor Antenna
(General Export Model)
In an area where FM signals are weak, it will
be necessary to use a 75-ohm unbalanced-
type outdoor FM antenna. Generally, a 3-
element antenna will be sufficient; if you live
in an area where the FM signals are
particularly weak, it may be necessary to
use one with 5 or more elements.
A 75-ohm antenna uses a coaxial cable and
should be connected as follows : first strip
the covering of the cable, then twist the wire
shielding so the inner core and shielding
can be connected as shown.
FM Outdoor Antenna
(European Model)
In an area where FM signals are weak, it will
be necessary to use a 75-ohm unbalanced-
type outdoor FM antenna using the optional
matching transformer, as shown. Generally,
a 3-element antenna will be sufficient; if you
live in an area where the FM signals are
particularly weak, it may be necessary to
use one with 5 or more elements.
Antenne FM intérieure
(Modèle d'exportation général)
Dans une région ou les signaux FM sont
forts, l'antenne de type en "T" fournie est
suffisante. Étendez-la en forme de "T" et
connectez les deux fils de la base du "T".
Etendre le haut du "T" et le fixer avec des
punaises, etc. à un mur ou un cadre de
fenêtre pour la meilleure réception possible..
Antenne FM intérieure
(Modèle européen)
Si vous habitez à proximité d’un émetteur et
souhaitez utiliser l'antenne FM fournie,
branchez celle-ci directement sur la prise
"FM 75Ω". Placez le manchon métallique de
l’antenne sur le conducteur central (centre)
de la prise "FM 75Ω", dépliez le fil et le fixer
sur un encadrement de fenêtre ou un mur à
l’aide de punaises, ou de tout autre système
de fixation équivalent, dès que vous aurez
trouvé la position vous permettant d’obtenir
la meilleure réception possible.
Antenne FM extérieure
(Modèle d'exportation général)
Dans une région où les signaux FM sont
faibles, il sera nécessaire d’utiliser une
antenne FM extérieure asymétrique 75
ohms.
En général, une antenne à 3 éléments sera
suffisante; si vous habitez dans une région
où les signaux FM sont particulièrement
faibles, il peut être nécessaire d’utiliser une
antenne à 5 éléments ou plus.
Les antennes 75 ohms utilisent un câble
coaxial et doivent être raccordées comme
suit: d'abord dénuder le revêtement du
câble, puis torsader le fil de blindage pour
que l'âme et le blindage puissent être
raccordés comme montré.
Antenne FM extérieure
(Modèle européen)
Dans une région où les signaux FM sont
faibles, il sera nécessaire d’utiliser une
antenne FM extérieure asymétrique 75 ohms
en utilisant le transformateur d’adaptation
en option, comme montré. En général, une
antenne à 3 éléments sera suffisante; si
vous habitez dans une région où les signaux
FM sont particulièrement faibles, il peut être
nécessaire d’utiliser une antenne à 5
éléments ou plus.
"T"-type FM Antenna
(300Ω)(provided)
Antenne FM type "T"
(300Ω) (fournie)
(UKW) FM-
Dipolantenne (300
Ohm) (mitgeliefert)
Antenna FM del tipo a
"T" (300Ω)
(in dotazione)
Antena de FM tipo "T"
(300 Ohmios)
(suministrado)
Lead-type FM Antenna(75Ω) (provided)
Antenne Filaire FM (75Ω) (fournie)
75-Ω-(UKW) FM-Antennenkabel (mitgeliefert)
Antenna FM a filo da 75 Ω (in dotazione)
Antena Tipo guía de FM (75Ω) (incluida)
Outdoor FM Antenna (75Ω)
Antenne FM extérieure (75Ω)
UKW-Außenantenne (75 Ω)
Antenna FM esterna (75 Ω)
Antena Externa de FM (75Ω)
Outdoor FM Antenna (75Ω)
Antenne FM extérieure (75Ω)
UKW-Außenantenne (75 Ω)
Antenna FM esterna (75 Ω)
Antena Externa de FM (75Ω)
Downloaded From TheatreSystem-Manual.com Manuals
Page is loading ...

ENGLISH FRANÇAIS
Remote Control Unit Télécommande
30
The provided Remote Control Unit allows the
unit to be operated from a distance.
When operating the remote control unit,
point it towards the REMOTE SENSOR on the
front panel of the unit.
<
Even if the remote control unit is operated
within the effective range, remote control
operation may be impossible if there are
any obstacles between the unit and the
remote control.
<
If the remote control unit is operated near
other appliances which generate infrared
rays, or if other remote control devices
using infrared rays are used near the unit,
it may operate incorrectly. Conversely, the
other appliances may operate incorrectly.
Battery Installation
1 Remove the battery compartment cover.
2 Insert two “AA“ (R6, SUM-3) dry
batteries. Make sure that the batteries
are inserted with their positive “+
“ and
negative “_
“ poles positioned correctly.
3 Close the cover.
Battery Replacement
If the distance required between the remote
control unit and main unit decreases, the
batteries are exhausted. In this case replace
the batteries with new ones.
Precautions concerning batteries
< Be sure to insert the batteries with
correct positive “+
“ and negative “_“
polarities.
<
Use batteries of the same type. Never
use different types of batteries together.
<
Rechargeable and non-rechargeable
batteries can be used. Refer to the
precautions on their labels.
<
When the remote control unit is not to be
used for a long time (more than a month),
remove the batteries from the remote
control unit to prevent them from leaking.
If they leak, wipe away the liquid inside
the battery compartment and replace the
batteries with new ones.
<
Do not heat or disassemble batteries and
never dispose of old batteries by
throwing them in a fire.
Le boîtier de télécommande fourni permet la
commande à distance defourni permet la
commande à distance de l'appareil. Pour
l'utilisation du boîtier de télécommande, le
diriger vers le détecteusation du boîtier de
télécommande, le diriger vers le détecteur
de télécommande du panneau avant de
l'appareil.
<
Même si le boîtier de télécommande est
activé dans la zone de fonctionnement, la
commande à distance peut être
impossible s'il y a des obstacles entre le
lecteur et le boîtier de télécommande.
<
Si le boîtier de télécommande fonctionne
dans le voisinage d'autres appareils
générant des rayons infrarouges, ou si
d'autres télécommandes utilisant des
rayons infrarouges sont utilisées près du
lecteur, le lecteur peut de ne pas bien
fonctionner. Dans la situation inverse, les
autres apaareils peuvent ne pas bien
fonctionner.
Mise en place des piles
1 Retirer le couvercle du compartiment des
piles.
2 Introduire deux piles “AA“ (R6, SUM-3).
S'assurer que les piles sont correctement
mises en respectant les polarités plus +
et moins _ .
3 Fermer le couvercle jusqu'au déclic.
Remplacement des piles
Si vous remarquez que la distance entre le
boîtier de télécommande et le lecteur
devient plus courte pour un fonctionnement
correct, ceci indique que les piles sont
usées. Dans ce cas, remplacer les piles par
des nouvelles.
Précautions à observer concernant les
piles
< Bien placer les piles en respectant les
polarités plus +
et moins _ .
<
Utiliser des piles du même type. Ne
jamais essayer d'utiliser des types de pile
différents ensemble.
<
Des piles ou des batteries peuvent être
utilisées. Se référer à leurs étiquettes
pour les précautions à respecter.
<
Si le boîtier de télécommande n'est pas
utilisé pendant une longue période (pluss
d'un mois), retirer les piles du boîtier de
télécommande pour éviter des fuites de
pile. Si elles coulent, essuyer le liquide
dans le compartiment des piles et
remplacer les piles par des neuves.
<
Ne pas chauffer, démonter les piles ni les
mettre au feu.
Downloaded From TheatreSystem-Manual.com Manuals
Page is loading ...

32
ENGLISH FRANÇAIS
Index des pièces et contrôles (1)
Panneau avant
a Interrupteur d’alimentation (POWER)
C’est l’interrupteur d’alimentation principale du système.
b Plateau porte-disque
Placer un disque sur ce plateau.
c Touche OPEN/CLOSE
Sert à ouvrir et fermer le plateau porte-disque.
d Touche .PREV [TUNING ‡]
Quand un disque est en lecture, la pression sur cette touche
vous permet de revenir sur le titre, chapitre ou piste précédents.
Quand on est en mode de syntonisateur, cette bouton sert à
chercher des fréquences plus basses. On peut le maintenir
pressé pour une seconde ou plus pour démarrer une
syntonisation automatique.
Touche NEXT/ [TUNING °]
Quand un disque est en lecture, la pression sur cette touche
vous permet de revenir sur le titre, chapitre ou piste suivants.
Quand on est en mode de syntonisateur, cette touche sert à
chercher des fréquences plus hautes. On peut le maintenir
pressé pour une seconde ou plus pour démarrer une
syntonisation automatique.
e Touche STOP
Sert à arrêter la lecture d’un disque.
f Touche PLAY /PAUSE
Sert à mettre un disque en lecture ou à l’arrêter
momentanément.
g Touche SELECT
Sert à choisir des canaux audio ou à régler leurs niveaux.
h Touche VOLUME/ADJ
Sert à augmenter le niveau sonore général ou le niveau d’un
canal choisi.
i Touche STANDBY/ON
Sert à commuter l’appareil sur un état d’attente ou à le mettre en
marche.
j Afficheur frontal
Indique le temps de lecture entre autres.
k REMOTE SENSOR
C’est un endroit sensible aux signaux provenant de la
télécommande à infrarouge.
l Touche AUX[1/2]
Sert à choisir la fonction correspondante.
m Touche TUNER [BAND]
Sert à mettre l’appareil en fonction de syntonisation.
n Touche DVD
Sert à mettre l’appareil en fonction DVD.
o Prise PHONES
On y branche un casque d’écoute.
Cet appareil consomme un faible courant même si cet
interrupteur est en position relâchée.
Name of Each Control (1)
Front Panel
a POWER switch
Turns on and off the main power of the system.
b Disc Tray
Place a disc on the tray.
c LOPEN/CLOSE button
Opens or closes the disc tray.
d .PREV [TUNING ‡] button
While playing a disc, press this button to select the previous title,
chapter or track. While listening to the radio, press this button to
decrease the frequency. For automatic tuning, press and hold it
for more than 1 second.
NEXT/ [TUNING °] button
While playing a disc, press this button to select the next title,
chapter or track. While listening to the radio, press this button to
increase the frequency. For automatic tuning, press and hold it
for more than 1 second.
e HSTOP button
Stops playing a disc.
f G/JPLAY/PAUSE button
Plays or pauses a disc.
g SELECT button
Selects the audio channel to view or adjust its level.
h VOLUME/ADJ button
Increase the master volume level or the selected channel level.
i STANDBY/ON button
Select the STANDBY mode.
j Front Panel Display
Indicates the playing time, etc..
k REMOTE SENSOR
Accepts the remote control signals.
l AUX [1/2] button
Selects the AUX (1)(2) function.
m TUNER [BAND] button
Selects the TUNER function.
n DVD button
Selects the DVD function.
o PHONES jack
Connects the headphones to this jack.
The equipment draws nominal non-operating power from the
AC outlet with its POWER switch in the OFF position.
Downloaded From TheatreSystem-Manual.com Manuals
Page is loading ...

ENGLISH FRANÇAIS
Name of Each Control (2)
Index des pièces et contrôles (2)
34
such as “DVD”, “VCD”, “CD” and “MP3”,
etc.
It can show the track and time
information of the playing CD and MP3
disc.
It can show the tuner band and
frequency.
It can show the station name and
program type when an RDS station is
received.
J Dolby 3-Stereo indicator
Illuminates when the listening mode of
“3-Stereo Normal” or “3-Stereo Wide” is
selected.
K Nor indicator
Illuminates when the listening mode of
“Pro Logic Normal” or “3-Stereo Normal”
is selected.
L Phan indicator
Illuminates when the listening mode of
“Pro Logic Phantom” is selected.
M Frequency Unit indicator
In AM mode, the “kHz” lights up.
In FM mode, the “MHz” lights up.
N Mono indicator
Illuminates when setting to decode FM
signal in mono mode.
O DTS indicator
Illuminates when the playing disc is
recorded with DTS format.
P Wide indicator
Illuminates when the listening mode of
“Pro Logic Wide” or “3-Stereo Wide” is
selected.
Front Panel Display
A PTY (Program Type) indicator
Illuminates when an RDS station is
received and its PTY is decoded by the
system.
B Sleep indicator
Illuminates when the sleep timer is set to
on.
C Speakers Icon
Light according to the selected listening
mode and the type of playing disc.
D Memory indicator
Illuminates when the program play mode
is set.
Illuminates when presetting radio
stations.
E Stereo indicator
Illuminates when a stereo FM station is
received.
F RDS indicator
Illuminates when an RDS station is
received.
G Dolby Digital indicator
Illuminates when the playing disc is
recorded with Dolby Digital format.
H Dolby Pro Logic
Illuminates when the playing disc is
recorded with Dolby Pro Logic format.
Illuminates when the listening mode of
“Pro Logic Normal”, “Pro Logic
Phantom” or “Pro Logic Wide” is
selected.
I Status Bar
It can show the operating information,
such as “OPEN”, “CLOSE” and “LOAD-
ING”, etc.
It can show the type of the playing disc,
Afficheur frontal
A Témoin PTY (Programe Type)
S’allume au réglage sur une station RDS
et par conséquent au décodage de l’
information en matière de son TPY.
B Témoin “Sleep”
S’allume quand la minuterie de veille est
mise en marche.
C Témoins de haut-parleurs
Indiquent le mode d’écoute et le type du
disque en lecture.
D Témoin “Memory”
S’allume à la lecture programmée
Il l’est aussi au préréglage des stations
radiophoniques.
E Témoin “Stereo”
S’allume à la réception des programmes
FM stéréo.
F Témoin RDS
S’allume au réglage sur une station RDS.
G Témoin DIGITAL
S’allume à la lecture d’un disque
enregistré au format Dolby Digital.
H Témoin Pro Logic
S’allume à la lecture d’un disque
enregistré au format Dolby Pro Logic, que
le mode d’écoute choisi soit “Pro Logic
Normal,” “Pro Logic Phantom,” ou “Pro
Logic Wide.”
I Lucarne d’indication de ce qui se
passe
On y affiche une information en matière
des fonctionnements telle que “OPEN,”
“CLOSE” et “LOADING”.
On y affiche aussi une information en
matière du type des disques en lecture,
telle que “DVD,” “VCD,” “CD,” et “MP3.”
On y affiche aussi une information en
matière des pistes et du temps lors de la
lecture des disques CD ou MP3.
En mode de tuner, on y lit des bandes et
des fréquences.
A l’écoute d’une station RDS, on y lit son
nom et le type du programme.
J Témoin “3-Stereo”
S’allume au choix du mode d’écoute “3-
Stereo Normal” ou “3-Stereo Wide.”
K Témoin “Nor”
S’allume aux choix du mode d’écoute
“Pro Logic Normal” ou “3-Stereo
Normal.”
L Témoin “Phan”
S’allume au choix du mode d’écoute “Pro
Logic Phantom.”
M Témoin d’unité de fréquence
“kHz” s’allume en mode AM, et “MHz”
en mode FM.
N Témoin “Mono”
S’allume à l’écoute des programmes
stéréo en mono.
O Témoin DTS
S’allume à la lecture d’un disque
enregistré au format DTS.
P Témoin “Wide”
S’allume en mode “Pro Logic Wide” ou
“3-Stereo Wide.”
Downloaded From TheatreSystem-Manual.com Manuals
Page is loading ...

ENGLISH FRANÇAIS
Name of Each Control (3)
Index des pièces et contrôles (3)
36
A POWER / STANDBY button
Turns on and off the system power.
B Number buttons
Select the items or settings.
C AUX button
Selects the AUX1 or AUX2 component
(i.e. external source).
D SETUP button
Displays or exits the SETUP menu.
E m/, (PRESET5/b) buttons
In DVD player mode, press to select the
next / previous title, chapter or track.
In Tuner mode, press to change the
tuning frequency.
Press and hold the button for more than 1
second to search the station
automatically.
F /FM MODE button
Do the single stepping play while playing
a DVD or VCD.
Switches monaural or stereo of FM
stereo reception.
G TITLE button
Displays the title menu when playing a
DVD.
H DISPLAY button
Switches the item displayed on the TV
screen or/and on the front panel display.
I PAL/NTSC button
Changes the color system temporarily to
match your TV standard.
J AUDIO button
Selects the audio channels for sound.
K GOTO button
Selects a start point to play.
L SLEEP button
Activates the sleep timer.
M DVD button
Selects the DVD player mode.
N LISTENING button
Selects a listening mode you want.
O L (open/close) button
Opens or closes the disc tray.
P .//(TUNING b/5) buttons
In DVD player mode, press to select the
next / previous title, chapter or track.
In Tuner mode, press to change the
tuning frequency.
Press and hold the button for more than 1
second to search the station
automatically.
Q y/ J (play/pause) button
Starts or pauses playing a disc.
R MENU/PBC button
Switch the PBC functions to on or off
when playing a VCD (Ver. 2.0) or SVCD.
A Touche POWER/STANDBY
Sert à mettre l’appareil sous tension ou
en veille.
B Touches numériques
Servent à choisir des options ou à entrer
des chiffres.
C Commutateur AUX
Sert à choisir les appareils branchés sur
la prise AUX 1 ou AUX 2.
D Touche SETUP
Donne accès au menu SETUP ou sert à le
quitter.
E Touches m/,(PRESET5/b)
En mode DVD, ils servent à choisir le titre,
chapitre ou piste précédents ou suivants.
En mode tuner, ils servent à chercher une
fréquence.
Au maintien appuyé de l’un ou l’autre
touche pour une seconde ou plus, une
recherche automatique des fréquences
recevables se met en marche.
F Touche /FM MODE
Lors de la lecture d’un disque DVD ou
VCD, cette touche vous permet de voir
une série d’images pas à pas.
A l’écoute des programmes FM, cette
touche sert à les commuter entre stéréo
et mono.
G Touche TITLE
Sert à afficher le menu de titres lors de la
lecture d’un disque DVD.
H Touche DISPLAY
Sert à commuter les indications apparues
sur l’écran TV ou l’afficheur frontal de cet
appareil.
I Commutateur NTSC/PAL
Sert à commuter l’appareil sur les
normes NTSC ou PAL.
J Touche AUDIO
Sert à choisir les canaux audio.
K Touche GOTO
Sert à marquer un point d’où la lecture
est à démarrer.
L Touche SLEEP
Sert à mettre en marche la minuterie de
veille.
M Touche DVD
Sert à commuter l’appareil sur le mode
lecteur DVD.
N Touche LISTENING
Sert à choisir le mode d’écoute désiré.
O Touche L (ouverture/fermeture)
Sert à ouvrir ou fermer le plateau porte-
disque.
P Touches .// (TUNING b/5)
En mode DVD, ils servent à choisir le titre,
chapitre ou piste précédents ou suivants.
En mode tuner, ils servent à chercher une
fréquence.
Au maintien appuyé de l’un ou l’autre
touche pour une seconde ou plus, une
recherche automatique des fréquences
recevables se met en marche
Q Touche y/ J (lecture/pause)
Sert à mettre un disque en lecture ou à
arrêter la lecture momentanément.
R Touche MENU/PBC
Sert à mettre en ou hors service le
fonctionnement PBC à la lecture d’un
disque VCD (Version2,0) ou SVCD.
Downloaded From TheatreSystem-Manual.com Manuals
Page is loading ...
Page is loading ...
Page is loading ...
Page is loading ...
Page is loading ...
Page is loading ...
Page is loading ...
Page is loading ...
Page is loading ...
Page is loading ...
Page is loading ...
Page is loading ...
Page is loading ...
Page is loading ...
Page is loading ...
Page is loading ...
Page is loading ...
Page is loading ...
Page is loading ...
Page is loading ...
Page is loading ...
Page is loading ...
Page is loading ...
Page is loading ...
Page is loading ...
Page is loading ...
Page is loading ...
Page is loading ...
Page is loading ...
Page is loading ...
Page is loading ...
Page is loading ...
Page is loading ...
Page is loading ...
Page is loading ...
Page is loading ...
Page is loading ...
Page is loading ...
Page is loading ...
Page is loading ...
Page is loading ...
Page is loading ...
Page is loading ...
Page is loading ...
Page is loading ...
Page is loading ...
Page is loading ...
Page is loading ...
Page is loading ...
Page is loading ...
Page is loading ...
Page is loading ...
Page is loading ...
Page is loading ...
Page is loading ...
Page is loading ...
Page is loading ...
Page is loading ...
Page is loading ...
Page is loading ...
Page is loading ...
Page is loading ...
Page is loading ...
Page is loading ...
Page is loading ...
Page is loading ...
Page is loading ...
Page is loading ...
Page is loading ...
Page is loading ...
Page is loading ...
Page is loading ...
Page is loading ...
Page is loading ...
Page is loading ...
Page is loading ...
Page is loading ...
Page is loading ...
Page is loading ...
Page is loading ...
Page is loading ...
Page is loading ...
Page is loading ...
Page is loading ...
Page is loading ...
Page is loading ...
Page is loading ...
Page is loading ...
Page is loading ...
Page is loading ...
Page is loading ...
Page is loading ...
Page is loading ...
Page is loading ...
Page is loading ...
Page is loading ...
Page is loading ...
Page is loading ...
Page is loading ...
Page is loading ...
Page is loading ...
Page is loading ...
Page is loading ...
Page is loading ...
-
 1
1
-
 2
2
-
 3
3
-
 4
4
-
 5
5
-
 6
6
-
 7
7
-
 8
8
-
 9
9
-
 10
10
-
 11
11
-
 12
12
-
 13
13
-
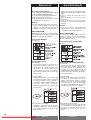 14
14
-
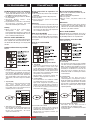 15
15
-
 16
16
-
 17
17
-
 18
18
-
 19
19
-
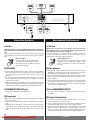 20
20
-
 21
21
-
 22
22
-
 23
23
-
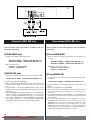 24
24
-
 25
25
-
 26
26
-
 27
27
-
 28
28
-
 29
29
-
 30
30
-
 31
31
-
 32
32
-
 33
33
-
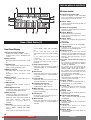 34
34
-
 35
35
-
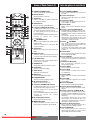 36
36
-
 37
37
-
 38
38
-
 39
39
-
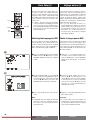 40
40
-
 41
41
-
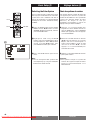 42
42
-
 43
43
-
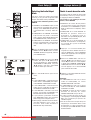 44
44
-
 45
45
-
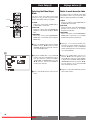 46
46
-
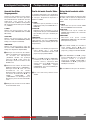 47
47
-
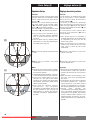 48
48
-
 49
49
-
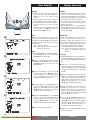 50
50
-
 51
51
-
 52
52
-
 53
53
-
 54
54
-
 55
55
-
 56
56
-
 57
57
-
 58
58
-
 59
59
-
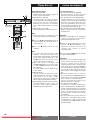 60
60
-
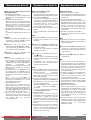 61
61
-
 62
62
-
 63
63
-
 64
64
-
 65
65
-
 66
66
-
 67
67
-
 68
68
-
 69
69
-
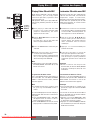 70
70
-
 71
71
-
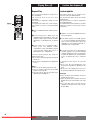 72
72
-
 73
73
-
 74
74
-
 75
75
-
 76
76
-
 77
77
-
 78
78
-
 79
79
-
 80
80
-
 81
81
-
 82
82
-
 83
83
-
 84
84
-
 85
85
-
 86
86
-
 87
87
-
 88
88
-
 89
89
-
 90
90
-
 91
91
-
 92
92
-
 93
93
-
 94
94
-
 95
95
-
 96
96
-
 97
97
-
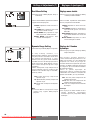 98
98
-
 99
99
-
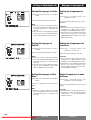 100
100
-
 101
101
-
 102
102
-
 103
103
-
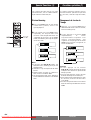 104
104
-
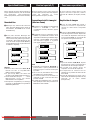 105
105
-
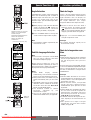 106
106
-
 107
107
-
 108
108
-
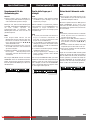 109
109
-
 110
110
-
 111
111
-
 112
112
-
 113
113
-
 114
114
-
 115
115
-
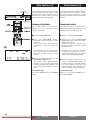 116
116
-
 117
117
-
 118
118
-
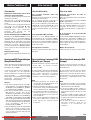 119
119
-
 120
120
-
 121
121
-
 122
122
-
 123
123
-
 124
124
-
 125
125
-
 126
126
-
 127
127
-
 128
128
-
 129
129
-
 130
130
-
 131
131
-
 132
132
-
 133
133
-
 134
134
-
 135
135
-
 136
136
-
 137
137
-
 138
138
-
 139
139
-
 140
140


Ask a question and I''ll find the answer in the document
Finding information in a document is now easier with AI
in other languages
- italiano: TEAC PL-D2000 Manuale del proprietario
- français: TEAC PL-D2000 Le manuel du propriétaire
- español: TEAC PL-D2000 El manual del propietario
- Deutsch: TEAC PL-D2000 Bedienungsanleitung