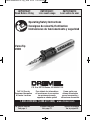
Dremel 2000 VERSATIP Operating/Safety Instructions Manual
- Type
- Operating/Safety Instructions Manual

IMPORTANT: IMPORTANT : IMPORTANTE:
Read Before Using Lire avant usage Leer antes de usar
For English Version Version française Versión en español
See page 2 Voir page 11 Ver la página 20
Operating/Safety Instructions
Consignes de sécurité/d’utilisation
Instrucciones de funcionamiento y seguridad
1-800-4-DREMEL (1-800-437-3635) www.dremel.com
Call Toll Free for
Consumer Information
& Service Locations
Pour obtenir des informations
et les adresses de nos centres
de service après-vente,
appelez ce numéro gratuit
Llame gratis para
obtener información
para el consumidor y
ubicaciones de servicio
P.O. Box 081126 Racine, WI 53408-1126
VersaTip
2000
DM 2610Z06356 05-14 copy_2000 5/7/14 11:47 AM Page 1

-2-
Read all instructions in
this manual and familiarize
yourself with the torch before lighting and
using it. Failure to comply with the
warnings and instructions may result in
fire or an explosion that may result in
property damage, serious personal injury
or death.
Tank contains extremely flammable gas
under pressure.
Keep torch out of reach of children and
anyone who has not read these
Operating/Safety Instructions.
Do not point the torch flame or torch
exhaust port towards your face, other
persons, or flammable items.
Take precautions not to heat the fuel tank.
Do not expose the torch or fuel to
temperatures exceeding 120°F/49°C or
prolonged sunlight.
Never use the torch in or around
flammable fumes, liquids, or explosive
materials.
Never leave the torch unattended when lit.
Make sure the torch is completely
extinguished after use.
Never pierce the fuel tank or expose torch
to external flame.
Never attempt to repair or heat any
containers that held flammable liquid,
gas, or any chemical. Heating these
containers can result in fire or explosion.
Never use the torch near combustibles
(fuels, rags, towels, paper products, etc.).
Be careful around motor vehicles or any
gasoline-fired products and beware of
hidden fuel lines and tanks.
Be sure the torch is not pointed toward
objects that may ignite when the torch is
set down.
Do not breathe gas, fumes, vapor, or
spray. If inhaled, remove affected person
to fresh air. Always use torch in a well-
ventilated area.
Wear a respirator when working on
applications where toxic or nauseating
vapors may exist. Avoid the fumes from
fluxes, lead-based paint, and all metal
heating operations. Fumes from cadmium
plating and galvanized metal may be
present.
Avoid fuel contact with eyes or skin. In
case of contact with eyes, rinse
immediately with plenty of water and seek
medical advice. For skin contact, flush
with large amounts of water.
Always protect torch from impact, or
dropping onto floor or hard surfaces.
Never use the torch if damage is
suspected.
Do not modify torch or alter factory
settings in any way.
Always use manufacturer recommended
replacement parts.
Read refueling instruction before
refueling torch.
Do not smoke while filling, refilling, or
operating the torch.
READ ALL INSTRUCTIONS
SAVE ALL WARNINGS AND
INSTRUCTIONS FOR FUTURE
REFERENCE
!
DANGER
Safety Warnings
DM 2610Z06356 05-14 copy_2000 5/7/14 11:47 AM Page 2

Before using, check all
parts for proper function
and damage to component parts.
Do not use this torch to heat, mold, or
bend plastic sheets, molding or tubing.
Hidden areas such as behind walls, ceilings,
floors, soffit boards and other panels may
contain flammable materials that could be
ignited by the heat gun when working in
these locations. The ignition of these
materials may not be readily apparent and
could result in property damage and injury to
persons.
When working in these locations, keep the
torch moving in a back-and-forth motion.
Lingering or pausing in one spot could ignite
the panel or the material behind it.
Extreme care should be taken when stripping
paint. The peelings, residue and vapors of
paint may contain lead, which is poisonous.
Any pre-1977 paint may contain lead and
paint applied to homes prior to 1950 is likely
to contain lead. Once deposited on surfaces,
hand to mouth contact can result in the
ingestion of lead. Exposure to even low
levels of lead can cause irreversible brain
and nervous system damage; young and
unborn children are particularly vulnerable.
Before beginning any paint removal process
you should determine whether the paint you
are removing contains lead. This can be
done by your local health department or by a
professional who uses a paint analyzer to
check the lead content of the paint to be
removed. LEAD-BASED PAINT SHOULD
ONLY BE REMOVED BY A
PROFESSIONAL AND SHOULD NOT BE
REMOVED USING A TORCH.
Persons removing paint should follow
these guidelines:
1) Move the work piece outdoors. If this is not
possible, keep the work area well
ventilated. Open the windows and put an
exhaust fan in one of them. Be sure the
fan is moving the air from inside to outside.
2) Remove or cover any carpets, rugs,
furniture, clothing, cooking utensils and air
ducts.
3) Place drop cloths in the work area to catch
any paint chips or peelings. Wear
protective clothing such as extra work
shirts, overalls and hats.
4) Work in one room at a time. Furnishings
should be removed or placed in the center
of the room and covered. Work areas
should be sealed off from the rest of the
dwelling by sealing doorways with drop
cloths.
5) Children, pregnant or potentially pregnant
women and nursing mothers should not be
present in the work area until the work is
done and all clean up is complete.
6) Wear a dust respirator mask or a dual filter
(dust and fume) respirator mask which has
been approved by the Occupational Safety
and Health Administration (OSHA), the
National Institute of Safety and Health
(NIOSH), or the United States Bureau of
Mines. These masks and replaceable
filters are readily available at major
hardware stores. Be sure the mask fits.
Beards and facial hair may keep masks
from sealing properly. Change filters often.
DISPOSABLE PAPER MASKS ARE NOT
ADEQUATE.
7) Use caution when operating the torch.
Keep the torch moving, as excessive heat
will generate fumes, which can be inhaled
by the operator.
8) Keep food and drink out of the work area.
Wash hands, arms and face and rinse
mouth before eating or drinking. Do not
smoke or chew gum or tobacco in the work
area.
9) Clean up all removed paint and dust by
wet mopping the floors. Use a wet cloth to
clean all walls, sills and any other surface
where paint or dust is clinging. DO NOT
SWEEP, DRY DUST OR VACUUM. Use a
high phosphate detergent or trisodium
phosphate (TSP) to wash and mop areas.
10) At the end of each work session put the
paint chips and debris in a double plastic
bag, close it with tape or twist ties and
dispose of properly.
11) Remove protective clothing and work
shoes in the work area to avoid carrying
dust into the rest of the dwelling. Wash
work clothes separately. Wipe shoes off
with a wet rag that is then washed with
the work clothes. Wash hair and body
thoroughly with soap and water.
Never attempt to use torch as a cigarette,
cigar, or pipe lighter.
-3-
!
WARNING
DM 2610Z06356 05-14 copy_2000 5/7/14 11:47 AM Page 3

Always wear eye protection when lighting
and using the torch.
Keep your hair, and clothing away from the
flame. Loose clothes or long hair can catch
fire. Hot solder may cause burns.
Use only liquid butane fuel when filling or
refilling torch.
Before each use and after refilling, inspect
for leaks. Never use a flame to check for
leaks. If leak is suspected use soapy water
solution and look for continuous bubbling.
Ignite torch away from face, hands,
clothing, or other flammable material.
Discontinue gas flow if torch is
extinguished accidentally.
Always check to make sure that unintended
parts or materials are not being heated.
Heat may be conducted to near objects or
substances that may ignite or become
pressurized when heated.
Use OSHA specified coating removal
methods when preparing plated metal work
pieces for heating.
Always make sure the torch is resting
securely on its stand when handling work
with both hands.
Do not touch the torch flame guard, flame
diffuser, tips and attachments until they
have cooled. Torch flame guard, flame
diffuser, tips and attachments become
extremely hot during use and remain hot after
extinguishing.
Use caution when operating the torch
outdoors. Bright sun makes it difficult to see
flame of the torch. Wind may carry heat and/or
sparks towards you, areas not intended to be
heated, or combustible materials.
Allow the torch to completely cool before
refilling fuel, changing accessories,
cleaning, or storing.
Store torch in well ventilated areas.
Use only Dremel accessories to ensure
proper operation of Dremel VersaTip.
Do not pack this item or any other
flammable gas item in any checked or
carry-on baggage. Department of
Transportation Hazardous Materials
Regulations forbids the carriage of butane or
other flammable gas products on passenger
aircraft.
-4-
SAVE THESE INSTRUCTIONS
Dremel VersaTip 2000 meets or exceeds the CPSC Safety Standard for Multi Purpose
Lighters at 16 C.F.R. § 1212.17(b) and Federal Hazardous Substance Act (FHSA).
DM 2610Z06356 05-14 copy_2000 5/7/14 11:47 AM Page 4

-5-
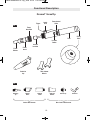
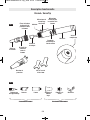
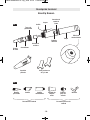
Functional Description
Dremel
®
VersaTip
FIG. 1
Flame
Diffuser
Flame
Guard
Flame
Guard Nut
Ceramic
Insulator
Lock-On
Button
Flame Control
Slider
Tank
Trigger
Safety
Lock
Filling
Valve
FIG. 2
Soldering
Tip
Cutting
Knife
Shaping
Knife
Wide Tip
Blower
Hot Air Tip
Deflector
Contact Attachments Non-Contact Attachments
Protective
Cap
7mm & 8mm
Wrench
DM 2610Z06356 05-14 copy_2000 5/7/14 11:47 AM Page 5

Observe all provided
warnings and safety
instructions when using the torch.
In cold weather size of flame will be smaller.
To produce larger flame, pre-warm torch to
room temperature prior to use.
Ensure all accessories are securely tightened
before igniting the torch.
Familiarize yourself with the construction of
the Dremel VersaTip components (Figure 1),
and its accessories (Figure 2) before use.
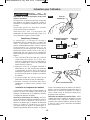
Filling / Refilling Operation
Filling / refilling of the fuel tank must be done
in a well-ventilated place far away from any
possible sources of ignition. Be sure to
observe the safety instructions and warning
notices provided by the manufacturer of the
liquid butane fuel. Make sure the gas you are
using is a refined butane gas that can also
be used for lighters.
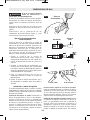
1. Hold the VersaTip with the Filling Valve
facing up, then invert fuel container and
insert the tip into the Filling Valve as
shown in Figure 3.
2. Push the fuel container and VersaTip
together to allow fuel to flow into the torch
fuel tank. The VersaTip fuel tank should be
filled in about 10 seconds.
3. Stop refilling once the fuel begins to
escape at the Filling Valve.
4. Wait at least 3 minutes to allow fuel gas to
stabilize before igniting the VersaTip.
Installing or Changing Tips
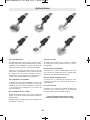
Use of the Soldering Tip, Cutting Knife,
Shaping Knife, Hot Air Tip, Wide Tip Blower,
and Deflector requires the Flame Diffuser to
be installed.
To install the Flame Diffuser: Unscrew the
Flame Guard nut and remove the Flame
Guard. Slide the Flame Diffuser into the
Flame Guard by inserting the narrow end of
the Flame Diffuser into the Flame Guard first.
Figure 4 shows correct assembly of the
Flame Diffuser. Place the Flame Guard with
Flame Diffuser back on to the tool and
securely tighten the Flame Guard nut.
To install threaded attachment tips:
Thread the desired tip into the Flame Diffuser
and tighten using the 7mm wrench while
using the 8mm wrench to hold the Flame
Diffuser in place, Figure 5. To remove follow
the installation steps in reverse order.
To install the Wide Tip Blower: Slide the
Wide Tip Blower over the Flame Diffuser and
Flame Guard until the Wide Tip Blower is
firmly secured to the Flame Guard. Make
sure there is no tip installed in the Flame
Diffuser before installing the Wide Tip
Blower. To remove, slide the Wide Tip
Blower off the Flame Guard and Flame
Diffuser.
-6-
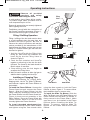
Operating Instructions
!
WARNING
FIG. 4
Flame
Diffuser
Flame
Guard
FIG. 3
Filling
Valve
FIG. 5
7mm Wrench 8mm Wrench
DM 2610Z06356 05-14 copy_2000 5/7/14 11:47 AM Page 6

-7-
To install the Deflector: Slide the Deflector
over the end of the Flame Diffuser until the
Deflector is firmly secured to the Flame
Diffuser. To remove, slide the Deflector off
the Flame Diffuser.
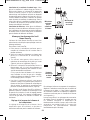
Lighting and Operation of the
Dremel VersaTip
The Dremel VersaTip igniter is equipped with
a safety mechanism intended to protect
against unintended ignition.
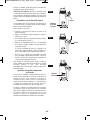
To ignite the VersaTip:
a. Turn the Flame Control Slider to the
minimum position,
b. Grasp the torch body placing your thumb
on the safety lock,
c. Using your thumb, rotate the Safety Lock
forward (Figure 6) and pull back the
Trigger (Figure 7),
d. Observe the Flame Guard to see if glow of
the flame is visible. Also, listen for a sound
of flame.
If there is no flame glow and the sound is
of the escaping gas, then release the
Trigger and repeat steps c and d. If ignition
occurs, continue to step e.
e. Once the torch is ignited, you can hold on
to the Trigger to maintain the flame, or slide
the Lock-On Button to the lock position for
continuous operation (Figure 8).
To turn off the Dremel VersaTip, let go of the
Trigger, and move the Lock-On Button to the
right if it was engaged during use. This will
immediately stop the flow of butane gas and
extinguish the torch flame.
Flame Length and Temperature
Adjustment
Adjustment of the flame length / temperature
can be made by adjusting the Flame Control
Slider. To increase flame length and
temperature, move the Flame Control Slider
to the right (+). To decrease flame length and
temperature, move the Flame Control Slider
to the left (-).
When using with any of the contact
attachments (Figure 2) allow 25 seconds for
tips to reach full temperature. When using
non-contact attachments (figure 2) the full
temperature is available immediately after
ignition.
LOCK
FIG. 6
LOCK
FIG. 7
LOCK
FIG. 8
Safety
lock
Flame
Control
Slider
Lock-On
Button
Trigger
DM 2610Z06356 05-14 copy_2000 5/7/14 11:47 AM Page 7

-8-
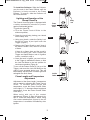
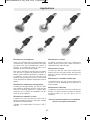
Using with an Open Flame
When configured for open flame, the
VersaTip can be used for tasks such as
culinary caramelizing, brazing, copper pipe
sweating, and freeing of seized nuts and
bolts.
To use the Dremel VersaTip with an open
flame, unscrew the flame guard, remove the
flame diffuser and tip (if attached), screw the
flame guard back onto the tool, and securely
tighten the flame guard nut.
Using with Soldering Tip
The soldering tip (to be used with the flame
diffuser) can be used for regular soldering
activities, including joining wire and
component installation on printed circuit
boards.
Using with Hot Air Tip
The Hot Air Tip (to be used with the flame
diffuser): can be used for heating of heat-
sensitive materials.
The hot air tip generates air temperature of
1256°F (680 °C)
Using with Cutting Knife
The Cutting Knife (to be used with the flame
diffuser) can be used for cutting of nylon rope
to prevent ‘feathering’.
Using with Shaping Knife
The Shaping Knife (to be used with the flame
diffuser) can be used for cutting to size of
sheets of plastic and other heat sensitive
materials.
Using Wide Tip Blower
The Blower can be used for preparing
surface areas for detailed paint and coating
removal.
Use with Deflector
The Deflector (to be used with the flame
diffuser) is for shrinking of heat sensitive
insulation around electrical wiring.
Follow instructions provided with
materials being used and worked on.
Applications
DM 2610Z06356 05-14 copy_2000 5/7/14 11:47 AM Page 8

-9-
Maintenance & Storage
Maintenance
Clean the exterior of the tool with a clean dry
cloth. If necessary, use a damp cloth.
When soldering, to clean the Soldering Tip,
wipe the tip on a wet sponge while it is still
hot and solder is molten.
Never clean the Soldering Tip with
sandpaper as this reduces its lifetime.
The torch gas nozzle can get clogged due to
butane gas impurities. To return the torch to
full operating condition the nozzle needs to
be replaced. Contact Dremel customer
service to order the replacement nozzle and
instructions.
Storage
Ensure that the Lock-On Button is in the
unlocked position and Trigger is locked out
with the Safety Lock.
Allow several minutes for torch to cool.
When torch is cool, store torch out of reach
of children.
DM 2610Z06356 05-14 copy_2000 5/7/14 11:47 AM Page 9

-10-
Your Dremel product is warranted against defective material or workmanship for a period of two years from
date of purchase. In the event of a failure of a product to conform to this written warranty, please take the
f
ollowing action:
1. DO NOT return your product to the place of purchase.
2. Carefully package the product by itself, with no other items, and return it, freight prepaid, along with:
A. A copy of your dated proof of purchase (please keep a copy for yourself).
B. A written statement about the nature of the problem.
C. Your name, address and phone number to:
UNITED STATES CANADA
Dremel Service Center Giles Tool Agency
4915 21st Street OR 47 Granger Av.
Racine, WI 53406 Canada M1K 3K9 1-416-287-3000
OUTSIDE CONTINENTAL UNITED STATES CONTINENTAL UNITED STATES
See your local distributor or write to Dremel, 4915 21st Street Racine, WI 53406
We recommend that the package be insured against loss or in transit damage for which we cannot be
responsible.
This warranty applies only to the original registered purchaser. DAMAGE TO THE PRODUCT RESULTING
FROM TAMPERING, ACCIDENT, ABUSE, NEGLIGENCE, UNAUTHORIZED REPAIRS OR ALTERATIONS,
UNAPPROVED ATTACHMENTS OR OTHER CAUSES UNRELATED TO PROBLEMS WITH MATERIAL OR
WORKMANSHIP ARE NOT COVERED BY THIS WARRANTY.
No employee, agent, dealer or other person is authorized to give any warranties on behalf of Dremel. If
Dremel inspection shows that the problem was caused by problems with material or workman ship within the
limitations of the warranty, Dremel will repair or replace the product free of charge and return product
prepaid. Repairs made necessary by normal wear or abuse, or repair for product outside the warranty period,
if they can be made, will be charged at regular factory prices.
DREMEL MAKES NO OTHER WARRANTY OF ANY KIND WHATEVER, EXPRESSED OR IMPLIED, AND ALL
IMPLIED WARRANTIES OF MERCHANTABILITY AND FITNESS FOR A PARTICULAR PURPOSE WHICH
EXCEED THE ABOVE MENTIONED OBLIGATION ARE HEREBY DISCLAIMED BY DREMEL AND EXCLUDED
FROM THIS LIMITED WARRANTY.
This warranty gives you specific legal rights and you may also have other rights which vary from state to
state. The obligation of the warrantor is solely to repair or replace the product. The warrantor is not liable for
any incidental or consequential damages due to any such alleged defect. Some states do not allow the
exclusion or limitation of incidental or consequential damages, so the above limitations or exclusion may not
apply to you.
For prices and warranty fulfillment in the continental United States, contact your local Dremel distributor.
Imported for Dremel® in the U.S. by:
Robert Bosch Tool Corporation
1800 West Central Road
Mount Prospect, Illinois 60056
Dremel
®
Limited Warranty
DM 2610Z06356 05-14 copy_2000 5/7/14 11:47 AM Page 10
Page is loading ...
Page is loading ...
Page is loading ...
Page is loading ...
Page is loading ...
Page is loading ...
Page is loading ...
Page is loading ...
Page is loading ...
Page is loading ...
Page is loading ...
Page is loading ...
Page is loading ...
Page is loading ...
Page is loading ...
Page is loading ...
Page is loading ...
Page is loading ...
-
 1
1
-
 2
2
-
 3
3
-
 4
4
-
 5
5
-
 6
6
-
 7
7
-
 8
8
-
 9
9
-
 10
10
-
 11
11
-
 12
12
-
 13
13
-
 14
14
-
 15
15
-
 16
16
-
 17
17
-
 18
18
-
 19
19
-
 20
20
-
 21
21
-
 22
22
-
 23
23
-
 24
24
-
 25
25
-
 26
26
-
 27
27
-
 28
28


Dremel 2000 VERSATIP Operating/Safety Instructions Manual
- Type
- Operating/Safety Instructions Manual
Ask a question and I''ll find the answer in the document
Finding information in a document is now easier with AI
in other languages
- français: Dremel 2000 VERSATIP
- español: Dremel 2000 VERSATIP
Related papers
Other documents
-
SMANIA SOLDERPRO Operating instructions
-
Laser 3410 User manual
-
Vogue CT-3000 Operating instructions
-
 iroda PT-220V User manual
-
Rothenberger Cooks torch User manual
-
Power Fist 0140084 Owner's manual
-
 iroda CT-630 User manual
-
-
 iroda AT-2057CR User manual
-
 MagTorch MT790C Operating instructions


