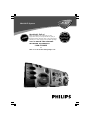
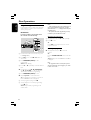
Philips FWM587/37B is a versatile multimedia device that combines the functionality of a powerful sound system with the convenience of an MP3 player. With its stylish design and array of features, the Philips FWM587/37B enhances your home entertainment experience. Key capabilities of this system include:
- Playable discs: The system supports playback of various disc formats including CD, CD-R, and CD-RW discs with MP3 and WMA files.
- Surround sound experience: It provides an immersive sound experience with its 2.0 channel speakers, delivering rich and clear audio for your favorite music, movies, or games.
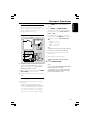


-
 1
1
-
 2
2
-
 3
3
-
 4
4
-
 5
5
-
 6
6
-
 7
7
-
 8
8
-
 9
9
-
 10
10
-
 11
11
-
 12
12
-
 13
13
-
 14
14
-
 15
15
-
 16
16
-
 17
17
-
 18
18
-
 19
19
-
 20
20
-
 21
21
-
 22
22
-
 23
23
-
 24
24
-
 25
25
-
 26
26


Philips FWM587/37B is a versatile multimedia device that combines the functionality of a powerful sound system with the convenience of an MP3 player. With its stylish design and array of features, the Philips FWM587/37B enhances your home entertainment experience. Key capabilities of this system include:
- Playable discs: The system supports playback of various disc formats including CD, CD-R, and CD-RW discs with MP3 and WMA files.
- Surround sound experience: It provides an immersive sound experience with its 2.0 channel speakers, delivering rich and clear audio for your favorite music, movies, or games.
Ask a question and I''ll find the answer in the document
Finding information in a document is now easier with AI
Related papers
Other documents
-
Sangean DT-F1 Pocket Datasheet
-
Lenco SCD-24 white Operating instructions
-
Craig SSM696MET22BT User manual
-
GPX HC208B User manual
-
Sony ICFS80 Operating instructions
-
-
-
Sony CDP-M400CS User manual
-
-
 PYLE Audio FWM352 User manual
