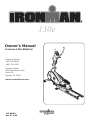
Ironman Fitness 130e User manual
- Type
- User manual
Ironman Fitness 130e is a quality elliptical designed to meet your needs for cardiovascular exercise. Read the Owner's Manual to become familiar with the operation of your new unit.
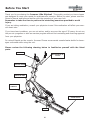
This machine has a user maximum capacity of 250 pounds. It should only be used on a level surface and is intended for indoor use only.
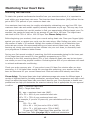
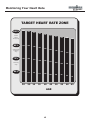
The 130e comes with a console that provides essential workout feedback such as time, speed, distance, and calories burned. It also features a pulse monitor to track your heart rate and a recovery function to monitor your improvement after each exercise.
Ironman Fitness 130e is a quality elliptical designed to meet your needs for cardiovascular exercise. Read the Owner's Manual to become familiar with the operation of your new unit.
This machine has a user maximum capacity of 250 pounds. It should only be used on a level surface and is intended for indoor use only.
The 130e comes with a console that provides essential workout feedback such as time, speed, distance, and calories burned. It also features a pulse monitor to track your heart rate and a recovery function to monitor your improvement after each exercise.


-
 1
1
-
 2
2
-
 3
3
-
 4
4
-
 5
5
-
 6
6
-
 7
7
-
 8
8
-
 9
9
-
 10
10
-
 11
11
-
 12
12
-
 13
13
-
 14
14
-
 15
15
-
 16
16
-
 17
17
-
 18
18


Ironman Fitness 130e User manual
- Type
- User manual
Ironman Fitness 130e is a quality elliptical designed to meet your needs for cardiovascular exercise. Read the Owner's Manual to become familiar with the operation of your new unit.
This machine has a user maximum capacity of 250 pounds. It should only be used on a level surface and is intended for indoor use only.
The 130e comes with a console that provides essential workout feedback such as time, speed, distance, and calories burned. It also features a pulse monitor to track your heart rate and a recovery function to monitor your improvement after each exercise.
Ask a question and I''ll find the answer in the document
Finding information in a document is now easier with AI
Related papers
-
Ironman Fitness M3EL User manual
-
-
-
-
-
-
-
Ironman Fitness Exploit 100125 User manual
-
-
Other documents
-
Keys Fitness Cardiomax 705el User manual
-
-
-
Drive Medical Width-Adjustable Seat Owner's manual
-
HP 240A Quick start guide
-
-
-
-
LOCK ER DOWN LD2025 User manual
-