Tripp Lite U357-002 User manual
- Category
- HDD/SSD enclosures
- Type
- User manual
This manual is also suitable for

1
Owner’s Manual
WARRANTY
REGISTRATION
Register online today for a
chance to win a FREE Tripp Lite
product! www.tripplite.com/warranty
1111 W. 35th Street, Chicago, IL 60609 USA • www.tripplite.com/support
Copyright © 2013 Tripp Lite. All rights reserved.
Dual Bay USB 3.0
to SATA Hard Drive
RAID Enclosure
Model: U357-002
Package Contents 2
Features 2
System Requirements 2
RAID Mode 3
Setting the RAID Mode 4
Installation Instructions 5
Warranty & Warranty Registration 6
13-10-121-9332DF.indd 1 10/25/2013 2:43:03 PM

2
Package Contents:
Features:
System Requirements:
•U357-002
•USB3.0A/BDeviceCable
•ExternalPowerSupplywithremovablepowercord
•Screwsformounting2.5”harddrives
•Owner’sManual
•Dualbayenclosureallowsyoutoquicklyturnanytwo2.5”or3.5”internalSATA
harddrivesintoexternalharddrives.
•Testedwithupto4TB3.5”HDDperbay(8TBtotal),andupto1TB2.5”HDDper
bay(2TBtotal).
•FeaturesRAID0,RAID1,JBOD,andNormaldiskmodes,givingyoutheexibilityto
accessyourdatainwhateverwayworksbestforyou.
•SupportsUSB3.0datatransferratesupto5Gbps.Backwardscompatiblewith
USB2.0and1.1.
•CompatiblewithSATAI,IIandIIIharddrives.
•Built-incoolingfankeepsdrivesfromoverheatingduringprolongeduse.
•Plugandplay;nosoftwareordriversrequired.
•(x2)2.5”or3.5”SATAHardDrive
•ComputerwithanavailableUSBport.AUSB3.0portisrequiredtoachieve
maximumspeeds.
•CompatiblewithWindows
®
,Mac,andLinux
13-10-121-9332DF.indd 2 10/25/2013 2:43:03 PM

3
RAID Mode
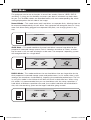
Theenclosurecanbesettofunctioninoneoffourmodes;Normal, JBOD, RAID 0,
and RAID 1,givingyoutheexibilitytoaccessyourdatainwhateverwayworksbest
foryou.Theavailablemodesaredescribedbelow,withtheircorrespondingdipswitch
setting displayed on the left side of the image.
Normal Mode –Thismodetreatsbothharddrivesasseparatedisks,allowingthemto
beaccessedindependentlyofeachother.Yourcomputerwillrecognizethemasifthey
wereashdrivesbeingpluggedintoseparateUSBports,notchangingtheminany
way.
ON
1 2
2 Disk Volume
SATA1 1000G SATA2 750G SATA1 1000G SATA2 750G
2 Disk Volume
ON
1 2
2 Disk Volume
SATA1 1000G SATA2 750G 1000G+750G=1750G
1 Disk Volume
ON
1 2
2 Disk Volume
SATA1 1000G SATA2 750G 750Gx2=1500G
1 Disk Volume
JBOD Mode –Thismodecombinesthetwoharddrivesintoonelargedriveforthe
purposeofincreasedstoragespace.Dataisstoredononedriveatatime,sowhen
therstoneisfull,thenextonebeginstobeused.Thecomputer’soperatingsystem
willrecognizethemasasingledrive.
RAID 0 Mode –Thismodecombinesthetwoharddrivesintoonelargedriveforthe
dualpurposeofincreasedstoragespaceandperformance.Inthismode,dataissplit
amongstthetwodrivessimultaneously,improvingtheread/writeperformance.Therisk
inusingthismodeisthatfailureofonediskwillresultintotaldataloss.Whenusing
thismode,itisrecommendedthatyouuseharddriveswiththesamecapacities.If
harddrivesofdifferentcapacitiesareused,thesmallerharddrivewillbedoubledin
size,withtheremainingspaceonthelargerharddrivegoingunused.
13-10-121-9332DF.indd 3 10/25/2013 2:43:03 PM

4
RAID Mode
Setting the RAID Mode
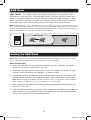
RAID 1 Mode –Thismodecreatestwomirrordiskdrivesforthepurposeofdata
redundancy.Ifonedrivefails,theotherdriveservesasaback-up.Whenusingthis
mode,itisrecommendedthatyouuseharddriveswiththesamecapacities.Ifhard
drivesofdifferentcapacitiesareused,thestoragecapacitywillbelimitedtothatof
thesmallerdrive,withtheremainingspaceonthelargerdrivegoingunused.
Note: In RAID1 mode, if one of the drives fails, the Red LED to the right of the hard drive tray will
blink. Replacing the drive will cause the enclosure to automatically enter rebuild mode, in which
the Red LED will continue to blink to indicate that the RAID1 array is being rebuilt. Depending on
the size of the drives, this may take several hours to a full day.
ON
1 2
2 Disk Volume
SATA1 1000G
MIRROR
SATA2 750G 750G
1 Disk Volume
Note: Make sure that you back up any important data prior to changing the enclosure’s RAID
mode. Initializing the RAID mode will erase all data on your hard drives.
When Powered On:
1. InstalltheharddrivesintheenclosureaccordingtotheInstallationInstructions
sectioninthismanual,poweringontheunit.
2. Bydefault,thedipswitchesonthebackoftheunitarebothsettotheOFF(Up)
position,whichwilldisplaytheharddrivesinNormal mode.
3. Setthedipswitchesonthebackoftheunitaccordingtothedesiredmode.See
theRAIDModesectioninthismanualforeachmode’sdipswitchconguration.
Note: When changing from RAID 1 mode to another mode, you must first switch to RAID 0
mode. Once set to RAID 0 mode, you can change to any other mode.
4. Aftersettingthedipswitchesaccordingly,pressandreleasetheResetbuttonon
thebackoftheunit.
5. Afteracoupleofseconds,yourdriveswillbeconguredaccordingtothemodeyou
haveselected.Thenewdrivewillnotbeformatted,andwillneedtobeformatted
usingyourcomputer’sDiskManagementutility.
13-10-121-9332DF.indd 4 10/25/2013 2:43:04 PM

5
Setting the RAID Mode
Installation Instructions
When Powered Off:
1. Installtheharddrivesintheenclosureaccordingtotheinstallationinstructionsin
thismanual,butdonotpowerontheunit.
2. Bydefault,thedipswitchesonthebackoftheunitarebothsettotheOFF(Up)
position,whichwilldisplaytheharddrivesinNormal mode.
3. Setthedipswitchesonthebackoftheunitaccordingtothedesiredmode.See
theRAIDModesectioninthismanualforeachmode’sdipswitchconguration.
Note: When changing from RAID 1 mode to another mode, you must first switch to RAID 0
mode. Once set to RAID 0 mode, you can change to any other mode.
4. Aftersettingthedipswitchesaccordingly,powerontheunit.
5. Afteracoupleofseconds,yourdriveswillbeconguredaccordingtothemodeyou
haveselected.Thenewdrivewillnotbeformatted,andwillneedtobeformatted
usingyourcomputer’sDiskManagementutility.
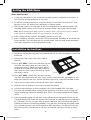
1. Removeatraybypressingdownthereleasetabsonitsfrontandpullingitfromthe
enclosure.
2. Remove the side snaps from each side of
the tray.
3a. For a 3.5” HDD –Placetheharddrivesothat
theSATAconnectorfacestherear,andthe
screw holes rest on top of the plastic pillars
locatedonthesideofthetray.Re-insertthe
side snaps on each side of the tray to secure
the drive in place.
3b.Fora2.5” HDD –Placetheharddrivesothat
theSATAconnectorfacestherear,liningupthescrewholesonthebottomofthe
drivewiththoseonthetray.Securethedrivetothetrayusingtheincludedscrews.
4. Fullyinsertthetrayintotheenclosureuntilitlocksintoplace.
5. Repeatssteps1through4toinstallasecondharddrive.
6. ConnecttheenclosuretoyourcomputerusingtheincludedUSB3.0cable.
7. Connecttheincludedpowersupplytotheenclosure,andplugitintoaTrippLite
SurgeSuppressor,PowerDistributionUnit(PDU),orUninterruptiblePowerSupply
(UPS).
8. Pressthepowerbuttononthefrontoftheenclosuretoturnpowertotheuniton.
TheBluePowerLEDunderthebuttonwillilluminatetoindicatetheunitispowered
on.TheBlueLEDsontherightfrontofeachharddrivetraywillilluminatesolidto
indicatethedriveisfunctioningproperly.TheywillblinktoindicatethatRAIDmode
hascrashedorerrorshaveoccurredduringRAIDrebuilding.TheRedLEDsonthe
rightfrontofeachharddrivetraywillblinktoindicatethatdatatransferistaking
place.
step 2
13-10-121-9332DF.indd 5 10/25/2013 2:43:04 PM

6
Warranty & Warranty Registration
1-Year Limited Warranty
TRIPPLITEwarrantsitsproductstobefreefromdefectsinmaterialsandworkmanshipforaperiodofone
(1)yearfromthedateofinitialpurchase.TRIPPLITE’sobligationunderthiswarrantyislimitedtorepairing
orreplacing(atitssoleoption)anysuchdefectiveproducts.Toobtainserviceunderthiswarranty,youmust
obtainaReturnedMaterialAuthorization(RMA)numberfromTRIPPLITEoranauthorizedTRIPPLITEservice
center.ProductsmustbereturnedtoTRIPPLITEoranauthorizedTRIPPLITEservicecenterwithtransportation
chargesprepaidandmustbeaccompaniedbyabriefdescriptionoftheproblemencounteredandproofof
dateandplaceofpurchase.Thiswarrantydoesnotapplytoequipment,whichhasbeendamagedbyaccident,
negligenceormisapplicationorhasbeenalteredormodiedinanyway.
EXCEPTASPROVIDEDHEREIN,TRIPPLITEMAKESNOWARRANTIES,EXPRESSORIMPLIED,INCLUDING
WARRANTIESOFMERCHANTABILITYANDFITNESSFORAPARTICULARPURPOSE.
Somestatesdonotpermitlimitationorexclusionofimpliedwarranties;therefore,theaforesaidlimitation(s)or
exclusion(s)maynotapplytothepurchaser.
EXCEPTASPROVIDEDABOVE,INNOEVENTWILLTRIPPLITEBELIABLEFORDIRECT,INDIRECT,SPECIAL,
INCIDENTALORCONSEQUENTIALDAMAGESARISINGOUTOFTHEUSEOFTHISPRODUCT,EVENIFADVISED
OFTHEPOSSIBILITYOFSUCHDAMAGE.Specically,TRIPPLITEisnotliableforanycosts,suchaslostprots
orrevenue,lossofequipment,lossofuseofequipment,lossofsoftware,lossofdata,costsofsubstitutes,
claimsbythirdparties,orotherwise.
Useofthisequipmentinlifesupportapplicationswherefailureofthisequipmentcanreasonablybeexpected
tocausethefailureofthelifesupportequipmentortosignicantlyaffectitssafetyoreffectivenessisnot
recommended.Donotusethisequipmentinthepresenceofaammableanestheticmixturewithair,oxygen
ornitrousoxide.
WARRANTY REGISTRATION
Visitwww.tripplite.com/warrantytodaytoregisterthewarrantyforyournewTrippLiteproduct.You’llbe
automatically entered into a drawing for a chance to win a FREE Tripp Lite product!*
*Nopurchasenecessary.Voidwhereprohibited.Somerestrictionsapply.Seewebsitefordetails.
TrippLitefollowsapolicyofcontinuousimprovement.Productspecicationsaresubjecttochangewithout
notice.
FCC Notice, Class B
Thisdevicecomplieswithpart15oftheFCCRules.Operationissubjecttothefollowingtwoconditions:(1)
Thisdevicemaynotcauseharmfulinterference,and(2)thisdevicemustacceptanyinterferencereceived,
including interference that may cause undesired operation.
Note:ThisequipmenthasbeentestedandfoundtocomplywiththelimitsforaClassBdigitaldevice,pursuant
topart15oftheFCCRules.Theselimitsaredesignedtoprovidereasonableprotectionagainstharmful
interferenceinaresidentialinstallation.Thisequipmentgenerates,usesandcanradiateradiofrequencyenergy
and,ifnotinstalledandusedinaccordancewiththeinstructions,maycauseharmfulinterferencetoradio
communications.However,thereisnoguaranteethatinterferencewillnotoccurinaparticularinstallation.If
thisequipmentdoescauseharmfulinterferencetoradioortelevisionreception,whichcanbedeterminedby
turningtheequipmentoffandon,theuserisencouragedtotrytocorrecttheinterferencebyoneormoreof
thefollowingmeasures:
• Reorientorrelocatethereceivingantenna.
• Increasetheseparationbetweentheequipmentandreceiver.
• Connecttheequipmentintoanoutletonacircuitdifferentfromthattowhichthereceiverisconnected.
• Consultthedealeroranexperiencedradio/TVtechnicianforhelp.
AnychangesormodicationstothisequipmentnotexpresslyapprovedbyTrippLitecouldvoidtheuser’s
authoritytooperatethisequipment.
WEEE Compliance Information for Tripp Lite Customers and Recyclers (European Union)
UndertheWasteElectricalandElectronicEquipment(WEEE)Directiveandimplementingregulations,
whencustomersbuynewelectricalandelectronicequipmentfromTrippLitetheyareentitledto:
• Sendoldequipmentforrecyclingonaone-for-one,like-for-likebasis(thisvariesdepending
onthecountry)
• Sendthenewequipmentbackforrecyclingwhenthisultimatelybecomeswaste
13-10-121-9332DF.indd 6 10/25/2013 2:43:04 PM

7
Notes
13-10-121-9332DF.indd 7 10/25/2013 2:43:04 PM

8
1111 W. 35th Street, Chicago, IL 60609 USA • www.tripplite.com/support
13-10-121•93-32DF_revA
13-10-121-9332DF.indd 8 10/25/2013 2:43:04 PM
-
 1
1
-
 2
2
-
 3
3
-
 4
4
-
 5
5
-
 6
6
-
 7
7
-
 8
8


Tripp Lite U357-002 User manual
- Category
- HDD/SSD enclosures
- Type
- User manual
- This manual is also suitable for
Ask a question and I''ll find the answer in the document
Finding information in a document is now easier with AI
Related papers
-
Tripp Lite U357-002 Owner's manual
-
Tripp Lite U256-025-R Datasheet
-
Tripp Lite U339-E02 Owner's manual
-
-
-
-
-
-
-