Page is loading ...

ITEM #0297983
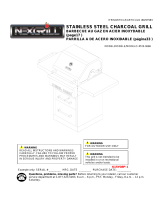
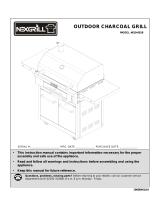
STAINLESS STEEL CHARCOAL GRILL
MODEL #720-0686
0
WARNING WARNING
READ ALL INSTRUCTIONS AND WARNINGS
CAREFULLY. FAILURE TO FOLLOW PROPER
PROCEDURES AND WARNINGS MAY RESULT
IN SERIOUS INJURY AND PROPERTY DAMAGE
FOR OUTDOOR USE ONLY
WARNING
This grill is not intended to be
installed in or on recreational
vehicles and/or boats.
Example only: SERIAL # ________ MFG. DATE ________ PURCHASE DATE: _________
Questions, problems, missing parts? Before returning to your retailer, call our customer
service department at 1-877-323-5263, 8 a.m. - 6 p.m., PST, Monday - Friday, 8 a.m. – 12 p.m.
Saturday.

TABLE OF CONTENTS
Safety Information……………………………………………………..........................................3
Package Contents List……….……………………………………………………………………….5
Hardware Contents…….…………………. ……………………….…………….……………….....6
Preparation...............................................................................................................................6
Assembly Instructions…………………………………………………………………….…..……6
Operating Tips ……………………………………………………………….....…….……...........12
Charcoal Grill Information ………………………………………………………………….………14
Warranty……………………….………….…………………………………………..…………..….16
Replacement Parts List………………….…....……………………………………..…….….…….17
2

SAFETY INFORMATION
CAUTION
WARNING – Hazards or unsafe
practices which COULD result in severe
personal injury or death.
This unit is heavy. Two people required for safe
assembly.
Some parts may contain sharp edges. Wear
protective gloves if necessary.
CAUTION – Hazards or unsafe
practices which COULD result in minor
personal injury.
Read and follow all safety statements, warning,
assembly instructions and use and care instructions
before attempting to assemble and use.
WARNING
Carbon monoxide hazard.
Burning charcoal inside can kill you. It gives off carbon monoxide, which has no odor. NEVER burn charcoal
inside homes, vehicles or tents.
WARNING
If for any reason you do not understand any of these instructions, contact customer service at
1-877-323-5263.
WARNING
WARNING
This grill is for outdoor use only, in well-ventilated
areas..
Keep a fire extinguisher near this unit at all times.
WARNING
WARNING
Use caution when lifting and moving the unit to
avoid back strain or back injury. Use two people
to lift or move the unit. Do not move the unit
while it is in use.
The use of alcohol, prescription or non-prescription
drugs may impair the user’s ability to properly
assemble and safely operate this unit
WARNING
DO NOT Operate the unit near or under flammable
or combustible materials such as decks, porches or
carports. A minimum clearance of 36 in. (92 cm) is
recommended. DO NOT operate the unit under
overhead construction.
WARNING
This product is not to be used as a heater.
WARNING
Operate the unit on a stable, level, non-
flammable surface such as asphalt, concrete or
solid ground. DO NOT operate the unit on
flammable material such as carpet or wood deck.
WARNING
Use caution when assembling and operating this
unit to avoid cuts and scrapes from edges.
WARNING
WARNING
DO NOT use this product in a manner other than
its intended a purpose. It is NOT intended for
commercial use. It is not intended to be installed or
used in or on a recreational vehicle and/or boats.
DO NOT Store this unit near gasoline or other
combustible liquids or where other combustible
vapors may be present.
3

WARNING WARNING
DO NOT store or operate this product in an area
accessible to children or pets. Store this unit in a
dry, protected location.
The grill head is heavy and will require two or
more people to lift and position onto grill cart.
WARNING
WARNING
DO NOT leave hot ashes unattended until the
g
rill cools com
p
letel
y
.
DO NOT leave the unit unattended while in use..
WARNING
DO NOT move the unit while in use or while ashes
are still hot. Allow the unit to cool completely before
moving or storing.
WARNING
NEVER use gasoline or other highly volatile
fluids as a starter.
WARNING WARNING
Always cook your food on the grade after the flame
is burned out.
Dispose of cold ashes by wrapping them in a
heavy-duty aluminum foil and placing in a
noncombustible container. Make sure that there
are no other combustible materials in or near the
container.
WARNING
If you must dispose of ashes in less time than it
takes for the ashes to completely cool down, then
remove the ashes from the unit, keeping them in
the heavy-duty foil, and soak them completely with
water before disposing of them in a
noncombusti
ble container
.
WARNING
Allow the unit to cool completely before
conducting any routine cleaning or maintenance.
SAFETY PRACTICES TO AVOID INJURY
When properly cared for, your grill will provide safe, reliable service for many years. However, use extreme care
as the grill produces intense heat that can increase accident potential.
When operating this appliance, practice these basic safety precautions:
Do not repair or replace any part of the grill unless specifically recommended in this manual. All other service
should be referred to a qualified technician.
Do not install the grill in or on recreational vehicles and/or boats.
Do not leave children alone or unattended in an area where the grill is being used. Do not allow children to sit,
stand or play on or around the grill at any time.
Do not store items of interest to children around or below the grill or cart. Do not allow children to crawl inside
the cart.
Do not use aluminum foil to line the grill racks or grill bottom. This can severely upset combustion air flow or trap
excessive heat in the control area.
Do not use the grill to cook excessively fatty meats or other products, which promote flare-ups.
This unit is intended for outdoor use only.
Never use the grill in extremely windy conditions. If located in a consistently windy area (oceanfront,
mountaintop, etc.), a windbreak will be required. Always adhere to the clearance specifications
4

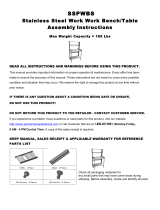
PACKAGE CONTENTS LIST
A. Bottom Panel -----------1pc
B. Caster ------------------2pcs
C.Swivel Caster with brake--1pc
D. Swivel Caster ----------1pc
E. Left Side Panel --------1pc
F. Right Side Panel---------1pc
.
G. Back Panel ----------1pc
H. Charcoal grill firebox ---1pc
I. Main Lid -----------------1pc
J. Crank Handle ----------1pc
.
K. Charcoal Tray ----------1pc
L. Drawer A ----------1pc .
M. Drawer B ----------1pc
N. Push Bar ----------------1pc
O. Side shelf,left------------1pc
P. Side Shelf,right--------1pc
Q. Grate Lifter--------------1pc
5

HARDWARE CONTENTS
Pack Description Quantity
AA 1/4-in. x 23-mm Main Lid Screw 2 pcs.
BB 1/4-in. x 15-mm Truss Head Screw 8 pcs.
CC 1/4-in. x 12-mm Truss Head Screw 36 pcs.
DD 5/32-in. x 10-mm Truss Head Screw 10pcs.
EE 1/4-in. Nut 4 pcs.
FF 1/4-in. Flat Washer 10 pc.
GG 1/4-in. Locking Washer 36 pc.
HH 5/32-in. Locking Washer 10 pc.
II 1 pc.
AA BB CC DD EE
FF GG HH
Before beginning assembly, installation or operation of product, make sure all parts are present. Compare
parts with package contents list and diagram above. If any part is missing or damaged, do not attempt to
assemble, install or operate the product. Contact customer service for replacement parts.
PREPARATION
y Estimated Assembly Time: 50 minutes
y Tools Required for Assembly:
Phillips Screwdriver (not included) and Wrench (not included)
y Note: The right and left sides of the grill are designated as if you are standing and facing the grill.
ASSEMBLY INSTRUCTIONS
Fig. 1
1. Swivel Caster Assembly
Mount the caster onto the bottom panel (A) using sixteen
1/4-in. x15-mm truss head screws (BB), sixteen 1/4-in.
locking washers (GG) and sixteen 1/4-in. flat washers (FF).
Position The swivel caster with brake (C) under
the left rear of the cart bottom (A), and position the swivel
caster (D) under left front as shown in Fig. 1.
Position the two stationary casters (B) should be positioned under the
A C
BB
FF
right side.
NOTE: Turn over the bottom panel to mount the caster.
B
D
G
G
Hardware Used Quantity
1/4-in. x 15-mm truss head screws (BB)
16 x
1/4 in. locking washers 16 x
1/4-in. flat washers (FF) 16 x
6

Fig. 2
2. Side Panel Assembly
Use two 1/4-in.×12-mm truss head screws (CC) and two
1/4-in. locking washers (GG) to connect the bottom of the
left side panel (E) to the bottom panel (A). Make the left
side panel flush with rear of bottom panel and tighten the
screws as shown in Fig. 2.
Repeat steps for the right side panel (F).
3. Back Panel Assembly
Remove the back panel from the carton. Position the back
panel (G) with the flat side facing outward. Attach the back
panel to the bottom panel (A) with two 1/4-in. x 12-mm truss
head screws (CC) and two 1/4-in. locking washers (GG) as
shown in Fig. 3
Use four 1/4-in.×12-mm truss head screws (CC) and four
1/4-in. locking washers (GG) to connect the back panel (G)
to the right and left side panels as shown in Fig. 4
Fig. 4
G
F
Fig. 3
G
A
E
CC
GG
A
Hardware Used Quantity
1/4-in.×12-mm truss head screws (CC) 4 x
1/4 in. locking washers (GG) 4 x
CC
GG
Hardware Used Quantity
1/4-in. x 12-mm truss head screws (CC) 2 x
1/4 in. locking washers (GG) 2 x
GG
CC
Hardware Used Quantity
1/4-in.x12-mm truss head screws (CC) 4 x
1/4-in. locking washers (GG) 4 x
7

Fig. 5
4. Firebox Assembly
H
CAUTION The firebox assembly is heavy and
will require two or more people to lift and position
onto grill cart. Failure to do so may result in back
injury.
Remove the firebox assembly (H) from the carton
and carefully place onto the grill cart as shown in Fig. 5
Note: Take care when moving the firebox assembly
as the bottom flanges can be bent, which would misalign the
holes.
Grill cart
Fig. 6
Attach the firebox assembly (H) to the grill cart using four
1/4-in. x 12-mm truss head screws (CC) and four 1/4-in.
locking washers (GG).
Note: Two screws and two washers for each side of cart
as shown in Fig. 6.
Secure the back of firebox using two 1/4-in. x 15-mm truss
head screws and two 1/4-in. locking washers as shown in
Fig. 6.
Note: To secure all the above screws from outside to inside.
H
Hardware Used Quantity
1/4-in. x 12-mm truss head screws (CC) 8 x
1/4 in. lockin
g
washers
(
GG
)
8 x
Grill cart
GG
CC
8

Fi
g
. 7
5. Main Lid Assembly
Remove the lid (I) from carton, and then attach lid to the
firebox (H) using two main lid screws (AA), 1/4-in. locking
washers (GG) and 1/4-in. nut (EE) to keep this lid in
places shown in Fig. 7.
NOTE: Secure all of the above screws from outside
to inside.
6. Charcoal Tray and Drawers Assembly
Insert the charcoal tray (K), drawer A (L) and drawer B
(M) to the glides, and then push them in as
shown in Fig. 8.
7. Charcoal Handle Assembly
Remove the charcoal handle (J) from the carton, and then screw
it into the hole on the charcoal door by turning the handle
clockwise as shown in Fig. 9.
Fig. 9
Fig. 8
L
K
M
Hardware Used Quantity
Main lid screw (AA) 2 x
1/4-in. locking washers (GG) 2 x
1/4-in. nut (EE) 2 x
GG
EE
AA
H
9

Fig. 10
8. Right Side Shelf Assembly
Loose the two screws on the right panel of firebox as shown
in Fig.10.
Fig. 11
Align the bottom key holes on right side shelf (P) with two
loosened screws, and tighten these two screws as shown in
Fig. 11.
.
P
Fig. 12
BB
Use two 1/4-in. x 15-mm truss head screws (BB) and two
1/4-in. locking washers (GG), to keep the right side shelf
(Q) in place (two screw holes are located in the top of right
side burner shelf).
G
G
Note: Screw the top two screws of the firebox from the
inside to outside of the right side shelf. Screw the bottom
two screws from the outside to inside.
Q
Hardware Used Quantity
1/4-in. x 12-mm truss head screws (CC) 4 x
1/4-in. locking washers (GG) 4 x
10

9. Left Side Shelf Assembly
Repeat step 8 for the left side shelf.
Fig. 13
10. Push Bar Assembly
Take out the push bar (N) from carton, align it to the
left flange of left side shelf with four 1/4-in. x 12-mm
screws (CC) and four 1/4-in. locking washers (GG) as
shown in Fig. 13.
Note:. These two screws are tighten from under the left
side shelf.
Operating Tips
Use of the Grate Lifter
WARNING:
THE GRATES COULD BE EXTREMELY HOT EVEN WHEN
CHARCOAL
IS EXTINGUISHED. DO NOT TRY TO MOVE THE GRATES WHILE
CHARCOAL IS BURNING.
IF YOU MUST MOVE THE GRATES WHILE THE GRATES ARE
STILL HOT, WARN ANYONE AROUND AND HANDLE GRATES WITH
CARE. ALWAYS WEAR A HEAT-RESISTANT GLOVE TO PROTECT
YOURSELF AND FOLLOW THE INSTRUCTIONS BELOW.
Use the Grate Lifter included in package. Put the tip of the lifter into the
correct opening on the grate as shown. When the handle tip is securely
locked with the grate, lift it a little bit to make sure it is stable and you are
able to control it. If not, do not try to move it anymore. Put the grate back
and ask someone for help. Continue to move it if you are sure that you
can control and handle the grate. While you are holding the grate up, do
not shake, wave, sway, swing or rock. Put it back on the grill or put it
down on a non-combustible surface. Do not leave the hot grate unattended.
NOTE: The grate is coated with porcelain, which is a fragile coating. Handle with care to avoid damage. Do
not cool the grate in cold water while it is still hot or the coating may crack. Let the grate cool off by itself.
Fig. 14
Hardware Used Quantity
1/4-in. x 12-mm truss head screws (CC) 2 x
1/4-in. locking washers (GG) 2 x
CC
GG
N
11

Crank Operation
This Charcoal Grill has an “Adjustable Height” feature for the charcoal pan (holder). By turning the crank
handle, the charcoal pan can be raised or lowered to desired height. The charcoal pan is easy to adjust,
and allows the heat to reach the food on the grates instantly. Do not raise the pan higher than the middle
setting with a full load of fresh charcoal. It is also easy for you to clean the interior of the bucket after the
unit has cooled down completely.
Charcoal Lighting Instructions
y Open grill lid.
y Remove cooking grates using tool provided.
y Adjust charcoal tray to the center position.
y Place one even row of charcoal briquettes in the charcoal tray. Do not cool pile the charcoal above the
top of the tray.
y Light briquettes.
y Move charcoal tray to the bottom position.
y With the lid open, allow the briquettes to fully ignite (to the point where there is no further flame.)
y Once the briquettes are lit, put the cooking grid back in the grill.
y Adjust charcoal tray as required to achieve the proper temperature.
y ADJUSTING TEMPERATURE
For maximum heat/temperature, open the vents located on the charcoal control panel as required.
To reduce the heat/temperature, close the air vents.
NOTE:
The temperature should not be above 500°F If the temperature goes above 500°F you should
reduce the quantity of briquettes that you have placed in the charcoal tray.
Seasoning Unit
1. Before your first cooking you should season the unit to enhance the cooking and to provide better
overall durability. Failure to properly follow these steps may damage the finish and/or impart metallic
flavors to your foods.
2. Remove all retail hangtags that are on the unit, making sure NOT to remove safety markings from the
unit.
y SEASON UNIT: Before first cooking, place about 20 briquettes in the charcoal pan. Do not place any
briquettes against walls of the bucket.
y Coat interior surfaces with vegetable cooking oil.
y Light briquettes and set ash pan at medium height by cranking the crank handle.
y Sustain burn for about one hour with lid closed and all ventilation holes open. Allow the unit to cool
down properly.
y Once this is completed, the unit is ready for use.
Rust can appear on the inside of your grill. Maintaining a light coating of vegetable oil on interior surfaces
will aid in protecting your grill. Exterior surfaces of the grill may need occasional touch up. NEVER PAINT
THE INTERIOR OF THE UNIT!
WARNING: The charcoal tray and ventilation on charcoal control panel could be very hot while grilling.
Always operate these parts with the Grate Lifter and wear a heat-resistant glove.
Grilling Maintenance
Frequency of cleaning is determined by now often the grill is used. Make sure coals are completely
extinguished and the grates are cooled down before cleaning inside of the unit. To remove the stains on
the stainless steel lid and front panel caused by the fumigation while grilling, use a cleaning pad. Wipe out
the interior of unit with cloth or paper towel. Clean the grates with warm water and pat dry. The coating is
fragile. Do not knock, hit or drop the grates.
12

It is very important to keep your appliances clear and away from any combustible materials.
Maintain at least 24 inches of clearances from sides and back and do not use under overhead combustible
construction.
WARNING
Most surfaces on this unit are hot when in use. Use extreme caution. Keep others away from
unit. Always wear protective clothing to prevent injury.
Keep children and pets away.
Do not move this unit during operation.
Never substitute gasoline, kerosene or alcohol for charcoal starter. Some states prohibit the
use of charcoal starter. In this case, paraffin-based starter cubes can be substituted for
charcoal starter. Never use charcoal starter fluid with an electric starter.
13

CHARCOAL GRILL INFORMATION
WARNING
y Keep a fire extinguisher nearby at all times.
y This grill is for outdoor use only, in well-ventilated areas.
y The use of alcohol, prescription or non-prescription drugs may impair the user’s ability to properly
assemble and safely operate this unit.
y Use caution when lifting and moving the unit to avoid back strain or back injury. Two people are should
lift or move the unit. Do not move the unit while it is in use.
y DO NOT Operate the unit near or under flammable or combustible materials such as decks, porches
or carports. A minimum clearance of 24 in. (610cm) is recommended. DO NOT operate the unit under
overhead construction.
y This product is not to be used as a heater.
y Operate the unit on a stable, level, non-flammable surface such as asphalt, concrete or solid ground.
DO NOT operate the unit on flammable material such as carpet or wood deck.
y Use caution when assembling and operating this unit to avoid cuts and scrapes from edges.
y DO NOT use this product in a manner other than its intended a purpose. It is NOT intended for
commercial use. It is not intended to be installed or used in or on a recreational vehicle and/or boats.
y DO NOT store this unit near gasoline or other combustible liquids or where other combustible vapors
may be present.
y DO NOT store or operate this product in an area accessible to children or pets. Store this unit in a dry,
protected location.
y DO NOT leave the unit unattended while in use.
y DO NOT leave hot ashes unattended until the grill cools completely.
y DO NOT move the unit while in use or while ashes are still hot. Allow the unit to cool completely before
moving or storing.
y NEVER use gasoline or other highly volatile fluids as a starter.
y Always cook your food on the grate after the flame is burned out.
y Dispose of cold ashes by wrapping them in a heavy-duty aluminum foil and placing in a
noncombustible container. Make sure there are no other combustible materials in or near the container.
y If you must dispose of ashes in less time than it takes for the ashes to completely cool down, and then
remove the ashes from the unit, keeping them in the heavy-duty foil, and soak them until completely
cooled down with water before disposing of them in a noncombustible container.
y Allow the unit to cool completely before conducting any routine cleaning or maintenance.
Proposition 65 WARNING:
Combustion (burning) of charcoal or charcoal-like briquettes, like other cooking methods,
produces carbon monoxide and other substances known by the State of California to cause cancer,
birth defects or reproduction harm.
14

ONE YEAR LIMITED WARRANTY (Model # 720-0686)
Nexgrill warrants to the original consumer-purchaser only that this product (Model #720-0686) shall be free from defects in workmanship and materials after correct
assembly and under normal and reasonable home use for the periods indicated below beginning on the date of purchase. The manufacturer reserves the right to require
photographic evidence of damage, or that defective parts be returned, postage and or freight pre-paid by the consumer, for review and examination.
.
COOKING GRIDS: 1 Year LIMITED warranty; does not cover dropping, chipping, scratching, or surface damage.
STAINLESS STEEL PARTS: 1 Year LIMITED warranty against perforation; does not cover cosmetic issues like surface corrosion, scratches and rust.
ALL OTHER PARTS: 1 Year LIMITED warranty (Includes, but not limited to, valves, frame, housing, cart, control panel, igniter, regulator, hoses) *Does not
cover chipping, scratching, cracking surface corrosion, scratches or rust.
Upon consumer supplying proof of purchase as provided herein, Manufacturer will repair or replace the parts which are proven defective during the applicable warranty
period. Parts required to complete such repair or replacement shall be free of charge to you except for shipping costs, as long as the purchaser is within the warranty
period from the original date of purchase. The original consumer-purchaser will be responsible for all shipping charges of parts replaced under the terms of this limited
warranty. This limited warranty is applicable in the United States only, is only available to the original owner of the product and is not transferable. Manufacturer requires
reasonable proof of your date of purchase. Therefore, you should retain your sales receipt and/or invoice. If the unit was received as a gift, please ask the gift-giver to send
in the receipt on your behalf, to the below address. Defective or missing parts subject to this limited warranty will not be replaced without registration or proof of purchase.
This limited warranty applies to the functionality of the product ONLY and does not cover cosmetic issues such as scratches, dents, corrosions or discoloring by heat,
abrasive and chemical cleaners or any tools used in the assembly or installation of the appliance, surface rust, or the discoloration of stainless steel surfaces. Surface
rust, corrosion, or powder paint chipping on metal parts that does not affect the structural integrity of the product is not considered a defect in workmanship or material and
is not covered by this warranty. This limited warranty will not reimburse you for the cost of any inconvenience, food, personal injury or property damage. If an original
replacement part is not available, a comparable replacement part will be sent. You will be responsible for all shipping charges of parts replaced under the terms of this
limited warranty.
ITEMS MANUFACTURER WILL NOT PAY FOR:
Service calls to your home.
Repairs when your product is used for other than normal, single-family household or residential use.
Damage resulting from accident, alteration, misuse, lack of maintenance/cleaning, abuse, fire, flood, acts of God, improper installation, and installation not in
accordance with electrical or plumbing codes or use of products not approved by the manufacturer.
Any food loss due to product failures.
Replacement parts or repair labor costs for units operated outside the United States or Canada.
Pickup and delivery of your product.
Postage fees or photo processing fees for photos sent in as documentation.
Repairs to parts or systems resulting from unauthorized modifications made to the product.
The removal and/or reinstallation of your product.
Shipping cost, standard or expedited, for warranty/non warranty and replacement parts.
DISCLAIMER OF IMPLIED WARRANTIES; LIMITATION OF REMEDIES
Repair or replacement of defective parts is your exclusive remedy under the terms of this limited warranty. Manufacturer will not be responsible for any consequential or
incidental damages arising from the breach of either this limited warranty or any applicable implied warranty, or for failure or damage resulting from acts of God, improper
care and maintenance, grease fire, accident, alteration, replacement of parts by anyone other than Manufacturer, misuse, transportation, commercial use, abuse, hostile
environments (inclement weather, acts of nature, animal tampering), improper installation or installation not in accordance with local codes or printed manufacturer
instructions.
THIS LIMITED WARRANTY IS THE SOLE EXPRESS WARRANTY GIVEN BY THE MANUFACTURER. NO PRODUCT PERFORMANCE SPECIFICATION OR
DESCRIPTION WHEREVER APPEARING IS WARRANTED BY MANUFACTURER EXCEPT TO THE EXTENT SET FORTH IN THIS LIMITED WARRANTY. ANY
IMPLIED WARRANTY PROTECTION ARISING UNDER THE LAWS OF ANY STATE, INCLUDING IMPLIED WARRANTY OF MERCHANTABILITY OR FITNESS FOR A
PARTICULAR PURPOSE OR USE, IS HEREBY LIMITED IN DURATION TO THE DURATION OF THIS LIMITED WARRANTY.
Neither dealers nor the retail establishment selling this product has any authority to make any additional warranties or to promise remedies in addition to or inconsistent
with those stated above. Manufacturer's maximum liability, in any event, shall not exceed the documented purchase price of the product paid by the original consumer.
This warranty only applies to units purchased from an authorized retailer and or re-seller. NOTE: Some states do not allow an exclusion or limitation of incidental or
consequential damages, so some of the above limitations or exclusions may not apply to you; this limited warranty gives you specific legal rights as set for herein. You may
also have other rights which vary from state to state.
If you wish to obtain performance of any obligation under this limited warranty, you should write to:
Nexgrill Customer Relations
280 Machlin Court
City of Industry, CA 91789
All consumer returns, parts orders, general questions, and troubleshooting
assistance can be acquired by calling 1-877-323-5263.
15

REPLACEMENT PARTS LIST
For replacement parts, call our customer service department at 1-877-323-5263, 8 a.m. – 6 p.m., PST,
Monday – Friday and 8 a.m. – 12 p.m. PST, Saturday.
WARRANT
Y
WARRANT
Y
REF# DESCRIPTION
COVERAG
E
QTY REF#DESCRIPTION
COVERAG
E
QTY
01 19
Main Lid 1 1 Left side panel, top 1 1
02 20
Main Lid Screw 1 2 Right side panel, top 1 1
03 21
Temperature Gauge 1 1 Back panel, top 1 1
04
Logo 1 1
22
Side panel left 1 1
05 23
Hood Buffer 1 2 Side panel right 1 1
Main lid handle heat
06
insulating spacer
1 2
24
Back panel 1 1
07 25
Main lid handle assembly 1 1 Cart trim piece 1 1
08 26
Push bar 1 2 Swivel caster with brake 1 1
09 27
Side shelf, left 1 1 Swivel caster 1 1
10 28
Side shelf, right 1 1 Bottom panel 1 1
11 29
Main firebox bowl assembly 1 1 Caster 1 2
12 30
Main control panel 1 1 Drawer slide 1 2
13 31
Pilot box cover 1 1 Charcoal tray 1 1
14
Pilot box cover handle 1 1
32
Drawer handle seat 1 4
15 33
Cooking grid with hole 1 2 Drawer handle tube 1 2
16 34
Grid Lifter 1 1 Drawer A 1 1
17 35
Charcoal gray 1 1 Drawer B 1 1
18
Crank handle 1 1
16

Printed in China
17
/