Beko ASP341 User manual
- Category
- Side-by-side fridge-freezers
- Type
- User manual

ASN541B
ASN541S
ASN541X
ASP341B
ASP341S
ASP341X

Please read this manual first!
Dear Customer,
We hope that your product, which has been produced in modern plants and checked under the most
meticulous quality control procedures, will provide you with effective service.
For this, we recommend you to carefully read the entire manual of your product before using it and keep
it at hand for future references.
The user manual will help you use the product in a fast and safe way.
• Read the manual before installing and operating your product.
• Follow the instructions, especially those for safety.
• Keep the manual in an easily accessible place as you may need it later.
• Besides, read also the other documents provided with your product.
Please note that this manual may be valid for other models as well.
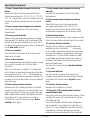
Symbols and their descriptions
This instruction manual contains the following symbols:
C
Important information or useful usage
tips.
A
Warning against dangerous conditions
for life and property.
B
Warning against electric voltage.
Packaging materials of the product are
manufactured from recyclable materi-
als in accordance with our National
Environment Regulations.

2 / 30 EN
Refrigerator / User Manual
1 Important instructions for safety and
environment 3
2 Your refrigerator 6
3 Installation 7
3.1. Appropriate installation location . . . . . . .7
3.2. Installing the plastic wedges. . . . . . . . . .7
3.3. Electrical connection . . . . . . . . . . . . . . .8
3.4. Adjusting the feet. . . . . . . . . . . . . . . . . .8
3.5. Illumination lamp . . . . . . . . . . . . . . . . . .8
3.6. Door open warning. . . . . . . . . . . . . . . . .9
3.7. Water connection . . . . . . . . . . . . . . . . .9
3.8. Connecting the water hose to the
refrigerator . . . . . . . . . . . . . . . . . . . . . .9
3.9. Connecting of the water hose to the cold
water mains line . . . . . . . . . . . . . . . . .10
3.10. Water filter. . . . . . . . . . . . . . . . . . . . . .10
3.11. Mounting the external filter onto the wall 11
3.12. Things to do to have the filter usage time
calculated automatically. . . . . . . . . . . .12
3.13. Before starting to use the water/ice
dispenser . . . . . . . . . . . . . . . . . . . . . .12
3.14. Transportation of the product . . . . . . . .13
4 Preparation 14
4.1. Things to be done for energy saving . . .14
4.2. Efficient operation . . . . . . . . . . . . . . . .14
4.3. Recommendations on the fridge
compartment. . . . . . . . . . . . . . . . . . . .14
4.4. Initial use. . . . . . . . . . . . . . . . . . . . . . .14
5 Operating the product 16
5.1. Indicator panel. . . . . . . . . . . . . . . . . . .16
5.2. NeoFrost Cooling System . . . . . . . . . . .19
5.3. Freezing fresh food . . . . . . . . . . . . . . .19
5.4. Recommendations for preserving the frozen
food . . . . . . . . . . . . . . . . . . . . . . . . . .20
5.5. Placing the food. . . . . . . . . . . . . . . . . .20
5.6. Deep-freeze information. . . . . . . . . . . .20
5.7. Chiller compartment. . . . . . . . . . . . . . .21
5.8. Butter & cheese section . . . . . . . . . . .21
5.9. Egg section . . . . . . . . . . . . . . . . . . . . .21
5.10. Crisper . . . . . . . . . . . . . . . . . . . . . . . .21
5.11. Odour filter . . . . . . . . . . . . . . . . . . . . .21
5.12. Using the dispenser . . . . . . . . . . . . . . .22
5.13. Filling the water dispenser’s tank . . . . .22
5.14. Drip tray . . . . . . . . . . . . . . . . . . . . . . .23
5.15. Cleaning the water tank . . . . . . . . . . .23
5.16. Icematic and ice storage container . . . .24
6 Maintenance and cleaning 25
6.1 Avoiding bad odours. . . . . . . . . . . . . . .25
6.2 Protecting the plastic surfaces . . . . . . .25
7 Troubleshooting 26

3 / 30 EN
Refrigerator / User Manual
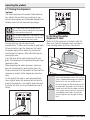
1 Important instructions for safety and environment
• Do not connect your appliance to the electricity
supply until all packing and transit protectors
have been removed.
• If transported horizontally leave to stand upright
for at least 4 hours before switching on to allow
compressor oil to settle
• If you are discarding an old refrigerator with a
lock or latch fitted to the door, disable the lock/
latch, ensure that it is left in a safe condition to
prevent the entrapment of young children.
• This fridge/freezer must only be used for its
intended purpose i.e the storing and freezing of
edible foodstuff.
• Do not dispose of the appliance on a fire.
At BEKO, the care and protection of our
environment is an ongoing commitment. This
appliance which is among the latest range
introduced is particularly environment friendly.
Your appliance contains non CFC / HFC natural
substances in the cooling system (Called R600a)
and in the insulation (Called cyclopentane) which
are potentially flammable if exposed to fire.
Therefore, take care not to damage, the cooling
circuit / pipes of the appliance in transportation
and in use. In case of damage do not expose
the appliance to fire or potential ignition source
and immediately ventilate the room where the
appliance is situated.
• We suggest you contact your local authority for
disposal information and facilities available.
• See Installation Instructions on page 8 for
information on suitable location.
• To obtain the best possible performance and
trouble free operation from your appliance
it is very important to carefully read these
instructions.
• On delivery, check to make sure that the product
is not damaged and that all the parts and
accessories are in perfect condition.
• Ensure that the plug remains readily accessible.
Do not use multiple adapter or extension cable.
• Failure to observe these instructions may
invalidate your right to free service during the
guarantee period.
• Keep ventilation openings, in the appliance
enclosure or in the built-in structure, clear of
obstruction.
• Do not use mechanical devices or other means
to accelerate the defrosting process, other than
those recommended by the manufacturer.
• Do not damage the refrigerant circuit.
• Do not use electrical appliances inside the
food storage compartments of the appliance,
unless they are of the type recommended by the
manufacturer.
• We suggest you keep these instructions in a
safe place for easy reference.
• This appliance can be used by children aged
from 8 years and above and persons with
reduced physical, sensory or mental capabilities
or lack of experience and knowledge if they
have been given supervision or instruction
concerning use of the appliance in a safe way
and understand the hazards involved. Children
shall not play with the appliance. Cleaning and
user maintenance shall not be made by children
without supervision.
• Children should be supervised to ensure that
they do not play with the appliance.
Electrical requirements
Before you insert the plug into the wall socket
make sure that the voltage and the frequency
shown on the rating plate inside the appliance
corresponds to your electricity supply.
Rating label is on the left hand side of fridge inner
liner.

4 / 30 EN
Refrigerator / User Manual
Important instructions for safety and environment
We recommend that this appliance be connected
to the mains supply via a suitable switched and
fused socket. The appliance must be positioned so
that the plug is accessible.
Should the mains lead of the appliance become
damaged or should it need Replacing at any time,
it must be replaced by a special purpose made
mains lead which can only be obtained from a
BEKO authorised service agent.
Warning! This appliance must be
earthed
If the fitted moulded plug is not suitable for your
socket, then the plug should be cut off and an
appropriate plug fitted. Destroy the old plug which
is cut off as a plug with bared cord could cause a
shock hazard if inserted into a socket elsewhere in
the house.
The moulded plug on this appliance incorporates
a 13 A fuse. Should the fuse need to be replaced
an ASTABEAB approved BS 1362 fuse of the same
rating must be used. Do not forget to refit the fuse
cover. In the event of losing the fuse cover the plug
must not be used until a replacement fuse cover
has been fitted.
Colour of the replacement fuse cover must be the
same colour as that visible on the pin face of the
plug. Fuse covers are available from any good
electrical store.
Important! Fitting A Different Plug
As the colours of the wires in the mains lead
of this appliance may not correspond with the
coloured markings identifying the terminals in your
plug proceed as follows: (See diagram).
1. Connect the green-yellow or green (Earth) wire
to the terminal in the plug marked ‘E’ or with
the symbol or coloured green and yellow or
green.
2. Connect the blue (Neutral) wire to the terminal in
the plug marked ‘N’ or coloured black.
3. Connect the brown (Live) wire to the terminal in
the plug marked ‘L’ or coloured red.
With alternative plugs a 13 A fuse must be fitted
either in the plug or adaptor or in the main fuse
box. If in doubt contact a qualified electrician.
FITTED WITH
BS 1362 13A FUSE ALWAYS
FIT BS 1362 REPLACEMENT
CARTRIDGE FUSE
GREEN &
YELLOW
OR
GREEN
N
BLUE
OR
BLACK
L
BROWN
OR
RED
22mm.
6mm.
6mm.
6mm.
32mm.
12mm.
FUSE
CORD GRIP

5 / 30 EN
Refrigerator / User Manual
Important instructions for safety and environment
Energy saving tips
1. Ensure your appliance is installed in a well
ventilated area.
2. Ensure the time between buying chilled/frozen
food and placing them in your appliance is
kept at minimum, particularly in summer. We
recommend you use a cool bag or a special
carrier bag to carry perishable food.
3. Do not leave the door (s) of your appliance open
longer than necessary and ensure they are
closed properly after each opening.
4. Defrost frozen food in the fridge compartment,
so that frozen food acts as an ice pack to assist
cooling in the fridge.
5. Energy consumption of this appliance is
measured while freezer compartment is loaded
without use of top shelf lid and the drawers
except the bottom drawer. It is advised that
freezer compartment is loaded without use of
drawers except the bottom drawer in order to
achieve maximum loading capacity.
Compliance with WEEE Directive and
Disposing of the Waste Product:
This product complies with EU WEEE
Directive (2012/19/EU). This product
bears a classification symbol for
waste electrical and electronic
equipment (WEEE).This product has
been manufactured with high quality
parts and materials which can be
reused and are suitable for recycling. Do not
dispose of the waste product with normal domestic
and other wastes at the end of its service life. Take
it to the collection center for the recycling of
electrical and electronic equipment. Please consult
your local authorities to learn about these
collection centers.
Compliance with rohs directive:
The product you have purchased complies with EU
RoHS Directive (2011/65/EU). It does not contain
harmful and prohibited materials specified in the
Directive.
Package information
Packaging materials of the product are
manufactured from recyclable materials in
accordance with our National Environment
Regulations. Do not dispose of the packaging
materials together with the domestic or other
wastes. Take them to the packaging material
collection points designated by the local
authorities.

6 / 30 EN
Refrigerator / User Manual
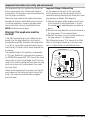
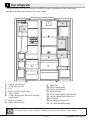
2 Your refrigerator
C
*Optional: Figures in this user manual are schematic and may not match the product exactly. If
the relevant parts are not available in the product you purchased, it applies to other models.
Congratulations on your choice of a BEKO quality Appliance which has been
designed to give you service for many years.
2
1
3
*4
5
*6
*7
*8
11
10
13
14
9
*15
*16
*17
1212
1- Freezer compartment
2- Fridge compartment
3- Fan
4- Butter-cheese compartments
5- Glass shelves
6- Fridge compartment door racks and egg
compartment
7- Minibar accessory
8- Water dispenser tank
9- Odour filter
10- Chiller compartment
11- Crisper compartment
12- Adjustable feet
13- Frozen food storage compartments
14- Freezer compartment door racks
15- Ice makers
16- Ice storage compartment
17- Ice maker decorative cover

7 / 30 EN
Refrigerator / User Manual
3 Installation
Always have the repair procedures carried out by
the Authorised Service Agent. Manufacturer shall
not be held liable for damages that may arise from
procedures carried out by unauthorised persons.
To make the product ready for use, make sure
that the electricity installation is appropriate before
calling the Authorised Service Agent. If not, call
a qualified electrician to have any necessary
arrangements carried out.
C
Preparation of the location and electrical
installation at the place of installation is
under customer's responsibility.
B
Product must not be plugged in during
installation. Otherwise, there is the risk of
death or serious injury!
B
WARNING: Manufacturer shall not
be held liable for damages that may
arise from procedures carried out by
unauthorised persons.
A
WARNING: Prior to installation, visually
check if the product has any defects on
it. If so, do not have it installed. Damaged
products cause risks for your safety.
C
Make sure that the power cable is not
pinched or crushed while pushing the
product into its place after installation or
cleaning procedures.
3.1. Appropriate
installation location
A
WARNING: If the door of the room where
the product will be placed is too small for
the product to pass, then the product's
doors can be removed and the product
turned aside to pass it through.
• Choose a place at where you would use the
product comfortably.
• Install the product at least 30 cm away from
heat sources such as hobs, ovens, heater cores
and stoves. Product must not be subjected to
direct sun light and kept in humid places after
installation.
• Appropriate air ventilation must be provided
around your product in order to achieve an
efficient operation. If the product is to be placed
in a recess in the wall, pay attention to leave at
least 5 cm distance with the ceiling and side
walls.
• Do not place the product on the materials such
as rugs or carpets.
• Place the product on an even floor surface to
prevent jolts.
• Do not install the product in places where the
temperature falls below 5°C.
C
If two coolers are to be installed side
by side, there should be at least 4 cm
distance between them.
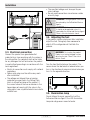
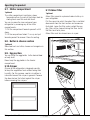
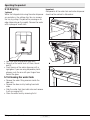
3.2. Installing the
plastic wedges
Plastic wedges are used to create the distance
for the air circulation between the product and
the rear wall. Insert the 2 plastic wedges onto the
rear ventilation cover as illustrated in the figure.
To install the wedges, remove the screws on the
product and use the screws given in the same
pouch with the wedges.

8 / 30 EN
Refrigerator / User Manual
Installation
3.3. Electrical connection
Connect the product to a grounded outlet
protected by a fuse complying with the values in
the rating plate. Our company shall not be liable
for any damages that will arise when the product
is used without grounding in accordance with the
local regulations.
• Electrical connection must comply with national
regulations.
• Power cable plug must be within easy reach
after installation.
• The voltage and allowed fuse or breaker
protection are specified in the Rating Plate
which is affixed to interior of the product. If
the current value of the fuse or breaker in the
house does not comply with the value in the
rating plate, have a qualified electrician install a
suitable fuse.
• The specified voltage must be equal to your
mains voltage.
• Do not make connections via extension cables
or multi-plugs.
B
WARNING: Damaged power cable must
be replaced by the Authorised Service
Agents.
B
WARNING: If the product has a failure,
it should not be operated unless it is
repaired by the Authorised Service Agent!
There is the risk of electric shock!
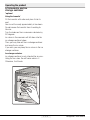
3.4. Adjusting the feet
If the product stands unbalanced after installation
adjust the feet. Taking help from someone to
slightly lift the refrigerator will facilitate this
process.
B
WARNING: First unplug the product.
Product must not be plugged in when
adjusting the feet. There is the risk of
electric shock!
Turn the front feet to balance the product. The
corner where the foot exists is lowered when you
turn in the direction of arrow and raised when you
turn it in the opposite direction.
3.5. Illumination lamp
Do not attempt to repair yourself but call the
Authorised Service Agent if the LED illumination
lamps do not go on or are out of order.

9 / 30 EN
Refrigerator / User Manual
Installation
3.6. Door open warning
(This feature is optional)
An audio warning signal will be given when the
door of your product is left open for 1 minute. This
warning will be muted when the door is closed or
any of the display buttons (if any) are pressed.
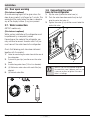
3.7. Water connection
ASP341 models only
(This feature is optional)
Water system installation of the refrigerator must
be performed by a competent person.
Depending on the model of the refrigerator, you
may not have to connect to water main.First you
must connect the water hose to the refrigerator.
Check that following parts have been delivered
together with the product:
1.
Union for connecting the water hose to the rear of
the refrigerator
2.
3 pieces of pipe clips (used to secure the water
hose)
3.
5-meter long water hose (1/4 inch in diameter)
4.
(4) Cold mains water valve with mesh filter (tap
adapter)
5.
(5) External water filter.
c
a
a
b
1
2
3
1
4
2
*5
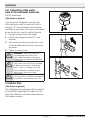
3.8. Connecting the water
hose to the refrigerator
1.
Slip the union (b) onto the water hose (a).
2.
Push the water hose downwards firmly to slip it
onto the water inlet valve (c).
3.
Tighten the union (c) by hand to secure it onto the
water inlet valve.
C
Normally, you are not required to tighten
the union with a tool. However, you can use
a spanner or pliers to tighten the union if
there is a leakage.

10 / 30 EN
Refrigerator / User Manual
Installation
3.9. Connecting of the water
hose to the cold water mains line
ASP341 models only
(This feature is optional)
If you will use the refrigerator by connecting it
to the cold water mains line, you must install a
standard 1/2" valve connector to the cold water
installation of your home. If this valve is not present
or you are not sure, consult a qualified plumber.
1.
Separate the union from the tap adaptor.
2.
Install the tap adaptor to standard 1/2” valve
connector.
3.
After inserting the water hose to the union, install
it to the tap adaptor and insert to the union to the
tap adapter.
4.
Tighten the union by hand.
A
WARNING: Secure the water hose
to suitable points by means of the
clips supplied to avoid any damage or
displacement or accidental disconnection.
A
WARNING: After turning on the water
valve, make sure that there is no leakage
at both connection points of the water
hose. If there is a leakage, turn off the
valve immediately and tighten all joints
again using a spanner or a pliers.
A
WARNING: Make sure that standard 1/2"
valve connector is available and completely
turned off on your cold water mains line.
3.10. Water filter
(This feature is optional)
Your refrigerator may be equipped with an external
or internal filter depending on its model. To fit the
water filter, follow the instructions below referring
to the figures supplied:

11 / 30 EN
Refrigerator / User Manual
Installation
3.11. Mounting the external
filter onto the wall
ASP341 models only
1.
First, determine the location to mount the external
filter.
2.
Then, determine the distance between the
filter and the tap and filter and the water inlet
respectively. Prepare hoses at required lengths.
3.
Mount the filter connection kit onto the wall by
using a screwdriver and attach the filter.
B
WARNING: Water filter must be held
upright as shown in the figure. It is critical
to connect the water inlet and outlet
hoses on the filter correctly.
C
After connecting the filter, do not
consume the first 10 glasses of
water.
B
WARNING: Never mount the filter onto
the refrigerator. Coolant pipes might be
pierced!

12 / 30 EN
Refrigerator / User Manual
Installation
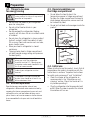
3.12. Things to do to have
the filter usage time
calculated automatically
ASP341 models only
(For products connected to the mains water line
and equipped with filter)
1.
Plug in the refrigerator. Press A (key lock) button
simultaneously to enable the key lock.
A
3
4
2
1
2.
Then press on the following buttons in turn.
A
3
4
2
1
1.Vacation button
2.Fridge temperature setting button
3.Quick Cool setting button
4.Freezer temperature setting button
When the buttons are pressed in the correct order,
Key Lock symbol will turn off, buzzer will sound
shortly and Filter Change Warning indicator will
turn on. When the Filter Replacement Warning
button is pressed on, filter usage times are started
to be calculated automatically.
C
If the filter usage time is calculated
automatically, Filter Change Warning
indicator will illuminate continuously in a
few seconds after the product is plugged
in.
C
Automatic filter usage time calculation is
not enabled ex factory. It must be enabled
in products equipped with a filter.
C
If the same procedure is repeated when
the automatic filter usage time calculation
is enabled, then the function will be
cancelled.
3.13. Before starting to use
the water/ice dispenser
(This feature is optional)
• If the water pressure is below 1 bar then a
separate pump may need to be used.
• Water system of the refrigerator must be
connected to the cold water line. It must not be
connected to hot water line.
• No water may be obtained in the initial start-
up of the refrigerator. Because there is air in
the system. To discharge air from the system,
press dispenser latch for 1-2 minutes until
water comes from the dispenser. Water flow
may be irregular at the beginning. After the
air in the system is discharged, water flow will
return to normal.
• During initial use, you will have to wait
approximately 12 hours for the water to cool
down.
• It will take around 1-2 days for the system to
produce the full amount of ice.
• Water pressure must be between 1-8 bars for
the operation of ice/water dispenser smoothly.
For this, check that 1 glass of water (100 cc)
can be filled in 10 seconds.
• The first 10 glasses of water should not be
consumed.
• You must wait approximately 12 hours to
obtain ice from the ice dispenser for the first
time. If there is not enough ice in the ice
container, ice may not be obtained from ice
dispenser.

13 / 30 EN
Refrigerator / User Manual
Installation
• Do not consume the first 30 pieces (3-4 Liters)
of ice cubes.
• First several glasses of water may be cloudy
when the filter is used for the first time.
Therefore, do not consume the first several
glasses of water.
• If the water dispenser is not used for a long
period of time, first 1-2 glasses of water can
be not so cold.
• If a power outage or a temporary failure occurs
while the refrigerator is operating, ice can melt
down a little bit and then get frozen again. In
such a case, ice cubes can stick to each other.
If the outage or failure prolongs, ice can melt
down causing water leakage. If you experience
such a problem, empty and clean the ice
container.
• Ice cubes can stick to each other if they are left
in the container for a long time.
• If the product is to be connected to the water
mains, make sure that you use potable water.
• Water system of the product is designed to
operate only with water. Do not use beverage
such as soft drinks and/or juices in the water
system.
• It is recommended that the water is
disconnected if you will not be using the
refrigerator for a long period of time due to
vacation or similar reasons.
• Do not attempt to dismantle the ice container
group assembly parts.
• Do not attempt to clean the ice container
assembly without removing it from the
refrigerator.
3.14. Transportation
of the product
1.
Unplug the product before transporting it.
2.
Remove water connections.
3.
Secure the shelves, accessories, crisper and
etc. in the refrigerator by adhesive tape before
repackaging it.
C
Packaging must be adequate and the rules
of transportation printed on the package
must be followed.
C
Original packaging and foam materials
should be kept for future transportations.
A
WARNING: Packaging materials
are dangerous for the children. Keep
packaging materials in a safe place away
from reach of the children.

14 / 30 EN
Refrigerator / User Manual
4 Preparation
4.1. Things to be done
for energy saving
A
Connecting the product to electric energy
saving systems is risky as it may restrict
operation of the product.
• Do not leave the doors of your refrigerator
open for a long time.
• Do not put hot food or drinks in your
refrigerator.
• Do not overload the refrigerator. Cooling
capacity will fall when the air circulation inside
is hindered.
• Do not place the refrigerator in places subject
to direct sunlight. Install the product at least
30 cm away from heat sources such as hobs,
ovens, heater cores.
• Store your food in refrigerator in closed
containers.
• Thawing frozen food in fridge compartment
will both provide energy saving and preserve
the food quality.
C
The ambient temperature of the room
where you install the refrigerator
should at least be 5°C. Operating your
refrigerator under cooler conditions than
this is not recommended.
C
Inside of your refrigerator must be
cleaned.
C
If two coolers are to be installed side
by side, there should be at least 4 cm
distance between them.
4.2. Efficient operation
Specified energy consumption value of your
refrigerator is determined under maximum load by
removing the freezer compartment upper rack and
while other racks and two bottom drawers are in
place. there is no harm to remove a shelf or drawer
to accommodate the shapes and size of food to be
frozen.
4.3. Recommendations on
the fridge compartment
• Do not allow the food to touch the
temperature sensor in fridge compartment.
To allow the fridge compartment to keep its
ideal storage temperature, sensor must not
be hindered by food.
• Do not put hot food and beverages inside the
product.
4.4. Initial use
Before starting to use the product, check that all
preparations are made in accordance with the
instructions in sections "Important instructions
for safety and environment" and "Installation".
• Clean the interior of the refrigerator as
recommended in the “Maintenance and
cleaning” section. Check that inside of it is
dry before operating it.
• Plug the refrigerator into the grounded wall
outlet. When the door is opened the interior
illumination will turn on.

15 / 30 EN
Refrigerator / User Manual
Preparation
• Run the refrigerator without putting any food
for 6 hours and do not open its door unless
absolutely necessary.
C
You will hear a noise when the compressor
starts up. The liquids and gases sealed
within the refrigeration system may also
give rise to noise, even if the compressor is
not running and this is quite normal.
C
Front edges of the refrigerator may
feel warm. This is normal. These areas
are designed to be warm to avoid
condensation.

16 / 30 EN
Refrigerator / User Manual
5 Operating the product
C
*Optional:Figures in this user manual are schematic and may not match the product exactly. If the
subject parts are not included in the product you have purchased, then those parts are valid for other
models.
5.1. Indicator panel
Indicator panels may vary according to the product model.
1 2 3 5 64
16
18
17
7
8
9
10
11
13 12
14
15
21
20
19
8
9
10
11
1
*
72 3 6
5
4
12
13
1516
14
17
18
1- Freezer compartment temperature setting button
2- Freezer compartment temperature indicator
3- Economy mode indicator
4- Auto eco indicator
5- Error status indicator
6- Quick cooling function indicator
7- Fridge compartment temperature setting indicator
8- Fridge compartment temperature setting button
9- Quick cooling button
10- Vacation function indicator
11- Key lock indicator
12- Vacation function button
13- Key lock / filter replacement warning cancellation
button
14- Water, crushed ice, ice cubes selection indicator
15- Water, crushed ice, ice cubes selection button
16- Ice maker on/off indicator
17- Ice maker on/off button
18- Display on/off button
19- Display on/off indicator
20- Auto eco button
21- Quick freezebutton

17 / 30 EN
Refrigerator / User Manual
Operating the product
1. Freezer compartment temperature setting
button
Press this button to set the temperature of the
freezer compartment to -18,-19,-20,-21,-22,-23,
-24,-18... respectively. Press this button to set the
freezer compartment temperature to the desired
value.
2. Freezer compartment temperature indicator
Indicates the temperature set for the Freezer
Compartment.
3. Economy mode indicator
Indicates that the refrigerator operates in energy
saving mode. This display shall be activated if the
freezer compartment temperature is set to -18°C
or cooling with energy saving function is performed
due to eco-extra function.
4. Auto eco indicator:
This indicator is illuminated after 6 hours when
auto eco is activated.
5. Error status indicator
If the refrigerator does not perform enough cooling
or in case of a sensor fault, this indicator is
activated.
When this indicator is activated, “E” is displayed
on the freezer compartment temperature indicator,
and numbers such as “1,2,3...” are displayed on
the fridge compartment temperature indicator. The
numbers on the indicator inform service personnel
about the error.
6. Quick cooling function indicator
Indicates that quick cooling function is activated.
Use this function when you place fresh food in the
fridge compartment or when you require that your
food is cooled down rapidly. Refrigerator operates
continuously for 1 hour when this function is
activated. To cancel this function press Quick
cooling button again.
7. Fridge compartment temperature setting
indicator
Indicates the temperature set for the Fridge
Compartment.
8. Fridge compartment temperature setting
button
Press this button to set the temperature of
the fridge compartment to 8,7,6,5,4,3,2...
respectively. Press this button to set the fridge
compartment temperature to the desired value.
9. Quick cooling button
Press this button to activate quick cooling function.
Press the same buttons to deactivate the function.
10. Vacation function indicator
Indicates that vacation is activated. When the
vacation function is activated, “- -” is displayed
on the fridge compartment temperature indicator
and no active cooling is performed on the fridge
compartment. It is not suitable to keep the food
in the fridge compartment when this function is
activated. The freezer will continue to work and
keep your food frozen.
To cancel this function press vacation function
button again.
11. Key lock indicator
Use this function if you want to prevent any
changes being made to the temperature settings.
To activate this function press key lock button
again.
12. Vacation function button
Indicates that vacation is activated.
13. Key lock / filter replacement warning
cancellation button
Press this button to activate key lock feature. Press
and hold the button for 3 seconds to turn off the
Filter Warning Light.
You should change the filter of your refrigerator
every 6 months. If you follow the instructions in
article 3.12, your refrigerator calculates this time
automatically and filter replacement warning
indicator is illuminated when the filter is expired.

18 / 30 EN
Refrigerator / User Manual
Operating the product
14. Water, crushed ice, ice cubes selection
indicator
Water, crushed ice, ice cubes indicators are
illuminated as per selection.
15. Water, crushed ice, ice cubes selection
button
Press this button to obtain water, crushed ice or
ice cubes. Then, you can take water or ice as you
desire when your press the trigger.
16. Ice maker on/off indicator
If the ice maker function is activated, the ON LED
is illuminated OFF LED is illuminated if it is not
activated.
17. Ice maker on/off button
Stops or resumes the ice making operation.
18. Display on/off button
Turns on/off the display lights.
19. Display on/off indicator
Turns on/off the display lights.
20. Auto eco button
This function is activated when auto eco button is
pressed. If the door is kept open for a long time
when this button is pressed, fridge compartment
starts to operate in economy mode. If you press
this button again, this function is cancelled.
21. Quick freeze button
Press this button to activate quick freezing
function. Quick freeze is good for freezing large
amounts of fresh food to keep the nutrients and
taste locked in.Press the same button to deactivate
the function.

19 / 30 EN
Refrigerator / User Manual
Operating the product
5.2. NeoFrost Cooling System
Thanks to the two separate cooling systems,
cooling speed is much faster than traditional
refrigerators. Air in the fridge is kept with optimal
humidity which is essential for fruit and vegetables
and the freezer maintains a dry environment.
Odours are also not transferred from the fridge to
freezer and vice versa.
5.3. Freezing fresh food
• Wrap the food or place them in a covered
container before putting in the freezer.
• Hot food and beverages must cool down to the
room temperature before putting them in the
freezer.
• The foodstuff that you want to freeze must be
fresh and in good quality.
• Divide the food into portions according to your
family's daily or meal based consumption needs.
• Pack the food in an airtight manner to prevent
them from drying even if they are going to be
stored for a short time.
• Materials to be used for packaging must be
tear-proof and resistant to cold, humidity,
oils and acids and they must also be airtight.
Moreover, they must be made from easy-to-use
materials that are suitable for deep-freezers.
• Frozen food must be used immediately after
they are thawed and they should never be re-
frozen.
• Do not freeze too large quantities of food at one
time. The quality of the food is best preserved
when it is frozen right through to the core as
quickly as possible.
• Placing warm food into the freezer compartment
causes the cooling system to operate
continuously until the food is frozen solid.
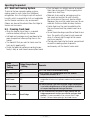
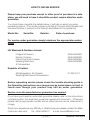
Freezer
Compartment
Setting
Fridge Compartment
Setting
Remarks
-18°C 4°C This is the normal recommended setting.
-20, -24 or -24°C 4°C
These settings are recommended when the ambient
temperature exceeds 30°C.
Quick Freeze 4°C
Use when you wish to freeze your food in a short time. Your
refrigerator will return to its previous mode when the process is
over.
-18°C or colder 2°C
Use these settings if you think that your fridge compartment
is not cold enough because of the hot ambient conditions
or frequent opening and closing of the door.
-18°C or colder Quick Fridge
Use this function when you place a large amount into the
fridge compartment or when you need to cool your food
quickly. It is recommended that you activate Quick Fridge
function 4-8 hours before placing a lot of food at once.
Page is loading ...
Page is loading ...
Page is loading ...
Page is loading ...
Page is loading ...
Page is loading ...
Page is loading ...
Page is loading ...
Page is loading ...
Page is loading ...
Page is loading ...
Page is loading ...
-
 1
1
-
 2
2
-
 3
3
-
 4
4
-
 5
5
-
 6
6
-
 7
7
-
 8
8
-
 9
9
-
 10
10
-
 11
11
-
 12
12
-
 13
13
-
 14
14
-
 15
15
-
 16
16
-
 17
17
-
 18
18
-
 19
19
-
 20
20
-
 21
21
-
 22
22
-
 23
23
-
 24
24
-
 25
25
-
 26
26
-
 27
27
-
 28
28
-
 29
29
-
 30
30
-
 31
31
-
 32
32


Beko ASP341 User manual
- Category
- Side-by-side fridge-freezers
- Type
- User manual
Ask a question and I''ll find the answer in the document
Finding information in a document is now easier with AI
Related papers
Other documents
-
Teka NFE 900 X User manual
-
Summit Appliance FFBF280WX User guide
-
Summit FFBF245SSXIM User manual
-
Grundig GSN10710D User manual
-
Whirlpool W8TIH 182 X User guide
-
-
-
Blomberg DND 9977 PD User manual
-
-
Altus ABM396PX User manual