GO
O
4-=J
c-
O
C.)
c-
Q
>
O
_J
©
i,L!
3=
p-.
Z
m
¢13
Oven Controls
Upper Oven
Controls
_ Upp_n _
Lock Controls
o ec
/
Common Controls
Lower Oven
Controls
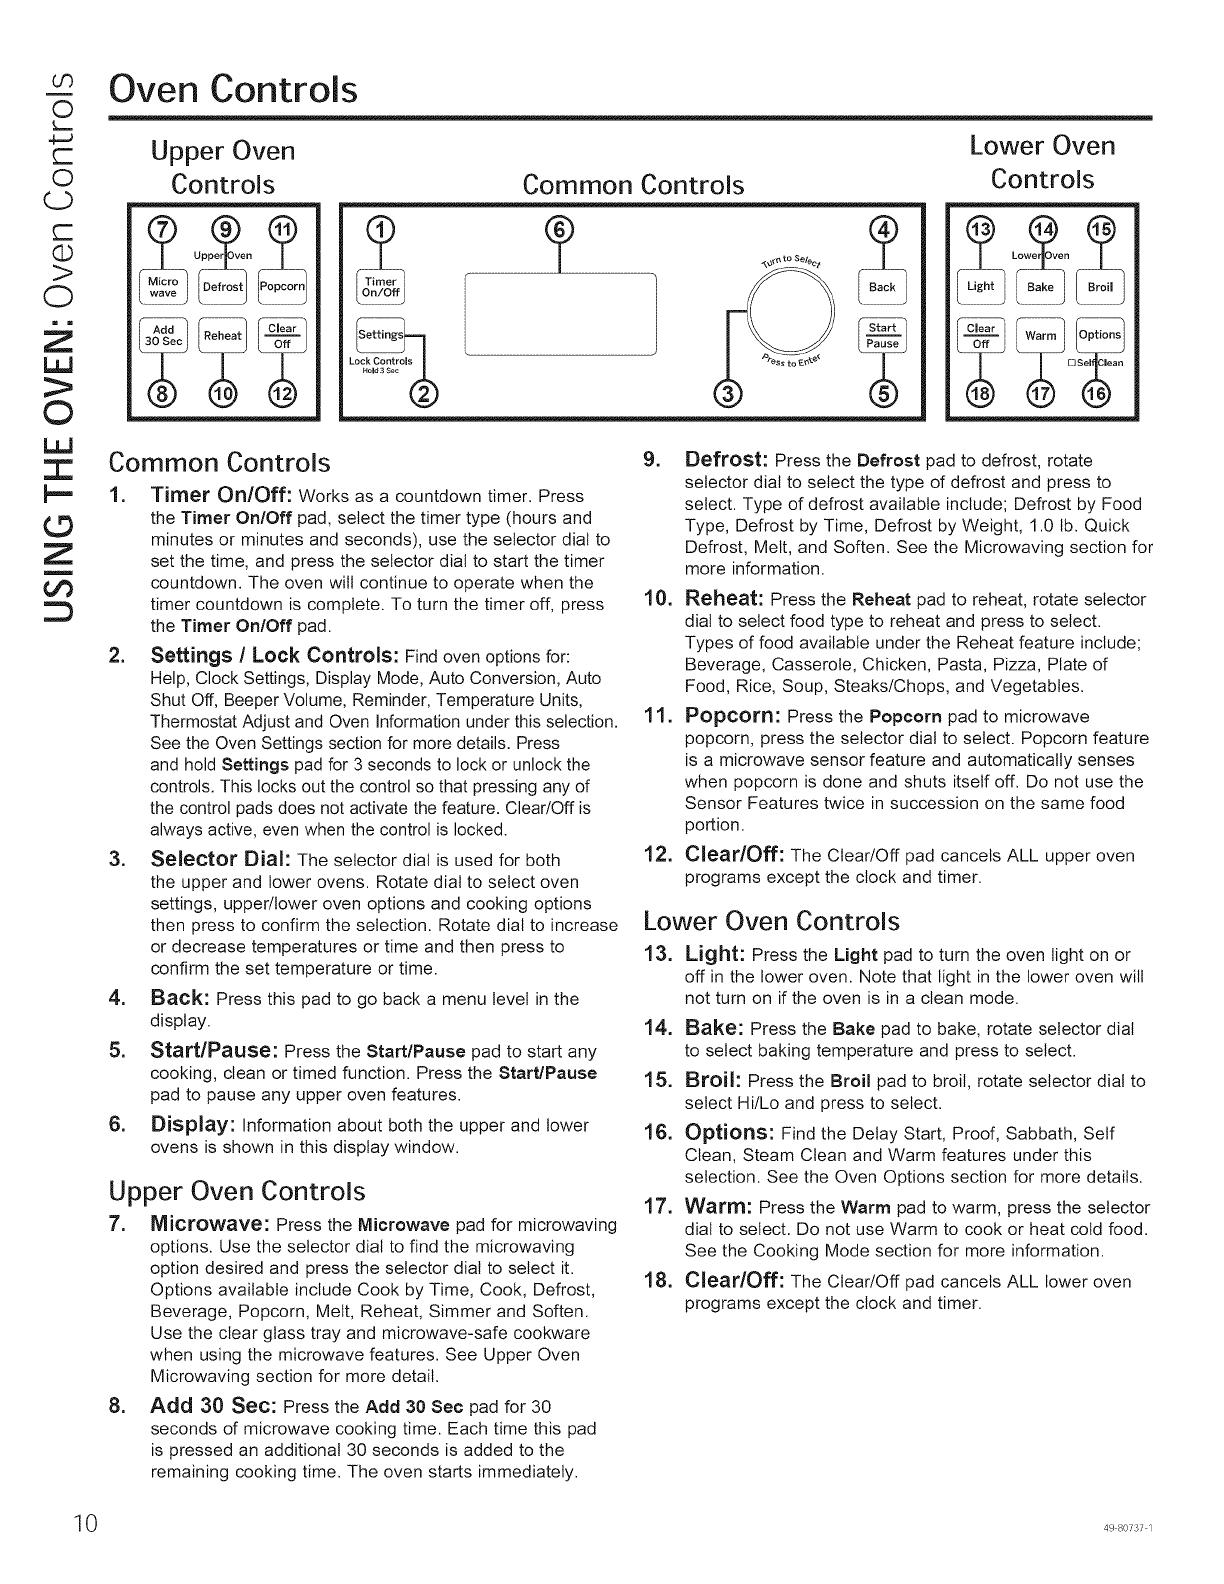
Common Controls
1. Timer On/Off: Works as a countdown timer. Press
the Timer On/Off pad, select the timer type (hours and
minutes or minutes and seconds), use the selector dial to
set the time, and press the selector dial to start the timer
countdown. The oven will continue to operate when the
timer countdown is complete. To turn the timer off, press
the Timer On/Off pad.
2. Settings / Lock Controls: Find ovenoptionsfor:
Help, Clock Settings, Display Mode, Auto Conversion, Auto
Shut Off, Beeper Volume, Reminder, Temperature Units,
Thermostat Adjust and Oven Information under this selection.
See the Oven Settings section for more details. Press
and hold Settings pad for 3 seconds to lock or unlock the
controls. This locks out the control so that pressing any of
the control pads does not activate the feature. Clear/Off is
always active, even when the control is locked.
3. Selector Dial: The selector dial is used for both
the upper and lower ovens. Rotate dial to select oven
settings, upper/tower oven options and cooking options
then press to confirm the selection. Rotate dial to increase
or decrease temperatures or time and then press to
confirm the set temperature or time.
4. Back: Press this pad to go back a menu level in the
display.
5. Start/Pause: Press the StartlPause pad to start any
cooking, clean or timed function. Press the Start/Pause
pad to pause any upper oven features.
6. Display: Information about both the upper and lower
ovens is shown in this display window.
Upper Oven Controls
7. Microwave: Press the Microwave pad for microwaving
options. Use the selector dial to find the microwaving
option desired and press the selector dial to select it.
Options available include Cook by Time, Cook, Defrost,
Beverage, Popcorn, Melt, Reheat, Simmer and Soften.
Use the clear glass tray and microwave-safe cookware
when using the microwave features. See Upper Oven
Microwaving section for more detail.
8. Add 30 Sec: Press the Add 30 Sec pad for 30
seconds of microwave cooking time. Each time this pad
is pressed an additional 30 seconds is added to the
remaining cooking time. The oven starts immediately.
=
Defrost: Press the Defrost pad to defrost, rotate
selector dial to select the type of defrost and press to
select. Type of defrost available include; Defrost by Food
Type, Defrost by Time, Defrost by Weight, 1.0 lb. Quick
Defrost, Melt, and Soften. See the Microwaving section for
more information.
10. Reheat: Press the Reheat pad to reheat, rotate selector
dial to select food type to reheat and press to select.
Types of food available under the Reheat feature include;
Beverage, Casserole, Chicken, Pasta, Pizza, Plate of
Food, Rice, Soup, Steaks/Chops, and Vegetables.
11. Popcorn: Press the Popcorn pad to microwave
popcorn, press the selector dial to select. Popcorn feature
is a microwave sensor feature and automatically senses
when popcorn is done and shuts itself off. Do not use the
Sensor Features twice in succession on the same food
portion.
i2. Clear/Off: The Clear/Off pad cancels ALL upper oven
programs except the clock and timer.
Lower Oven Controls
13. Light: Press the Light pad to turn the oven light on or
off in the lower oven. Note that light in the lower oven will
not turn on if the oven is in a clean mode.
14. Bake: Press the Bake pad to bake, rotate selector dial
to select baking temperature and press to select.
i5. Broil: Press the Broil pad to broil, rotate selector dial to
select Hi/Lo and press to select.
i6. Options: Find the Delay Start, Proof, Sabbath, Self
Clean, Steam Clean and Warm features under this
selection. See the Oven Options section for more details.
17. Warm: Press the Warm pad to warm, press the selector
dial to select. Do not use Warm to cook or heat cold food.
See the Cooking Mode section for more information.
18. Clear/Off: The Clear/Off pad cancels ALL lower oven
programs except the clock and timer.
_0 49 80737 1