Page is loading ...

PLEASE READ THESE INSTRUCTIONS BEFORE
STARTING INSTALLATION
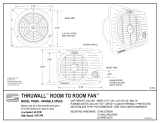
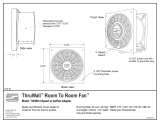
The ThruWall can be mounted in any normal drywall or paneled stud construc-
tion wall up to 6-1/2” maximum total thickness. Depending on your needs,
the ThruWall can be installed high or low on the wall. Please note that warm
air rises, thus is found near the ceiling. Conversely, cold air falls and is found
near the oor. The temperature of the air near the ceiling may be as much as
10°F to 15°F higher than near the oor. Start by making sure that there are NO
studs, water, drain, electrical or other obstruction in the wall where you wish to
install the unit. The power cord of the ThruWall is 10ft long, please verify that
the power cord will reach a 110 Volt AC outlet. The use of extension cords is not
recommended. Please see the airow direction label on the housing.
The grilles of your ThruWall fan may be painted to suit any decor. Thoroughly
wash the grilles with mild household detergent, dry completely, and spray with
a quality, fast dry, spray paint.
When installing your ThruWall fan, the cutouts must be accurate.
IN THE CARTON YOU WILL FIND:
(1) Telescoping metal sleeve with plastic grill attached.
(1) Telescoping metal sleeve without grill attached.
(1) Loose grille.
(6) #6 Screws.
(6) Wall Anchors.
ONE YEAR WARRANTY
Subject to the following limitations, WhisperKOOL warrants that the ThruWall
Fan will, for 1 (one) year from date of original retail purchase, but not exceeding
two years from date of manufacture, remain free from appearance of defects
in workmanship or materials. This warranty is subject to the following limita-
tions: (a) manufacturer’s liability is limited to the replacement or repair of the
unit, as decided by the manufacturer; (b) a defective unit must be returned,
prepaid, with proof of purchase; and (c) this warranty does not apply to defects
resulting from the alteration, abuse, accidental damage, unauthorized repair, or
misuse of the unit. This warranty is given in lieu of all other warranties, guaran-
tees, and conditions on manufacturer’s part, and the manufacturer shall have
no tortious or other liability in respect to this ThruWall Fan.
Actual product appearance may dier from illustrations.
WhisperKOOL reserves the right to modify any or all of its products’ features,
designs, components and specications without notice.
INSTALLATION
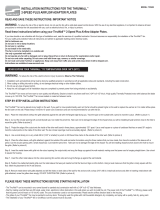
1. Place the metal sleeve (without the grille attached) against the wall with
the anged edge facing you. Trace the pipe on the outside with a pencil
to mark the cutout. (Figure 1)
WhisperKOOL
1738 E. Alpine Ave. Stockton, CA 95205
1(800) 343-9463
www.whisperkool.com
INTRODUCTION
The ThruWall fan moves air from room to room quietly and eciently. Simple
to install in any frame wall from 3-1/2” to 6-3/4” thick. A high quality Thermally
Protected motor with balanced fan blade moves up to 200 CFM. Move heated
or cooled air between rooms.
The fans are carefully packaged, inspected and tested to insure safe operation
and delivery. When you receive your fans, examine it carefully to determine
that there are no broken or damaged parts that may have occurred during
shipment. If damage has occurred, make notation and notify WhisperKool.
They will assist you in replacement or repair, if required.
READ INSTRUCTIONS CAREFULLY BEFORE ATTEMPTING TO INSTALL, OPER-
ATE OR SERVICE THE THRUWALL ROOM TO ROOM FAN™. KNOW THE FAN
APPLICATION, LIMITATIONS AND POTENTIAL HAZARDS. PROTECT YOURSELF
AND OTHERS BY OBSERVING ALL SAFETY INFORMATION. FAILURE TO COMPLY
WITH INSTRUCTIONS COULD RESULT IN PERSONAL INJURY AND/OR PROPERTY
DAMAGE! RETAIN INSTRUCTIONS FOR FUTURE REFERENCE. INSTALLATION AND
CONNECTIONS ARE TO BE MADE BY A QUALIFIED PERSON.
IMPORTANT NOTICE
WARNING - TO REDUCE THE RISK OF FIRE OR ELECTRIC SHOCK, DO NOT USE
THIS FAN WITH A SOLID STATE SPEED CONTROL DEVICE.
With the use of any electrical appliance, it is important to observe all basic
precautions to minimize the risk associated with use, such as electrical shock,
re, or injury to persons.
Read these instructions before using your ThruWall Room to Room Fan™.
If you have doubts or are unfamiliar with this type of installation work, seek the
services of a qualied electrician. WhisperKOOL assumes no responsibility for
installation of thru ThruWall Fan ™ Do not use a variable speed controls with
this product. WhisperKOOL does not provide electrical connection information.
For your safety and protection follow all instructions and adhere to applicable
building and/ or electrical codes.
Not for bathroom use.
Do not use in wet locations.
Do not use in a window.
Do not install in re rated walls.
Route the electric cord so that it cannot be tripped over.
Use only a grounded wall outlet.
WARNING -
TO REDUCE THE RISK OF FIRE, ELECTRIC SHOCK OR INJURY TO PERSONS,
OBSERVE THE FOLLOWING:
1. Installation work and electrical wiring must be done by qualied person(s)
in accordance with all applicable codes and standards, including re-rated
construction.
2. When cutting or drilling into wall or ceiling, do not damage electrical wiring
or other hidden utilities.
3. Not to be used with any solid state speed control.
Operation Instructions:
The ThruWall is equipped with a two speed motor. There is a three position
switch on the output side of the fan. The switches: position (I) is low speed,
center (O) o, and position (II) is high speed.
WARNING
!!
Figure 1

4. Use a small sharp pin or very small drill bit (1/32“ or smaller) to punch
or drill these three marks to the outside of the other wall.
5. Place the other sleeve, with grille attached, against the outside of the
wall and center its location using the three markers that you have
made, then trace the outside of the sleeve with a pencil. Cut the
circular opening with a small drywall saw. Cut inside the pencil line.
Take care not to damage the edge of the drywall. You will be installing
drywall anchors close to the hole to mount the grille.
6. Insert the metal sleeve with grille into the cutout opening (fan output
side) and snug the ange up against the wall material, making sure
that power cord is hanging straight down.
7. Insert the other metal sleeve into the cutout opening (fan suction side)
and snug the ange up against the wall material.
8. Position the unattached plastic grille over the metal sleeve that was
just inserted so that the logo is at the bottom and that one of the
mounting holes is in the top center. Mark the location of all 3 wall
anchors. Make sure that the grille ribs are nicely square with the oor.
9. Mark the position for the wall anchors on the grille.
10. Remove metal sleeve with grille attached and drill the holes on both
sides of the wall for the anchors with a sharp 3/16“ drill bit. Install wall
anchors and after re-inserting metal sleeve with grille attached, screw
the grilles down snugly. (Figure 4) DO NOT OVERTIGHTEN.
2. Cut out the circular opening with a small drywall saw. Cut inside the pen-
cil line. Take care not to damage the edge of the drywall since you will be
installing drywall anchors close to the hole to mount the grille. (Figure 2)
3. Project the edge of the cutout onto the inside of the other wall board in
three places, approximately 120° apart. Use a small square or a piece of
cardboard that has an exact 90° angle to mark the cutout points on the
inside of the other wall. The two circular openings must be accurately
aligned. (Figure 3)
Back of Unit
EXHAUST ROOM
HEAT
HEAT
HEAT
Figure 2
Figure 3 Figure 4
/


