Page is loading ...

P4791A
NOTE TO INSTALLER:
LEAVE THESE INSTRUCTIONS WITH THE CONSUMER AFTER INSTALLATION.
NOTE TO CONSUMER: RETAIN FOR FUTURE REFERENCE.
THIS OUTDOOR COOKING GAS APPLIANCE IS NOT INTENDED TO BE
INSTALLED IN OR ON RECREATIONAL VEHICLES AND/OR BOATS.
DATE: JUNE 5, 2000
REVISED:
SAFETY INSTRUCTIONS
PARTS LIST
ASSEMBLY INSTRUCTIONS
LIGHTING INSTRUCTIONS
COOKING INSTRUCTIONS
CLEANING & MAINTENANCE INSTRUCTIONS
FREQUENTLY ASKED QUESTIONS
2
5
8
11
12
13
15
TABLE OF CONTENTS
PAGE
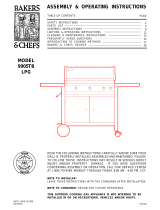
ASSEMBLY & OPERATING INSTRUCTIONS
READ FOLLOWING INSTRUCTIONS CAREFULLY AND BE SURE YOUR
GRILL IS PROPERLY INSTALLED, ASSEMBLED AND MAINTAINED.
FAILURE TO FOLLOW THESE INSTRUCTIONS MAY RESULT IN SERIOUS
BODILY INJURY AND/OR PROPERTY DAMAGE. IF YOU HAVE QUES-
TIONS CONCERNING ASSEMBLY OR OPERATION, CONSULT GRAND
HALL SERVICE CENTER, GAS APPLIANCE SERVICE PERSON OR YOUR
LP GAS COMPANY.
Grand Hall Enterprise Co., Ltd.
Taipei, Taiwan
MODEL
Y0003CW
LPG

Safety Instructions
Read carefully before assembling and operating your Gas Grill.
INSTALLATION
This gas grill must be installed in accordance with the
local codes or, if in an area without local codes, with
the latest edition of the National Fuel Gas Code ANSI
Z223.1. In Canada, installation must conform to the
standard CAN/CGA 1-b149.1 and/or .2 (Installation
Code for Gas Burning Appliances and Equipment) and
any local codes.
THE LOCATION FOR YOUR GRILL
DO NOT use your gas grill in garages, porches,
breezeways, sheds or other enclosed areas. Your gas
grill is to be used OUTDOORS ONLY, at least 21" from
the back and side to any combustible surface. The
grill should not be placed under any surface that will
burn. Do not obstruct the flow of combustion and
ventilation air around the grill housing.
This outdoor cooking gas appliance is not intended to be
installed in or on recreational vehicles and/or boats.
2
PROTECT CHILDREN: Keep them away from grill
during use and until grill has cooled after you are
finished. Do not allow children to operate grill.
CHECKING FOR GAS LEAKS
NEVER TEST FOR LEAKS WITH A FLAME
Prior to first use and at the beginning of each new
season (or, if using LP, whenever gas cylinder is
changed), it is a must for you to check for gas leaks.
Follow these steps:
1.
2.
3.
4.
Make soap solution by mixing one part liquid
detergent and one part water.
Turn off heat control valve(s), then turn on gas at
source.
Apply the soap solution to all gas connections.
Bubbles will appear in the soap solution if connec-
tions are not properly sealed. Tighten or repair as
necessary.
If you have a gas leak that you cannot repair, turn
off the gas at the source, disconnect fuel line from
grill and immediately call your gas supplier for
professional assistance.
LP GAS CYLINDER SAFETY
Your gas grill is designed for use with a standard 20
lb. LP gas cylinder. DO NOT CONNECT YOUR GRILL
TO AN LP GAS CYLINDER EXCEEDING THIS
CAPACITY. A tank of approximately 12 inches in
diameter by 18-1/2 inches high should be the Maximum
size tank used.
LP gas cylinder is not provided with this grill. When
you buy LP gas cylinder, be sure that (1) the cylinder
must be provided with a shutoff valve terminating in
an LP gas supply cylinder valve outlet compatible with
a Type I cylinder connection device and a safety relief
device having a direct communication with the vapor
space of the cylinder; (2) the cylinder supply system
must be arranged for vapor withdrawal; and (3) the
cylinder used must include a collar to protect the
cylinder valve.
The LP gas cylinder must be constructed and marked
in accordance with specifications of the U.S. Depart-
ment of Transportation(DOT). In Canada, gas cylinders
must meet Canadian Transportation and Communications
(CTC) specifications.
FOR YOUR SAFETY
If you smell gas:
1. Shut off gas to the appliance.
2. Extinguish any open flame.
3. Open lid.
4. If odor continues, immediately call
your gas supplier or your fire
department.
FOR YOUR SAFETY
1. Do not store or use gasoline or other
flammable vapors and liquids in the
vicinity of this or any other appliance.
2. An LP cylinder not connected for use
shall not be stored in the vicinity of this
or any other appliance.
Do not store empty or full spare gas cylinders
under or near this or any other appliance.
Keep the fuel hose and any electrical cord away
from hot surfaces. Protect fuel hose from dripping
grease. Avoid unnecessary twisting of hose.
Visually Inspect hose prior to each use for cuts,
cracks, excessive wear or other damage. Replace
hose, if necessary.
NEVER test for gas leaks with a lighted match or
open flame.
NEVER light grill with lid closed or before check-
ing to insure burner tubes are fully seated over
gas valve orifices.
NEVER lean over cooking surface while lighting
grill. Use barbecue tools with long handles and
good quality insulated oven mitts when operating
grill.

Safety Instructions
3
DANGER: If you smell or hear the hiss of
escaping gas from the LP gas cylinder:
Get away from the LP gas cylinder.
Do not attempt to correct the problem
yourself.
Call your fire department (Do not make the
call from near the LP gas cylinder - your
telephone is an electrical device).
>
>
>
Never connect an unregulated LP gas cylinder to
your grill. A gas regulator adjusted to have an outlet
pressure of 11" water column(W.C.) is supplied for
connection to the LP gas cylinder. The pressure
regulator and hose assembly supplied with the appli-
ance must be used. Replacement pressure regulators
and hose assemblies must be those specified by the
appliance manufacturer.
SAFETY !
BEWARE
OF
SPIDERS
CAUTION: BURNER TUBES MUST BE IN-
SPECTED AND CLEANED BEFORE FIRST
USE
Spiders and small insects occasionally spin
webs or make nests in the burner tubes during
warehousing and transit. These webs can lead
to a gas flow obstruction which could result in
a fire in and around the burner tubes. This type
of fire is known as "FLASH-BACK" and can
cause serious damage to your grill and create
an unsafe operating condition for the user.
Although an obstructed burner tube is not the
only cause of "FLASH-BACK" it is the most
common cause and frequent inspection and
cleaning of the burner tubes is necessary.
Have the LP gas cylinder filled by a reputable LP gas
dealer, and visually inspected and re-qualified at each
filling.
Have your LP gas dealer check the release valve after
every filling to assure that it remains free of defects.
Always keep cylinder in an upright position. Always
close the cylinder valve when the grill is not in use.
Do not subject LP gas cylinder to excessive heat.
Never store your LP gas cylinder indoors. If you store
your grill indoors, ALWAYS disconnect LP gas cylinder
FIRST, and store LP gas cylinder safely outside.
When the appliance is not in use, the gas must
be turned off at the supply cylinder.
Storage of an appliance indoors is permissible only
if the cylinder is disconnected and removed from the
appliance.
Cylinders must be stored outdoors in a well-ventilated
area out of the reach of children. Disconnected
cylinders must not be stored in a building, garage or
any other enclosed area.
HOSE ASSEMBLY SAFETY
Check tank valve features to ensure it has proper
external mating threads. (Type 1 connection per ANSI
Z21.58a-1998)
Make sure all burner valves are in their off position.
Inspect valve connections port and regulator assem-
bly. Look for any damage or debris. Remove any
debris. Inspect hose for damage. Never attempt to
use damaged or plugged equipment. See your local
LP gas dealer for repair.
When connecting regulator assembly to the tank
valve, hand tighten nut clockwise to a positive stop. Do
Not use a wrench to tighten. Use of a wrench may
damage quick coupling nut and result in a hazardous
condition.
Open tank valve fully(counter-clockwise). Use a soapy
water solution to check all connections for leaks
before attempting to light grill. If a leak is found, turn
tank valve off and do not use grill untill repairs can be
made by a local LP gas dealer.
2.
3.
4.
5.
6.
a) Turn the burner valves off.
b) Turn the tank valve off fully.( Turn clockwise to stop.)
c) Detach the regulator assembly from tank valve by
turning the quick coupling nut counter-clockwise.
To disconnect LP gas cylinder:
The hose assembly must be inspected before each use of
the appliance. If it is evident there is excessive abrasion
or wear; or the hose is cut, it must be replaced prior to the
appliance being put into operation.
TO CONNECT THE LP GAS SUPPLY CYLINDER,
PLEASE FOLLOW THE FOLLOWING STEPS:
Make sure tank valve is in its full off position.(Turn
clockwise to stop)
1.

Safety Instructions
BURNER TUBE CLEANING
For cleaning the burner tubes. Follow the procedure
that is most convenient for you.
Remove burner assembly from the grill bowl.
Bend a stiff wire, (a light weight coat hanger works
well) into a small hook as shown below,
Run the hook up through each venturi tube and
into the burner several times.
1.
2.
Run the brush up through each venturi tube and
into the burner several times.
SAFETY !
Use a bottle brush with a flexible handle.
3.
VERY IMPORTANT:
The location of burner with respect to orifice is vital to safe operation. Check to assure the valve
orifices are inside of the burner tubes before using your gas grill. See drawing below.
If the burner tubes (venturi) do not fit over the valve orifices, lighting the burners may cause an explosion
and or a fire accident might happen.
CARE AND MAINTENANCE
As with all appliances, proper care and maintenance
will keep them in top operating condition and prolong
their life. Your new gas grill is no exception. By
following these cleaning procedures on a timely basis,
your grill will be kept clean and working properly with
minimum effort.
FOLLOW THE BURNER AND BURNER TUBE CLEAN-
ING PROCEDURE BEFORE ASSEMBLY OF YOUR
GRILL.
To reduce the chance of "Flash-back", the procedure
below should be followed at least once a month in
late summer or early fall when spiders are most active,
or when your grill has not been used for an extended
period of time.
Wire brush entire outer surface of burner to remove
loose corrosion.
Clean any clogged holes with a stiff wire (for
example: an open paper clip).
Inspect the burner assembly for any opening
caused by corrosion.
If openings due to corrosion are found, order a new
burner.
Replace the burner as described in the assembly
instructions.
Check the burner for proper location after replacing.
Check to assure the valve orifices are inside of
the burner tubes.
Should "Flash-back" occur, immediately turn the con-
trol knobs to "OFF" and carefully turn the gas supply
off at the gas source.
1.
2.
3.
4.
5.
6.
7.
BURNER CLEANING
Regardless of which venturi cleaning procedure you
used, we recommend that you complete the following
steps to help prolong burner life.
4
Burner
Burner Tube (Venturi)
OrificeGas Cock with Ignitor
Control Knob
Spark Electrode
Gas Collect Box
3/16"

5
Parts List
Remove all components from the packing carton and place within easy reach. Do not throw
the shipping carton away but use it as a protective work surface.

6
Parts List
1.
2.
3.
4.
5.
6.
7.
8.
9.
10.
11.
12.
13.
14.
15.
16.
17.
18.
19.
20.
21.
22.
23.
24.
25.
26.
27.
28.
29.
30.
31.
32.
33.
34.
35.
36.
HOW TO ORDER REPLACEMENT
PARTS
QTY.
1
1
1
1
1
1
1
1
1
1
1
1
1
1
1
1
1
2
1
1
4
2
2
1
2
4
1
4
1
4
4
4
4
1
1
2
1
1
REF#
HEAT INDICATOR
HINGE, R/UP
HINGE, L/UP
GRILL LID, HUNTER GREEN
LID HANDLE
CENTER COOKING GRID
COOKING GRID
CENTER FLAME TAMER
FLAME TAMER
BURNER ASSEMBLY
GREASE SHIELD
GAS COLLECTOR BOX WITH
ELECTRODE
BURNER BRACKET
HINGE, R/DOWN
HINGE, L/DOWN
GRILL BOWL
GAS VALVE WITH IGNITOR
SIDE SHELF
REGULATOR WITH HOSE ASSEM-
BLY
GREASE CUP
BOWL SUPPORT BRACKET, T-
SHAPED
BOWL SUPPORT BRACKET
TANK HOLDER
CONTROL PANEL
CONTROL KNOB
CART LEG, UPPER
MIDDLE SHELF
CART LEG, LOWER
BOTTOM SHELF
CASTOR SEAT
CASTOR
CART LEG SEAT, R
CART LEG SEAT, L
COOKING POT WITH LID
14" CHINESE WOK
SIDE SHELF BRACKET
OWNER'S MANUAL
TROLLEY HARDWARE BAG
DESCRIPTION
To order replacement parts, contact Grand
Hall service center at 1-877-537-6190.
To make sure you obtain the correct replace-
ment part(s) for your Gas Grill, please refer
to the parts list on this page. The following
information is required to assure getting the
correct part:
1. Gas Grill Model Number (see data sticker
2. Part Number
3. Description
4. Quantity of parts needed
IMPORTANT: Keep this assembly and op-
erating instruction manual for convenient
referral and for part replacement.
IMPORTANT: Use only factory authorized
parts. The use of any part that is not factory
authorized can be dangerous. This will also
void your warranty.
on grill)
PART#
P0602A
P5544B
P5544D
P0127B
P0224A
P1641B
P1618B
P1724A
P1718A
P1939B
P8065C
P2629A
P2226A
P5544A
P5544C
P0755A
P32B2A
P1143A
P3632A
P2721A
P1334A
P1335A
P4030A
P2958A
P3409F
P0841A
P1049A
P0938A
P1050A
P4508A
P5109C
P80D9A
P80D9B
P5816C
P5736B
P1143B
P4791A
P55B8A
AGA label located
here

Parts List
The following table illustrates a breakdown of the screwpack. It highlights what
components are used in the various stages of assembly.
Actual Sizes:
1/4" x 1/2" PHILLIPS HEAD SCREW
1/4" x 1/2" PHILLIPS HEAD SCREW
(DETACHED FROM THE CORNERS OF
MIDDLE SHELF)
1/4" x 1/2" HEX HEAD SCREW
ALUMINUM WASHER
1/4" x 1/2" PHILLIPS HEAD SCREW
1/4" LOCK NUT
B.
B.
A.
C.
B.
D.
COMPONENTS USES
X4
X4
X8
X8
X4
X4
INSTALLS CART LEGS TO BOTTOM SHELF
INSTALLS GRILL HEAD TO CART
INSTALLS SIDE SHELVES TO BOWL SUPPORT
BRACKETS
INSTALLS TANK HOLDERS TO MIDDLE AND BOT-
TOM SHELVES
REF.
D. 1/4" LOCK
NUT x 4
B. 1/4" x 1/2" PHILLIPS
HEAD SCREW x 12
C. ALUMINUM WASHER x 8
A. 1/4" x 1/2" HEX
HEAD SCREW x 8
(4 out of 12 found at the
corners of Middle Shelf)
7

Side Shelf
Bowl Support Bracket
Assembly Instructions
8
ATTACHING THE GRILL HEAD ASSEMBLY
TO THE CART LEGS (SEE FIG. 1 ~ FIG. 4)
1.
2.
3.
4.
5.
6.
7.
Remove Grill assembly and all components from the
carton.
Insert the 4 Casters into the bottom of Cart Legs by
turning the threaded caster stem clockwise, by
hand, until it stops. Tighten securely using a wrench.
See Fig. 1.
Insert the Cart Legs (Caster attached) through the
holes on the Bottom Shelf. Align the hole on the
corner of Bottom Shelf with the tapped hole on the
lower section of cart leg. Tighten securely using the
1/4" x 1/2" phillips head screw provided.
To install the Grill Head assembly, detach the 4
screws and nuts located at the corners of Middle
Shelf, as shown in Fig. 2. Retain these screws
for use in step number 6.
This step requires assistance from a second person
because the grill head is heavy. Make sure the holes
for Tank Holder on Bottom Shelf are located on the
right side. Place the Grill Head assembly over the 4
cart legs. See Fig. 2. Align the 4 legs with the 4
holes on the bottom of Middle Shelf.
Gently press the Grill Head down - evenly onto the
four cart legs, until you have aligned the holes on the
corners of the Middle Shelf with the tapped holes on
the cart legs. Tighten securely using the 1/4" x 1/2"
phillips head screws detached in step 4 above.
Insert the Heat Indicator into the hole on the Grill Lid
as shown in Fig. 2. Adjust it to level position, then
tighten securely using lock washer and hex nut
provided.
Snap Control Knobs onto the Gas Valve shafts as
shown in Fig. 2.
Attach both Side Shelves to Bowl Support Brackets
by sliding on to cast Bowl Support Bracket. Align the
holes on Side Shelf with the tapped holes on Bowl
Support Brackets. Tighten securely using the 1/4" x
1/2" hex head screws and aluminum washers provided.
See Fig. 3.
Fig. 1
Fig. 2
Fig. 3
Bottom Shelf
Caster
Cart Leg
tapped hole
Cart Leg
tapped hole
holes for Tank Holder
Middle Shelf
Control Panel
holes for Tank Holder
Heat Indicator
Control Knob
Gas Valve shaft
8.
9.

9
Assembly Instructions
COOKING COMPONENTS INSTALLATION
(SEE FIG. 5)
Grease Cup
Tank Holder
Fig. 4
Fig. 5
10.
11.
12.
Attach Tank Holder to Bottom Shelf. Align the holes
on Tank Holder with the holes on Bottom Shelf.
Tighten securely using the 1/4" x 1/2" phillips head
screws and lock nuts provided. Install the other Tank
Holder to Middle Shelf the same way. See Fig. 4.
Place Grease Cup onto the center of Middle Shelf.
Remove cooking components from separate inner
box.
Open Grill Lid. Remove all packing materials from
Grill Bowl.
Place Outside Flame Tamer on the lower ledge of
grill bowl above the burner. See Fig. 5.
Place Center Flame Tamer on the center of Outside
Flame Tamer.
Place Outside Cooking Grid on the ledge above the
Flame Tamers.
Place Center Cooking Grid, Cooking Pot with Lid or
Chinese Wok on the center of Outside Cooking Grid.
Outside Cooking
Grid
Center Flame
Tamer
Outside Flame
Tamer
Grill Bowl
Burner
Center Cooking
Grid
Cooking Pot
with Lid
Chinese Wok

Assembly Instructions
Congratulations
Now your gas grill is ready to use. Before
first use and at the beginning of each
barbecue season (and, LP grill models only,
whenever LP gas cylinder is changed):
1.
2.
3.
Please read safety, lighting and operating
instructions carefully.
Check gas valve orifices, venturi tubes and
burner ports for any obstructions.
Perform gas leak check (see page 2).
10
Turn the burner valves off.
Turn the tank valve off.(Turn clockwise to stop)
Detach the regulator assembly from tank valve by
turning the quick coupling nut counter-clockwise.
1.
2.
3.
TO DISCONNECT THE LPG TANK
CAUTION: When the appliance is not in use, the
gas must be turned off at the supply tank.
CONNECTING A LIQUID PROPANE GAS
(LPG) TANK TO YOUR GRILL (SEE FIG. 6)
Fig. 6
Hang filled gas tank on both the Tank Holders
of Bottom and Middle Shelves. Make sure the
tank valve is in the off position (turn clockwise
to stop). See Fig. 6.
Check tank valve features to ensure it has proper
external mating threads. (Type 1 connection per
ANSI Z21.58a-1998)
Make sure all burner valves are in their off
position.
Inspect valve connections port and regulator
assembly. Look for any damage or debris.
Remove any debris. Inspect hose for damage.
Never attempt to use damaged or plugged
equipment. See your local LP gas dealer for
repair.
When connecting regulator assembly to the tank
valve, hand tighten coupling nut clockwise to a
positive stop. Do Not use a wrench to tighten.
Use of a wrench may damage quick coupling nut
and result in a hazardous condition.
Open tank valve fully(counter-clockwise). Use a
soapy water solution to check all connections for
leaks before attempting to light grill. If a leak is
found, turn tank valve off and do not use grill until
repairs can be made by a local LP gas dealer.
1.
2.
3.
4.
5.
6.
gas tank
Regulator
Bottom Shelf
Middle Shelf
coupling nut
Tank Holder
Tank Holder

Familiarize yourself with the safety guidelines at
the front of this manual. Do not smoke while
lighting grill or checking gas supply connections.
Be sure the LPG cylinder is filled.
Check that the end of each burner tube is properly
located over each valve orifice.
Make sure all gas connections are securely
tightened.
Open the grill lid.
Set control knobs to OFF and open the LPG
cylinder valve.
Push and turn the RIGHT control knob to HIGH.
Adjust the control knobs to your desired cooking
temperature.
11
Push the right control knob in fully then rotate knob
left about 1/4 turn. Hold here for 3 to 4 seconds
(allowing just enough gas to collect). Then turn knob
slowly to the left further, until a click is heard. Turn
the control knob to OFF if the burner does not light.
You may have to repeat this step 3 or 4 times to light
the burner.
If the burner does not light, turn gas off and wait 5
minutes for gas to clear, before retrial or light by
match.
After the outer burner has been lit, turn the inner
LEFT control knob to HIGH. The inner ring burner
will be lit by the outer burner.
WARNING
Lighting Instructions
Basic Lighting Procedures
1.
2.
3.
4.
5.
6.
7.
11.
Lighting Your Grill by Match
To light your gas grill by match, follow steps 1 through
6 of the Basic Lighting Procedures. Then, insert a lit
match through the lighting hole on the right side of the
grill bowl. See Fig. 4. Press in the right control knob
and rotate left to "HI" setting to release gas. The burner
should light immediately.
Figure 4
Never lean over the grill cooking area while
lighting your gas grill. Keep your face and
body a safe distance (at least 18 inches)
from the lighting hole or burners, when lighting
your grill by match.
WARNING!
Get away from the LPG cylinder.
Do not try to fix the problem yourself.
Call your fire department. (Do not call
near the LPG cylinder because your
telephone is an electrical device.)
!
Checking For LP Gas Leaks
Never test for leaks with a flame. Prior to first
use, at the beginning of each season, or every time
your LPG cylinder is changed, you must check for
gas leaks. Follow these four steps:
3.
4.
Apply the soap solution to all gas connections.
Bubbles will appear in the soap solution if the
connections are not properly sealed. Tighten or
repair as necessary.
If you have a gas leak that you cannot repair,
turn off the gas at the source, disconnect fuel
line from your grill and call your gas supplier
for repair assistance.
!
1.
2.
Make a soap solution by mixing one part liquid
detergent and one part water.
Turn the grill control knobs to the full OFF
position, then turn the gas ON at source.
A strong gas smell, or the hissing sound of
gas indicates a serious problem with your
gas grill or the LPG cylinder. Failure to
immediately follow the steps listed below
could result in a fire or explosion which
could cause serious bodily injury, death, or
property damage.
•
•
•
WARNING
Failure to open the grill lid during the
lighting procedures could result in a
fire or explosion which could cause
serious bodily injury, death, or property
damage.
WARNING
!
IF YOU SMELL GAS:
• Shut off gas supply to the grill.
• Extinguish any open flame.
• Open grill lid.
• If odor continues, immediately call your
gas company or local fire department.
Failure to comply with these instructions
could result in a fire or explosion which
could cause serious bodily injury, death, or
property damage.
•
•
•
•
Lighting Hole

12
•
•
•
1.
2.
3.
Misalignment of burner tubes over orifices
Correction: Reposition burner tubes over
orifices.
Obstruction in gas line
Correction: Remove fuel line from grill. Do not
smoke! Open gas supply for one second to
clear any obstruction from fuel line. Close off
gas supply at source and reconnect fuel line to
grill.
Obstruction in gas valve
Correction: If an obstruction is suspected in
gas valves or gas valve bracket, please call your
gas apliance service person for assistance.
Misalignment of ignitor on burner
Correction: Check for proper position of the
electrode tip. The tip of the electrode should be
pointing toward the top of the collector box, as
shown in Figure 1 on page 4. The gap between
the spark electrode and the top of the gas
collector box should be 3/16". Adjust if
necessary. With the gas supply closed and all
control knobs set to OFF check positive ignitor
for presence of spark at electrode. In turn, push
Right control knob in and rotate about 1/4 turn
to the left (counter-clockwise) until a click is
heard. The trigger hitting the Strike Block should
produce a blue spark at the electrode tip.
Turn gas off at source and turn the control knob to
OFF. Wait at least five minutes for gas to clear,
then retry.
Check gas supply and connections.
Repeat lighting procedure. If your grill still fails
to operate properly, turn the gas off at source,
turn the control knobs to OFF, then check the
following:
If the grill fails to light properly:
If all checks or corrections have been made and
your grill still fails to operate properly, call your gas
apliance service person.
4.
WARNING
!
Immediately turn the gas OFF at its
source.
Turn the control knobs to OFF position.
Once the grill has cooled down, clean
the burner tubes and burners according
to the Burner Tube Cleaning Instructions
found on page 13 of this manual.
•
•
•
Should a "FLASH-BACK" fire occur in/or
around the burner tubes, follow the
instructions below. Failure to comply
with these instructions could result in a
fire or explosion which could cause
serious bodily injury, death, or property
damage.
Cooking Instructions
Burn-off
Before cooking on your gas grill for the first time, you
will want to "burn off" the grill to eliminate any odor or
foreign matter. Just ignite the burners, close the lid,
and operate grill on the HIGH setting for about five
minutes.
CAUTION:
Operating your grill on the HIGH setting for longer than
five minutes may damage certain parts of your grill. Do
not leave your grill unattended.
Preheating
To preheat, light your grill on HIGH, close the lid and
follow this timetable:
Cooking Temperatures
High setting: Only use this setting for fast warm-up,
searing steaks or chops and for burning food residue
off the grill after cooking is complete. Never use the
HIGH setting for extended cooking.
Medium to Low settings: Most recipes specify
medium to low settings, including all smoking and for
cooking lean cuts such as fish.
NOTE: Temperature settings will vary with the amount
of wind and temperature outside your home.
Direct Cooking
The direct cooking method can be used with the
supplied cooking grids, optional griddle placed directly
over the lit grill burners. Direct cooking requires the
grill lid to be open. This method is ideal for searing
and whenever you want meat, poultry or fish to have an
open-flame barbecued taste. Deep frying and smoking
are also best cooked in this manner because they
require direct heat.
Indirect Cooking
The indirect cooking method can also be used with the
supplied cooking grids, optional griddle. To cook
indirectly, the food should be placed on the outer or
inner side of your grill with the burner lit on the oppo-
site side. Or place your food on the optional warming
rack inside your grill and light the inner grill burner.
Either way, indirect cooking must be done with the
lid down.
Flare-Ups
The fats and juices dripping from grilled food can cause
flare-ups. Since flare-ups impart a favorably distinctive
taste and color to food cooked over an open flame,
they should be accepted up to a point. Nevertheless,
uncontrolled flaring can result in a ruined meal.
For high temperature cooking, preheat grill
5 minutes.
For low temperature cooking, preheat grill
3 minutes.
To slow cook, preheating is not necessary.
•
•
•
•

13
CAUTION: If burners go out during operation, close gas
supply at source, and turn all gas valves off. Open lid and
wait five minutes before attempting to re-light (this allows
accumulated gas fumes to clear).
CAUTION: Should a grease fire occur, close gas
supply at source, turn off all burners and leave lid
closed until fire is out.
CAUTION: Do not attempt to disconnect any gas fitting
while your gas grill is in operation. As with all
appliances, proper care and maintenance will keep
them in top operating condition and prolong their life.
Your gas grill is no exception. By following these
cleaning procedures on a timely basis, your grill will be
kept clean and working properly with minimum effort.
KEEP OUTDOOR COOKING AREA AND GAS APPLI-
ANCE CLEAR AND FREE FROM COMBUSTIBLE MA-
TERIAL, GASOLINE AND OTHER FLAMMABLE VA-
PORS AND LIQUID.
Turn the burner valve off.
Turn the tank valve off fully.( Turn clockwise to stop.)
Detach the regulator assembly from tank valve by
turning the quick coupling nut counter-clockwise.
Remove cooking grids and flame tamers from the grill.
Remove the burner by unscrewing the two (2) Phillips
screws that secure the burner to the "n" shaped
bracket. Then disconnect the electrode assembly wire
from the ignitor.
Carefully lift each burner up and away from gas valve
orifice.
6.
5.
4.
3.
2.
1.
CLEANING THE COOKING GRIDS
After cooking, turn control knobs to "OFF" and let grill cool
before attempting to clean your cooking grids.
Periodically it is suggested that you wash the cooking
grids in a mild soap and warm water solution. You can use
a wash cloth, vegetable brush or brass brush to clean your
cooking grids if you desire. NEVER use a steel type wire
brush. Take care not to chip or scratch the porcelain
coating because it will cause the grids to rust - which is not
covered under your warranty.
CLEANING THE BURNER TUBES AND BURNER PORTS
( to prevent FLASH-BACK)
To reduce the chance of FLASH-BACK, this procedure
must be followed at least once a month in late summer or
early fall when spiders are most active, or when your grill
has not been used for an extended period of time.
KEEP THE VENTILATION OPENINGS OF THE CYL-
INDER ENCLOSURE FREE AND CLEAR FROM
DEBRIS.
Cleaning & Maintenance
We offer three (3) ways to clean your burner tubes. Use the
procedure at the top of the next page that is most
convenient for you.
CLEANING THE FLAME TAMER
Periodically use a wire brush to remove stubborn burned
on cooking residue (and any rust that may have developed),
wash in warm soapy water and dry. Coat with cooking oil.
Rusting may appear on the flame tamers. This is a natural
oxidation process and does not affect the performance of
the flame tamer or adversely affect the taste of the food.
Application of cooking oil to the flame tamers between
uses can help prolong the life of the flame tamers. Grand
Hall does not warrant the flame tamers against rust unless
the flame tamer is completely rusted through.

14
Check spark electrode, adjusting as instructed. Elec-
trode tip must point toward the top of gas collector and
approximately 3/16" from the top of collector box.
Replace burners and adjust spark electrode collector
box. Edge of collector box must overlap burner port.
Replace flame tamers, cooking grids.
Reconnect to gas source and observe burner flame for
correct operation.
Regardless of which burner tube cleaning procedure you
use, we recommend that you also complete the following
steps to help prolong burner life.
1.
2.
3.
Wire brush entire outer burner surface to remove
food residue and dirt.
Clean clogged ports with stiff wire or open paper clip.
Inspect the burner for damage (cracks or holes) or
loose screws. If damaged, order and install a new
burner. After installation, check to insure that gas
valve orifices are correctly placed inside ends of burner
tubes. Also check position of spark electrode.
CLEANING THE GREASE CUP
The grease cup should be emptied, wiped and periodically
washed using a mild detergent and warm water solution.
ANNUAL CLEANING OF GRILL HOUSING
Regular care and maintenance will keep your grill in top
operating condition and prolong it's life. However, once a
year you should give the entire grill a thorough cleaning to
keep it in top operating condition.
2.
3.
1.
4.
Cover gas valve orifices with a piece of aluminum foil.
Brush the inside and bottom of the grill with a brass
brush, and wash down with a mild soap and warm water
solution. Rinse thoroughly and let dry.
Remove aluminum foil from orifices and check orifices
for obstruction.
5.
6.
Turn the burner valves off.
Turn the tank valve off. (Turn clockwise to stop.)
Detach the regulator assembly from tank valve by
turning the quick coupling nut counter-clockwise.
Remove and clean (as explained before) the cooking
grids, flame tamers and burners.
7.
8.
9.
10.
IMPORTANT: You should NOT line the bottom of the grill
housing with aluminum foil, sand or any other grease-
absorbent substance. To avoid grease fires, the grease
must be allowed to drain through the grill bowl and down
to the Grease Cup.
CLEANING EXTERIOR SURFACES:
Your gas grill is made of heavy steel, and should provide
you with years of trouble-free service. Should you decide
to touch up any scratches in the paint which may occur
with use, a touch-up paint designed for use with high
temperature. Follow these steps for best results when
applying touch-up paint:
1.
2.
3.
4.
Shut off gas supply at source and disconnect fuel line
from gas valve manifold. Protect fuel line fitting.
Remove loose paint by lightly sanding surface(s) with
a medium grit emery cloth or a fine grit sandpaper.
Remove any dirt or grease by washing the surface(s)
with a mild soap and warm water solution.
Rinse with clean water and allow surface to dry
thoroughly or wipe the area with vinegar.
11.
Daily weathering and the high heat associated with
grill cooking can cause exterior stainless steel sur-
faces to tan. Follow these directions for best results.
Never attempt to clean hot grill surfaces.
Remove dirt or grease using a soft cloth, then polish
Stainless Steel using a Foam Spray cleaner specifi-
cally designed for use on stainless steel. Never use
an abrasive cleaner or scrubber as they may scratch
and damage your stainless surfaces.
Dry with a soft cloth and allow to air dry before starting
your grill.
CLEANING THE STAINLESS STEEL SURFACES:
1.
2.
1.
2.
3.
Bend a stiff wire (a lightweight coat hanger works well)
into a small hook. Run the hook through each burner
tube and into the burner several times.
Using a narrow bottle brush with a flexible handle (do
not use a brass wire brush), run the brush through each
burner tube and into the burner several times.
Use an air hose to force air through the burner tube and
out through the burner ports. Observe each port to
make sure air comes out every hole.
CLEANING THE GRILL INTERIOR

Frequently Asked Questions
Our Service Center is available during business hours to assist you with your new gas grill. We're here to
take your questions, listen to your input, and we're certainly open to new recipe ideas! For your convenience
we've listed some of the more commonly asked questions here, but if you have more questions or com-
ments please call us Monday through Friday, 8:00 am to 4:30 pm CST, at 1-877-537-6190.
Q. I am not familiar with Grand Hall. How long have you been in the gas grill business?
A. Grand Hall has been in business for 22 years manufacturing gas regulators, valves, burners, grills and
assorted parts and accessories for the grill-related industry. Since 1996 we have been manufacturing
the top-of-the-line Bakers & Chefs - a private label grill line commissioned by Sam's Club.
Q. I want to convert my LPG (liquid propane gas) grill to natural gas. Is this safe?
A. Your gas grill is manufactured to exact specifications and is approved by the American
Gas Association (AGA) for use with an LPG cylinder only. We the manufacturer support the U.S.
Government in it's efforts to prevent after-market conversions of gas appliances. For your own safety,
conversion kits are not available and attempts to convert your grill will void your product warranty.
Q. When I mail my Warranty Registration card to the Service Center, will I start getting a lot of junk mail?
A. Grand Hall does not sell or offer it's customer list to other companies. You'll notice the card is quick and
simple to complete. We only ask for pertinent information that enables us to match your name with the
correct model number, date ofpurchase and serial number - all of which must be on-file if you ever
need replacement parts, accessories or want to place a warranty claim. Your information is held
private, and will be on-file here at the Service Center. You can mail the card, or fax it directly to
(214)553-0090.
Q. My Warranty Registration card asks for the serial number off my grill. Where can I find this information?
A. Each gas grill has an individual serial number which may include five numbers and one
letter. However, your serial number may be different. You will find this serial number (and the model
number) on the silver AGA label, placed on the middle shelf. It is very important to include
your serial number on the warranty registration card exactly as it appears on your grill.
Q. How long are parts available for my current grill model?
A. Grand Hall maintains an ample inventory of parts for current gas grills. In the rare event a grill part has
been discontinued or modified, Grand Hall reserves the right to substitute a similar part at our option.
Q. The regulator and hose that came with my grill does not fit my older LPG tank. Why?
A. The U.S. Government regulates gas appliances and LPG cylinder fittings. Increased regulations have
altered the tank fittings over the last few years and they continue to change as the industry develops
improved technology. We apologize for any inconvenience, but if your tank does not fit the current
regulator it means your tank is outdated and must be replaced.
15

Q. I want to take good care of my investment, so what is the best way to clean my gas grill?
A. As with all appliances, proper care and maintenance will keep them in top operating condition and help
prolong their life. Your gas grill is no exception. Follow the "Cleaning & Maintenance"
instructions in this instruction manual on a timely basis, and your grill will offer you years of enjoyment.
Q. What can cause grills to rust, and what affect does it have on the materials?
A. Rusting is a natural oxidation process and may appear on steel flame tamers at any time. Because your
grill is manufactured with heavy gauge steel, rust will not affect the performance of your grill or affect the
taste of your foods. Grand Hall can not warrant against rust unless the components are completely
rusted through.
Q. How can I remove rust from my grill? Is there a treatment I can use for rust?
A. Here is a quick and easy way to remove annoying rust: Brush off rusted surfaces and create a mixture
of 1 part vinegar and 1 part water. Spray this solution onto rusted areas to dissolve rust, then scrub with
wire brush if necessary. To treat against rust, keep all cooking surfaces and steel flame tamers
lightly oiled at all times. Vegetable oil works well for this and helps to prolong the life of your
steel cooking surfaces and any cast-iron cooking accessories.
Q. What does treating cast-iron mean, and what is the benefit?
A. Treating cast-iron will make foods stick less (which means cooking and
clean-up are botheasier) and helps prolong the life of cast-iron
accessories. It's easy to do, just wipe the cast-ironwith vegetable oil,
olive oil, canola oil, grease, etc., then heat on high in the grill for a few
minutes. After cooking you can wipe a greased cloth along the
cast-iron and much of theresidue will wipe away so you don't
actually have to soak
”
the accessory. After continued use,
the cast-iron will retain flavor and memory of previous recipes,
which is what they mean by
seasoned pan.
”
For best results, it is best to treat cast-iron
before, and after cooking.
16
Frequently Asked Questions

GRAND HALL U.S.A., INC.
10280 Miller Road
Dallas, Texas 75238
Tel: 1-877-537-6190 Fax: (214) 553-0090
Notes
/