
MGL-2250R
ЕЛЕКТРИЧНА М’ЯСОРУБКА
Інструкція з експлуатації
ELECTRIC MEAT GRINDER
Instruction manual
100%
20%

3
UA
ЗАХОДИ БЕЗПЕКИ
• Перед першим вмиканням перевірте, чи відповідають
технічні характеристики, зазначені на виробі, параме-
трам електромережі.
• Використовувати тільки в побутових цілях згідно з цією
інструкцією по експлуатації. Прилад не призначений
для промислового застосування.
• Не використовуйте поза приміщеннями. Забороня-
ється розбирати пристрій, якщо його підключено
до електромережі. Завжди відключайте пристрій від
електромережі перед чищенням, а також якщо він не
використовується.
• Щоб уникнути ураження електричним струмом та за-
горяння, не занурюйте прилад у воду або інші рідини.
Якщо це сталося, негайно вимкніть його від електроме-
режі та зверніться до авторизованого сервісного цен-
тру для перевірки.
• Цей прилад можуть використовувати діти у віці від 8
років та особи з обмеженими фізичними, чуттєвими або
розумовими можливостями або з недостатністю досвіду
й знань, якщо вони перебувають під постійним нагля-
дом або їх проінструктовано щодо безпечного викори-
стання приладу та вони зрозуміють можливі небезпеки.
Очищення та обслуговування споживачем не повинні
здійснювати діти без нагляду.
• Діти повинні перебувати під контролем для недопущен-
ня гри з приладом.
• Не залишайте пристрій працювати без нагляду.
• Не використовуйте приладдя, що не входить в комплект
поставки.
• При пошкодженні кабелю живлення його заміну, щоб
уникнути небезпеку, повинен здійснювати виробник

4
UA
або авторизований сервісний центр, або аналогічний
кваліфікований персонал.
• Не намагайтеся самостійно ремонтувати пристрій. При
виникненні неполадок звертайтеся до найближчого
авторизованого сервісного центру.
• Слідкуйте, щоб шнур живлення не торкався гострих
кромок і гарячих поверхонь.
• Не тягніть, не перекручуйте і ні на що не намотуйте
шнур живлення.
• Не ставте прилад на гарячу газову або електричну пли-
ту, не кладіть його поблизу від джерел тепла.
• Не торкайтеся рухомих частин приладу.
• Будьте обережні при поводженні з ножем - він дуже
гострий.
• Не проштовхуйте продукти в горловину пальцями,
використовуйте для цього штовхач. Якщо це не допо-
могло, вимкніть і відключіть прилад від електромережі,
розберіть його і очистіть засмічені місця.
• При перенесенні тримайте прилад обома руками за
корпус і ні в якому разі не за лоток для продуктів або
горловину.
• При використанні насадки «kibbe» не встановляйте ніж
і решітки.
• Не подрібнюйте в м’ясорубці тверді продукти (кістки,
горіхи, імбир та ін.).
• Якщо спрацювала система захисту від перегріву двигу-
на, не вмикайте прилад, поки він повністю не охолоне.
• Максимально допустимий час безперервної роботи -
не більше 5 хвилин з обов’язковою перервою не менше
10 хвилин.
• Кожного разу після закінчення роботи переконайтеся,
що прилад вимкнений, відключений від електромережі
і двигун повністю зупинився, перш ніж приступати до
розбирання пристрою.

5
UA
• Не перенавантажуйте прилад продуктами.
• Якщо виріб деякий час перебував при температурі
нижче 0 °С, перед включенням його слід витримати в
кімнатних умовах не менше 2 годин.
• Виробник залишає за собою право без попереднього
повідомлення вносити незначні зміни в конструкцію
виробу, що кардинально не впливають на його безпеку,
працездатність і функціональність.
Цей прилад обладнаний термостатом, що автоматично
відключає подачу електроенергії до приладу в разі пере-
гріву. Якщо пристрій раптово припинив роботу: витягніть
вилку з розетки, вимкніть пристрій, дайте приладу охо-
лонути протягом 60 хвилин, вставте штепсель у розетку,
увімкніть прилад знову. Зверніться до авторизованного
сервісого центру, якщо система термостата активується
занадто часто.

6
UA
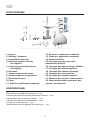
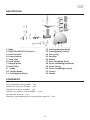
ОПИС ПРИЛАДУ
1. Корпус
2. Вмикач / вимикач
3. Інерційний вимикач
4. Фіксатор знімного блоку
м’ясорубки
5. Гніздо для установки блоку
м’ясорубки
6. Штовхач
7. Завантажувальний лоток
8. Завантажувальна горловина
9. Металевий шнек
10. Ніж
11. Решітка з дрібними отворами
12. Решітка з середніми отворами
13. Решітка з крупними отворами
14. Кільцева гайка
15. Насадка для приготування
домашньої ковбаси
16. Насадка для приготування «kibbe»
17. Насадка для тертки (дрібна)
18. Насадка для тертки (середня)
19. Насадка для шинкування
20. Насадка для тертки (крупна)
21. Штовхач для тертки і шинкування
22. Завантажувальна горловина для
тертки і шинкування
КОМПЛЕКТАЦІЯ:
М’ясорубка у розібраному вигляді - 1 шт.
Насадка для приготування домашньої ковбаси - 1 шт.
Насадка для приготування «кеббе» - 1 шт.
Насадки для тертки та шинкування – 4 шт.
Інструкція з експлуатації - 1 шт.
Гарантійний талон (доданий в інструкцію) – 1 шт.

7
UA
ПІДГОТОВКА ДО РОБОТИ
Всі частини м’ясорубки, які будуть стикатися з продуктами (крім корпусу), вимийте
теплою водою з миючим засобом. Перед підключенням приладу до електромережі
упевніться, що він вимкнений.
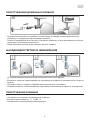
СКЛАДАННЯ (МАЛ. 1-7)
• Вставте блок м’ясорубки в гніздо на корпусі і, утримуючи його однією рукою, другою
вставте фіксатор в отвір на бічній панелі і затягніть його (мал. 1-2).
• Вставте в блок м’ясорубки шнек довгим кінцем і повертайте його до тих пір, поки він
не стане на місце (мал. 3)
• Одягніть на шнек спочатку ніж, а потім - одну з решіток так, щоб її виступи увійшли в
пази на корпусі блоку м’ясорубки, а ріжучі кромки ножа щільно прилягли до її пло-
щини, інакше м’ясо не буде перемелюватися (мал. 4-5).
• Затягніть (не перетягуючи) кільцеву гайку (мал. 6).
• Встановіть на блок м’ясорубки лоток для продуктів (мал. 7).
• Поставте м’ясорубку на рівну поверхню.
• Нічим не перекривайте вентиляційні отвори на нижній і бічній панелях.
Перед використанням затягніть фіксуюче кільце, переконайтеся, що кільце не може
бути від’єднано.

8
UA
ОБРОБКА М’ЯСА
• Поріжте м’ясо на шматки такого розміру, щоб вони легко проходили в завантажу-
вальну горловину.
• Підключіть м’ясорубку до електромережі.
• Переключіть інерційний вимикач в положення «3» і переведіть вмикач / вимикач в
положення ON.
• Покладіть м’ясо на піддон і потроху подавайте в м’ясорубку штовхачем.
• Після закінчення роботи вимкніть м’ясорубку (інерційний вимикач в положення «4» і
переведіть вмикач / вимикач в положення R) і відключіть її від електромережі.
РЕВЕРС
• Якщо м’ясорубка забилася, переведіть вимикач в положення R. Шнек почне оберта-
тися в протилежному напрямку і виштовхне застряглі продукти.
• Якщо це не допомагає, вимкніть м’ясорубку від електромережі, розберіть і очистіть.
ПРИГОТУВАННЯ КЕББЕ (KIBBE)
Кеббе - це традиційна близькосхідна страва. Її зазвичай
готують з баранини і пшеничної крупи, які перекручують в
однорідний фарш. З фаршу роблять порожнисті трубочки,
начиняють їх більш грубим фаршем зі спеціями і обсмажу-
ють в олії.
Пропустіть заздалегідь приготовлений фарш через насадку
для приготування кеббе. Поріжте порожнисту трубку на
шматочки бажаної довжини. Наповніть трубочки начинкою
і заліпіть їх кінці. Обсмажте кеббе в маслі.

9
UA
ПРИГОТУВАНННЯ ДОМАШНЬОЇ КОВБАСИ
• Потримайте оболонку для ковбаси в теплій воді 10 хвилин, потім надіньте вологу
оболонку на насадку для приготування ковбаси.
• Помістіть подрібнене м’ясо в лоток. Наповніть оболонку, м’яко проштовхуючи м’ясо в
горловину за допомогою штовхача.
• Якщо оболонка прилипне до насадки, змочіть її водою.
НАСАДКИ ДЛЯ ТЕРТКИ ТА ШИНКУВАННЯ
• Ці насадки використовуються для шинкування овочів та фруктів.
• Вставте та закріпіть завантажувальну горловину для тертки та шинкування в гніздо на
корпусі.
• Покладіть одну з насадок у барабан завантажувальної горловини.
• Подавайте овочі в завантажувальну горловину штовхачем для тертки та шинкування.
ПРИГОТУВАННЯ ЛОКШИНИ
• Час роботи не повинен перевищувати 3 хвилин.
• Використовуйте решітку 11, 12 або 13.
• Наповнюйте лоток борошном безперервно.

10
UA
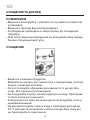
ОЧИЩЕННЯ ТА ДОГЛЯД
РОЗБИРАННЯ
• Вимкніть м’ясорубку і упевніться, що двигун повністю
зупинився.
• Вимкніть прилад від електромережі.
• Розбирання проводьте в зворотному до складання
порядку.
• Для полегшення розбирання на кільцевій гайці перед-
бачені спеціальні виступи.
ОЧИЩЕННЯ
• Видаліть залишки продуктів.
• Вимийте всі деталі, які стикаються з продуктами, теплою
водою з миючим засобом.
• Не застосовуйте абразивні речовини та ті, що містять
хлор, або органічні розчинники.
• Не занурюйте корпус електродвигуна в воду. Протирай-
те його вологою тканиною.
• Забороняється мити металеві деталі м’ясорубки в посу-
домийній машині!
• Не використовуйте гарячу воду з температурою вище
50 °С для миття металевих частин м’ясорубки, тому що
це прискорить їх окислення.

11
UA
• Після миття витріть металеві частини сухою тканиною.
Якщо м’ясорубка не використовуватиметься тривалий
час, протріть всі її металеві частини тканиною, змоче-
ною в рослинному маслі.
• Чисті та висушені ніж і решітки протріть тканиною, про-
соченою рослинним маслом.
ЗБЕРІГАННЯ
• Перед зберіганням переконайтеся, що прилад відклю-
чений від електромережі і повністю охолонув. Виконай-
те всі вимоги розділу ОЧИЩЕННЯ ТА ДОГЛЯД.
• Змотайте шнур живлення.
• Зберігайте прилад в сухому прохолодному місці.
ЕКОЛОГІЧНО БЕЗПЕЧНА УТИЛІЗАЦІЯ
(утилізація електричного та електронного обладнання)
Утилізацію упаковки, посібника користувача, а також самого приладу
необхідно здійснювати відповідно до місцевої програми з переробки
відходів. Потурбуйтеся про навколишнє середовище: не викидайте
такі ви роби разом із звичайним побутовим сміттям.
Використані (старі) прилади не можна викидати з іншим побутовим
сміттям, їх потрібно утилізувати окремо. Власники старого обладнан-
ня зобов’язані віднести прилади до спеціальних пунктів прийому або
здати до відповідних організацій. Так ви допомагаєте програмі з переробки цінної
сировини, а також очищення від забруднюючих речовин.

EN
12
SAFETY GUARDS
This appliance is equipped with a thermostat system. This
system will automatically cut o the power supply to the
appliance in case of overheating.
If you appliance suddenly stops running:
1. Pull the mains plug out of the socket.
2. Press the switch button to turn o the appliance.
3. Let the appliance cool down for 60 minutes.
4. Put the mains plug in the socket.
5. Switch the appliance on again.
6. Please contact your dealer of an authorized service center
if the thermostat system is activated too often.
7. If you plug in, the indicator light will be on.
8. This appliance shall not be used by children. Keep the
appliance and its cord out of reach of children.
9. Appliances can be used by persons with reduced physical,
sensory or mental capabilities or lack of experience
and knowledge if they have been given supervision or
instruction concerning use of the appliance in a safe way
and if they understand the hazards involved.
10. Children shall not play with the appliance.
11. Switch o the appliance and disconnect from supply
before changing accessories or approaching parts that
move in use.
CAUTION! In order to avoid a hazardous situation, this
appliance must never be connected to a time switch.
1. Read these instructions for use carefully and look at the
illustrations before using the appliance.
2. Before use, tight the xing ring by spanner, make sure the
ring can not be detach by 4 Nm.
3. Keep these instructions for future reference.

EN
13
4. Check if the voltage indicated on the appliance
corresponds to the local mains voltage before you
connect the appliance.
5. Never use any accessories of parts from other
manufacture. Your guarantee will become invalid if such
accessories or parts have been used.
6. Do not use the appliance if the mains cord, the plug or
other parts are damaged.
7. If the power cord of this appliance is damaged, it must
always be replaced by manufacture or a service center
authorized, in order to avoid hazardous situations.
8. Thoroughly clean the parts that will come into contact
with food before you use the appliance for the rst time .
9. Unplug the appliance immediately after use.
10. Never use your nger or an objection to push
ingredients down the feed tube while the appliance is
running. Only the pusher is to be used for this purpose.
11. Keep the appliance out of the reach of children.
12. Never let the appliance run unattended.
13. Switch the appliance o before detaching and install any
accessory.
14. Wait until moving parts have stopped running before
you remove the parts of the appliance.
15. Never immerse the motor unit in the water or any other
liquid, nor rinse it under the tap. Use only a moist cloth
to clean the motor unit.
16. Do not attempt to grind bones, nuts or other hard items.
17. Never reach into the cutter housing. Always use the
pusher.
18. Mincers are fed with sinewless, boneless and fatless beef
that has been cut into pieces approximately 20 mm x 20
mm x 60 mm. Do not use the appliance for more than 5
minutes consecutively. Leave the appliance to cool for
10 minutes before using again.

EN
14
19. Accessories shall include instructions for their safe use.
20. It shall warn of potential injury from misuse.
21. This appliance is not intended for use by persons
(including children) with reduced physical, sensory
or mental capabilities, or lack of experience and
knowledge, unless they have been give supervision or
instruction concerning use of the appliance by a person
responsible for their safety.
22. Children should be supervised to ensure that they do
not play with the appliance.
23. If the appliance is locked, please press Reversal button
(REV). The meat locked in cutter housing is untrodden,
so the appliance can renew its usual condition.
24. Disposal of appliances and batteries.
25. This appliance can be used by children aged from 8
years and above if they have been given supervision
or instruction concerning use of the appliance in a
safe way and if they understand the hazards involved.
Cleaning and user maintenance shall not be made by
children unless they are aged from 8 years and above
and supervised. Keep the appliance and its cord out of
reach of children aged less than 8 years.
26. This appliance is intended to be used in household and
similar applications such as:
– sta kitchen areas in shops, oces and other working
environments;
– farm houses;
– by clients in hotels, motels and other residential type
environments;
– bed and breakfast type environments.
Please read carefully and keep the instruction well
In order to avoid rust we advise you to lubricate the cutter
unit and the grinding discs with some vegetable oil.

EN
15
DESCRIPTION
1. Body
2. ON/0/R (ON/OFF/ Reverse)
3. Inertia switch
4. Fasten button
5. Tube inlet
6. Food pusher
7. Hopper plate
8. Head Tube
9. Snake
10. Cutting blade
11. Cutting plate (fine)
12. Cutting plate(medium)
13. Cutting plate (coarse)
14. Fixing ring
15. Sausage
16. Kebbe
17. Rum shredding (fine)
18. Drum shredding (medium)
19. Drum slicing
20. Drum shredding (coarse)
21. Pusher
22. Feeder
EQUIPMENT:
Disassembled meat grinder - 1 pc.
Nozzle for making sausage - 1 pc.
Nozzle for making “kebbe” - 1 pc.
Nozzles for graters and shredders - 4 pcs.
Instruction manual - 1 pc.
Warranty card (added to the instruction manual) - 1 pc.

EN
16
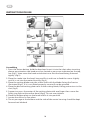
INSTRUCTION FOR USE
Assembling
1. Press the fasten button, hold the head and insert it into the inlet when inserting
please pay attention the head must be slanted as per arrow indicated on the top,
see (fig.1), then move the head anticlockwise so that the head being fastened
tightly. (fig.2)
2. Place the snake into the head, long end first, and turn to feed the screw slightly
until it is set into the motor housing. (fig.3)
3. Place the cutting blade onto the snake shaft with the blade facing the front as
illustrated (fig.4). If it is not fitted properly, meat will not be grinded.
4. Place the desired cutting plate next to the cutting blade, fitting protrusions in the
slot. (fig.5)
5. Support or press the center of the cutting plate with one finger then screw the
fixing ring tight with another hand (fig.6). Do not over tighten.
6. Place the hopper plate on the head and fix it into position.
7. Locate the unit on a firm place.
8. The air passage at the bottom and the side of the motor housing should be kept
free and not blocked.

EN
17
Mincer
1. Insert the worm shaft into the cutter housing, the plastic end first.
Place the cutter unit onto the worm shaft. (The cutting edges should be at the
front) Place the medium grinding disc or coarse grinding disc (depending on the
consistency you prefer) onto the worm shaft. (Make sure the notch of the grinding
disc fit onto the projections of the mincer head.) Turn the screw ring in the direction
of the arrow on the cutter housing until it is properly fastened.
2. Attach the cutter housing to the motor unit.
3. Place the tray on the upright part of the cutter housing.
4. Now the appliance is ready for mincing.
Cut the meat into 10cm-long, 2cm-thick strips. Remove bones, pieces of gristle and
sinews as much as possible. (Never use frozen meat!)
Put the meat in the tray. Use the pusher to gently push the meat into the cutter
hosing. (For steak tartare , mince the meat with the medium grinding disc twice. )
(fig.7)
Plug the unit on and switch3/4 knob to “3” , then switch ON/0/R knob to “ ON “
position. After use it, Plug the unit on and switch 3/4 knob to “4”, then switch ON/0/R
knob to “ R “ position.
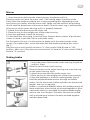
Making kebbe
1. Insert the worm shaft into the cutter housing, the plastic
end first. (fig.8)
Place the cone in the cutter housing.
Place the former on the cutter housing and screw the ring
on the cutter housing. (fig.9)
2. Attach the cutter housing to the motor unit.
3. Place the tray on the upright part of the cutter housing.
4. Now the appliance is ready for making kebbe. (fig.10)
Feed the prepared kebbe mixture through the kebbe
maker. Cut the continuous hollow cylinder into the desired
lengths and user as required.
Kebbe is a traditional Middle Eastern dish made primarily of
lamp and bulgur wheat which are minced together to form
a paste the mixture is extruded through the kebbe maker
and cut into short lengths. The tubes can then be stuffed
with a minced meat mixture, the ends pinched together
and then deep fried.

EN
18
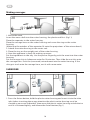
Making sausages
1. Mince the meat
Insert the worm shaft into the cutter housing, the plastic end first. (fig.11)
Place the separator in the cutter housing.
Place the sausage horn on the cutter housing and screw the ring on the cutter
housing.
(Make sure the notches of the separator fit onto the projections of the mincer head.)
2. Attach the cutter housing to the motor unit.
3. Place the tray on the upright part of the cutter housing.
4. Now the appliance is ready for making sausages.
Put the ingredients in the tray. Use the pusher to gently push the meat into the cutter
housing.
Put the sausage skin in lukewarm water for 10 minutes. Then slide the wet skin onto
the sausage horn. Push the (seasoned) minced meat into the cutter housing. If the
skin gets stuck onto the sausage horn, wet it with some water.
SHREDDER
1. Press the fasten button, hold the plastic cutter housing and insert it into the tube
inlet (when inserting please pay attention the plastic cutter housing must be
slanted as per arrow indicated), then move the plastic cutter housing anticlockwise
until it is fastened tightly, and release the fasten button.(fig.1)

EN
19
2. Place the shredder drum into the plastic cutter housing, then move the shredder
clockwise so that it being properly fastened.(fig.2)
3. Place the pusher on the upright part of the plastic cutter housing, and use the
pusher to gently push the vegetable into the plastic cutter housing.(fig.3)
4. Now the appliance is ready for cutting.
Making noodle
1. Operation time shall not exceed 3 minutes.
2. Use cutting plate 11 or 12 or 13.
3. Fill the tray with flour continuely.
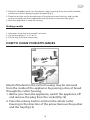
HOW TO CLEAN YOUR APPLIANCES
Meat left behind in the cutter housing may be removed
from the inside of the appliance by passing a slice of bread
through the cutter housing.
1. Before you clean the appliance, switch the appliance o
and remove the plug from the socket.(g.12)
2. Press the release button and turn the whole cutter
housing in the direction of the arrow. Remove the pusher
and the tray.(g.13)

EN
20
3. Unscrew the screw ring and remove all parts of the cutter
housing. Do not clean the parts in the dishwasher!
4. Wash all parts that have come into contact with meat in
hot soapy water. Clean them immediately after use.
5. Rinse them with clear hot water and dry them
immediately.
6. We advise you to lubricate the cutter unit and the
grinding discs with some vegetable oil.
Disposal of appliances and batteries
After the implementation of the European Directive 2002/96/EU in the
national legal system, the following applies:
Electrical and electronic devices may not be disposed of with domestic
waste. Consumers are obliged by law to return electrical and electronic
devices at the end of their service lives to the public collecting points
set up for this purpose or point of sale. Details to this are defined by the
national law of the respective country. This symbol on the product, the instruction
manual or the package indicates that a product is subject to these regulations. By
recycling, reusing the materials or other forms of utilising old devices, you are making
an important contribution to protecting our environment.

Умови гарантії:
Завод гарантує нормальну роботу виробу
протягом 12 місяців з моменту його продажу
за умови дотримання споживачем правил
експлуатації і догляду, передбачених цією
інструкцією.
Термін служби виробу 5 років.
Щоб уникнути непорозумінь, переконливо
просимо Вас уважно вивчити Інструкцію з
експлуатації, умови гарантійних зобов’язань,
перевірити правильність заповнення гарантій-
ного талона. Гарантійний талон дійсний тільки
за наявності правильно та чітко зазначених:
моделі, серійного номера виробу, дати прода-
жу, чітких відбитків печаток фірми-продавця,
підпису покупця. Модель та серійний номер
виробу повинні відповідати зазначеним у
гарантійному талоні.
При порушенні цих умов, а також у випадку,
коли дані, зазначені в гарантійному талоні
змінені, стерті або переписані, гарантійний
талон визнається недійсним.
Налаштування та установка (монтаж, підклю-
чення тощо) виробу, описані в документації,
що додається до нього, можуть бути виконані
як самим користувачем, так і фахівцями УСЦ
відповідного профілю і фірм-продавців (на
платній основі). При цьому особа (організація),
що встановила виріб, несе відповідальність
за правильність і якість установки (нала-
штування). Просимо Вас звернути увагу на
важливість правильної установки виробу як
для його надійної роботи, так і для отримання
гарантійного та безкоштовного сервісного
обслуговування. Вимагайте від спеціаліста з
налаштування внести всі необхідні відомості
про установку до гарантійного талона.
У разі виходу виробу з ладу протягом гарантій-
ного терміну експлуатації з вини виробника,
власник має право на безкоштовний гаран-
тійний ремонт при пред’явленні правильно
заповненого гарантійного талона, виробу в
заводській комплектації та упаковці до гаран-
тійної майстерні або до місця придбання. За-
доволення претензій споживача через провину
виробника провадиться відповідно до закону
«Про захист прав споживачів». При гарантійно-
му ремонті термін гарантії подовжується на час
ремонту та пересилання.
Warranty conditions:
The plant guarantees normal operation of the
product within 12 months from the date of the
sale, provided that the consumer complies with
the rules of operation and care provided by this
Manual.
Service life of the product is 5 years.
In order to avoid any misunderstanding we kindly
ask you to carefully study the Owner’s Manual,
the terms of warranty, and check the correctness
of filling the Warranty Card. The Warranty Card is
valid only if the following information is correctly
and clearly stated: model, serial number of the
product, date of sale, clear seals of the company-
seller, signature of the buyer. The model and serial
number of the product must correspond to those
specified in the Warranty Card.
If these terms are violated, and if the information
specified in the Warranty Card is changed, erased
or rewritten, the Warranty Card is considered
invalid.
Setup and installation (assembly, connection, etc.)
of the appliance are described in the attached
documentation; they can be carried out both by
the user, and by specialists having the necessary
qualification sent by USC or selling companies
(on a paid basis). In this case, the person (the
institution) installing the appliance shall be
responsible for the correctness and quality of
installation (setup). Please pay attention to the
importance of the correct installation of the
appliance, both for its reliable operation, and for
obtaining warranty and free service. Require the
installation specialist to enter all the necessary
information about the installation in the Warranty
Card.
In case of failure of the appliance during the
warranty period by the fault of the manufacturer,
the owner is entitled to free warranty repair
upon presentation of the correctly filled Warranty
Card together with the appliance in the factory
configuration packed in the original packaging
to the warranty workshop or the place of its
purchase. Satisfaction of the customer’s claim due
to the fault of the manufacturer shall be made
in accordance with the law «On Protection of
Consumers’ Rights». In the case of warranty repair
the warranty period shall be extended for the
period of repair and shipment.
Page is loading ...
Page is loading ...
Page is loading ...
-
 1
1
-
 2
2
-
 3
3
-
 4
4
-
 5
5
-
 6
6
-
 7
7
-
 8
8
-
 9
9
-
 10
10
-
 11
11
-
 12
12
-
 13
13
-
 14
14
-
 15
15
-
 16
16
-
 17
17
-
 18
18
-
 19
19
-
 20
20
-
 21
21
-
 22
22
-
 23
23


Ask a question and I''ll find the answer in the document
Finding information in a document is now easier with AI
Related papers
-
 ARDESTO MGL-2250R Owner's manual
-
 ARDESTO MGL-2050R Owner's manual
-
ARDESTO MGL-1730R Owner's manual
-
 ARDESTO MGL-2050R User manual
-
ARDESTO MGA-2300J Owner's manual
-
 ARDESTO MGA-1750R Owner's manual
-
-
 ARDESTO MGK-2400 Owner's manual
-
 ARDESTO MGK-2100 Owner's manual
-
 ARDESTO MGK-2100 Electric Meat Grinder Owner's manual


Other documents
-
Binatone MGR-3030 User manual
-
-
Saturn ST-FP1098 Owner's manual
-
-
Bosch MFW3710B/02 User manual
-
Oursson MG2012/RD User manual
-
Moulinex ME850D81 User manual
-
Philips HR2743 User manual
-
Zelmer ZMM5588W Fleischwolf User manual
-