Page is loading ...

All disclosures, notices and warranty conditions are being written on the back of the box. Released on 15th of June, 2010.
Installation and mounting manual for EK-VGA bracket GeForce
This product is intended for installation only by expert users. Please consult with a qualified technician for installation. Improper installation may result in damage to your equipment. EK Water Blocks assumes no liability
whatsoever, expressed or implied, for the use of these products, nor their installation. The following instructions are subject to change without notice. Please visit our web site at www.ekwaterblocks.com for updates.
Before installation of this product please read important notice, disclosure and warranty conditions printed on the back of the box.
The barb hose fittings require only a small amount of force to screw them in; otherwise the high flow fittings might break. These fittings do not need to be tightened with much force because the
liquid seal is made using o-rings.
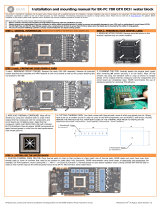
STEP 1: GENERAL INFORMATION. Sample picture of NVidia GeForce 470 GTX
PCB design
STEP 2: PREPARING YOUR GRAPHIC CARD.
1. REMOVING STOCK COOLER: Remove encircled screws on the bracket:
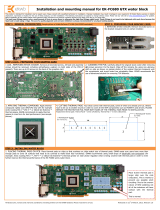
STEP 2 cont.: PREPARING YOUR GRAPHIC CARD
1 cont.. REMOVING STOCK COOLER. Remove all encircled screws. All heat sink assembly screws should be removed. There are 16 screws on the back of the graphic card.
STEP 3: MOUNTING THE BRACKET
Place bracket on graphic card as shown on picture and screw back in stored stock screws. Afterwards you card is prepared for block installation (according to its manuals) and
can be inserted in the motherboards slot.
These screws are to be stored
aside, since you are going to
need them later.
Stock screws
/