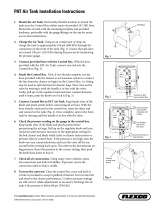
PREVOST H3-45 VIP Owner's manual

Type
Owner's manual

This manual is also suitable for

00-1
SECTION 00:
GENERAL INFORMATION
CONTENTS
1. FOREWORD.................................................................................................................................00-2
2. UPDATES, SERVICE BULLETINS AND SERVICE INFORMATION DOCUMENT.........................00-2
3. SCHEMATICS...............................................................................................................................00-2
4. SAFETY NOTICE..........................................................................................................................00-2
5. DATA PLATES CERTIFICATIONS................................................................................................00-3
5.1 Engine...........................................................................................................................00-3
5.2 Transmission ................................................................................................................00-3
5.3 Drive Axle .....................................................................................................................00-3
5.4 Front Axle .....................................................................................................................00-3
5.5 Power Steering Pump...................................................................................................00-3
5.6 Coach Final Record......................................................................................................00-4
5.7 Safety Certification........................................................................................................00-4
5.8 Dot Certification Label ..................................................................................................00-4
5.9 EPA Engine Label.........................................................................................................00-4
5.10 Fuel Tank Label............................................................................................................00-4
5.11 Vehicle Identification Number (VIN)..............................................................................00-4
6. FASTENER STRENGTH IDENTIFICATION..................................................................................00-6
6.1 Prevailing Torque Fasteners...........................................................................................00-7
6.2 Recommendations For Reuse ........................................................................................00-7
6.3 Six Lobed Socket Head..................................................................................................00-7
7. MAINTENANCE MANUAL - TABLE OF CONTENTS...................................................................00-10
LIST OF ILLUSTRATIONS
FIG. 1: SERIAL AND MODEL NUMBERS ........................................................................................00-3
FIG. 2: LABEL..................................................................................................................................00-3
FIG. 3: TYPICAL SERIAL AND MODEL NUMBERS.........................................................................00-3
FIG. 4: TYPICAL SERIAL AND MODEL NUMBERS.........................................................................00-3
FIG. 5: POWER STEERING PUMP NAMEPLATE............................................................................00-3
FIG. 6. DOT CERTIFICATION LABEL..............................................................................................00-4
FIG. 7: ENGINE COMPARTMENT ...................................................................................................00-4
FIG. 8: FUEL TANK ACCESS PANEL..............................................................................................00-4
FIG. 9: VEHICLE I.D. .......................................................................................................................00-5
FIG. 10: VEHICLE IDENTIFICATION NUMBER.................................................................................00-5
FIG. 11: THREAD NOTATION............................................................................................................00-6
FIG. 12: BOLT STRENGTH MARKINGS............................................................................................00-6
FIG. 13: PREVAILING TORQUE FASTENERS..................................................................................00-7
FIG. 14: TORQUE CHART.................................................................................................................00-7
FIG. 15: METRIC - ENGLISH CONVERSION TABLE.........................................................................00-8
FIG. 16: CONVERSION CHART - CUSTOMARY AND METRIC.........................................................00-9
BACK / RETOUR
Section 00: GENERAL INFORMATION
00-2
1. FOREWORD
This manual includes procedures for diagnosis, service, maintenance and repair for components of
the coach model listed on the front cover page.
This manual should be kept in a handy place for ready reference by the technician. If properly used, it
will meet the needs of the technician and vehicle owner.
Information provided in Section 1 through 24 pertains to standard equipment items, systems and com-
ponents and the most commonly used optional equipment and special equipment offered on the
coach models covered by this manual.
At the beginning of each section : a Table of Contents and a list of illustrations give the page number
on which each subject begins and where each figure is located.
Coach operating information is provided in a separate Operator's Manual. Audio/Video system opera-
tor instructions are also included in a separate manual.
More specific information on engine and transmission operating, maintenance, and overhaul informa-
tion is contained in the applicable engine or transmission service manual published by the engine or
transmission manufacturer. Engine and transmission parts information is contained in the applicable
engine or transmission parts catalog published by the engine or transmission manufacturer.
All information, illustrations and specifications contained in this manual are based on the latest prod-
uct information available at the time of publication approval. The right is reserved to make product
changes at any time without notice.
Note: Typical illustrations may be used, therefore minor illustration difference may exist when com-
pared to actual parts or other publications.
2. UPDATES, SERVICE BULLETINS AND SERVICE INFORMATION
DOCUMENTS
They are issued, when required, to supplement or supersede information in this manual. Update sheet
and bulletins should be noted and filed at the end of the proper section for future use.
3. SCHEMATICS
Vehicle AIR SCHEMATICS are provided at the end of Section 12, "Brake". SUSPENSION AIR SCHE-
MATICS are provided at the end of Section 16, "Suspension". Moreover, ELECTRICAL SCHEMATICS
are provided in the technical publication box. Refer to those schematics for detailed circuit informa-
tion or during diagnosis.
4. SAFETY NOTICE
This maintenance manual has been prepared in order to assist skilled mechanics in the efficient repair
and maintenance of PRÉVOST vehicles.
This manual covers only the procedures as of the manufacturing date.
Safety features may be impaired if other than genuine PRÉVOST parts are installed.
Torque wrench tightening specifications must be strictly observed. Locking devices must be installed
or replaced by new ones, where specified. If the efficiency of a locking device is impaired, It must be
replaced.
This manual emphasizes particular information outlined by the wording and symbols:
Warning: Identifies an instruction which, if not followed, could cause personal injuries.
Caution: Outlined an instruction which, if not followed, could severely damage vehicle components.
Note: Indicates supplementary information needed to fully complete an instruction.Although, the mere
reading of such information does not eliminate the hazard, your understanding of the information will
promote its correct use.
BACK / RETOUR
Section 00: GENERAL INFORMATION
00-3
5. DATA PLATES
CERTIFICATIONS
Delay and confusion can be avoided by placing the
complete vehicle identification number of the coach
and the serial numbers of the engine on parts orders
and correspondence. Also, the transmission, axles,
power steering pump chassis and other major
components are identified by serial numbers.
5.1 Engine
The engine serial and model number are stamped
on the cylinder block (as viewed from the flywheel
end) on the left side just below the fire deck and
above the cast-in Detroit Diesel logo (Fig. 1).
FIGURE 1: SERIAL AND MODEL NUMBERS OEH3B802
In addition, option plates made of laminated
paper are located on the rocker cover (starter
side). The engine serial and model number
and a list of the optional engine equipment is
written on the option plate. Refer to this
information when ordering replacement parts
(Fig. 2).
FIGURE 2: LABEL
5.2 Transmission
The transmission identification plate is located on
the right-rear side of the transmission.The
identification plate shows the transmission serial
number, part number (assembly number), and
model number. Use all three numbers when ordering
parts.
5.3 Drive Axle
OEH3B812
FIGURE 3: TYPICAL SERIAL AND MODEL NUMBERS
5.4 Front Axle
OEH3B814
FIGURE 4: TYPICAL SERIAL AND MODEL NUMBERS
5.5 Power Steering Pump
Power steering pump serial number is located on a
tag on the pump (Fig. 5). The pump is mounted on
the engine beside the crankshaft pulley.
00001
FIGURE 5: POWER STEERING PUMP NAMEPLATE
BACK / RETOUR
Section 00: GENERAL INFORMATION
00-4
5.6 Coach Final Record
The Coach Final Record is a record of all data
pertaining to the assembly of the coach. This
record is included in the technical publication
package supplied with the coach. Retain this
record in the company records office for
reference and safe-keeping.
5.7 Safety Certification
Coach components meet specifications and
standards as follows:
− Material and parts conform to ASTM and/or
SAE standards in effect at the time of
manufacture.
− All factory-installed interior materials meet
FMVSS 302 for fire resistance.
− Certified according to Provincial, State and
Federal Safety standards (Canadian and
US) BMCSS, FMVSS, and CMVSS.
Other applicable certification labels are affixed
to the component.
5.8 DOT Certification Label
This certifies that coaches manufactured by
Prevost Car Inc., comply with all Federal Motor
Vehicle Safety Standards at the time of
manufacture. The DOT Certification label is
affixed on the wall, at the L.H. side of the
driver's seat under the L.H. side control panel
(Fig. 6).
FIGURE 6: DOT CERTIFICATION LABEL OEH3B818
5.9 EPA Engine Label
The exhaust emission certification label affixed to
the oil reserve tank certifies that the engine
conforms to federal and any state exhaust emission
regulations (Fig. 7). It gives the operating conditions
under which certification was made.
FIGURE 7: ENGINE COMPARTMENT OEH3B820
5.10 Fuel Tank Label
The fuel tank label is affixed to the R.H. side of
the fuel tank (Fig. 8). To read this label,
unscrew the fuel tank access panel nuts
located at the left in the condenser
compartment.
FIGURE 8: FUEL TANK ACCESS PANEL OEH3B822
5.11 Vehicle Identification
Number (VIN)
The seventeen-digit vehicle identification
number (VIN) is located on a plate (Fig. 9 & 10)
located on the windshield frame pillar (driver's
side). The VIN is visible from the outside of
the coach. Make sure the correct vehicle
identification number is given when ordering
replacement parts. Using the VIN when
ordering parts will facilitate processing.
BACK / RETOUR
Section 00: GENERAL INFORMATION
00-5
FIGURE 9: VEHICLE I.D. OEH3B816
Note: Record the VIN in the coach
documentation and keep with company
records. The VIN will normally be used for
vehicle registration and for obtaining vehicle
insurance coverage.
FIGURE 10: VEHICLE IDENTIFICATION NUMBER VIN
* TABLE - CHARACTERS USED FOR DESIGNATING THE MODEL YEAR
YEAR
CODE
YEAR
CODE
1996
T
1998
W
1997
V
1999
X
BACK / RETOUR
Section 00: GENERAL INFORMATION
00-6
6. FASTENER STRENGTH IDENTIFICATION
Most commonly used metric fastener strength property classes are 9.8 and 10.9 with the class identi-
fication embossed on the head of each bolt. Customary (inch) strength classes range from grade 2 to
8 with radial line identification embossed on each bolt head actual grade (i.e., a grade 7 bolt will have
5 embossed radial lines on the bolt head). Some metric nuts will be marked with single digit strength
identification numbers on the nut face. Fig. 12 shows the different strength markings. When replacing
metric fasteners, be careful to use fasteners of the same or greater strength than the original fasten-
ers (the same number marking or higher). It is also important to select replacement fastener of the cor-
rect size. Correct replacement fasteners are available through the parts division. Some metric fasten-
ers available in after-market parts sources were designed to metric standards of countries other the
United States and may be of a lower strength, may not have the numbered head marking system, and
may be of a different thread pitch.
FIGURE 11: THREAD NOTATION 00002
FIGURE 12: BOLT STRENGTH MARKINGS 00003
BACK / RETOUR
Section 00: GENERAL INFORMATION
00-7
The metric fasteners used on the coach are
designed to new standards and may not yet be
manufactured by some nondomestic fastener
suppliers. In general, except for special appli-
cations, the common sizes and pitches are :
♦ M 8 X 1.25
♦ M 10 X 1.5
♦ M 12 X 1.75
♦ M 14 X 2
6.1 Prevailing Torque Fasteners
A prevailing torque nut is designed with an in-
terference fit between the nut and bolt threads.
This is most often accomplished by distortion
of the top of an all-metal nut or by using a ny-
lon patch on the threads. A nylon insert may
also be used as a method of interference be-
tween nut and bolt threads (Fig. 13).
A prevailing torque bolt is designed to develop
an interference fit bolt and nut threads, or the
threads of a tapped hole. This is accomplished
by distorting some of the threads or by using a
nylon patch or adhesive (Fig. 13).
6.2 Recommendations For Reuse
1. Clean, unrusted prevailing torque fastener
may be reused as follows :
a) Clean dirt and other foreign material from
the fastener.
b) Inspect the fastener to ensure there is no
crack, elongation, or other sign of fatigue
or overtightening. If there is any doubt, re-
place with a new prevailing torque fastener
of equal or greater strength.
c) Assemble parts and hand start fastener.
d) Observe that , before the fastener seats, it
develops torque per the chart in figure 14.
If there is any doubt, replace with a new
prevailing torque fastener of equal or
greater strength.
e) Tighten the fastener to torque specified in
the applicable section of this manual.
2. Fasteners which are rusty or damaged
should be replaced with new parts of equal
or greater strength.
FIGURE 13: PREVAILING TORQUE FASTENERS 00004
6.3 Six Lobed Socket Head
Six lobed socket head (Torx) fastener are used
in some applications on vehicles covered in
this manual. The tools designed for these fas-
teners are available commercially. However, in
some cases, if the correct tool is not available,
a hex socket head wrench may be used.
FIGURE 14: TORQUE CHART
METRIC SIZES
6 & 6.3
8
12
14
20
NUT AND ALL
N
•
m
0.4
0.8
2.2
3.0
7.0
METAL BOLTS
lbf
•
in
4.0
7.0
18
25
57
ADHESIVE OR NY-
LON
N
•
m
0.4
0.6
1.6
2.4
5.6
COATED BOLTS
lbf
•
in
4.0
5.0
14
20
46
SIZES
.250
.312
.375
.500
.562
.750
NUT AND ALL
N
•
m
0.4
0.6
1.4
2.4
3.2
6.2
METAL BOLTS
lbf
•
in
4.0
5.0
12
20
27
51
ADHESIVE OR NY-
LON
N
•
m
0.4
0.6
1.0
1.8
2.6
5.2
COATED BOLTS
lbf
•
in
4.0
5.0
9.0
15
22
43
BACK / RETOUR
Section 00: GENERAL INFORMATION
00-8
FIGURE 15: METRIC - ENGLISH CONVERSION TABLE 00005
BACK / RETOUR
Section 00: GENERAL INFORMATION
00-9
FIGURE 16: CONVERSION CHART - CUSTOMARY AND METRIC 00006
BACK / RETOUR
Section 00: GENERAL INFORMATION
00-10
7. MAINTENANCE MANUAL - TABLE OF CONTENTS
The Table of Contents on this page indicates the sections covered in this manual. At the beginning of
each section is a Table of Contents which gives the page number on which each subject begins.
ENGINE 01
CLUTCH 02
FUEL SYSTEM 03
EXHAUST SYSTEM 04
COOLING SYSTEM 05
ELECTRICAL SYSTEM 06
TRANSMISSION 07
PROPELLER SHAFT 09
FRONT AXLE 10
REAR AXLE 11
BRAKE AND AIR SYSTEM 12
WHEELS, HUBS AND TIRES 13
STEERING 14
SUSPENSION 16
BODY 18
HEATING AND A/C SYSTEMS 22
ACCESSORIES 23
LUBRICATION 24
BACK / RETOUR
01-1
SECTION 01: ENGINE
CONTENTS
1. ENGINE ...............................................................................................................................................01-3
1.1 Description.............................................................................................................................01-3
2. ENGINE-MOUNTED COMPONENTS...................................................................................................01-3
2.1 Electronic Control Module....................................................................................................01-4
2.2 Electronic Unit Injector.........................................................................................................01-4
2.3 Synchronous Reference Sensor ..........................................................................................01-5
2.4 Timing Reference Sensor.....................................................................................................01-6
2.5 Turbo Boost Pressure Sensor..............................................................................................01-6
2.6 Coolant Temperature Sensor...............................................................................................01-6
2.7 Fuel Temperature Sensor.....................................................................................................01-6
2.8 Air Temperature Sensor.......................................................................................................01-7
2.9 Oil Pressure Sensor.............................................................................................................01-7
2.10 Oil Temperature Sensor.......................................................................................................01-7
3. ENGINE-RELATED COMPONENTS....................................................................................................01-7
3.1 Coolant Level System (CLS)..................................................................................................01-8
3.2 Electronic Foot Pedal Assembly (EFPA) & Throttle Position Sensor .....................................01-8
3.3 Cruise Control Switch.............................................................................................................01-8
3.4 Diagnostic System Accessories.............................................................................................01-9
4. DDEC III Diagnostic Codes..................................................................................................................01-10
4.1 Reading Diagnostic Codes - Flash Method...........................................................................01-10
4.2 DDEC III Diagnostic Codes List.............................................................................................01-11
5. ENGINE OIL LEVEL.............................................................................................................................01-14
6. ENGINE OIL AND FILTER CHANGE ...................................................................................................01-14
7. RECOMMENDED ENGINE OIL TYPE..................................................................................................01-15
8. WELDING PRECAUTION.....................................................................................................................01-15
9. POWER PLANT ASSEMBLY REMOVAL (Automatic and Manual).......................................................01-16
10. POWER PLANT ASSEMBLY INSTALLATION (Automatic and Manual)..............................................01-19
11. ENGINE MOUNTS ..............................................................................................................................01-20
12. JAKE BRAKE......................................................................................................................................01-20
13. SPECIFICATIONS...............................................................................................................................01-21
BACK / RETOUR
Section 01: Engine
01-2
LIST OF ILLUSTRATIONS
FIG. 1: DETROIT DIESEL SERIES 60 ENGINE......................................................................................01-3
FIG. 2: ELECTRONIC CONTROL MODULE (ECM).................................................................................01-4
FIG. 3: ELECTRONIC UNIT INJECTOR CROSS-SECTION....................................................................01-5
FIG. 4: SRS LOCATION..........................................................................................................................01-5
FIG. 5: BULL GEAR................................................................................................................................01-5
FIG. 6: TIMING REFERENCE SENSOR AND RELATED PARTS ...........................................................01-6
FIG. 7: TURBO BOOST PRESSURE SENSOR.......................................................................................01-6
FIG. 8: ENGINE FUEL TEMPERATURE SENSOR..................................................................................01-7
FIG. 9: ENGINE OIL PRESSURE AND OIL TEMPERATURE SENSOR..................................................01-7
FIG. 10: ELECTRONIC FOOT PEDAL ASSEMBLY ..................................................................................01-8
FIG. 11: ENGINE OIL LEVEL DIPSTICK ..................................................................................................01-14
FIG. 12: ENGINE COMPARTMENT ..........................................................................................................01-14
FIG. 13: UNDER VEHICLE VIEW..............................................................................................................01-15
FIG. 14: ENGINE COMPARTMENT ..........................................................................................................01-16
FIG. 15: ENGINE COMPARTMENT ..........................................................................................................01-17
FIG. 16: ENGINE COMPARTMENT ..........................................................................................................01-17
FIG. 17: RUBBER DAMPER TOLERANCE...............................................................................................01-19
FIG. 18: POWER PLANT CRADLE INSTALLATION.................................................................................01-21
BACK / RETOUR
Section 01: Engine
01-3
1. ENGINE
1.1 Description
This vehicle is powered by a 6-cylinder, four-cycle, Detroit Diesel series 60 engine, equipped with an
electronic control system (DDEC III). Two volumes of charge are used in the engine: 11 liters or 12.7
liters. Summary information on the Electronic Control System is given in this section. Complete
maintenance and repair information on the engine will be found in the current DDEC III Service
Manual #6SE483. Engine controls, accessories and related components are covered in the
applicable sections of this maintenance manual. Engine removal and installation procedures are given
at the end of this section. The DDEC system is self-diagnostic. It can identify faulty components and
other engine-related problems by providing the technician with a diagnostic code. Refer to DDEC
Troubleshooting Guide # 6SE492 for more complete information on diagnosis of components and
system problems published by Detroit Diesel.
DDEC III (Detroit Diesel Electronic Control) controls the timing and amount of fuel injection by the
electronic unit injectors (EUI). The system also monitors several engine functions using electrical
sensors which send electrical signals to the Electronic Control Module (ECM). The ECM computes the
electrical signals and determines the correct fuel output and timing for optimum power, fuel economy
and emissions. The ECM also has the ability to display warnings or shut down the engine completely
(depending on option selection) in the event of damaging engine conditions, such as low oil pressure,
low coolant, or high oil temperature.
The system components are divided in two categories: engine-mounted components and
engine-related components.
2. ENGINE-MOUNTED COMPONENTS
FIGURE 1: DETROIT DIESEL SERIES 60 ENGINE 01015
BACK / RETOUR
Section 01: Engine
01-4
Engine-mounted components are as follows:
• Electronic Control Module
• Electronic Unit Injector
• Synchronous Reference Sensor
• Timing Reference Sensor
• Turbo Boost Pressure Sensor
• Coolant Temperature Sensor
• Fuel Temperature Sensor
• Air Temperature Sensor
• Oil Pressure Sensor
• Oil Temperature Sensor
2.1 Electronic Control Module
The Electronic Control Module is mounted, on
the starter side of the engine (Fig. 2). It is
considered the "Brain" of the DDEC III system
because it provides overall monitoring and
control of the engine by comparing input data
from the various sensors to a set of calibration
data stored in the EEPROM (Electrically
Erasable, Programmable, Read-Only Memory)
within the Electronic Control Module. After
comparing the input data with the calibrations
data, the ECM sends high current command
pulses to the Electronic Unit Injectors (EUI) to
initiate fuel injection. The ECM also receives
feedback regarding the start and end of
injection for a given cylinder.
The EEPROM within the Electronic Control
Module is factory programmed by Detroit
Diesel. Reprogramming must be done at a
Detroit Diesel authorized service center.
However, some changes may be performed to
the cruise control and road speed limit using a
diagnostic data reader (see paragraph "4.
DDEC III Diagnostic Codes" in this section).
01018
FIGURE 2: ELECTRONIC CONTROL MODULE (ECM)
2.2 Electronic Unit Injector
The Electronic Unit Injector is a compact unit
that injects diesel fuel directly into the
combustion chamber (Fig. 3). The amount of
fuel injected and beginning of injection timing
is determined by the Electronic Control Module
(ECM). The ECM sends a command pulse
which activates the injector solenoid. The EUI
performs four functions:
• Creates the high-fuel pressure required for
efficient injection
• Meters and injects the exact amount of fuel
required to handle the load
• Atomizes the fuel for mixing with the air in
the combustion chamber
• Permits continuous fuel flow for component
cooling
BACK / RETOUR
Section 01: Engine
01-5
01019
FIGURE 3: ELECTRONIC UNIT INJECTOR CROSS-
SECTION
2.3 Synchronous Reference
Sensor
The Synchronous Reference Sensor (SRS) is
an electronic component that is mounted to the
rear of the gear case (Fig. 4). The SRS sensor
extends through a hole in the gear case and is
positioned near the rear of the bull gear. A bolt,
inserted through a hole in the SRS bracket,
secures the SRS assembly to the gear case.
The SRS connector is black. The SRS sends a
signal to the ECM. This signal is generated by
a raised metal pin on the rear of the bull gear
(Fig. 5).
FIGURE 4: SRS LOCATION 01020
FIGURE 5: BULL GEAR 01021
The bull gear pin passes by the SRS as the
number one piston reaches 45° before Top-
Dead-Center. This information is used by the
ECM to determine engine speed.
The SRS is non-serviceable and must be
replaced as a unit. No adjustment is required.
BACK / RETOUR
Section 01: Engine
01-6
2.4 Timing Reference Sensor
The Timing Reference Sensor (TRS) is an
electronic component that is mounted on the
left side of the gear case, near the crankshaft
center line (Fig. 6).
01022
FIGURE 6: TIMING REFERENCE SENSOR AND
RELATED PARTS
The TRS sensor extends through an opening
in the gear case and is positioned near the
timing wheel gear teeth. A bolt, inserted
through a hole in the TRS bracket, secures the
TRS assembly to the gear case. The TRS
connector is gray.
The TRS sensor sends a signal to the ECM.
This is generated by a series of evenly spaced
teeth on the timing wheel, rotating by the
crankshaft. A tooth passes by the TRS as
each cylinder reaches 10o before Top-Dead-
Center. These signals are used by the ECM to
determine injector solenoid operation time. The
TRS is non-serviceable and must be replaced
as a unit. No adjustment is required.
2.5 Turbo Boost Pressure
Sensor
The Turbo Boost Pressure Sensor is mounted
to the intake manifold with two bolts. A rubber
O-ring is used to seal the sensor to the
manifold (Fig. 7). This device is a pressure
sensor that sends an electrical signal to the
ECM. The ECM uses this information to
compute the amount of air entering the engine.
Fuel supply is regulated by the turbo boost
sensor information to control engine exhaust.
The turbo boost sensor is non-serviceable and
must be replaced as an assembly. No
adjustment is required.
FIGURE 7: TURBO BOOST PRESSURE SENSOR 01023
2.6 Coolant Temperature Sensor
The coolant temperature sensor is mounted on
the engine, on the radiator side of the engine
(Fig. 1). The sensor protects the engine in
case of overheating by sensing coolant
temperature.
2.7 Fuel Temperature Sensor
The Fuel Temperature Sensor (FTS) is
installed on the secondary fuel filter (Fig. 8).
The FTS sends an electrical signal to the ECM
indicating fuel inlet temperature. The ECM
uses this information to calculate fuel
consumption.
BACK / RETOUR
Section 01: Engine
01-7
The FTS is non-serviceable and must be
replaced as a unit. No adjustment is required.
01024
FIGURE 8: ENGINE FUEL TEMPERATURE SENSOR
2.8 Air Temperature Sensor
The Air Temperature Sensor (Fig. 1) located on
the engine (starter side) near the intake
manifold provides input data to vary hot idle
speed and injection timing. This helps to
improve cold starts and reduces white exhaust.
2.9 Oil Pressure Sensor
The Oil Pressure Sensor (OPS) is installed in
the main engine oil gallery. A typical location is
the left rear corner of the cylinder block (Fig.
9).
The OPS sends an electrical signal to the ECM
indicating the engine oil pressure at any given
speed. A low oil pressure signal exceeding
seven seconds is used by the ECM to begin
the stop engine or warning function. The OPS
is non-serviceable and must be replaced as a
unit. No adjustment is required.
01025
FIGURE 9: ENGINE OIL PRESSURE AND OIL
TEMPERATURE SENSOR
2.10 Oil Temperature Sensor
The Oil Temperature Sensor (OTS) is installed
on the main engine oil gallery. A typical
location is the left rear corner of the cylinder
block as shown in Figure 9. The OTS sends an
electrical signal to the ECM indicating engine
oil temperature. The ECM uses this information
to modify engine speed for better cold weather
starts and faster warm-ups. Oil temperatures
exceeding engine specifications for two
seconds or more will illuminate the Check
Engine Light. The OTS is non-serviceable and
must be replaced as a unit. No adjustment is
required.
3. ENGINE-RELATED
COMPONENTS
Engine-related components:
• Coolant Level System (CLS)
• Electronic Foot Pedal Assembly (EFPA)
and Throttle Position Sensor
• Cruise Control Switch (CCS)
• Diagnostic System Accessories (DSA)
BACK / RETOUR
Section 01: Engine
01-8
3.1 Coolant Level System (CLS)
The coolant level system consists of a conductivity
probe mounted in the surge tank and an electronic
interface module located, inside the rear junction
box. Coolant level is determined by the change in
impedance of the probe and its brass mount when it
is immersed in coolant. The electronic device in the
module conditions the signal to levels compatible
with DDEC. Low coolant level will trigger the
warning engine functions. The probe and the
electronic interface module are non-serviceable
items and if found defective, they should be
replaced as units. No adjustment is required.
3.2 Electronic Foot Pedal
Assembly (EFPA) & Throttle
Position Sensor
The Electronic Foot Pedal Assembly (EFPA)
connects the accelerator pedal to a Throttle
Position Sensor (TPS). The (TPS) is a device
that sends an electrical signal to the Electronic
Control Module (ECM) that varies in voltage,
depending on how low the pedal is depressed.
The system is installed in the space normally
occupied by the mechanical foot pedal. The
(EFPA) has maximum and minimum stops that
are built into the unit during manufacturing
(Fig. 10).
The (TPS) converts the operator's foot pedal
input into a signal for the ECM. The (EFPA) is
shown in Figure 10.
When installed by the equipment manufacturer,
the TPS should not require adjustment. If the
TPS is suspected of being misadjusted,
confirm that the sensor is installed in
accordance with the manufacturer's
specifications. It is recommended that the idle
count be at 50 or higher with a full throttle
count of up to 200.
The TPS is self-calibrating and therefore has
no optimum closed throttle or wide open
throttle count value. If the counts are within the
50 to 200 range, the sensor is properly set.
01026
FIGURE 10: ELECTRONIC FOOT PEDAL ASSEMBLY
Monitor the (TPS) as the controls move it
through its full stroke. Be sure there is no
misalignment or obstruction preventing the
smooth movement of the TPS through the full
stroke. Using a diagnostic data reader, check
that the idle and full throttle position counts do
not fall within the error zones. The error zones
occur when the idle position is less than 14
counts, or when the full throttle position is more
than 233 counts. Should these conditions
occur, the ECU will signal diagnostic codes of
21-12 for idle error and 21-23 for wide open
throttle error.
3.3 Cruise Control Switches
(CCS)
The four cruise control switches are located in
the driver's area on the L.H. side control
panel.
1. Cruise On/Off: This is the main switch that
actuates the ECM memory in order to use the
speed regulating mode.
2. Cruise Set: This switch is used to set the
cruise control speed or to decrease the set
speed by 2 MPH at each application.
BACK / RETOUR
Section 01: Engine
01-9
Note: Cruise control system will not accept
speed settings, nor will the "Resume" switch
operate below 20 mph (32 km/h) and the
engine speed must be above 1100 RPM.
3. Cruise Resume: Each time this switch is
actuated, the speed will be increased by 2 mph
(3,5 km/h). This switch allows the driver return
to the last regulated speed following a brake or
"DECEL" switch application.
Note: On-off switch must be in the "ON"
position in order to return to the last regulated
speed.
4. Cruise Decel: Will cancel the cruise
temporarily like a brake application but without
actuating brake light. Set speed is still in
memory for resume.
For additional information, see your "Operator's
Manual"
3.4 Diagnostic System
Accessories (DSA)
The DDEC III engine Diagnostic System
Accessories include the following:
• Check Engine warning light;
• Stop Engine warning light;
• Stop Engine Override switch; and
• Diagnostic Data Link (DDL) connectors.
1. Check Engine Warning Light: This
light, mounted on the central
dashboard panel, illuminates to
indicate that a problem is currently
being detected and that a code has
been stored in the ECM memory. This
light also has a 5-second bulb check
when the ignition is first turned on. The
Check Engine Light illuminates when
the temperature at coolant sensors
exceeds 217°F (103°C) and the
temperature at oil sensors exceeds
260°F (127°C). When sensors reach
those temperatures, engine power
starts to decrease linearly.
2. Stop Engine Warning Light: This
light, also mounted on the central
dashboard panel, illuminates to indica-
te that a major engine problem is
occurring (with the exception of a 5-
second bulb check when the ignition is
first turned on). The Stop Engine Light
illuminates when temperature at coo-
lant sensors exceeds 222°F (106°C)
and the temperature at oil sensors
exceeds 239°F (115°C). When sensors
reach those temperatures, the engine
will shut down after 30 seconds. This
30-second delay period may be
repeated using the OVERRIDE switch.
Note: Once engine is stopped, it can not be
restarted until the malfunction is corrected.
3. Stop Engine OVERRIDE Switch: This
switch, mounted on the L.H. lower
control panel, is used when the Stop
engine warning light is illuminated.
Push down the switch to allow a 30-
second delay period (non cumulative)
in the shutdown procedure. This swicth
can be repeatedly depressed, i.e. one
(1) pulse is sufficient for each 30
second period, in order to move the
vehicle out of traffic.
Note: The stop engine override switch will be
operative only if it has been depressed before the
end of the 30 second delay period.
Caution: The OVERRIDE switch must be used
only in emergency cases, such as to move the
vehicle out of traffic. Excessive use of this switch
could cause serious damage to the engine.
4. Diagnostic Data Link (DDL)
Connectors: A connector is mounted
on the L.H. Lower Control Panel.
Another connector is located in the
rear electric compartment. They allow
to connect the Diagnostic Data Reader
(DDR) and to read the codes or to
access pertinent data on the engine
condition. This enables a more
complete analysis of any defect found
in the DDEC system operation. For
more information, see Detroit Diesel
Troubleshooting Guide #6SE492.
BACK / RETOUR
Section 01: Engine
01-10
4. DDEC III DIAGNOSTIC CODES
4.1 Reading Diagnostic Codes -
Flash Method:
DDEC III makes use of two types of codes:
Active and inactive. The difference between
the two types of codes are as follows:
1. Active Codes: These are the codes which
are currently keeping the Check Engine or
Stop Engine light illuminated. Active codes
are flashed via the Stop Engine Light when
check with override switch.
2. Inactive Codes: These are all the codes
logged in the ECM (whether or not they are
currently turning on the Stop or Check
Engine Light). Inactive codes are flashed
via the Check Engine light when checked
with override switch.
In most instances, only the DDR can provide
the information necessary for a quick diagnosis
of the problem. If you just need to read out
codes, however, and do not have a DDR
available, the following procedure will let you
read out codes. Make sure the rear starting
switch (located in the engine compartment) is
in the normal position. Momentarily depress
the Stop Engine Override switch (located on
the L.H. lower control panel) with the ignition
ON, the engine idling or engine shut-off. Active
codes will be flashed on the stop engine
telltale (located on the central dashboard),
followed by the inactive codes being flashed
on the check engine telltale (located on the
central dashboard). The cycle repeats itself
until the operator depresses the Stop Engine
Override Switch. A code "43" consists of four
flashes, followed by a short pause, then three
flashes in quick succession.
BACK / RETOUR
  • Page 1 1
  • Page 2 2
  • Page 3 3
  • Page 4 4
  • Page 5 5
  • Page 6 6
  • Page 7 7
  • Page 8 8
  • Page 9 9
  • Page 10 10
  • Page 11 11
  • Page 12 12
  • Page 13 13
  • Page 14 14
  • Page 15 15
  • Page 16 16
  • Page 17 17
  • Page 18 18
  • Page 19 19
  • Page 20 20
  • Page 21 21
  • Page 22 22
  • Page 23 23
  • Page 24 24
  • Page 25 25
  • Page 26 26
  • Page 27 27
  • Page 28 28
  • Page 29 29
  • Page 30 30
  • Page 31 31
  • Page 32 32
  • Page 33 33
  • Page 34 34
  • Page 35 35
  • Page 36 36
  • Page 37 37
  • Page 38 38
  • Page 39 39
  • Page 40 40
  • Page 41 41
  • Page 42 42
  • Page 43 43
  • Page 44 44
  • Page 45 45
  • Page 46 46
  • Page 47 47
  • Page 48 48
  • Page 49 49
  • Page 50 50
  • Page 51 51
  • Page 52 52
  • Page 53 53
  • Page 54 54
  • Page 55 55
  • Page 56 56
  • Page 57 57
  • Page 58 58
  • Page 59 59
  • Page 60 60
  • Page 61 61
  • Page 62 62
  • Page 63 63
  • Page 64 64
  • Page 65 65
  • Page 66 66
  • Page 67 67
  • Page 68 68
  • Page 69 69
  • Page 70 70
  • Page 71 71
  • Page 72 72
  • Page 73 73
  • Page 74 74
  • Page 75 75
  • Page 76 76
  • Page 77 77
  • Page 78 78
  • Page 79 79
  • Page 80 80
  • Page 81 81
  • Page 82 82
  • Page 83 83
  • Page 84 84
  • Page 85 85
  • Page 86 86
  • Page 87 87
  • Page 88 88
  • Page 89 89
  • Page 90 90
  • Page 91 91
  • Page 92 92
  • Page 93 93
  • Page 94 94
  • Page 95 95
  • Page 96 96
  • Page 97 97
  • Page 98 98
  • Page 99 99
  • Page 100 100
  • Page 101 101
  • Page 102 102
  • Page 103 103
  • Page 104 104
  • Page 105 105
  • Page 106 106
  • Page 107 107
  • Page 108 108
  • Page 109 109
  • Page 110 110
  • Page 111 111
  • Page 112 112
  • Page 113 113
  • Page 114 114
  • Page 115 115
  • Page 116 116
  • Page 117 117
  • Page 118 118
  • Page 119 119
  • Page 120 120
  • Page 121 121
  • Page 122 122
  • Page 123 123
  • Page 124 124
  • Page 125 125
  • Page 126 126
  • Page 127 127
  • Page 128 128
  • Page 129 129
  • Page 130 130
  • Page 131 131
  • Page 132 132
  • Page 133 133
  • Page 134 134
  • Page 135 135
  • Page 136 136
  • Page 137 137
  • Page 138 138
  • Page 139 139
  • Page 140 140
  • Page 141 141
  • Page 142 142
  • Page 143 143
  • Page 144 144
  • Page 145 145
  • Page 146 146
  • Page 147 147
  • Page 148 148
  • Page 149 149
  • Page 150 150
  • Page 151 151
  • Page 152 152
  • Page 153 153
  • Page 154 154
  • Page 155 155
  • Page 156 156
  • Page 157 157
  • Page 158 158
  • Page 159 159
  • Page 160 160
  • Page 161 161
  • Page 162 162
  • Page 163 163
  • Page 164 164
  • Page 165 165
  • Page 166 166
  • Page 167 167
  • Page 168 168
  • Page 169 169
  • Page 170 170
  • Page 171 171
  • Page 172 172
  • Page 173 173
  • Page 174 174
  • Page 175 175
  • Page 176 176
  • Page 177 177
  • Page 178 178
  • Page 179 179
  • Page 180 180
  • Page 181 181
  • Page 182 182
  • Page 183 183
  • Page 184 184
  • Page 185 185
  • Page 186 186
  • Page 187 187
  • Page 188 188
  • Page 189 189
  • Page 190 190
  • Page 191 191
  • Page 192 192
  • Page 193 193
  • Page 194 194
  • Page 195 195
  • Page 196 196
  • Page 197 197
  • Page 198 198
  • Page 199 199
  • Page 200 200
  • Page 201 201
  • Page 202 202
  • Page 203 203
  • Page 204 204
  • Page 205 205
  • Page 206 206
  • Page 207 207
  • Page 208 208
  • Page 209 209
  • Page 210 210
  • Page 211 211
  • Page 212 212
  • Page 213 213
  • Page 214 214
  • Page 215 215
  • Page 216 216
  • Page 217 217
  • Page 218 218
  • Page 219 219
  • Page 220 220
  • Page 221 221
  • Page 222 222
  • Page 223 223
  • Page 224 224
  • Page 225 225
  • Page 226 226
  • Page 227 227
  • Page 228 228
  • Page 229 229
  • Page 230 230
  • Page 231 231
  • Page 232 232
  • Page 233 233
  • Page 234 234
  • Page 235 235
  • Page 236 236
  • Page 237 237
  • Page 238 238
  • Page 239 239
  • Page 240 240
  • Page 241 241
  • Page 242 242
  • Page 243 243
  • Page 244 244
  • Page 245 245
  • Page 246 246
  • Page 247 247
  • Page 248 248
  • Page 249 249
  • Page 250 250
  • Page 251 251
  • Page 252 252
  • Page 253 253
  • Page 254 254
  • Page 255 255
  • Page 256 256
  • Page 257 257
  • Page 258 258
  • Page 259 259
  • Page 260 260
  • Page 261 261
  • Page 262 262
  • Page 263 263
  • Page 264 264
  • Page 265 265
  • Page 266 266
  • Page 267 267
  • Page 268 268
  • Page 269 269
  • Page 270 270
  • Page 271 271
  • Page 272 272
  • Page 273 273
  • Page 274 274
  • Page 275 275
  • Page 276 276
  • Page 277 277
  • Page 278 278
  • Page 279 279
  • Page 280 280
  • Page 281 281
  • Page 282 282
  • Page 283 283
  • Page 284 284
  • Page 285 285
  • Page 286 286
  • Page 287 287
  • Page 288 288
  • Page 289 289
  • Page 290 290
  • Page 291 291
  • Page 292 292
  • Page 293 293
  • Page 294 294
  • Page 295 295
  • Page 296 296
  • Page 297 297
  • Page 298 298
  • Page 299 299
  • Page 300 300
  • Page 301 301
  • Page 302 302
  • Page 303 303
  • Page 304 304
  • Page 305 305
  • Page 306 306
  • Page 307 307
  • Page 308 308
  • Page 309 309
  • Page 310 310
  • Page 311 311
  • Page 312 312
  • Page 313 313
  • Page 314 314
  • Page 315 315
  • Page 316 316
  • Page 317 317
  • Page 318 318
  • Page 319 319
  • Page 320 320
  • Page 321 321
  • Page 322 322
  • Page 323 323
  • Page 324 324
  • Page 325 325
  • Page 326 326
  • Page 327 327
  • Page 328 328
  • Page 329 329
  • Page 330 330
  • Page 331 331
  • Page 332 332
  • Page 333 333
  • Page 334 334
  • Page 335 335
  • Page 336 336
  • Page 337 337
  • Page 338 338
  • Page 339 339
  • Page 340 340
  • Page 341 341
  • Page 342 342
  • Page 343 343
  • Page 344 344
  • Page 345 345
  • Page 346 346
  • Page 347 347
  • Page 348 348
  • Page 349 349
  • Page 350 350
  • Page 351 351
  • Page 352 352
  • Page 353 353
  • Page 354 354
  • Page 355 355
  • Page 356 356
  • Page 357 357
  • Page 358 358
  • Page 359 359
  • Page 360 360
  • Page 361 361
  • Page 362 362
  • Page 363 363
  • Page 364 364
  • Page 365 365
  • Page 366 366
  • Page 367 367
  • Page 368 368
  • Page 369 369
  • Page 370 370
  • Page 371 371
  • Page 372 372
  • Page 373 373
  • Page 374 374
  • Page 375 375
  • Page 376 376
  • Page 377 377
  • Page 378 378
  • Page 379 379
  • Page 380 380
  • Page 381 381
  • Page 382 382
  • Page 383 383
  • Page 384 384
  • Page 385 385
  • Page 386 386
  • Page 387 387
  • Page 388 388
  • Page 389 389
  • Page 390 390
  • Page 391 391
  • Page 392 392
  • Page 393 393
  • Page 394 394
  • Page 395 395
  • Page 396 396
  • Page 397 397
  • Page 398 398
  • Page 399 399
  • Page 400 400
  • Page 401 401
  • Page 402 402
  • Page 403 403
  • Page 404 404
  • Page 405 405
  • Page 406 406
  • Page 407 407
  • Page 408 408
  • Page 409 409
  • Page 410 410
  • Page 411 411
  • Page 412 412
  • Page 413 413
  • Page 414 414
  • Page 415 415
  • Page 416 416
  • Page 417 417
  • Page 418 418
  • Page 419 419
  • Page 420 420
  • Page 421 421
  • Page 422 422
  • Page 423 423
  • Page 424 424
  • Page 425 425
  • Page 426 426
  • Page 427 427
  • Page 428 428
  • Page 429 429
  • Page 430 430
  • Page 431 431
  • Page 432 432
  • Page 433 433
  • Page 434 434
  • Page 435 435
  • Page 436 436
  • Page 437 437
  • Page 438 438
  • Page 439 439
  • Page 440 440
  • Page 441 441
  • Page 442 442
  • Page 443 443
  • Page 444 444
  • Page 445 445
  • Page 446 446
  • Page 447 447
  • Page 448 448
  • Page 449 449
  • Page 450 450
  • Page 451 451
  • Page 452 452
  • Page 453 453
  • Page 454 454
  • Page 455 455
  • Page 456 456
  • Page 457 457
  • Page 458 458
  • Page 459 459
  • Page 460 460
  • Page 461 461
  • Page 462 462
  • Page 463 463
  • Page 464 464
  • Page 465 465
  • Page 466 466
  • Page 467 467
  • Page 468 468
  • Page 469 469
  • Page 470 470
  • Page 471 471
  • Page 472 472
  • Page 473 473
  • Page 474 474
  • Page 475 475
  • Page 476 476
  • Page 477 477
  • Page 478 478
  • Page 479 479
  • Page 480 480
  • Page 481 481
  • Page 482 482
  • Page 483 483
  • Page 484 484
  • Page 485 485
  • Page 486 486
  • Page 487 487
  • Page 488 488
  • Page 489 489
  • Page 490 490
  • Page 491 491
  • Page 492 492
  • Page 493 493
  • Page 494 494
  • Page 495 495
  • Page 496 496
  • Page 497 497
  • Page 498 498
  • Page 499 499
  • Page 500 500
  • Page 501 501
  • Page 502 502
  • Page 503 503
  • Page 504 504
  • Page 505 505
  • Page 506 506
  • Page 507 507
  • Page 508 508
  • Page 509 509
  • Page 510 510
  • Page 511 511
  • Page 512 512
  • Page 513 513
  • Page 514 514
  • Page 515 515
  • Page 516 516
  • Page 517 517
  • Page 518 518
  • Page 519 519
  • Page 520 520
  • Page 521 521
  • Page 522 522
  • Page 523 523
  • Page 524 524
  • Page 525 525
  • Page 526 526
  • Page 527 527
  • Page 528 528
  • Page 529 529
  • Page 530 530
  • Page 531 531
  • Page 532 532
  • Page 533 533
  • Page 534 534
  • Page 535 535
  • Page 536 536
  • Page 537 537
  • Page 538 538
  • Page 539 539
  • Page 540 540
  • Page 541 541
  • Page 542 542
  • Page 543 543
  • Page 544 544
  • Page 545 545
  • Page 546 546
  • Page 547 547
  • Page 548 548
  • Page 549 549
  • Page 550 550
  • Page 551 551
  • Page 552 552
  • Page 553 553
  • Page 554 554
  • Page 555 555
  • Page 556 556
  • Page 557 557
  • Page 558 558
  • Page 559 559
  • Page 560 560
  • Page 561 561
  • Page 562 562
  • Page 563 563
  • Page 564 564
  • Page 565 565
  • Page 566 566
  • Page 567 567
  • Page 568 568
  • Page 569 569
  • Page 570 570
  • Page 571 571
  • Page 572 572
  • Page 573 573
  • Page 574 574
  • Page 575 575
  • Page 576 576
  • Page 577 577
  • Page 578 578
  • Page 579 579
  • Page 580 580
  • Page 581 581
  • Page 582 582
  • Page 583 583
  • Page 584 584
  • Page 585 585
  • Page 586 586
  • Page 587 587
  • Page 588 588
  • Page 589 589
  • Page 590 590
  • Page 591 591
  • Page 592 592
  • Page 593 593
  • Page 594 594
  • Page 595 595
  • Page 596 596
  • Page 597 597
  • Page 598 598
  • Page 599 599
  • Page 600 600
  • Page 601 601
  • Page 602 602
  • Page 603 603
  • Page 604 604
  • Page 605 605
  • Page 606 606
  • Page 607 607
  • Page 608 608
  • Page 609 609
  • Page 610 610
  • Page 611 611
  • Page 612 612
  • Page 613 613
  • Page 614 614
  • Page 615 615
  • Page 616 616
  • Page 617 617
  • Page 618 618
  • Page 619 619
  • Page 620 620
  • Page 621 621
  • Page 622 622
  • Page 623 623
  • Page 624 624
  • Page 625 625
  • Page 626 626
  • Page 627 627
  • Page 628 628
  • Page 629 629
  • Page 630 630
  • Page 631 631
  • Page 632 632
  • Page 633 633
  • Page 634 634
  • Page 635 635
  • Page 636 636
  • Page 637 637
  • Page 638 638
  • Page 639 639
  • Page 640 640
  • Page 641 641
  • Page 642 642
  • Page 643 643
  • Page 644 644
  • Page 645 645
  • Page 646 646
  • Page 647 647
  • Page 648 648
  • Page 649 649
  • Page 650 650
  • Page 651 651
  • Page 652 652
  • Page 653 653
  • Page 654 654
  • Page 655 655
  • Page 656 656
  • Page 657 657
  • Page 658 658
  • Page 659 659
  • Page 660 660
  • Page 661 661
  • Page 662 662
  • Page 663 663
  • Page 664 664
  • Page 665 665
  • Page 666 666
  • Page 667 667
  • Page 668 668
  • Page 669 669
  • Page 670 670
  • Page 671 671
  • Page 672 672
  • Page 673 673
  • Page 674 674
  • Page 675 675
  • Page 676 676
  • Page 677 677
  • Page 678 678
  • Page 679 679
  • Page 680 680
  • Page 681 681
  • Page 682 682
  • Page 683 683
  • Page 684 684
  • Page 685 685
  • Page 686 686
  • Page 687 687
  • Page 688 688
  • Page 689 689
  • Page 690 690
  • Page 691 691
  • Page 692 692
  • Page 693 693
  • Page 694 694
  • Page 695 695
  • Page 696 696
  • Page 697 697
  • Page 698 698
  • Page 699 699
  • Page 700 700
  • Page 701 701
  • Page 702 702
  • Page 703 703
  • Page 704 704
  • Page 705 705
  • Page 706 706
  • Page 707 707
  • Page 708 708
  • Page 709 709
  • Page 710 710
  • Page 711 711
  • Page 712 712
  • Page 713 713
  • Page 714 714
  • Page 715 715
  • Page 716 716
  • Page 717 717
  • Page 718 718
  • Page 719 719
  • Page 720 720
  • Page 721 721
  • Page 722 722
  • Page 723 723
  • Page 724 724
  • Page 725 725
  • Page 726 726
  • Page 727 727
  • Page 728 728
  • Page 729 729
  • Page 730 730
  • Page 731 731
  • Page 732 732
  • Page 733 733
  • Page 734 734
  • Page 735 735
  • Page 736 736
  • Page 737 737
  • Page 738 738
  • Page 739 739
  • Page 740 740
  • Page 741 741
  • Page 742 742
  • Page 743 743
  • Page 744 744
  • Page 745 745
  • Page 746 746
  • Page 747 747
  • Page 748 748
  • Page 749 749
  • Page 750 750
  • Page 751 751
  • Page 752 752
  • Page 753 753
  • Page 754 754
  • Page 755 755
  • Page 756 756
  • Page 757 757
  • Page 758 758
  • Page 759 759
  • Page 760 760
  • Page 761 761
  • Page 762 762
  • Page 763 763
  • Page 764 764
  • Page 765 765
  • Page 766 766
  • Page 767 767
  • Page 768 768
  • Page 769 769
  • Page 770 770
  • Page 771 771
  • Page 772 772
  • Page 773 773
  • Page 774 774
  • Page 775 775
  • Page 776 776
  • Page 777 777
  • Page 778 778
  • Page 779 779
  • Page 780 780
  • Page 781 781
  • Page 782 782
  • Page 783 783
  • Page 784 784
  • Page 785 785
  • Page 786 786
  • Page 787 787
  • Page 788 788
  • Page 789 789
  • Page 790 790
  • Page 791 791
  • Page 792 792
  • Page 793 793
  • Page 794 794
  • Page 795 795
  • Page 796 796
  • Page 797 797
  • Page 798 798
  • Page 799 799
  • Page 800 800
  • Page 801 801
  • Page 802 802
  • Page 803 803
  • Page 804 804
  • Page 805 805
  • Page 806 806
  • Page 807 807
  • Page 808 808
  • Page 809 809
  • Page 810 810
  • Page 811 811
  • Page 812 812
  • Page 813 813
  • Page 814 814
  • Page 815 815
  • Page 816 816
  • Page 817 817
  • Page 818 818
  • Page 819 819
  • Page 820 820
  • Page 821 821
  • Page 822 822
  • Page 823 823
  • Page 824 824
  • Page 825 825
  • Page 826 826
  • Page 827 827
  • Page 828 828
  • Page 829 829
  • Page 830 830
  • Page 831 831
  • Page 832 832
  • Page 833 833
  • Page 834 834
  • Page 835 835
  • Page 836 836
  • Page 837 837
  • Page 838 838
  • Page 839 839
  • Page 840 840
  • Page 841 841
  • Page 842 842
  • Page 843 843
  • Page 844 844
  • Page 845 845
  • Page 846 846
  • Page 847 847
  • Page 848 848
  • Page 849 849
  • Page 850 850
  • Page 851 851
  • Page 852 852
  • Page 853 853
  • Page 854 854
  • Page 855 855
  • Page 856 856
  • Page 857 857
  • Page 858 858
  • Page 859 859
  • Page 860 860
  • Page 861 861
  • Page 862 862
  • Page 863 863
  • Page 864 864
  • Page 865 865
  • Page 866 866
  • Page 867 867
  • Page 868 868
  • Page 869 869
  • Page 870 870
  • Page 871 871
  • Page 872 872
  • Page 873 873
  • Page 874 874
  • Page 875 875
  • Page 876 876
  • Page 877 877
  • Page 878 878
  • Page 879 879
  • Page 880 880
  • Page 881 881
  • Page 882 882
  • Page 883 883
  • Page 884 884
  • Page 885 885
  • Page 886 886
  • Page 887 887
  • Page 888 888
  • Page 889 889
  • Page 890 890
  • Page 891 891
  • Page 892 892
  • Page 893 893
  • Page 894 894
  • Page 895 895
  • Page 896 896
  • Page 897 897
  • Page 898 898
  • Page 899 899
  • Page 900 900
  • Page 901 901
  • Page 902 902
  • Page 903 903
  • Page 904 904
  • Page 905 905
  • Page 906 906
  • Page 907 907
  • Page 908 908
  • Page 909 909
  • Page 910 910
  • Page 911 911
  • Page 912 912
  • Page 913 913
  • Page 914 914
  • Page 915 915
  • Page 916 916
  • Page 917 917
  • Page 918 918
  • Page 919 919
  • Page 920 920
  • Page 921 921
  • Page 922 922
  • Page 923 923
  • Page 924 924
  • Page 925 925
  • Page 926 926
  • Page 927 927
  • Page 928 928
  • Page 929 929
  • Page 930 930
  • Page 931 931
  • Page 932 932
  • Page 933 933
  • Page 934 934
  • Page 935 935
  • Page 936 936
  • Page 937 937
  • Page 938 938
  • Page 939 939
  • Page 940 940
  • Page 941 941
  • Page 942 942
  • Page 943 943
  • Page 944 944
  • Page 945 945
  • Page 946 946
  • Page 947 947
  • Page 948 948
  • Page 949 949
  • Page 950 950
  • Page 951 951
  • Page 952 952
  • Page 953 953
  • Page 954 954
  • Page 955 955
  • Page 956 956
  • Page 957 957
  • Page 958 958
  • Page 959 959
  • Page 960 960
  • Page 961 961
  • Page 962 962
  • Page 963 963
  • Page 964 964
  • Page 965 965
  • Page 966 966
  • Page 967 967
  • Page 968 968
  • Page 969 969
  • Page 970 970
  • Page 971 971
  • Page 972 972
  • Page 973 973
  • Page 974 974
  • Page 975 975
  • Page 976 976
  • Page 977 977
  • Page 978 978
  • Page 979 979
  • Page 980 980
  • Page 981 981
  • Page 982 982
  • Page 983 983
  • Page 984 984
  • Page 985 985
  • Page 986 986
  • Page 987 987
  • Page 988 988
  • Page 989 989
  • Page 990 990
  • Page 991 991
  • Page 992 992
  • Page 993 993
  • Page 994 994
  • Page 995 995
  • Page 996 996
  • Page 997 997
  • Page 998 998
  • Page 999 999
  • Page 1000 1000
  • Page 1001 1001

PREVOST H3-45 VIP Owner's manual

Type
Owner's manual
This manual is also suitable for

Ask a question and I''ll find the answer in the document

Finding information in a document is now easier with AI