Chief MAC790 Installation guide
- Category
- Wall & ceiling mounts accessories
- Type
- Installation guide
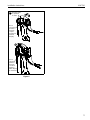
Below you will find brief information for MAC790. This medium swivel accessory for carts and stands allows for 15° rotation and tilt. It supports a maximum combined weight of 150 lbs. The accessory is designed to be mounted on Chief brand carts and stands. The display can be locked in an upright position using a bolt.
Below you will find brief information for MAC790. This medium swivel accessory for carts and stands allows for 15° rotation and tilt. It supports a maximum combined weight of 150 lbs. The accessory is designed to be mounted on Chief brand carts and stands. The display can be locked in an upright position using a bolt.


-
 1
1
-
 2
2
-
 3
3
-
 4
4
-
 5
5
-
 6
6
-
 7
7
-
 8
8


Chief MAC790 Installation guide
- Category
- Wall & ceiling mounts accessories
- Type
- Installation guide
Below you will find brief information for MAC790. This medium swivel accessory for carts and stands allows for 15° rotation and tilt. It supports a maximum combined weight of 150 lbs. The accessory is designed to be mounted on Chief brand carts and stands. The display can be locked in an upright position using a bolt.
Ask a question and I''ll find the answer in the document
Finding information in a document is now easier with AI
in other languages
- français: Chief MAC790 Guide d'installation
Related papers
-
Chief PAC138 Installation guide
-
Chief PSS2000B Installation guide
-
-
-
-
Chief MSS6000 User manual
-
-
-
-