
Grandstream Networks, Inc.
GXV3350
User Guide

GXV3350 - User Guide
WELCOME
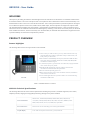
Thank you for purchasing Grandstream GXV3350 High-End Smart Video Phone for Android . The GXV3350 IP Video Phone
for Android combines a 16-line IP video phone with a multi-platform video collaboration solution and the functionality of an
Android tablet to offer an all-in-one communications solution. This IP video phone delivers a powerful experience through its’
5 inch 1280×720 capacitive touch screen, tiltable camera, HDMI output, dual microphones and support for 720p HD video.
The GXV3350 adds dual Gigabit ports with PoE/PoE+, integrated Wi-Fi and Bluetooth support. It also runs Android 7.0 and
offers instant access to hundreds of thousands of Android apps. By combining a state-of-the-art IP video phone, an advanced
video collaboration solution, and the functionality of an Android tablet, the GXV3350 offers businesses throughout the world
a powerful desktop communication and productivity solution.
PRODUCT OVERVIEW
Feature Highlights
The following tables contain the major features of the GXV3350:
Table 1: GXV3350 Features in a Glance
GXV3350 Technical Specifications
The following table resumes all the technical specifications including the protocols / standards supported, voice codecs,
telephony features, languages and upgrade/provisioning settings for the phone GXV3350.
TM
GXV3350
●16 lines with up to 16 SIP accounts, up to 6-way audio conference and 3-way
720p 30fps HD video conference, phonebook with up to 1000 contacts, call
history with up to 1000 records.
●Dual switched 10/100/1000Mbps network ports, Dual-band 2.4GHz & 5GHz
Wi-Fi (802.11a/b/g/n), PoE/PoE+, Bluetooth 4.2+EDR, USB, HDMI, EHS
with Plantronics headsets support.
●5" (1280x720) capacitive (5 points) touch screen TFT LCD, mega pixel CMOS
sensor camera with privacy shutter.
●Dual MIC & HD speakerphone with noise reduction, advanced echo
cancellation and excellent double-talk performance.
●Runs the Android™ Operating System 7.0.
●Built-in support for GXV series of video surveillance cameras, and GDS37xx
series of access control devices.
●Create Android applications for any business need to run on GXV3350 using
Grandstream's SDK toolkit.
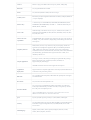
Protocols/Standards
SIP RFC3261, TCP/IP/UDP, RTP/RTCP, HTTP/HTTPS, ARP, ICMP, DNS (A
record, SRV, NAPTR), DHCP, PPPoE, SSH, TFTP, NTP, STUN, SIMPLE, LLDP-
MED, LDAP, TR-069, 802.1x, TLS, SRTP, IPv6, OpenVPN®
Network Interfaces Dual switched 10/ 100/ 1000 Mbps ports with integrated PoE/PoE+
Graphic Display 5 inch 1280×720 capacitive touch screen (5 points) TFT LCD

Camera Tiltable 1 mega-pixel CMOS camera with privacy shutter, 720P@30fps
Bluetooth Yes, integrated. Bluetooth 4.2+EDR.
Wi-Fi Yes, dual-band (2.4GHz & 5GHz) with 802.11 a/b/g/n
Auxiliary Ports RJ9 headset jack (allowing EHS with Plantronics headsets), USB port, HDMI-out
(1.4 up to 720p30fps)
Feature Keys
11 functions keys for CONFERENCE, TRANSFER, SEND/REDIAL, MUTE,
EARPHONE, SPEAKERPHONE, VOLUME -/+. 3 dedicated Android keys for
HOME, MENU, and BACK
Voice Codec
Wide-band Opus, wide-band G.722, G.711μ/a, G. 729A/B, G.726-32, iLBC, in-
band and out-of-band DTMF (In audio, RFC2833, SIP INFO), VAD, CNG, AEC,
PLC, AJB, AGC, ANS
Video Codec and
Capabilities
H.264 BP/MP/HP, video resolution up to 720p, frame rate up to 30 fps, bit rate up
to 2Mbps, 3-way video conference (720p@30fps), anti-flickering, auto focus and
auto exposure
Telephony Features
Hold, transfer, forward, 3-way conference, call park, call pickup, shared-call-
appearance (SCA)/bridged-line-appearance (BLA), downloadable phonebook
(XML, LDAP, up to 1000 items), call waiting, call log (up to 1000 records),
customization of screen, off-hook auto dial, auto answer, click-to-dial, flexible dial
plan, Hot Desking, personalized music ringtones and music on hold, server
redundancy and fail-over.
Sample Applications
Local apps: Contacts, Call History, File Manager, Programmable Key, Settings,
Browser, Voicemail, Clock, Calculator, Recorder, GS Market, etc.
Support third-party Android apps.
API/SDK available for advanced custom application development
Applications
Deployment
Support Android 7.0 compliant applications to be developed, downloaded and run
on the device with provisioning control.
HD audio Yes, 2 omnidirectional microphones, HD handset and speakerphone with support
for wideband audio
Base Stand Yes, base stand with three adjustable levels
Extension Module
Yes, can power up to 4 GBX20 EXT modules which feature a 272×480 color
LCD, 20 quick-dial/ BLF keys with dual-color LED, 2 navigation keys and less
than 1.2W power consumption per unit.
*The second GBX20 must be powered on by a 12V/1A PSU when 2 or more
GBX20 extension modules are connected to GXV3350.
QoS Layer 2 QoS (802.1Q, 802.1p) and Layer 3 (ToS, DiffServ, MPLS) QoS
Security
User and administrator level passwords, MD5 and MD5-sess based authentication,
256bit-AES encrypted configuration file, TLS, SRTP, HTTPS, 802.1x media
access control.
Multi-language English, German, Italian, French, Spanish, Portuguese, Russian, Croatian,
Chinese, Korean, Japanese, and more.

Table 2: GXV3350 Technical Specifications
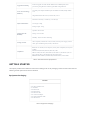
GETTING STARTED
This chapter provides basic installation instructions including the list of the packaging contents and also information for
obtaining the best performance with the GXV3350.
Equipment Packaging
Table 3: Equipment Packaging
Upgrade/Provisioning Firmware upgrade via TFTP / HTTP / HTTPS or local HTTP upload, mass
provisioning using TR-069 or AES encrypted XML configuration file.
Power & Green Energy
Efficiency
Universal power adapter included: Input: 100-240VAC 50-60Hz; Output 12VDC
1.5A
Integrated PoE* 802.3af Class 3, PoE+ 802.3at, Class 4
Physical information
Dimension: 210mm (L) x 243mm (L) x 47.5mm (H)
Unit weight: 1.24kg
Package weight: 1.67kg
Temperature and
Humidity
Operation: 0oC to 40oC
Storage: -10oC to 60oC
Humidity: 10% to 90% Non-condensing
Package Content GXV3350 phone, handset with cord, base stand, universal power supply, network
cable, quick installation guide, brochure, GPL license
Compliance
FCC: Part 15 Class B; Part 15 Subpart C(15.247); Part 15 Subpart E(15.407); Part
68 HAC
IC: RSS-247; RSS-Gen; RSS-102; IECS-003; CS03
CE: EN 55032; EN 55035; EN 61000-3-2; EN 61000-3-3; EN 62368-1; EN 301
489-1; EN 301 489-17; EN 300 328; EN 301 893; EN 62311
RCM: AS/NZS CISPR 32; AS/NZS 4268; AS/NZS 62368.1; AS/CA S004
GXV3350
●1x GXV3350 Main Case.
●1 x Handset.
●1x Phone Cord.
●1x Phone Stand
●1x Ethernet Cable.
●1x 12V Power Adapter.
●1x Quick Installation Guide.
●1x GPL License.

Figure 1: GXV3350 Package Content
Note: Check the package before installation. If you find anything missing, contact your system administrator.
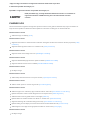
Description of the GXV3350
Front View
Figure 2: GXV3350 Front and GBX20 Extension Module Front
Item Name Description

Table 4: GXV3350 Front View
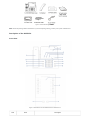
Back View
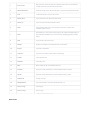
1 Front Camera Mega pixel front camera. The angle can be adjusted, and the camera can be blocked by
scrolling up/down the wheel on the back of the camera.
2 MWI LED Indicator To indicate message status, call status and phone’s system status using the LED indicator.
3 LCD 5 (1280*720) capacitive (5 points) touch screen.
4 Volume Down Tap to turn down the call volume and media volume.
5 Volume Up Tap to turn up the call volume and media volume.
6 Home Tap to go back to Home screen; or touch and press for about 2 seconds to take a
screenshot of phone’s screen.
7 Menu
Press MENU key to access phone’s display settings, edit widgets and thread manager. Or
press and hold on the MENU key for 2 seconds to enter managing application interface
directly.
8 Back Tap to go back to the previous menu.
9 Handset Off hook to use handset as the audio channel for calls and media.
10 Keypad Tap to dial or send DTMF
11 Conference Tap to enter into conference, then make an online meeting
12 Transfer Tap to transfer the call
13 Dial/Send Tap to make a call
14 Mute Mute / Unmute the call. Or enable DND when free
15 Earphone Tap to enter into the dial interface or switch the media channel to earphone
16 Speaker Tap to enter into the dial interface or switch the media channel to speaker
17 GBX20 LCD 272*480 color LCD
18 Multiple Button Tap to make all kinds of call, like speed dial, BLF and so on
19 Turn Last Page Turn last page
20 Turn Next Page Turn next page

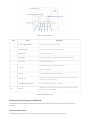
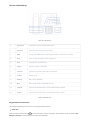
Figure 3: GXV3350 Back View
Table 5: GXV3350 Back View
Connecting and Setting Up the GXV3350
The GXV3350 can be installed on the desktop using the built-in stand or attached on the wall using the slots for wall
mounting.
Using the Phone Stand
The GXV3350 has a phone stand. To set up the GXV3350 as your desk phone, follow the steps below:
Item Name Description
1 Camera Adjusting Wheel Scroll up/down to adjust the camera angle.
2 Phone Stand Slot Put the phone stand from left to right into the slots.
3 Handset Port RJ9 handset connector port.
4 Headset Port RJ9 headset connector port (supporting EHS with Plantronics headset).
5 Power Jack 12V DC Power connector port.
6 LAN Port
10/100/1000Mbps RJ-45 port connecting to Ethernet.
PoE/PoE+ is supported
7 PC Port 10/100/1000Mbps RJ-45 port connecting to PC.
8 USB Port 2.0 USB devices can be connected via the USB port. For example, connect a USB
flash drive to save captured pictures.
9 Side GBX20 Connection Slot The slots for connecting GXV3450 and GBX20.
10 USB 3.0 USB devices can be connected via the USB port. For example, connect a USB
flash drive to save captured pictures.

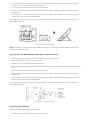
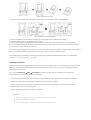
1. For installing the phone on the table with the phone stand, attach the phone stand to the bottom of the phone where
there is a slot for the phone stand, (upper half, bottom part);
2. Connect the handset and main phone case with the phone cord;
3. Connect the LAN port of the phone to the RJ-45 socket of a hub/switch or a router (LAN side of the router) using the
Ethernet cable;
4. Connect the 12V DC output plug to the power jack on the phone; plug the power adapter into an electrical outlet. If PoE
switch is used in step 3, this step could be skipped;
The LCD will display the booting up screen or firmware upgrading information. Before con tinuing, please wait for the main
screen display to show up.
Figure 4: Phone Stand on GXV3350
NOTE: The 2 positions of the Phone Stand for GXV3350: One angle is 49.5°, and the other is 44.5°, between the device LCD
interface and the horizontal plane.
Using the Slots for Wall Mounting (Wall Mount *Sold Separately)
1. Attach the wall mount to the slots for wall mount spaces on the back of the phone;
2. Attach the phone to the wall via the wall mount hole;
3. Pull out the tab from the handset cradle (see figure below);
4. Rotate the tab and plug it back into the slot with the extension up to hold the handset while the phone is mounted on the
wall.
5. Connect the handset and main phone case with the phone cord;
6. Connect the LAN port of the phone to the RJ-45 socket of a hub/switch or a router (LAN side of the router) using the
Ethernet cable;
7. Connect the 12V DC output plug to the power jack on the phone; plug the power adapter into an electrical outlet. If PoE
switch is used in step 3, this step could be skipped;
The LCD will display the booting up screen or firmware upgrading information. Before con tinuing, please wait for the main
screen display to show up.
Figure 5: Tab on The Handset Cradle
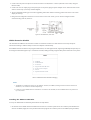
Connecting the GXV3350
To setup your GXV3350, please follow the steps below:
1. Connect the handset and main phone case with the phone cord;

2. Connect the LAN port of the phone to the RJ-45 socket of a hub/switch or a router (LAN side of the router) using the
Ethernet cable;
3. Connect the 12V DC output plug to the power jack on the phone; plug the power adapter into an electrical outlet. If PoE
switch is used in step 2, this step could be skipped;
4. The LCD will display booting up or firmware upgrading information. Before continuing, please wait for the main screen
display to show up;
5. Using the web configuration interface or from the menu of the touch screen, you can further configure network
connection using static IP, DHCP etc.
Figure 6: GXV3350 Back / Side View
GBX20 Extension Module
The GXV3350 uses GBX20 as the extension module. The extension module is an ideal solution for the busy enterprise
environment looking to add the ability to receive and dispatch calls efficiently.
Each GBX20 extension module has 20 programmable buttons, Left and Right buttons, supporting 40 Multiple Purpose Keys to
be configured. GXV3350 supports up to 4 extension modules, adding 160 fully programmable phone extensions to the phone.
Table 6: GBX20 Extension Module Packaging
Installing the GBX20 to GXV3350
To set up the GBX20 with the GXV3350, please follow the steps below:
1. On the back of the GBX20 and the GXV3350 there are slots for connector plate. Attach the connector plate between the
slots for the GBX20, Apply the screw provided and securely tighten the connector plate to the GBX20 (see figure below).
GBX20
●1x GBX20.
●1x GBX20 Stand.
●1x Connector.
●1x TypeA-MicroB USB Cable.
●1x 12V/1A Power Adapter.
●1x Screw.
●1x Quick Installation Guide.
Notes
1. The GBX20 is an additional accessory for the GXV3350. Therefore, the GBX20 (including extension module accessories for
installation) is not included in the GXV3350 package.
2. In case two or more GBX20 extension modules are connected to the GXV3350, the second GBX20 needs to be powered on
by a 12V/1A PSU.

Figure 7: GBX20 with connector
2. Attach the other side of the connector plate to the GXV3350’s EXT slots like shown in the figure below:
Figure 8: Connect GXV3350 and GBX20
3. Connect the GBX20 to the GXV3350 via the USB port using the USB cable provided with the GBX20.
4. Install the phone stands on the GXV3350 and the GBX20.
5. Power up the GXV3350. The GBX20 will show the booting up screen with version information and connecting status.
6. After successfully booting up, the extension board will stay in idle. Press and hold the LEFT and RIGHT button at the same
time to check the version information and status.
The GBX20 can be configured via the web GUI of the GXV3350 connected. After successfully configured, press LEFT and RIGHT
button on the GBX20 and users could browse all the Programmable Keys’ status in different pages.
For more information on installing, connecting and configuring the GBX20 with GXV3350, please refer to the GBX20 user
manual in https://www.grandstream.com/support.
Cleaning the Phone
For daily dust removal and fingerprint removal, please use the screen cleaning cloth in the factory package to wipe the phone.
Before you clean the touchscreen, we recommend turning cleaning mode on, so that you will not activate phone functions
while wiping the touchscreen.
You can go toLCD Settings 🡺 Basic 🡺 Accessibilityto enable cleaning mode. Once finished, you can enable the
touchscreen again by pressing any hardkey on the phone.
For some special cases like medical environment, you can use medical alcohol or isopropanol. The steps are as followed:
1. Before cleaning the phone, stop using it and disconnect it from the power supply.
2. Spray a small amount of disinfectant on screen, camera, handle and other places that are easily touched by users.
3. Wipe the phone with screen cleaning cloth.
4. Power on until the disinfectant is completely volatilized.
Important
Keep the power plug clean and dry, or may lead to electric shock or other perils.
DO NOT use disinfectant too frequently.
DO NOT use high degree or even pure disinfectant. It could damage the phone.

GETTING TO KNOW GXV3350
Use the Touchscreen
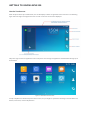
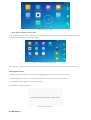
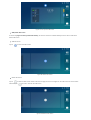
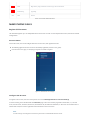
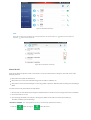
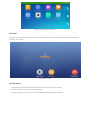
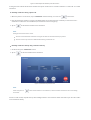
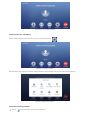
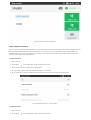
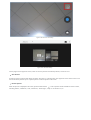
When the phone boots up in HOME screen, the LCD will display as below. A registered account is shown in the following
figure and users might need register their own account to have the account status displayed.
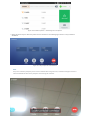
Swipe from right to show the application menu of the phone. The settings and applications installed will be brought up as
shown below.
Figure 10: GXV3350 Onscreen Menu
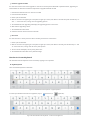
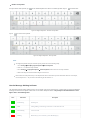
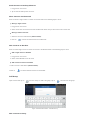
To fully manipulate the GXV3350 capacitive touch screen, use your fingers to operate the following on the GXV3350 icons,
buttons, menu items, onscreen keyboard etc.

Figure 11: GXV3350 Finger Gestures on the Touch Screen
Tap
Slightly touch the screen with fingertip to initiate menu, options or applications. For example, to select items on the screen
(e.g., setting options, apps etc.); to press onscreen buttons (e.g., “End” or “Options” softkey during the call); to type letters and
symbols using the onscreen keyboard.
Long Press
Touch the screen with fingertip and press for about 2 seconds without lifting your finger from the screen till an action occurs.
For example, long press on a picture to bring up selection option.
Flick and Slide
Touch the screen with fingertip and slide over the screen. For example, user could slide up to scroll up the page, slide down to
open dropdown menu, slide left or slide right to delete an item from the list. If your finger stays on the screen for too long,
the item may be selected, and sliding won’t occur.
Press and Drag
Touch and press the item, then move it by dragging it up, down, left or right, without lifting your finger from the screen.
Zoom In/Zoom Out
Place two fingers on the screen, then pinch them together (zoom out) or spread them apart (zoom in).
Double Tap
Quickly touch the screen twice with fingertip to switch between default display and zoomed-in display. This is usually used
when viewing photos or web pages.
Use the Desktop
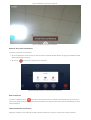
Desktop Menu
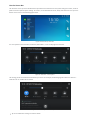
When the GXV3350 is on idle screen, press the MENU key to bring up phone’s menu. Users can access the following in the
desktop menu:

Figure 12: GXV3350 Desktop Menu
Desktop page
Add, delete or edit desktop pages, set Home page and change the screen sequence.
Wallpaper
Select wallpaper from Local gallery or from the available system Wallpapers
Widgets
Add widgets to the desktop by touching and holding the widget from the widget menu.
Management
Manage running applications on the GXV3350.
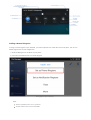
in case of screen lock password, after 5 incorrect attempts countdown timer is starting.
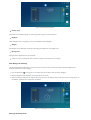
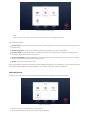
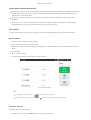
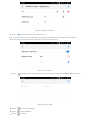
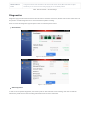
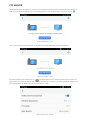
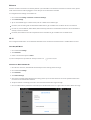
Add Widget to Desktop
The GXV3350 provides widgets like account bar, clock, contacts etc. Users could conveniently add those widgets to the
desktop as preferred. To add a widget:
1. Press the Menu key or long press on an empty space on the idle screen and select “Widgets”.
2. Different widgets will be displayed on the right side of the screen.
3. Select and drag the widget to the desired spot to be placed on the desktop. Please make sure there is enough space on
the desktop. Otherwise, the widget won’t be added.
Figure 13: Add Widget to the Desktop
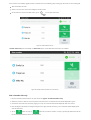
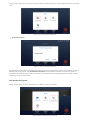
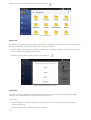
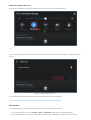
Manage Desktop Items

On the GXV3350 desktop, users could tap on the desktop items to manage shortcuts and widgets. The following operations
can be done:
Tap on the shortcut icon to open the application.
For example, tap on “File Manager” icon to access file manager application.
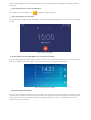
Tap on the widget to open and edit it.
For example, tap on the digital clock on the desktop. The clock settings will be brought up for users to set up timer, stopwatch
or alarm.
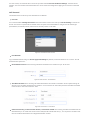
Figure 14: Open Clock Widget
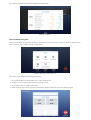
Certain widgets such as the MPK Widget can be resized on the desktop.
To resize a widget, press and hold the widget for about 2 seconds. Then lift your finger from the screen. This will bring up the
white frame as shown in the following figure. Touch and drag the border of the frame to adjust the size.
Figure 15: Resize Digital Clock Widget
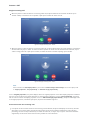
Move/delete Application/Widget
To move a shortcut/widget to a different spot on the desktop or to a different idle screen, touch and press the item for about
1 seconds until a recycle bin icon shows up on the top of the screen. Drag the item up/down/left/right to the destination spot
on the screen. Lift your finger once done. To delete the item/widget, press on it for about 1 seconds then move it to the
recycle bin on the top of the screen.

Figure 16: Move Clock Widget
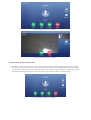
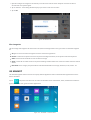
Group Apps into folders on home screen
To group different Apps in a folder, hold press on the app and drag it on top of the other app the folder will be created with a
dark background showing icons of the Apps added.
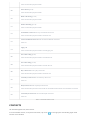
Figure 17: Creating a Folder grouping Apps
Tap the folder to display the Apps included, you can rename the folder by touching the upper box to display the keyboard.
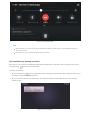
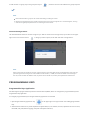
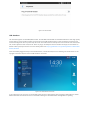
Auto Adjust Screen
This app is running in background and automatically triggered when the user opens a third-party app, such
as YouTube, Skype, Zoom, Teams, etc, so that app layout would be correct. When the user goes back to
the LCD desktop, the app adjusts the screen back to normal.
The notification would show as below:
Figure 18: Auto Adjust Screen
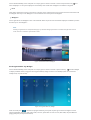
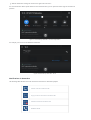
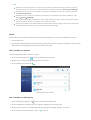
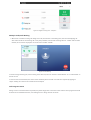
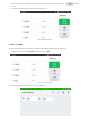
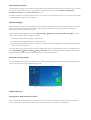
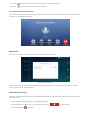
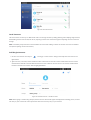
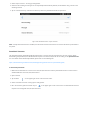
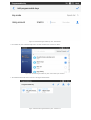
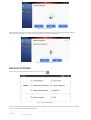
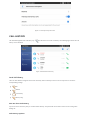
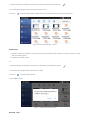
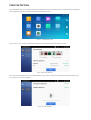
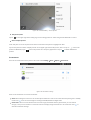
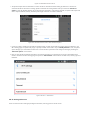
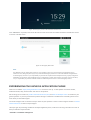
Set Wallpapers

On the GXV3350 desktop, touch and press on an empty spot for about 2 seconds or users could press menu key and
select “Wallpaper” to set up the wallpaper for the desktop. Users could select wallpaper from different categories:
Local
Open Gallery application and tap on the picture to preview. Touch and drag the picture to adjust the frame that will be used
as wallpaper. Then tap on “Set Wallpaper” to set the selected area of the picture as wallpaper.
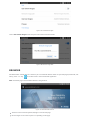
Wallpapers
On the right side of the Wallpaper menu of the GXV3350. Select the picture from the default wallpapers available to preview
and then tap on “Set wallpaper”.
Figure 19: GXV3350 Choose Wallpaper
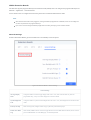
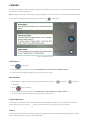
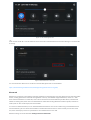
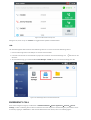
Set Programmable Key Widget
On the GXV3350 desktop, touch and press on an empty spot for about 2 seconds or press menu key and select Widgets
to display available choices, Long press the Programmable key widget to add It to the desktop (users can choose from
multiple sizes; 1xN, 2xN or 3xN).
Figure 23: Programmable Key Widget
Press the modify icon to show all the programmable key, then press the plus sign to add and configure of those
options (Speed dial, Busy lamp field, Call transfer, Intercom, Speed dial via active account, Dial DTMF, Call park Multicast
paging, Dial prefix, and Speed conference)
Note
Deleting an application icon will systematically pop up a window asking the permission to uninstall the application from the
screen. Press ok to uninstall or press cancel to abort.

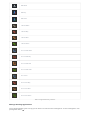
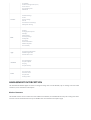
Programmable Key Indicators
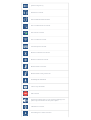
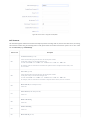
The following table shows the indicator status in different scenarios:
Table 7: Programmable Key Indicator
Indicator Status
Account Not Registered
Account Registered
Account Registering
Account Call Park
Dial Prefix
Speed Dial
Transfer
Dial DTMF
Intercom
Multicast Paging
Speed Conference

Table 7: Programmable Key Indicator
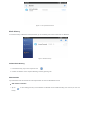
Manage Running Applications
On the GXV3350 desktop, press an empty spot for about 2 seconds then select “Management” or select “Management” after
pressing Menu button ..
BLF Offline
BLF Busy
BLF Online
Call Park Offline
Call Park Busy
Call Park Hold
Call Park Online
SCA Call Park Offline
SCA Call Park Busy
SCA Call Park Hold
SCA Call Park Online
SCA account
SCA Account Busy
SCA Account Hold
SCA Account Online

Figure 25: GXV3350 Recent Applications
Users could use the thread manager to do the following:
Slide the running thread to the left or right to stop the application.
Tap on icon to delete all running threads.
Tap on “Application” softkey to access application menu for advanced management options.
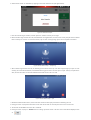
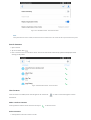
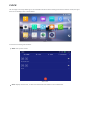
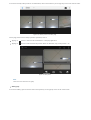
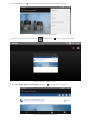
Idle Screen
Switch Idle Screens
The GXV3350 supports multiple idle screens by sliding the screen horizontally. On the GXV3350 screen, slightly touch an
empty area and slide to the left or right using your finger to switch between different idle screens.
Figure 26: GXV3350 Switch Idle Screens
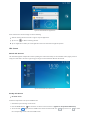
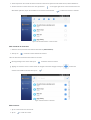
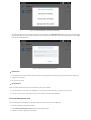
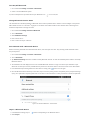
Set Up Idle Screen
Set home screen
Follow the steps below to set up the HOME screen.
1. GXV3350 is up and running on idle screen.
2. Press the MENU button . This will zoom out all the screens as shown in [Figure 27: Set up Home Idle Screen].
3. The screen with displayed is the HOME screen. Others are shown with icon . Tap on the icon to select
the corresponding screen as the new HOME screen.

Figure 27: Set up Home Idle Screen
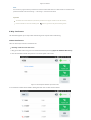
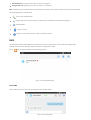
Add/Delete idle screen
As shown in [Figure 27: Set up Home Idle Screen], this section shows the available desktop screens. Users could add or
delete idle screen.
Add idle screen.
Tap on to add a new idle screen.
Figure 28: Add an Idle Screen
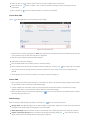
Delete idle screen.
Tap on to delet the Idle screen. Please make sure the apps, shortcuts or widgets on the idle screen are removed first.
Otherwise, the icon won’t show for the idle screen.
Figure 29: Delete an Idle Screen
Page is loading ...
Page is loading ...
Page is loading ...
Page is loading ...
Page is loading ...
Page is loading ...
Page is loading ...
Page is loading ...
Page is loading ...
Page is loading ...
Page is loading ...
Page is loading ...
Page is loading ...
Page is loading ...
Page is loading ...
Page is loading ...
Page is loading ...
Page is loading ...
Page is loading ...
Page is loading ...
Page is loading ...
Page is loading ...
Page is loading ...
Page is loading ...
Page is loading ...
Page is loading ...
Page is loading ...
Page is loading ...
Page is loading ...
Page is loading ...
Page is loading ...
Page is loading ...
Page is loading ...
Page is loading ...
Page is loading ...
Page is loading ...
Page is loading ...
Page is loading ...
Page is loading ...
Page is loading ...
Page is loading ...
Page is loading ...
Page is loading ...
Page is loading ...
Page is loading ...
Page is loading ...
Page is loading ...
Page is loading ...
Page is loading ...
Page is loading ...
Page is loading ...
Page is loading ...
Page is loading ...
Page is loading ...
Page is loading ...
Page is loading ...
Page is loading ...
Page is loading ...
Page is loading ...
Page is loading ...
Page is loading ...
Page is loading ...
Page is loading ...
Page is loading ...
Page is loading ...
Page is loading ...
Page is loading ...
Page is loading ...
Page is loading ...
Page is loading ...
Page is loading ...
Page is loading ...
Page is loading ...
Page is loading ...
Page is loading ...
Page is loading ...
Page is loading ...
Page is loading ...
-
 1
1
-
 2
2
-
 3
3
-
 4
4
-
 5
5
-
 6
6
-
 7
7
-
 8
8
-
 9
9
-
 10
10
-
 11
11
-
 12
12
-
 13
13
-
 14
14
-
 15
15
-
 16
16
-
 17
17
-
 18
18
-
 19
19
-
 20
20
-
 21
21
-
 22
22
-
 23
23
-
 24
24
-
 25
25
-
 26
26
-
 27
27
-
 28
28
-
 29
29
-
 30
30
-
 31
31
-
 32
32
-
 33
33
-
 34
34
-
 35
35
-
 36
36
-
 37
37
-
 38
38
-
 39
39
-
 40
40
-
 41
41
-
 42
42
-
 43
43
-
 44
44
-
 45
45
-
 46
46
-
 47
47
-
 48
48
-
 49
49
-
 50
50
-
 51
51
-
 52
52
-
 53
53
-
 54
54
-
 55
55
-
 56
56
-
 57
57
-
 58
58
-
 59
59
-
 60
60
-
 61
61
-
 62
62
-
 63
63
-
 64
64
-
 65
65
-
 66
66
-
 67
67
-
 68
68
-
 69
69
-
 70
70
-
 71
71
-
 72
72
-
 73
73
-
 74
74
-
 75
75
-
 76
76
-
 77
77
-
 78
78
-
 79
79
-
 80
80
-
 81
81
-
 82
82
-
 83
83
-
 84
84
-
 85
85
-
 86
86
-
 87
87
-
 88
88
-
 89
89
-
 90
90
-
 91
91
-
 92
92
-
 93
93
-
 94
94
-
 95
95
-
 96
96
-
 97
97
-
 98
98


Ask a question and I''ll find the answer in the document
Finding information in a document is now easier with AI
Related papers
-
Grandstream Networks GXV3350 User manual
-
-
Grandstream Networks GBX20 Quick Installation Guide
-
Grandstream GAC2570 User manual
-
Grandstream GDS37xx User guide
-
Grandstream GRP260x Installation guide
-
Grandstream Networks UCM63 Series User guide
-
-
-