Page is loading ...

(29)
(30)
(23)
o
f
f
o
n
IN
OU
T
(24)
(25)
(26)
(27)
(28)
+
–
O
FF
(31)
(32)
(33)
(34)
(35)
(36)
(37)

6
IMPORTANT SAFETY INSTRUCTIONS
WARNING – To guard against injury, basic safety precautions should be observed, including the following.
a)
READ AND FOLLOW ALL SAFETY INSTRUCTIONS.
b) DANGER – To avoid possible electric shock, special care should be taken since water is employed
in the use of aquarium equipment. For each of the following situations, do not attempt repairs by yourself;
return the appliance to an authorized service facility for service or discard the appliance.
1) If the appliance falls into the water, DON’T reach for it ! First unplug it and then retrieve it. If electrical
components of the appliance get wet, unplug the appliance immediately. (Non-immersible equipment only)
2) If the appliance shows any sign of abnormal water leakage, immediately unplug it from the power
source. (Immersible equipment only)
3) Carefully examine the appliance after installation. It should not be plugged in if there is water on parts
not intended to be wet.
4) Do not operate any appliance if it has a damaged cord or plug, or if it is malfunctioning or has been
dropped or damaged in any manner.
5) To avoid the possibility of the appliance plug or receptacle getting wet, position aquarium stand and
tank to one side of a wall-mounted receptacle to prevent water from dripping onto the receptacle or plug.
A ”drip loop”, shown in the figure, should be arranged by the user for each cord connecting an aquarium
appliance to a receptacle. The ”drip loop” is that part of the cord below the level of the receptacle, or the
connector if an extension cord is used, to prevent
water traveling along the cord and coming in contact
with the receptacle. If the plug or socket does get
wet, DON’T unplug the cord. Disconnect the fuse or
circuit breaker that supplies power to the appliance.
Then unplug and examine for presence of water in
the receptacle.
c) Close supervision is necessary when any appliance
is used by or near children.
d) To avoid injury, do not contact moving parts or hot
parts such as heaters, reflectors, lamp bulbs etc.
e) Always unplug an appliance from an outlet when not
in use, before putting on or taking off parts, and be-
fore cleaning. Never yank cord to pull plug from out-
let. Grasp the plug and pull to disconnect.
f) Do not use an appliance for other than intended use. The use of attachments not recommended or sold
by the appliance manufacturer may cause an unsafe condition.
g) Do not install or store the appliance where it will be exposed to the weather or to temperatures below
freezing.
h) Make sure an appliance mounted on a tank is securely in stalled before operating it.
i) Read and observe all the important notices on the appliance.
j) If an extension cord is necessary, a cord with a proper rating should be used. A cord rated for less am-
peres or watts than the appliance rating may overheat. Care should be taken to arrange the cord so that
it will not be tripped over or pulled.
k) This appliance has a polarized plug (one blade is wider than the other). As a safety feature, this plug will
fit in a polarized outlet only one way. If the plug does not fit fully in the outlet, reverse the plug. If it still
does not fit, contact a qualified electrician. Never use with an extension cord unless plug can be fully in-
serted. Do not attempt to defeat this safety feature.
Exception: This instruction may be omitted for an appliance that is not provided with a polarized attach-
ment plug.
l) ”SAVE THESE INSTRUCTIONS”.
USA
DRIP LOOP DRIP LOOP

Operating Instructions
and Technical Information
External Aquarium Filter 2422 and 2424
Aquarium Thermofilter 2324 Model: see type label at top of filter
Thank you
for buying a new external filter EHEIM professionel. It gives you optimum performance with excellent reliability
and great effectiveness. The large container volume – combined with a balanced combination of filter media –
guarantees highly effective disposal of pollutants.
Please take note of the relevant references to thermofilter models.
eXperience
For indoor use only. For use with aquariums. The aquarium filter is for domestic use only.
All electrical equipment in the water must be disconnected from the mains during care and maintenance work. It is
imperative to disconnect the filter from the mains prior to opening it.
The connecting line of this device can not be replaced. In case of damage to the power cord, the device is to be
scrapped. Never carry the pump by the cable; do not bend the cable.
This equipment is not intended for use by persons (including children) with limited physical, sensory or mental abili-
ties or for persons with no experience or knowledge unless they are supervised by a person responsible for safety or
unless they have received from such a person instructions on how to use the equipment. Children should be supervised
to ensure that they do not play with the equipment.
Notice: These devices produce magnetic fields which might cause electronic and mechanical disturbances or
damages. This also refers to pacemakers.
Please consult the manuals of medical equipment for the required safety margins.
Attention: Maintenance work presents the risk of crushing th fingers due to high magnetic forces.
For your own safety, we recommend to form a drip loop with the connection
cable to prevent any water running along the cable from intruding into the
socket.
When using a multiple socket or an external power supply unit, position them
atop the filter’s power connection.
Since a wide variety of varnishes and polishes are used when processing timer,
the appliance feet can leave visible traces on furniture or parquet floors as a re-
sult of chemical reactions. Therefore the device should not be placed on un-
protected wooden surfaces.
To achieve optimal operational safety there must be a maximum of 180 cm between the surface of
the water and the bottom of the filter.
Attention: Filter must always be operated in an upright position only.
Burning danger! Be careful when touching the heating coil of devices with integrated heater.
Take the necessary precautions when handling components that can discharge static electricity.
Do not clean the unit – or parts of it – in the dishwater. Not dishwater resistant!
Do not dispose of this product as normal household waste. Take it to your local refuse collection side.
The product is qualified in accordance with the respective national regulations and guidelines and meets
EC standards.
Safety instructions
20 cm
max.
180 cm
ü
7

Installation
(1) Flip all four EZ clips open and push upwards. With the help of the two recessed lid handles,
the pump head of the filter can be easily lifted off.
(2) Remove fine filter pad and take out each media container by grabbing the retractable handles
and pulling upwards.
(3) Fill the filter media containers with EHEIM filter media to achieve best results.
The lower filter tank is to be filled with EHEIM filter pads.
Fill the second container with the biological media SUBSTRAT to just below the edge.
Attention: Do not overfill. Do not clog flow-through pipe.
(4) Thoroughly rinse the filter media in the containers under running water until all cloudiness has
disappeared. Place the container with the blue filter pad in the filter canister and firmly press
downwards until it rests on the support frames. This guarantees an hermetic seal between
media containers and canister.
(5) Insert the second media container in the same manner. Make sure the flow-through pipe open-
ings line up on top of each other and that the 2 rubber seals are correctly fitted on the open-
ings, so as to achieve a hermetic seal.
Lower each retractable handle and ensure that both media containers lie flush on top of each
other. Then insert the fine filter pad (white) in such a manner that the round cut-out lines up
with the respective flow-through pipe opening.
Attention: Fine filter pad (white) should not be placed under the retractable handle of the
media container.
Thermofilter:
(6) By thermofilter version please check that the flow-through pipe openings are not
placed directly above the heating element.
C
°
External filter 2422 and 2424 for fresh and sea water
Thermofilter 2324 for fresh water only
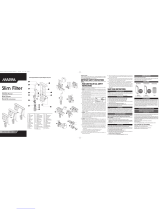
햲
Pump head
햳
Sealing gasket
햴
Fine filter pad (white)
햵
Coarse foam filter pad (blue)
햶
Filter media containers
햷
Rubber hermetic seals
햸
EZ clips
햹
Filter canister
햺
Inte-
grated double tap connector
햻
Hose clamp
햽
Intake pipe
햾
Intake strainer
햿
Security
outlet pipe
헀
Spray bar and end cap
헁
Suction cup with clips
헂
Tubing
헃
Vaseline.
Thermofilter:
헄
Control knob
헅
Control light.
When unpacking, please check to ensure that all parts have been included.
8
(7) Check to ensure that the sealing gasket on the pump head of the filter is not soiled and that
is properly placed into its groove.

(8) Place the pump head onto the filter canister so that the input connector of the pump head is
lined up with the input guide of the media containers. Close all four EZ clips.
(9) Attention: Before the integrated double tap connector is inserted into the pump head of the
filter, examine both o-rings for damage and correct fitting. Lightly grease the o-rings with Va-
seline to help installation.
(10) Insert the integrated double tap connector with the locking clamp in an upright position into
the opening on the pump head. To fasten the locking clamp into its sealed position push the
handle downwards.
Tubing installation
(11) Shut off the integrated double tap connector by shifting the two levers to the OFF position.
(12) Push the enclosed tubing onto the intake and output supports of the integrated double tap
connector as far as they will go. Since this can be a relatively difficult task, soak the hoses
in warm water beforehand to make them softer.
Note: It is very important that you use original EHEIM hoses only.
(13) Place the two-part hose clamp around the installed hoses, hang into the proper position and
(14) clip it into place.
(15) Place the now ready to use filter into the lower cabinet of your aquarium stand and observe
the prescribed installation height: the distance between water surface and base of the filter
should not exceed 180 cm (5’11’’) in order to attain optimum functioning.
(16) Attach the intake strainer to the intake tube and fasten it onto the interior glass of the aquar-
(17) ium with two clips and suction cups.
(18) Connect the security outlet pipe to the spray bar with a short piece of tubing and install in
the aquarium with the clips and suction cups. Place on the rear or on one of the sides of the
aquarium, depending on available space. Close the open side of the spray bar with the
enclosed end cap.
Tip: The spray bar can either be installed below water level or just above the surface, depend-
ing upon the amount of oxygen-rich surface movement required.
(19) Guide the hoses from the filter outwards through the opening in the aquarium furniture and
connect the installed intake pipe with the suction side of the filter, and the output pipe with
the pressure side of the filter.
To achieve an even flow, be sure that the tubing is laid out smoothly and has no kinks; if ne-
cessary, shorten them.
Tip: If you lay the tubing into warm water for some time beforehand, they will become soft
and possible kinks can be easily squeezed out.
Setting into operation
(20) Open the taps of the integrated double tap connector by shifting both levers to the ON po-
sition. Separate the output hose from the spray bar and suck strongly on the hose, to estab-
lish the syphon.
9

(21) Tip: Alternatively use the EHEIM Universal Installation Kit 1 (order no. 4004300, diam. 12 mm)
(22) or the EHEIM suction device (order no. 4003540). The canister will then automatically fill up
with water.
Reconnect the hose to the spray bar.
(23) Tip: The water flow from the pump can be controlled by using the tap only on the pressure
side (OUT).
Attention: Never reduce the pump output by closing the tap on the suction side (IN).
(24) Once again check all the connections for watertightness, then put the filter into operation
by connecting the mains plug of the pump head.
10
Thermofilter:
(25) Attention: Only conntect the heater’s mains plug (separate cable) once the filter is work-
ing smoothly. Never operate the heater when dry.
Once the heater has been plugged into the mains socket, wait a few minutes for the tem-
perature probe in the filter canister to adapt to the actual water temperature.
(26) Turn the temperature control knob to face a vertical position (arrow), which corresponds
to a value of between 25°C and 27°C. The control lamp lights on with the heater in opera-
tion, and switches off automatically once the desired temperature has been reached.
(27) Should you wish a higher temperature value, turn the knob clockwise (with the control light
switched off) until the control light turns back on again.
Once the heater and control light switch back off again, checkt the actual water tem-
perature with a thermometer. Should the value still be too low, repeat the procedure as
described above. As orientative measure use the +/– scale: each subdivision is equiva-
lent to approx. 1°C.
(28) Should the desired water temperature already be reached while the heater is still operative,
turn the control knob anti-clockwise, until the control light goes off.
The heater maintains the desired temperature virtually constant. As soon as the temper-
ature diminishes, it switches on automatically, until it reaches the set value. Should the
power supply be cut off the control light flickers. When the power is restored the heater
works normally.
C
°
Maintenance and Servicing
Thermofilter:
First pull out the heater’s mains plug, and then the pump’s mains plug.
C
°
(29) Close both tap levers (OFF position). Gently pull the locking clamp upwards and the remove
the integrated double tap connector from the pump head of the filter.
(30) Take the filter out of the cabinet by using the two recessed lid handles.

11
(31) Open all EZ clips and remove the pump head from the canister.
(32) In order to clean the pump chamber, turn the pump head upside down and open the pump
cover by turning it anti-clockwise.
(33) Then remove the pump cover, impeller and shaft.
(34) Thoroughly clean pump parts, impeller chamber and cooling channel with EHEIM cleaning set
(order no. 4009580). Carefully rinse off shaft (danger of breakage!), then put impeller back to-
gether again and insert into proper position.
Pay attention to the correct installation of shaft, bushings and pump cover. Lock pump cover
by turning clockwise.
(35) Filter media: Remove filter pads and containers from the canister. Thoroughly wash out the
filter media with used aquarium water – until no more clouding can be seen.
The fine filter pad (white) serves as mechanical fine filtration and should only be used once,
since adhering dirt particles cannot be washed out completely. Use new pad, (order no.
2616225). The blue filter pad (1 x included in set, order no. 2616220) can be reused up to
2-3 times. Rinse thoroughly before using.
Tip: When renewing the SUBSTRAT media, retain 1/3 of used filter medium and mix with new
material to speed-up bacteria recolonization.
(36) Wash out the filter canister and then place the media containers back in position. Press the
first one down to the support frame, then insert the second one as far as it will go. In the pro-
cess, the pipe flow-through openings of the media containers must lie on top of each other,
and the rubber seals must be correctly fitted on the openings so as to achieve an hermetic
seal.
Attention: Fine filter pad (white) should not be placed under the retractable handle of the
media container.
Place the new filter pad on the top container. Check to ensure that the sealing gasket of
the pump head fits properly and is clean. Then lightly lubricate the sealing gasket of the
pump head with Vaseline. Place the pump head on the filter canister, close the EZ clips and
place the filter into the cabinet.
Examine both o-rings on the double tap connector for damage and correct fitting and lightly
grease them with Vaseline; insert and lock in place. After both of the tap levers on the inte-
grated double tap connector have been opened (ON position), the filter will automatically fill
up again with water and be ready for operation. Put the filter into operation by connecting the
mains plug.
Note: All hose connections must be checked at regular intervals for correct fitting.
Attention: Filter must always be operated in an upright position only.
Thermofilter:
(37) Wash out the filter canister. Periodically check the heating element for dirt deposits and
clean if necessary. Do not bend the heating element. Do not submerge the filter canis-
ter underwater. Ensure heater electrics do not come into contact with splashing water.
Place media containers back into the canister, as described above. Connect the pump’s
plug (from the pump head) into the mains socket. Only connect the heater’s plug into the
mains once the filter is running smoothly.
C
°

F
ür Aquarien bis 150 l 250 l 150 l 250 l
For aquariums up to
Pour aquariums jusqu’à
Voor aquaria tot
Per acquari fino a
För akvarier upp till 33 Imp. gal. 55 Imp. gal. 40 U.S. gal. 66 U.S. gal.
Tamaño acuarios hasta
For akvarier op til
Akvaarioihin
Pumpenleistung 500 l /h 700 l /h 500 l /h 700 l /h
Pump output
Débit de la pompe
Pompcapaciteit
Potenza della pompa
Pumpkapacitet 110 Imp. gal./h 154 Imp. gal./h 132 U.S. gal./h 185 U.S. gal./h
Caudal bomba
Pumpeydelse
Pumppausteho
Förderhöhe H max m 1,30 1,50 1,30 1,50
Delivery head m wat. col.
Hauteur de réf. m col. d’eau
Opvoerhoogte m wk
Prevalenza / m
Lyfthöjd m / vst 4 ft. / 3 in. 4 ft. / 11 in. 4 ft. / 3 in. 4 ft. / 3 in.
Altura máx. de bombeo / m
Løftehøjde MVS
Nostokorkeus
Filtervolumen 2,3 l 3,0 l 2,3 l 3,0 l
Filter volume
Volume du filtre
Filtervolume
Volume del filtro
Filtervolym
Volumen filtrante
Suodatustilavuus
Leistungsaufnahme 8 W 8 W 8 W 8 W
Power consumption
Consommation de courant
Stroomverbruik
Assorbimento
Eleffekt
Consumo
Strømforbrug
Tehokulutus
Heizleistung Thermofilter 2322: 2324: 2322: 2324:
Heating power (thermo)
Puissance du chauffage 150 W 150 W 150 W 150 W
Verwarmingscapaciteit
Potenza riscaldatore
Värmeeffekt termofilter
Potencia calentador
Varmeydelse termofiltre
Lämpösuodattimen teho
230 V / 50 Hz 120 V / 60 Hz
240 V / 50 Hz 220 V / 60 Hz
2422 2424 / 2324 2422 2424 / 2324
102
eXperience
/