NEC NP-PA521U-13ZL Quick setup guide

Type
Quick setup guide

NEC NP-PA521U-13ZL is a high-quality projector that offers a wide range of features to enhance your presentations and multimedia experiences. With its XGA resolution and 5,200 lumens of brightness, it delivers sharp, vibrant images even in well-lit rooms. It also has a long lamp life of up to 10,000 hours in ECO mode, ensuring minimal maintenance and uninterrupted use. Additionally, the projector's multiple input options, including HDMI, VGA, and USB, provide versatile connectivity for various devices.

NEC NP-PA521U-13ZL is a high-quality projector that offers a wide range of features to enhance your presentations and multimedia experiences. With its XGA resolution and 5,200 lumens of brightness, it delivers sharp, vibrant images even in well-lit rooms. It also has a long lamp life of up to 10,000 hours in ECO mode, ensuring minimal maintenance and uninterrupted use. Additionally, the projector's multiple input options, including HDMI, VGA, and USB, provide versatile connectivity for various devices.

PA622U Series
PA621U Series
Quick Setup Guide
PA622U Series
PA621U Series
Quick Setup Guide
Connect the supplied power cord.
Schließen Sie das mitgelieferte Netzkabel an.
Connecter le câble d’alimentation fourni.
Collegate il cavo d’alimentazione in dotazione.
Conecte el cable de alimentación suministrado.
Conecte o cabo de alimentação fornecido.
Anslut den medlevererade nätkabeln.
Подсоедините силовой кабель, входящий в комплект поставки.
전원
케이블을
연결하십시오
.
Connect your computer to the projector.
Schließen Sie ihren Computer an den Projektor an.
Connecter l’ordinateur au projecteur.
Collegate il vostro computer al proiettore.
Conectar el ordenador al proyector.
Conecte seu computador ao projetor.
Anslut din dator till projektorn.
Подключите компьютер к проектору.
컴퓨터를
프로젝터에
연결하십시오
.
COMPUTER IN
Computer cable (sold commercially)
Computer-Kabel (im Handel erhältlich)
Câble d’ordinateur (vendu dans le commerce)
Cavo computer (venduto separatamente)
Cable de ordenador (vendido por separado)
Cabo do computador (vendido comercialmente)
Datorkabel (säljs separat)
Компьютерный кабель (продается отдельно)
컴퓨터
케이블
(
시중에서
판매
)
Fn F1 F
12
(
page 26, 274 of the User’s Manual)
TIP:
Press the AUTO ADJ. button to optimize an RGB
image automatically.
TIPP:
Drücken Sie zum automatischen Optimieren des RGB-
Bildes die AUTO ADJ.-Taste.
ASTUCE:
Appuyer sur la touche AUTO ADJ. pour optimiser
automatiquement une image RGB.
SUGGERIMENTO:
Premete il tasto AUTO ADJ. per ottimizzare automaticamente l’immagine RGB.
SUGERENCIA:
Pulse el botón de AUTO ADJ. para optimizar una imagen RGB automáticamente.
DICA:
Pressione o botão AUTO ADJ. (Ajuste automático) para otimizar automaticamente uma imagem RGB.
TIPS:
Tryck på AUTO ADJ.-tangenten för att optimera en RGB-bild automatiskt.
СОВЕТ:
Для выполнения автоматической оптимизации цветовых оттенков изображения нажмите кнопку AUTO ADJ.
:
AUTO ADJ.
버튼을
누르면
RGB
이미지를
자동으로
활용할
있습니다
.
Rotate the lens shift dial (Lens shift)
Drehen Sie den Linsenversatz-Wähler (Linsenversatz)
Tournez le bouton de réglage de l’objectif (décalage d’objectif)
Ruotate la ghiera spostamento obiettivo (spostamento obiettivo)
Gire el dial de desplazamiento de la lente (desplazamiento de lente)
Rodar o disco de deslocação da lente (deslocação da lente)
Vrid på linsjusteringsratten (linsjustering)
Поверните регулятор сдвига объектива (Сдвиг объектива)
렌즈
이동
다이얼을
돌리십시오
(
렌즈
이동
)
Adjust the picture size and position.
Einstellung der Bildgröße und Bildposition.
Ajuster la taille et de la position de l’image.
Regolate delle dimensioni e della posizione dell’immagine.
Ajuste del tamaño y la posición de la imagen.
Ajuste o tamanho da imagem e a posição.
Justera bildstorlek och position.
Настройте размер и положение изображения.
영상
크기와
위치를
조정하십시오
.
(
page 20 of the User’s Manual)
Downward
Abwärts
Vers le bas
Verso il basso
Hacia abajo
Para baixo
Nedåt
Вниз
아래로
Lens shift dial (Horizontal)
Linsenversatz-Wähler (horizontal)
Bouton de réglage de l’objectif (horizontal)
Ghiera spostamento obiettivo (orizzontale)
Dial de desplazamiento de la lente (horizontal)
Disco de troca da lente (Horizontal)
Linsjusteringsratt (horisontal)
Регулятор сдвига объектива (по горизонтали)
렌즈
이동
다이얼
(
수평
)
Lens shift dial (Veritical)
Linsenversatz-Wähler (vertikal)
Bouton de réglage de l’objectif (vertical)
Ghiera spostamento obiettivo (verticale)
Dial de desplazamiento de la lente (vertical)
Disco de troca da lente (Vertical)
Linsjusteringsratt (vertikal)
Регулятор сдвига объектива (по вертикали)
렌즈
이동
다이얼
(
수직
)
Leftward
Nach links
Vers la gauche
A sinistra
A la izquierda
Para a esquerda
Åt vänster
Влево
왼쪽으로
Upward
Aufwärts
Vers le haut
Verso l’alto
Hacia arriba
Para cima
Uppåt
Вверх
위로
Rightward
Nach rechts
Vers la droite
A destra
A la derecha
Para a direita
Åt höger
Вправо
오른쪽으로
(
page 21 of the User’s Manual)
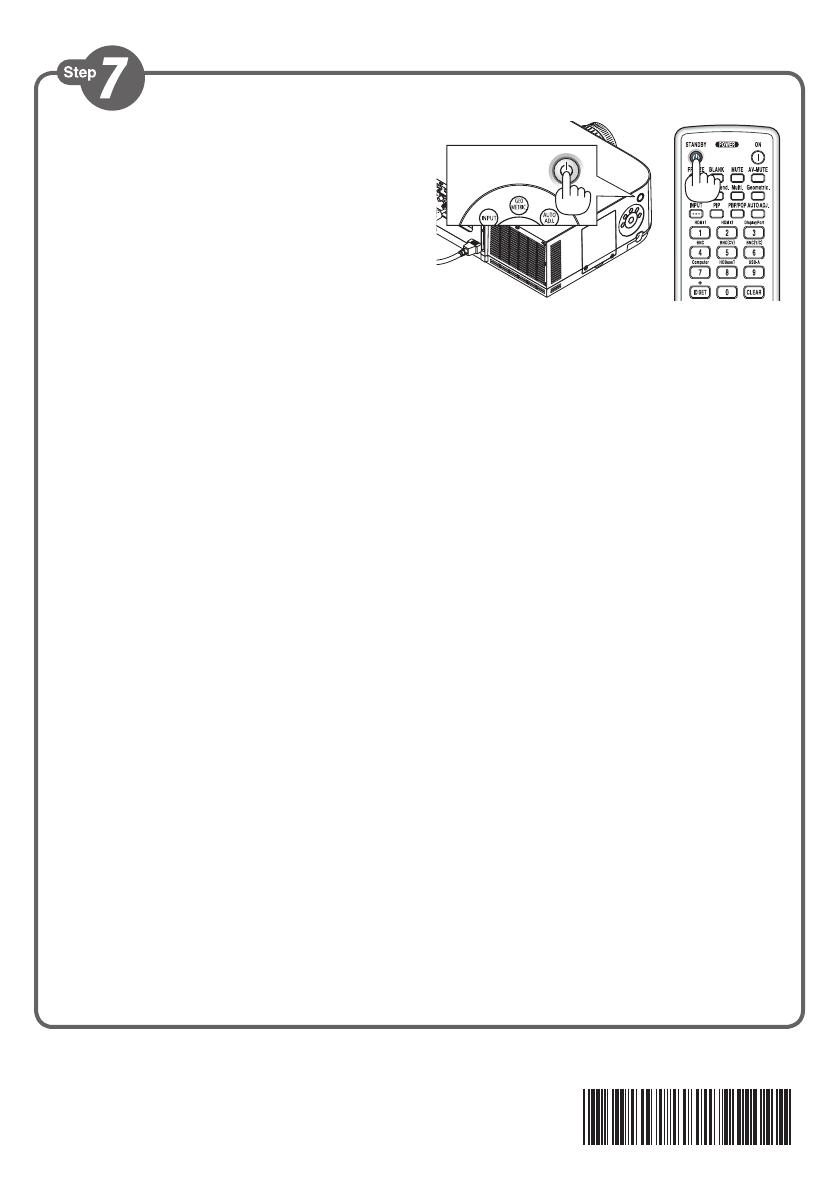
1. Press the STANDBY button twice.
The lamp will go off and the power supply
will be cut. At this point, if there are no input
signals, the projector will go into the standby
mode after about 10 seconds.
2. Disconnect all the cables.
1. Drücken Sie die STANDBY-Taste zweimal.
Die Lampe erlischt und die Stromversorgung
wird unterbrochen. Wenn an dieser Stelle keine
Signale eingehen, geht der Projektor nach etwa
10 Sekunden in den Standby-Modus über.
2. Ziehen Sie alle Kabel ab.
1. Appuyez deux fois de suite sur la touche
STANDBY.
La lampe s’éteint et l’alimentation est coupée.
À ce stade, s’il n’y a pas de signaux d’entrée, le
projecteur passe en mode veille après environ
10 secondes.
2. Débranchez tous les câbles.
1. Premere due volte il tasto STANDBY.
La lampada si spegnerà e l’alimentazione verrà
interrotta. A questo punto, se non vi sono
segnali in ingresso, il proiettore entrerà nel
modo di attesa dopo circa 10 secondi.
2. Scollegare tutti i cavi.
1. Pulse el botón STANDBY dos veces.
La lámpara se apagará y el suministro de
alimentación será desactivado. En este
momento, si no hay señales de entrada, el
proyector entrará en el modo de espera al cabo
de aproximadamente 10 segundos.
2. Desconecte todos los cables.
1. Pressione duas vezes o botão STANDBY.
A lâmpada irá desligar e o fornecimento de
energia será cortado. Neste momento, se não
houver sinais de entrada, o projetor entrará no
modo espera após cerca de 10 segundos.
2. Desconecte todos os cabos.
Printed in China
©NEC Display Solutions, Ltd. 2014
Ver. 2/1/14
1. Tryck på STANDBY-tangenten två gånger.
Lampan släcks och strömförsörjningen
stängs av. Vid detta tillfälle, om det inte finns
några insignaler, går projektorn in i standby-
läge efter ca 10 sekunder.
2. Koppla bort alla kablar.
1. Дважды нажмите кнопку STANDBY.
Лампа выключится, и питание будет
отключено. В этом случае, если нет входящих
сигналов, проектор войдет в режим ожидания
приблизительно через 10 секунд.
2. Отсоедините все кабели.
1. STANDBY
버튼을
누릅니다
.
램프가
꺼지고
전원
공급이
중단됩니다
.
입력
신호가
없는
경우
10
후에
프로젝터는
대기
모드
상태가
됩니다
.
2.
모든
케이블
연결을
분리합니다
.
(
page 27 of the User’s Manual)
*7N8N4142*
  • Page 1 1
  • Page 2 2
  • Page 3 3
  • Page 4 4
  • Page 5 5
  • Page 6 6

NEC NP-PA521U-13ZL Quick setup guide

Type
Quick setup guide

NEC NP-PA521U-13ZL is a high-quality projector that offers a wide range of features to enhance your presentations and multimedia experiences. With its XGA resolution and 5,200 lumens of brightness, it delivers sharp, vibrant images even in well-lit rooms. It also has a long lamp life of up to 10,000 hours in ECO mode, ensuring minimal maintenance and uninterrupted use. Additionally, the projector's multiple input options, including HDMI, VGA, and USB, provide versatile connectivity for various devices.

Ask a question and I''ll find the answer in the document

Finding information in a document is now easier with AI