Page is loading ...

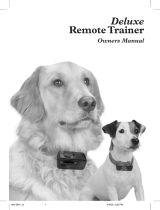
SportTRAINER
OWNERS MANUAL
TM
TM

INSTRUCTION MANUAL
Thank you for purchasing your SportTrainer, one of the nest training systems
available for training your dog. Due to the similarities between the Big and Little dog
receivers, both are discussed in this manual. Two simple steps will prepare your unit
for use.
Step I – Insert the batteries in the handheld transmitter and receiver collar.
Step II – Activate the receiver collar.
Please remember to ll out your warranty card before continuing. Either mail the
enclosed card or register online at www.sportdog.net.
2
Big Dog Receiver Collar for PST-105S
LED
Contact
Points
Push button
(on/off) switch
Little Dog Receiver Collar for PST-105
Instantaneous Level
Adjustment Knob
Stimulation
without
Tone Button
Tone Only
Button
LED
SportTrainer Hand Held
Transmitter

Step I — Insert Batteries
Receiver for the Little Dog Sport Trainer 105
• Use a small Philips screwdriver to remove the two screws on the receiver.
• Press the battery door up in the direction of the arrows on the door. It will move up
slightly and the door will release.
• Insert two, 3-volt lithium CR2032 batteries per the diagram on the receiver.
• Replace the battery door. Check to ensure the gasket is in place and clean.
• Tighten the screws. Do not over tighten.
Receiver for the Big Dog Sport Trainer 105S
• Use a small Philips screwdriver to remove the two
screws on the receiver and remove the battery door.
• Remove the battery door.
• Insert two, 3-volt lithium CR2032 batteries per the
diagram on the battery door.
• Replace the battery door. Check to ensure o-ring is
in place and clean. Press and snap into the receiver.
• Tighten the screws, being careful not to overtighten.
Hand Held Transmitter for Both Remote Trainers.
• Pull the battery door open at the top.
• Insert the 9V battery according to the diagram in the
transmitter. It will only t one way.
• Replace the battery door by positioning the bottom
edge and snapping door into place.
• Activate the transmitter by pressing either button.
or Ensure the receiver collar is not on the
dog. The transmitter LED will light.
3
Positive “+” polarity of battery
O-Ring for for the PST-105S
Gasket for the PST-105
Press Door Up Pull Door Out

Step II — Activate the Receiver Collar
• To activate the receiver collar, press and release the receiver’s on/off button.
• When the button is pressed, the LED will immediately come on and then ash twice
after the button is released, indicating that the receiver is ready to receive signals.
• To turn off the receiver collar, press and release the on/off button. The LED light will
come on when the button is pressed and will ash three times after the button is
released, indicating that the unit has been turned off.
TESTING YOUR UNIT BEFORE USING
Note: An alternative way for quickly checking whether or not the receiver is on is to press the
top button on the transmitter. Pressing this button will result in the receiver to beep only.
• Turn off the receiver by pressing the on/off button.
The receiver LED will ash three times.
• Loosen the two contact points on the collar until
the threading is exposed.
• Bend the wire ends of the test light and twist them
around the exposed threading.
• Securely hand-tighten the contact points over the
test wires.
• Activate the receiver by pressing the on/off button.
The LED will blink once.
• Turn the adjustment knob on the transmitter to level 5.
• Press the Stimulation button.
• The test light will illuminate, indicating that the unit is operational.
• The higher the intensity level that is set on the transmitter, the brighter the light
will shine.
• Loosen the contact points, remove the test wires, and securely tighten the contact
points. Do not over tighten.
4
Push button
(on/off) switch
Test Light on Receiver Probes

USING YOUR TRAINING SYSTEM
Fitting your Receiver Collar
• Wash both your dog’s neck and the contact points on
the receiver collar.
• Place the activated receiver high on the underside of
your dog’s neck.
• Buckle the collar snugly on your dog, allowing
enough room so that you can
comfortably place one nger between the contact
points and your dog’s neck.
NOTE: Do not buckle the collar too tightly. Doing so can
cause Pressure Necrosis, a condition that results in skin
deterioration. Check your dog’s collar regularly. Remove the collar weekly and wash your dog’s
neck and contact points with a mild soap that is approved by a veterinarian. If a rash appears
or sores form, remove the collar for a few days. When placing the collar back onto your dog,
make sure that it is secured properly.
To train using tone:
• Press the tone button on the transmitter. This button can be used to “warn” your dog
instead of giving him a stimulation. The sound emitted by the receiver can be just as
effective as the stimulation on some dogs.
• To indicate that tone is being activated, the red LED light on the transmitter will
remain illuminated as long as the button is pressed. If the LED light begins ashing
every four seconds or does not illuminate, the transmitter battery should be replaced.
To train using stimulation:
Use this button when either training or deterring unwanted behavior when the tone
is not effective. Your dog responds to the transmitter’s stimulation through two contact
points on the waterproof receiver that touch the dog’s neck. Therefore, it is important
that the receiver is tted properly onto your dog.
Your unit comes equipped with two sets of contact points, medium and long. The
medium should be used with dogs having shorter hair; the long should be used with
dogs having longer hair. The contact points on the receiver, from the factory, are
medium length.
• Select level 1 (lowest) on your transmitter.
• Walk around and wait for your dog to become distracted.
• Without a verbal command, press the stimulation button down for 2 or 3 seconds.
• To indicate that stimulation is being delivered, the red LED light on the transmitter
will remain illuminated for as long as the button is pressed. If the LED light begins
ashing every four seconds or does not illuminate, the battery should be replaced.
5

If after pressing the bottom/stimulation button the dog is still not responding to the
stimulation, even at level 10, then the contact points may need to be changed to ensure
better contact with the dog’s skin. If the dog still shows no response, then the dog’s hair
may need to be trimmed. This will allow the contact points to penetrate through the
hair and touch the dog’s skin.
NOTE: The stimulation will transmit for no more than 8 continuous seconds no matter how
long the button is pressed. To re-activate, release and re-press the button.
• Most dogs will turn their heads slightly in curiosity, scratch at the collar, or ick their
ears at the correct stimulation level.
• If your dog shows no reaction to the stimulation level, go up 1 level at a time until you
nd the proper level for you dog.
• Since every dog is unique, it is important that you nd the correct stimulation level
for your dog. Take your time with this exercise before increasing the stimulation level,
if needed.
NOTE: A slight change in your dog’s expression will let you know you are at the correct
stimulation level. Your dog should not vocalize or panic, if this happens the stimulation level
is too high. Go back to the previous level, without a verbal command, press the stimulation
button down for 2 or 3 seconds.
FREQUENTLY ASKED QUESTIONS
Q #1: What is the range of my trainer?
A: Your trainer will operate up to 100 yards. However, weather and
environmental factors such as terrain may affect its range.
Q #2: These products use what type of batteries?
A. Your receiver requires two, replaceable, 3-volt lithium batteries (CR2032). A set is
included. Your transmitter requires one, 9-V alkaline battery, which is included.
Both types of batteries are widely available at retail outlets.
Q #3: How much training time can I expect from my unit?
A. If your receiver is continuously turned on, you can expect having approximately two
weeks of training time before needing to replace the batteries. You can prolong the
life of your batteries by turning off the receiver when it is not being use.
Your transmitter should provide you with approximately two to four months of
training time. These estimates may vary depending upon type and frequency of used.
Q #4: How will I know if a battery needs replacing?
A: The LED lights on your transmitter and receiver will tell you when you have a
low battery. When the batteries are low on either unit, its LED light will ash once
every four seconds.
6

Q #5: How should I store the transmitter and receiver when I am not using them?
A. If you do not plan to use for two weeks or more, turn off receiver. Store both at
room temperature.
TROUBLESHOOTING GUIDE
Please refer to the guide below if you are experiencing problems with your Remote
Trainer. Please call the Customer Care Center at 1-800-732-0144 with additional
questions.
Problem: My dog is not responding when I press the stimulation button.
1. Check to see if the receiver collar is turned on.
2. Increase the level of intensity. As you turn the intensity knob on the hand held
transmitter, watch your dog to determine his “recognition” level of the signal. See
the “To train using stimulation” section.
3. Make sure that the collar’s contact points are placed snugly against your dog’s skin.
4. Make sure that the contact points on the receiver are not too short for your dog’s
hair length. If so, remove the medium length contact points and replace them with
the longer length contact points.
5. Check to see if either the transmitter or receiver batteries need replacing.
Problem: My training system’s range does not go to 100 yards.
1. Check to see if the receiver is turned on.
2. Check to see if either the transmitter or receiver batteries need replacing.
3. Make sure that you and your dog’s immediate surroundings are free from metal
obstructions that can reduce the unit’s operational range.
Problem: The receiver collar will not turn on.
1. Replace the batteries.
Problem: The receiver is not responding to the transmitter.
1. Check to see if the receiver is turned on.
2. Check to see if either the transmitter or receiver batteries need replacing.
3. Make sure that the stimulation button on the transmitter is not being pressed for
more than eight seconds. After eight seconds, the transmitter will stop sending
signals until the button is released and again pressed.
4. Verify ID codes are matched:
• Put intensity knob at level (1).
• Stand 3 or more feet away from receiver.
• Press and at the same time for 10 seconds or until receiver double beeps.
Problem: The receiver collar is not delivering stimulation.
1. Check to see if the receiver is turned on.
2. Check if the receiver beeps when the tone button is pressed.
3. Use the test light to verify whether the unit is operational.
7

PRODUCT WARRANTY
Please register your product by mailing in the warranty card or registering online at
www.sportdog.net.
All parts are covered under warranty for the life of the product. Labor is covered for
the rst year of ownership. Thereafter, there is a minimum service charge for the repair
or replacement of the product. Misuse, loss, or improper handling is not covered.
Radio Systems Corporation will not pay for loss of time, inconvenience, loss of use of
your product, loss of your product, or any incidental or consequential damages.
SERVICE
If you need service, please contact the Customer Care Center at 1-800-732-0144
for help in troubleshooting and, if needed, to arrange a repair for your product (a
service charge may apply). Also, please visit our website www.sportdog.net for more
Frequently Asked Questions and Troubleshooting Tips.
FCC COMPLIANCE
This equipment has been tested and found to comply with the limits for a Class
B digital device, pursuant to Part 15 of the FCC rules. Unauthorized changes or
modications to the equipment that are not approved by Radio Systems Corporation
are in violation of FCC regulations and could void the user’s authority to operate the
equipment and void the product warranty.
FCC limits are designed to provide reasonable protection against harmful interference
when the equipment is operated in a residential environment. This equipment
generates, uses and can radiate radio frequency energy. If not installed and used in
accordance with the instruction manual, the equipment may cause harmful interference
to radio communications. There is no guarantee that interference will not occur in a
practical installation.
Radio Systems Corporation
10427 Electric Ave.
Knoxville, TN 37932
1-800-732-0144
www.sportdog.net
400-589/1
/