Widex (language pack 1) User Instructions
- Type
- User Instructions

WIDEX A/S Nymoellevej 6, DK-3540 Lynge, Denmark
http://global.widex.com
Manual no.:
9 514 0419 088 #01
Issue:
2018-09
TV PLAY
USER INSTRUCTIONS
GB
JP
DE
FR
ES
PT
IT
NL
DK
NO
SE
IS
FI
PL
CZ
CN
TW
KR
TH
VN
MY
US
1.
2.
4.
7.
B
3.
5.
6.
A
1
Page is loading ...
Page is loading ...

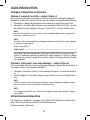
WELCOME
Congratulations on your new streaming device.
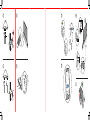
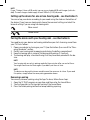
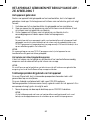
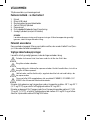
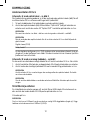
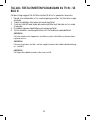
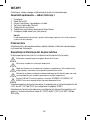
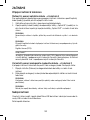
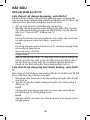
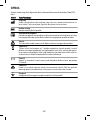
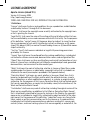
Package contents - see illustration 1
1. Device
2. Micro USB cable
3. Mounting bracket with cable holder
4. Optical (Toslink) audio cable
5. Cleaning sachet
6. Spare double adhesive tape for mounting
7. Analogue audio cable (mini jack-to-phono)
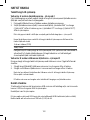
NOTE
Read this booklet and the user instructions for your hearing aids carefully before you
start using the device.
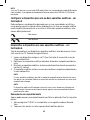
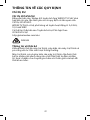
Intended use
This device is intended as a wireless sound transmitter from a television to supported
hearing aids.
Important safety information
Read this section carefully before you start using the device.
Keep the device out of reach of children under three years.
Don't use the device outdoors.
Don't try to open or repair the device yourself. Contact your hearing care professio-
nal if you need to have it repaired.
Keep the device away from direct sunlight and don't place it close to any other
equipment that may heat it up.
The TV or USB wall charger must comply to IEC 60601-1, IEC 60950-1, IEC 62368-1 or
equivalent safety standards.
Your device should be stored and transported within the temperature and humidity
ranges of -20°C to +55°C (-4°F to 131°F) and 10%-90% rH.
Your device is designed to operate within the temperature, humidity and atmospheric
pressure ranges of 0°C (32°F) to 45°C (113°F), 10%-90% rH and 500 to 1500 mBar.
4

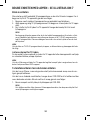
GETTING STARTED
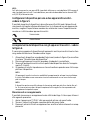
Connecting the device to your TV
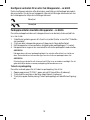
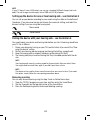
Option A: using the optical cable - see illustration 2
For audio connection, we recommend that you use the optical cable (blue) to connect
the device to your TV, as this gives you the best audio quality.
1. Remove the protection caps from both ends of the optical cable.
2. Connect the optical cable (blue) to the corresponding "Optical IN" socket (blue)
on the back of the device, and then connect it to the "Optical OUT" socket on the
back of your TV.
NOTE
Don't keep the device in a drawer - this might shorten the transmission range - see
illustration 9.
NOTE
When using the optical cable to connect the device to your TV, the following digital
formats are supported:
Digital stereo (PCM)
Dolby Audio™
It may be necessary to configure your TV, DVD player or home theater system to
choose one of the supported audio formats. Notice that the device may not be
able to stream sound from unsupported audio formats.
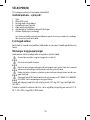
Option B: using the analogue audio cable - see illustration 3
You can also use the analogue cable to connect the device to your TV. To do so, follow
these steps:
1. Connect the plug (purple) on the analogue cable into the socket on the back of
the device.
2. Then connect the analogue audio cable into the corresponding sockets on the
back of your TV.
NOTE
Use either the optical cable option or the analogue cable option to connect your device
to the TV. You don't need to use both.
NOTE
If you have connected both cables, the device will always choose the source from the
optical connection.
Powering the device
To power the device, connect the Micro USB cable to the device and then connect the
other end to the USB socket on the back of your TV.
Then turn on your TV.
5

NOTE
If your TV doesn't have a USB socket, you can use a standard USB wall charger (not inclu-
ded). The wall charger should supply at least 500 mA (2.5 W) of power.
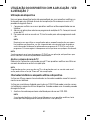
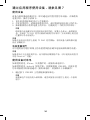
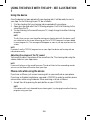
Setting up the device for one or two hearing aids - see illustration 5
You can set up your device according to your needs using the slider on the bottom of
the device. If you have one hearing aid, choose the monaural setting, and select the
binaural setting if you are using two hearing aids.
Mono sound
Stereo sound
Pairing the device with your hearing aids - see illustration 6
You need to pair your device and hearing aids before you start streaming sound from
your TV. Do as follows:
1. Power your device by turning on your TV (see illustration 4) or consult the "Pow-
ering the device" section.
2. Restart your hearing aids by opening and closing the battery compartment.
3. Keep the hearing aids in range of the device while pairing (1-2 metres).
4. The hearing aids play a tone confirming that they have been paired with the de-
vice.
NOTE
Your hearing aids are only in pairing mode for three minutes after you restart them.
You might need to restart them again if you didn't pair them in time.
NOTE
The device can be used to stream sound to more than one user at a time. If you need
this option, simply follow the same pairing procedure above.
Removing a pairing
You can only remove a pairing using the App. To do so, follow these steps:
1. Open the TV PLAY program on your App, and then enter the Sound Menu.
2. Tap the three dots on the top right corner of the Sound Menu.
3. Press the Delete pairing button and accept deleting a pairing.
6

USING THE DEVICE WITH THE APP - SEE ILLUSTRATION
7
Using the device
Once the device has been paired with your hearing aids, it will be ready to use via
your App. To start listening to your TV, do as follows:
1. Start by checking that your hearing aids are paired with your phone.
2. Open your App and select the TV listening program. You'll start listening to the
sound from the TV.
3. To stop listening to the sound from your TV, simply change to another listening
program.
NOTE
The first time you use your App after pairing your hearing aids with the device, you'll
see a help text on the screen informing you that a TV PLAY program has been added
to your program list. This message will disappear as soon as you tap anywhere on the
screen.
NOTE
If you don't see the TV PLAY program icon on your App, the device and hearing aids are
not paired correctly.
Adjusting the volume of the TV sound
You can easily adjust the volume of the sound from the TV or hearing aids using the
volume sliders on your App screen.
NOTE
If you want to focus on the sound from your TV and not listen to the surrounding sounds,
you can use the Room off function from your App.
Phone calls while using the device
If you have an iPhone, just answer incoming calls as you usually do on your phone.
If you have an Android smartphone, you need a COM-DEX in order to maintain phone
conversations while using the device. When receiving a call, do as follows:
1. Accept the call by pressing the push button on your COM-DEX.
NOTE
If the phone call is not streamed to your hearing aids, try changing to another listening
program using your App.
7

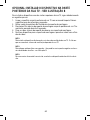
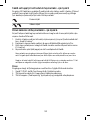
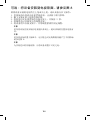
OPTIONAL: ATTACHING THE DEVICE TO THE BACK OF
YOUR TV - SEE ILLUSTRATION 8
To attach the device to one of the upper corners of your TV, follow these steps care-
fully:
1. Clean the surface on the back of your TV using the cleaning sachet. Let the surface
dry for a few seconds.
2. Remove the protective foil of the adhesive tape on your mounting bracket.
3. Press the adhesive tape on the mounting bracket on the back of your TV and keep
it pressed for 5 seconds.
4. Pull the cables through the cable holder on your mounting bracket.
5. Slide the device into the mounting bracket and secure the cables with the cable
fastener.
NOTE
Do not attach the device directly to your TV's ventilation system. Where the ventila-
tion system is placed depends of your TV.
NOTE
Don't keep the device in a drawer - this might have a negative impact on wireless data
transmission - see illustration 9.
NOTE
For longer transmission range keep the device in line of sight.
8

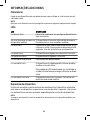
ADDITIONAL INFORMATION
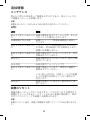
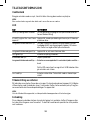
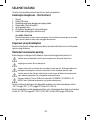
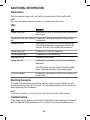
Maintenance
Clean your device using a soft, dry cloth, or vacuum clean it with a soft nozzle.
NOTE
Don't wash your device and never immerse it in water or any other liquid.
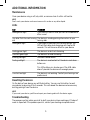
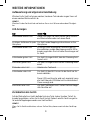
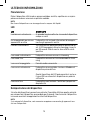
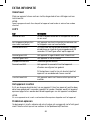
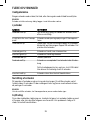
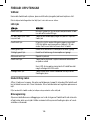
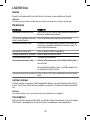
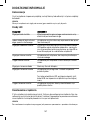
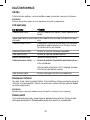
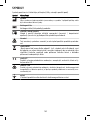
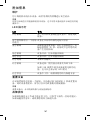
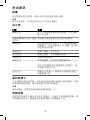
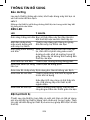
LEDs
LED MEANING
Fading white light You'll see this the first time you turn on the device or
after a reset
One blue flash for each hearing
aid
The device is sending pairing information to your
hearing aids
Fading blue light If you make a short press on the reset button, the
LED will flash blue and streaming will stop for 30
seconds. This will have no effect on your device
Fading green light The device is on but not streaming
Constant green light The device is on and streaming
Blinking red light Unknown sound format
Fading red light The device is overheated. Let the device cool down
before use
This LED pattern can also be seen if the USB cable
doesn't provide the device with enough power
Constant red light The device is not working. Contact your hearing care
professional
Resetting the device
On the back of your device you will find a button. You can use this button to reset
your device by pressing it for 5 seconds. This will reboot the device and remove any
existing pairings from the device.
NOTE
If you reset your device, you'll have to pair your hearing aids with the device again.
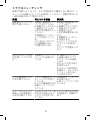
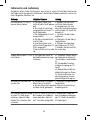
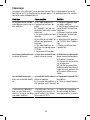
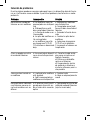
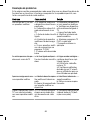
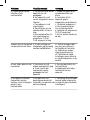
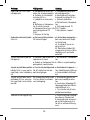
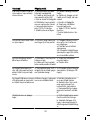
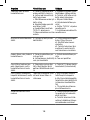
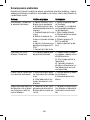
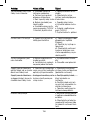
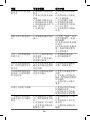
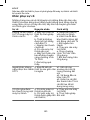
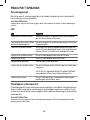
Troubleshooting
These pages contain advice on what to do if your device stops working or if it doesn't
work as expected. If the problem persists, contact your hearing care professional.
9

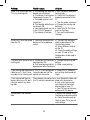
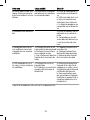
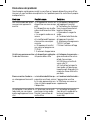
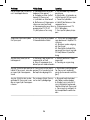
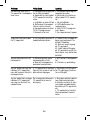
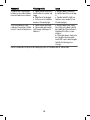
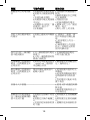
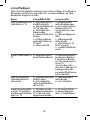
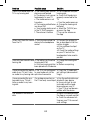
Problem Possible cause Solution
There is no sound from the
TV in my hearing aids
a. The hearing aids and the
device are not paired
b. The device is not connec-
ted properly to your TV
c. The audio source is not
turned on
d. The hearing aid batteries
are almost flat
e. Your hearing aids are not
in the TV PLAY program
f. The volume is too low
a. Pair the device and your
hearing aids
b. Check that the device is
properly connected to the
TV
c. Turn the audio source on
d. Change the hearing aid
batteries
e. Select the TV PLAY pro-
gram on the App
f. Turn up the volume on
the App
Others can't hear the sound
from the TV
a. You have connected the
device to the headphone
socket
a1. Connect the analogue
cable as described in the
Connection chapter
a2. Use a different output
on the TV
a3. Check the audio settings
on your TV and set the
loudspeakers to be used in
parallel
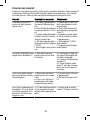
I can only hear sound in one
hearing aid
a. The battery on the other
hearing aid is flat
b. Only one hearing aid has
been paired with the device
a. Change the hearing aid
battery
b. Make a new pairing
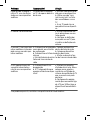
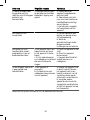
I have connected the optical
cable to my TV, but I have
no audio in my hearing aids
a. The TV is not configured
to send audio out via the
optical out connector
a. Check the TV audio out-
put settings (advanced set-
tings)
I have connected the ana-
logue cable to my TV, but I
have no audio in my hear-
ing aids
The analogue connectors on
the TV are only sound input
a. Use the optical cable sup-
plied with your device
b. Use a mini jack to mini
jack cable and the head-
phone plug on your TV
c. Your TV may not be com-
patible with the device
The volume is not comfort-
able
a. Adjust the volume using
the App or a remote control
b. Check the advanced set-
tings on your TV to see vol-
ume settings
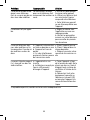
10

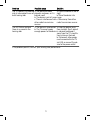
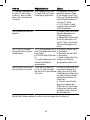
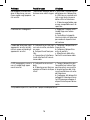
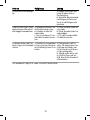
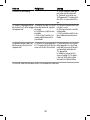
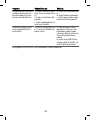
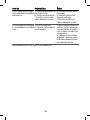
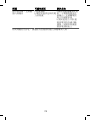
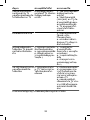
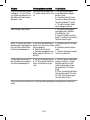
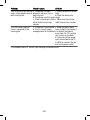
Problem Possible cause Solution
The TV sound in my hearing
aids is interrupted in one or
both hearing aids
a. The device has been
placed in a drawer, or it is
behind a wall
b. The device is out of range
c. There is interference from
other radio transmission
sources
a. Place the device in line of
sight
b. Place the device into
range
c. Move away from other
radio transmission sources
The LED flashes red and
there is no sound in the
hearing aids
a. The device is overheated
b. The TV cannot supply
enough power to the device
a. Keep the device away
from sunlight. Don't place it
in a drawer and keep it
away from the TV's ventila-
tion system on the back
b. Disconnect other equip-
ment connected to the TV
via USB, or connect the de-
vice to the power outlet
If the problem persists, contact your hearing care professional.
11

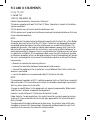
REGULATORY INFORMATION
EU Directives
Directive 2014/53/EU
Hereby, Widex A/S declares that this WIDEX TV PLAY is in compliance with the essen-
tial requirements and other relevant provisions of Directive 2014/53/EU.
The WIDEX TV PLAY contains radio transmitters operating at: 2.4 GHz, 10.0 mW EIRP.
A copy of the Declaration of Conformity according to 2014/53/EU can be found at:
http:global.widex.com/doc
N26346
Information regarding disposal
Do not dispose of hearing aids, hearing aid accessories and batteries with ordinary
household waste.
Hearing aids, batteries and hearing aid accessories should be disposed of at sites in-
tended for waste electrical and electronic equipment, or given to your hearing care
professional for safe disposal.
FCC and IC statements
FCC ID: TTY-TVP
IC: 5676B-TVP
Federal Communications Commission Statement
This device complies with part 15 of the FCC Rules. Operation is subject to the follow-
ing two conditions:
(1) This device may not cause harmful interference, and
(2) this device must accept any interference received, including interference that may
cause undesired operation.
NOTE:
This equipment has been tested and found to comply with the limits for a Class B digi-
tal device, pursuant to part 15 of the FCC Rules. These limits are designed to provide
reasonable protection against harmful interference in a residential installation. This
equipment generates, uses and can radiate radio frequency energy and, if not instal-
led and used in accordance with the instructions, may cause harmful interference to
radio communications. However, there is no guarantee that interference will not occur
in a particular installation. If this equipment does cause harmful interference to radio
or television reception, which can be determined by turning the equipment off and on,
the user is encouraged to try to correct the interference by one or more of the follow-
ing measures:
— Reorient or relocate the receiving antenna.
12

— Increase the separation between the equipment and receiver.
— Connect the equipment into an outlet on a circuit different from that to which the
receiver is connected.
— Consult the dealer or an experienced radio/TV technician for help.
NOTE:
This equipment complies with FCC radiation exposure limits set forth for an uncontrol-
led environment. This transmitter must not be co-located or operating in conjunction
with any other antenna or transmitter.
Changes or modifications to the equipment not expressly approved by Widex could
void the user’s authority to operate the equipment.
Industry Canada Statement / Déclaration d’industrie Canada
Under Industry Canada regulations, this radio transmitter may only operate using an
antenna of a type and maximum (or lesser) gain approved for the transmitter by In-
dustry Canada.
To reduce potential radio interference to other users, the antenna type and its gain
should be so chosen that the equivalent isotropically radiated power (e.i.r.p.) is not
more than that necessary for successful communication.
This device complies with Industry Canada licence-exempt RSS standard(s). Opera-
tion is subject to the following two conditions:
(1) this device may not cause interference, and
(2) this device must accept any interference, including interference that may cause
undesired operation of the device.
Conformément à la réglementation d’Industrie Canada, le présent émetteur radio peut
fonctionner avec une antenne d’un type et d’un gain maximal (ou inférieur) approuvé
pour l’émetteur par Industrie Canada.
Dans le but de réduire les risques de brouillage radioélectrique à l’intention des autres
utilisateurs, il faut choisir le type d’antenne et son gain de sorte que la puissance iso-
trope rayonnée équivalente (p.i.r.e.) ne dépasse pas l’intensité nécessaire à l’éta-
blissement d’une communication satisfaisante.
Le présent appareil est conforme aux CNR d’Industrie Canada applicables aux appa-
reils radio exempts de licence. L’exploitation est autorisée aux deux conditions sui-
vantes :
(1) l’appareil ne doit pas produire de brouillage, et
(2) l’utilisateur de l’appareil doit accepter tout brouillage radioélectrique subi, même
si le brouillage est susceptible d’en compromettre le fonctionnement.
13

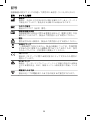
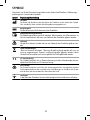
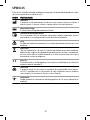
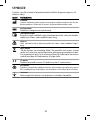
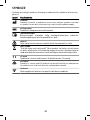
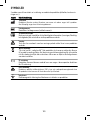
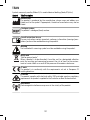
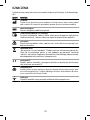
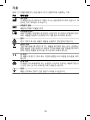
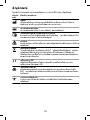
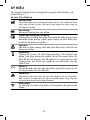
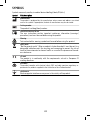
SYMBOLS
Symbols commonly used by WIDEX A/S in medical device labelling (labels/IFU/etc.)
Symbol Title/Description
Manufacturer
The product is produced by the manufacturer whose name and address are stated
next to the symbol. If appropriate, the date of manufacture may also be stated.
Catalogue number
The product’s catalogue (item) number.
Consult instructions for use
The user instructions contain important cautionary information (warnings/
precautions) and must be read before using the product.
Warning
Text marked with a warning symbol must be read before using the product.
WEEE mark
“Not for general waste”. When a product is to be discarded, it must be sent to a
designated collection point for recycling and recovering to prevent the risk of
harm to the environment or human health as a result of the presence of hazard-
ous substances.
CE mark
The product is in conformity with the requirements set out in European CE
marking directives.
RCM mark
The product complies with electrical safety, EMC and radio spectrum regulatory re-
quirements for products supplied to the Australian or New Zealand market.
Interference
Electromagnetic interference may occur in the vicinity of the product.
14
Page is loading ...
Page is loading ...
Page is loading ...
Page is loading ...
Page is loading ...
Page is loading ...
Page is loading ...
Page is loading ...
Page is loading ...
Page is loading ...
Page is loading ...
Page is loading ...
Page is loading ...
Page is loading ...
Page is loading ...
Page is loading ...
Page is loading ...
Page is loading ...
Page is loading ...
Page is loading ...
Page is loading ...
Page is loading ...
Page is loading ...
Page is loading ...
Page is loading ...
Page is loading ...
Page is loading ...
Page is loading ...
Page is loading ...
Page is loading ...
Page is loading ...
Page is loading ...
Page is loading ...
Page is loading ...
Page is loading ...
Page is loading ...
Page is loading ...
Page is loading ...
Page is loading ...
Page is loading ...
Page is loading ...
Page is loading ...
Page is loading ...
Page is loading ...
Page is loading ...
Page is loading ...
Page is loading ...
Page is loading ...
Page is loading ...
Page is loading ...
Page is loading ...
Page is loading ...
Page is loading ...
Page is loading ...
Page is loading ...
Page is loading ...
Page is loading ...
Page is loading ...
Page is loading ...
Page is loading ...
Page is loading ...
Page is loading ...
Page is loading ...
Page is loading ...
Page is loading ...
Page is loading ...
Page is loading ...
Page is loading ...
Page is loading ...
Page is loading ...
Page is loading ...
Page is loading ...
Page is loading ...
Page is loading ...
Page is loading ...
Page is loading ...
Page is loading ...
Page is loading ...
Page is loading ...
Page is loading ...
Page is loading ...
Page is loading ...
Page is loading ...
Page is loading ...
Page is loading ...
Page is loading ...
Page is loading ...
Page is loading ...
Page is loading ...
Page is loading ...
Page is loading ...
Page is loading ...
Page is loading ...
Page is loading ...
Page is loading ...
Page is loading ...
Page is loading ...
Page is loading ...
Page is loading ...
Page is loading ...
Page is loading ...
Page is loading ...
Page is loading ...

INFORMATION OM GÄLLANDE REGELVERK
EU-direktiv
Direktiv 2014/53/EU
Härmed intygar Widex A/S att WIDEX TV PLAY överensstämmer med väsentliga krav
och övriga relevanta bestämmelser i direktiv 2014/53/EU.
WIDEX TV PLAY innehåller radiosändare på: 2,4 GHz, 10,0 mW EIRP.
En kopia av försäkran om överensstämmelse i enlighet med direktiv 2014/53/EU finns
på:
http:global.widex.com/doc
N26346
Information om kassering
Släng inte hörapparater, hörapparatstillbehör och batterier i det vanliga hushållsavfal-
let.
Hörapparater, batterier och hörapparatstillbehör ska slängas på avfallsstationer som
är avsedda för elektriskt och elektroniskt avfall, eller lämnas till din audionom för sä-
ker avfallshantering.
FCC och IC-förklaringar
FCC ID: TTY-TVP
IC: 5676B-TVP
Federal Communications Commission Statement
This device complies with part 15 of the FCC Rules. Operation is subject to the follow-
ing two conditions:
(1) This device may not cause harmful interference, and
(2) this device must accept any interference received, including interference that may
cause undesired operation.
OBS!
This equipment has been tested and found to comply with the limits for a Class B digi-
tal device, pursuant to part 15 of the FCC Rules. These limits are designed to provide
reasonable protection against harmful interference in a residential installation. This
equipment generates, uses and can radiate radio frequency energy and, if not instal-
led and used in accordance with the instructions, may cause harmful interference to
radio communications. However, there is no guarantee that interference will not occur
in a particular installation. If this equipment does cause harmful interference to radio
or television reception, which can be determined by turning the equipment off and on,
the user is encouraged to try to correct the interference by one or more of the follow-
ing measures:
118

— Reorient or relocate the receiving antenna.
— Increase the separation between the equipment and receiver.
— Connect the equipment into an outlet on a circuit different from that to which the
receiver is connected.
— Consult the dealer or an experienced radio/TV technician for help.
OBS!
This equipment complies with FCC radiation exposure limits set forth for an uncontrol-
led environment. This transmitter must not be co-located or operating in conjunction
with any other antenna or transmitter.
Changes or modifications to the equipment not expressly approved by Widex could
void the user’s authority to operate the equipment.
Industry Canada Statement / Déclaration d’industrie Canada
Under Industry Canada regulations, this radio transmitter may only operate using an
antenna of a type and maximum (or lesser) gain approved for the transmitter by In-
dustry Canada.
To reduce potential radio interference to other users, the antenna type and its gain
should be so chosen that the equivalent isotropically radiated power (e.i.r.p.) is not
more than that necessary for successful communication.
This device complies with Industry Canada licence-exempt RSS standard(s). Opera-
tion is subject to the following two conditions:
(1) this device may not cause interference, and
(2) this device must accept any interference, including interference that may cause
undesired operation of the device.
Conformément à la réglementation d’Industrie Canada, le présent émetteur radio peut
fonctionner avec une antenne d’un type et d’un gain maximal (ou inférieur) approuvé
pour l’émetteur par Industrie Canada.
Dans le but de réduire les risques de brouillage radioélectrique à l’intention des autres
utilisateurs, il faut choisir le type d’antenne et son gain de sorte que la puissance iso-
trope rayonnée équivalente (p.i.r.e.) ne dépasse pas l’intensité nécessaire à l’établis-
sement d’une communication satisfaisante.
Le présent appareil est conforme aux CNR d’Industrie Canada applicables aux appa-
reils radio exempts de licence. L’exploitation est autorisée aux deux conditions suivan-
tes :
(1) l’appareil ne doit pas produire de brouillage, et
(2) l’utilisateur de l’appareil doit accepter tout brouillage radioélectrique subi, même
si le brouillage est susceptible d’en compromettre le fonctionnement.
119
Page is loading ...
Page is loading ...
Page is loading ...
Page is loading ...
Page is loading ...
Page is loading ...
Page is loading ...
Page is loading ...
Page is loading ...
Page is loading ...
Page is loading ...

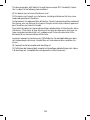
TÁKN
Symbols commonly used by Widex A/S in medical device labelling (labels/IFU/etc.)
Symbol Title/Description
Manufacturer
The product is produced by the manufacturer whose name and address are
stated next to the symbol. If appropriate, the date of manufacture may also be
stated.
Catalogue number
The product’s catalogue (item) number.
Consult instructions for use
The user instructions contain important cautionary information (warnings/prec-
autions) and must be read before using the product.
Warning
Text marked with a warning symbol must be read before using the product.
WEEE mark
“Not for general waste”
When a product is to be discarded, it must be sent to a designated collection
point for recycling and recovering to prevent the risk of harm to the environ-
ment or human health as a result of the presence of hazardous substances.
CE mark
The product is in conformity with the requirements set out in European CE
marking directives.
RCM mark
The product complies with electrical safety, EMC and radio spectrum regulatory
requirements for products supplied to the Australian or New Zealand market.
Interference
Electromagnetic interference may occur in the vicinity of the product.
131
Page is loading ...
Page is loading ...
Page is loading ...
Page is loading ...
Page is loading ...
Page is loading ...
Page is loading ...
Page is loading ...
Page is loading ...
Page is loading ...
Page is loading ...
Page is loading ...
Page is loading ...
Page is loading ...
Page is loading ...
Page is loading ...
Page is loading ...
Page is loading ...
Page is loading ...
Page is loading ...
Page is loading ...
Page is loading ...
Page is loading ...
Page is loading ...
Page is loading ...
Page is loading ...
Page is loading ...
Page is loading ...
Page is loading ...
Page is loading ...
Page is loading ...
Page is loading ...
Page is loading ...
Page is loading ...
Page is loading ...
Page is loading ...
Page is loading ...
Page is loading ...
Page is loading ...
Page is loading ...
Page is loading ...
Page is loading ...
Page is loading ...
Page is loading ...
Page is loading ...
Page is loading ...
Page is loading ...
Page is loading ...
Page is loading ...
Page is loading ...
Page is loading ...
Page is loading ...
Page is loading ...
Page is loading ...
Page is loading ...
Page is loading ...
Page is loading ...
Page is loading ...
Page is loading ...
Page is loading ...
Page is loading ...
Page is loading ...
Page is loading ...
Page is loading ...
Page is loading ...
Page is loading ...
Page is loading ...
Page is loading ...
Page is loading ...
Page is loading ...
Page is loading ...
Page is loading ...
Page is loading ...
Page is loading ...
Page is loading ...
Page is loading ...
Page is loading ...
Page is loading ...
Page is loading ...
Page is loading ...
Page is loading ...
Page is loading ...
Page is loading ...
Page is loading ...
Page is loading ...
Page is loading ...
Page is loading ...
Page is loading ...
Page is loading ...
Page is loading ...
Page is loading ...

WELCOME
Congratulations on your new streaming device.
Package contents - see illustration 1
1. Device
2. Micro USB cable
3. Mounting bracket with cable holder
4. Optical (Toslink) audio cable
5. Cleaning sachet
6. Spare double adhesive tape for mounting
7. Analog audio cable (mini jack-to-phono)
NOTE
Read this booklet and the user instructions for your hearing aids carefully before you
start using the device.
Intended use
This device is intended as a wireless sound transmitter from a television to supported
hearing aids.
Important safety information
Read this section carefully before you start using the device.
Keep the device out of reach of children under three years.
Don't use the device outdoors.
Don't try to open or repair the device yourself. Contact your hearing care professio-
nal if you need to have it repaired.
Keep the device away from direct sunlight and don't place it close to any other
equipment that may heat it up.
The TV or USB wall charger must comply to IEC 60601-1, IEC 60950-1, IEC 62368-1 or
equivalent safety standards.
Your device should be stored and transported within the temperature and humidity
ranges of -20°C to +55°C (-4°F to 131°F) and 10%-90% rH.
Your device is designed to operate within the temperature, humidity and atmospheric
pressure ranges of 0°C (32°F) to 45°C (113°F), 10%-90% rH and 500 to 1500 mBar.
223

GETTING STARTED
Connecting the device to your TV
Option A: using the optical cable - see illustration 2
For audio connection, we recommend that you use the optical cable (blue) to connect
the device to your TV, as this gives you the best audio quality.
1. Remove the protection caps from both ends of the optical cable.
2. Connect the optical cable (blue) to the corresponding "Optical IN" socket (blue)
on the back of the device, and then connect it to the "Optical OUT" socket on the
back of your TV.
NOTE
Don't keep the device in a drawer - this might shorten the transmission range - see
illustration 9.
NOTE
When using the optical cable to connect the device to your TV, the following digital
formats are supported:
Digital stereo (PCM)
Dolby Audio™
It may be necessary to configure your TV, DVD player or home theater system to
choose one of the supported audio formats. Notice that the device may not be
able to stream sound from unsupported audio formats.
Option B: using the analogue audio cable - see illustration 3
You can also use the analog cable to connect the device to your TV. To do so, follow
these steps:
1. Connect the plug (purple) on the analog cable into the socket on the back of the
device.
2. Then connect the analog audio cable into the corresponding sockets on the back
of your TV.
NOTE
Use either the optical cable option or the analog cable option to connect your device
to the TV. You don't need to use both.
NOTE
If you have connected both cables, the device will always choose the source from the
optical connection.
Powering the device
To power the device, connect the Micro USB cable to the device and then connect the
other end to the USB socket on the back of your TV.
Then turn on your TV.
224

NOTE
If your TV doesn't have a USB socket, you can use a standard USB wall charger (not inclu-
ded). The wall charger should supply at least 500 mA (2.5 W) of power.
Setting up the device for one or two hearing aids - see illustration 5
You can set up your device according to your needs using the slider on the bottom of
the device. If you have one hearing aid, choose the monaural setting, and select the
binaural setting if you are using two hearing aids.
Mono sound
Stereo sound
Pairing the device with your hearing aids - see illustration 6
You need to pair your device and hearing aids before you start streaming sound from
your TV. Do as follows:
1. Power your device by turning on your TV (see illustration 4) or consult the "Pow-
ering the device" section.
2. Restart your hearing aids by opening and closing the battery compartment.
3. Keep the hearing aids in range of the device while pairing (3-6 feet).
4. The hearing aids play a tone confirming that they have been paired with the de-
vice.
NOTE
Your hearing aids are only in pairing mode for three minutes after you restart them.
You might need to restart them again if you didn't pair them in time.
NOTE
The device can be used to stream sound to more than one user at a time. If you need
this option, simply follow the same pairing procedure above.
Removing a pairing
You can only remove a pairing using the App. To do so, follow these steps:
1. Open the TV PLAY program on your App, and then enter the Sound Menu.
2. Tap the three dots on the top right corner of the Sound Menu.
3. Press the Delete pairing button and accept deleting a pairing.
225

USING THE DEVICE WITH THE APP - SEE ILLUSTRATION
7
Using the device
Once the device has been paired with your hearing aids, it will be ready to use via
your App. To start listening to your TV, do as follows:
1. Start by checking that your hearing aids are paired with your phone.
2. Open your App and select the TV listening program. You'll start listening to the
sound from the TV.
3. To stop listening to the sound from your TV, simply change to another listening
program.
NOTE
The first time you use your App after pairing your hearing aids with the device, you'll
see a help text on the screen informing you that a TV PLAY program has been added
to your program list. This message will disappear as soon as you tap anywhere on the
screen.
NOTE
If you don't see the TV PLAY program icon on your App, the device and hearing aids are
not paired correctly.
Adjusting the volume of the TV sound
You can easily adjust the volume of the sound from the TV or hearing aids using the
volume sliders on your App screen.
NOTE
If you want to focus on the sound from your TV and not listen to the surrounding sounds,
you can use the Room off function from your App.
Phone calls while using the device
If you have an iPhone, just answer incoming calls as you usually do on your phone.
If you have an Android smartphone, you need a COM-DEX in order to maintain phone
conversations while using the device. When receiving a call, do as follows:
1. Accept the call by pressing the push button on your COM-DEX.
NOTE
If the phone call is not streamed to your hearing aids, try changing to another listening
program using your App.
226

OPTIONAL: ATTACHING THE DEVICE TO THE BACK OF
YOUR TV - SEE ILLUSTRATION 8
To attach the device to one of the upper corners of your TV, follow these steps care-
fully:
1. Clean the surface on the back of your TV using the cleaning sachet. Let the surface
dry for a few seconds.
2. Remove the protective foil of the adhesive tape on your mounting bracket.
3. Press the adhesive tape on the mounting bracket on the back of your TV and keep
it pressed for 5 seconds.
4. Pull the cables through the cable holder on your mounting bracket.
5. Slide the device into the mounting bracket and secure the cables with the cable
fastener.
NOTE
Do not attach the device directly to your TV's ventilation system. Where the ventila-
tion system is placed depends of your TV.
NOTE
Don't keep the device in a drawer - this might have a negative impact on wireless data
transmission - see illustration 9.
NOTE
For longer transmission range keep the device in line of sight.
227
Page is loading ...
Page is loading ...
Page is loading ...
Page is loading ...
Page is loading ...
Page is loading ...
Page is loading ...
Page is loading ...
Page is loading ...
Page is loading ...
Page is loading ...
Page is loading ...
Page is loading ...
-
 1
1
-
 2
2
-
 3
3
-
 4
4
-
 5
5
-
 6
6
-
 7
7
-
 8
8
-
 9
9
-
 10
10
-
 11
11
-
 12
12
-
 13
13
-
 14
14
-
 15
15
-
 16
16
-
 17
17
-
 18
18
-
 19
19
-
 20
20
-
 21
21
-
 22
22
-
 23
23
-
 24
24
-
 25
25
-
 26
26
-
 27
27
-
 28
28
-
 29
29
-
 30
30
-
 31
31
-
 32
32
-
 33
33
-
 34
34
-
 35
35
-
 36
36
-
 37
37
-
 38
38
-
 39
39
-
 40
40
-
 41
41
-
 42
42
-
 43
43
-
 44
44
-
 45
45
-
 46
46
-
 47
47
-
 48
48
-
 49
49
-
 50
50
-
 51
51
-
 52
52
-
 53
53
-
 54
54
-
 55
55
-
 56
56
-
 57
57
-
 58
58
-
 59
59
-
 60
60
-
 61
61
-
 62
62
-
 63
63
-
 64
64
-
 65
65
-
 66
66
-
 67
67
-
 68
68
-
 69
69
-
 70
70
-
 71
71
-
 72
72
-
 73
73
-
 74
74
-
 75
75
-
 76
76
-
 77
77
-
 78
78
-
 79
79
-
 80
80
-
 81
81
-
 82
82
-
 83
83
-
 84
84
-
 85
85
-
 86
86
-
 87
87
-
 88
88
-
 89
89
-
 90
90
-
 91
91
-
 92
92
-
 93
93
-
 94
94
-
 95
95
-
 96
96
-
 97
97
-
 98
98
-
 99
99
-
 100
100
-
 101
101
-
 102
102
-
 103
103
-
 104
104
-
 105
105
-
 106
106
-
 107
107
-
 108
108
-
 109
109
-
 110
110
-
 111
111
-
 112
112
-
 113
113
-
 114
114
-
 115
115
-
 116
116
-
 117
117
-
 118
118
-
 119
119
-
 120
120
-
 121
121
-
 122
122
-
 123
123
-
 124
124
-
 125
125
-
 126
126
-
 127
127
-
 128
128
-
 129
129
-
 130
130
-
 131
131
-
 132
132
-
 133
133
-
 134
134
-
 135
135
-
 136
136
-
 137
137
-
 138
138
-
 139
139
-
 140
140
-
 141
141
-
 142
142
-
 143
143
-
 144
144
-
 145
145
-
 146
146
-
 147
147
-
 148
148
-
 149
149
-
 150
150
-
 151
151
-
 152
152
-
 153
153
-
 154
154
-
 155
155
-
 156
156
-
 157
157
-
 158
158
-
 159
159
-
 160
160
-
 161
161
-
 162
162
-
 163
163
-
 164
164
-
 165
165
-
 166
166
-
 167
167
-
 168
168
-
 169
169
-
 170
170
-
 171
171
-
 172
172
-
 173
173
-
 174
174
-
 175
175
-
 176
176
-
 177
177
-
 178
178
-
 179
179
-
 180
180
-
 181
181
-
 182
182
-
 183
183
-
 184
184
-
 185
185
-
 186
186
-
 187
187
-
 188
188
-
 189
189
-
 190
190
-
 191
191
-
 192
192
-
 193
193
-
 194
194
-
 195
195
-
 196
196
-
 197
197
-
 198
198
-
 199
199
-
 200
200
-
 201
201
-
 202
202
-
 203
203
-
 204
204
-
 205
205
-
 206
206
-
 207
207
-
 208
208
-
 209
209
-
 210
210
-
 211
211
-
 212
212
-
 213
213
-
 214
214
-
 215
215
-
 216
216
-
 217
217
-
 218
218
-
 219
219
-
 220
220
-
 221
221
-
 222
222
-
 223
223
-
 224
224
-
 225
225
-
 226
226
-
 227
227
-
 228
228
-
 229
229
-
 230
230
-
 231
231
-
 232
232
-
 233
233
-
 234
234
-
 235
235
-
 236
236
-
 237
237
-
 238
238
-
 239
239
-
 240
240


Widex (language pack 1) User Instructions
- Type
- User Instructions
Ask a question and I''ll find the answer in the document
Finding information in a document is now easier with AI
in other languages
- italiano: Widex (language pack 1)
- français: Widex (language pack 1)
- español: Widex (language pack 1)
- Deutsch: Widex (language pack 1)
- Nederlands: Widex (language pack 1)
- português: Widex (language pack 1)
- dansk: Widex (language pack 1)
- polski: Widex (language pack 1)
- čeština: Widex (language pack 1)
- 日本語: Widex (language pack 1)
- svenska: Widex (language pack 1)
- suomi: Widex (language pack 1)
Related papers
-
Widex CALL-DEX Users Instructions
-
-
-
-
-
-
-
-
-
Other documents
-
Valueline VL2200PB001BU Datasheet
-
1mii B0302 User manual
-
 Coselgi Mojo MBB3 M1 User guide
-
Bose MediaMate® computer speakers Owner's manual
-
Bushnell Wingman Operating instructions
-
Korg KONNECT EFGSJ 1 Owner's manual
-
-
Bose SOUNDTOUCH 300 Owner's manual
-
Vox MSB50AIV Owner's manual
-
Bose Solo Soundbar II Owner's manual
