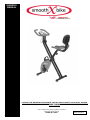
Smooth Fitness SMB-XBIKE Owner's manual
- Type
- Owner's manual

+
OWNER’S
MANUAL
CAUTION: THE MAXIMUM USER WEIGHT LIMIT ON THIS PRODUCT SHOULD NOT EXCEED
136KG / 300LBS
The Product May Vary Slightly From the
Picture Shown Above
MADE IN CHINA
VER-021114

2
Seat Cushion Disclosure
ALL NEW MATERIALS Consisting of: PP+PU+FOAM
Date of Manufacture: 2014.02
Model # SMB-XBIKE
Lot # DD6321-1

3
“SAFETY INSTRUCTION”
WARNING: To reduce the risk of serious injury, read the following safety instructions before using the
item
1. Read all warnings posted on the equipment.
2. Read this Owner's Manual and follow it carefully before using the equipment. Make sure that it is properly
assembled and tightened before use.
3. Keep children and pets away from the equipment. Do not allow children and pets to use or play on the
equipment .Always keep children and pets away from the equipment when it is in use.
4. Set up and operate the equipment on a solid level surface. Do not position the equipment on loose rugs or
uneven surfaces.
5. Inspect the equipment for worn or loose components prior to each use.
6. Tighten / replace any loose or worn components prior to using the equipment.
7. Follow your physician's recommendations in developing your own personal fitness program.
8. Always choose the workout which best fits your physical, strength and flexibility level. Know your limits and
train within them. Always use common sense when exercising.
9. Do not wear loose or dangling clothing while using the equipment.
10. Never exercise in bare feet or socks; always wear correct footwear, such as running, walking, or
cross-training shoes.
11. Be careful to maintain your balance while getting on this product, using this product and getting off this
product; loss of balance may result in a fall and/ or serious bodily injury.
12. The equipment should not be used by persons weighing over 300 pounds /136 kgs.
13. The equipment should be used by only one person at a time.
14. The equipment is for home use only.
15. Maintenance: Replace the defective components immediately and / or discontinue the use of the equipment
until it is repaired.
16. Make sure that adequate space is available for access to and passage around the equipment; keep at least a
distance of 1 meter from any obstruction object while using the machine.
17. If you feel faint or dizzy, discontinue use of this equipment immediately.
18. Serious bodily injury can occur if this equipment is not assembled and used correctly. Serious bodily injury
can also occur if all instructions are not followed.
19. Keep children and pets away from equipment when in use. Always make sure all bolts and nuts are
tightened prior to each use. Follow all safety instructions in this manual.
WARNING: Before starting any exercise or conditioning program you should consult with your personal physician to see if you require a
complete physical exam. This is especially important if you are over the age of 35, have never exercised before, are pregnant, or suffer from
any illness
READ AND FOLLOW THE SAFETY PRECAUTIONS. FAILURE TO FOLLOWTHESE
INSTRUCTIONS CAN RESULT IN SERIOUS BODILY INJURY

4
Thank you for choosing the Smooth XBIKE. We
take great pride in producing this quality product and
hope it will provide many hours of quality exercise to
make you feel better, look better and enjoy life to its
fullest.
Too often, our busy lifestyles limit our time and
opportunity to exercise. This equipment provides a
convenient and simple way to get your body in shape
and achieve a happier and healthier lifestyle.
Before reading further, please review the drawing
below and familiarize yourself with the parts that are
labeled. Read this manual carefully before using the
equipment.
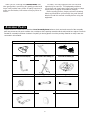
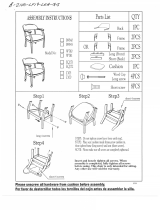
“ASSEMBLY PARTS”
Unpack the box in a clear area. Follow the List of Assembly Parts below to check and make sure all of the assembly
parts are present and in good condition. Do not dispose of the packing material until the trial period has expired. The tools
needed for assembly have been included. If anything is missing please check the packing materials to verify it was not
concealed in this material.
Seat Cushion (1)
Seat Post (23)
Pedal (13L) (8R)
L
R
Back Pad Frame(14)
Main Frame Assembly (7)
Console Assembly (2)
Seat Knob(14)
Front Support (11F)
Rear Support (11R)
Seat Handlebars (20)
Back Pad (21)

5
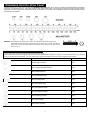
“HARDWARE IDENTIFICATION CHART”
Unpack the box in a clear area. Review the Hardware Kit List below. This chart is provided to help identify the hardware
used in the assembly process. Place the washers, the ends of the bolts, or screws on the circles to check for the correct
diameter. Use the small ruler to check the length of the bolts and screws. Do not dispose of the packing material until the
trial period has expired
NOTICE: The length of all bolts and screws, except those with flat heads, are
measured from below the head to the end of the bolt or screw. Flat head
bolts and screws are measured from the top of the head to the end of the
bolt or screw
Note: The assembly hardware has been pre-assembled.
Please review the contents of the hardware kit pictured below.
The hardware and some small parts may have been pre-attached for shipping. If a part is not in the hardware bag, check to
see if it has been pre-assembled. You can refer to the exploded diagram on page 16 for hardware placement
HARDWARE
Part No. and Description
Q’TY
#4 Bolt (M6 X 12mm)
4pcs
#10 Carriage bolt (M8x50mm)
6pcs
#18 Bolt(M8X45mm)
4pcs
#15 Screw(M5x15mm)
2pcs
#6 Flat washer (M6)
2pcs
#22 Flat washer (M8)
7pcs
#5 Curved washer (M6)
2pcs
#9 Curved washer (M8)
4pcs
#19 M8 Spring washer
6pcs
#12 Cap nut (M8)
4pcs
#16 Nylock nut (M8)
5pcs

6
“ASSEMBLY TOOLS”
THE FOLLOWING TOOLS ARE INCLUDED FOR ASSEMBLY:
“ASSEMBLY INSTRUCTIONS”
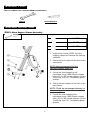
STEP1–Base Support Frame Assembly
1. Unpack the Smooth XBIKE from the
shipping carton and remove the packing
materials.
2. Attach the front support to the front of the
main frame.
NOTE: the front support has the
transport wheels attached.
3. Secure the front support to the
mainframe using 2×M8*50mm carriage
bolts (10), 2x M8 curved washers (9) and
2x M8 cap nuts (12). Completely tighten
all bolts.
4. Attach the rear support to the front of the
main frame.
NOTE: There are no transport wheels on
the rear support.
5. Secure the rear support to the
mainframe using 2×M8*50mm carriage
bolts (10), 2x M8 curved washers (9) and
2x M8 cap nuts (12). Completely tighten
all bolts.
4x #10
4x #9
4x #12
ALLEN WRENCH
Wrench
11F
11R

7
“ASSEMBLY INSTRUCTIONS”
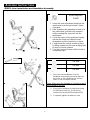
STEP2–Seat Assembly
3x #22
3x #16
1. Attach the seat to the seat post. The seat
studs will insert through the seat post holes
2. Secure the seat to the seat post using
2×M8 flat washers (22) and 3x M8 Nylock
nuts (16).
3. Tighten all fasteners now
After the seat has been attached and the
fasteners are completely tightened.
1. Secure the back pad frame to the seat post
using 2x M8*50mm carriage bolts (10), 2x
M8 flat washers (22) and 2x M8 cap nut
(16).
2. Tighten all fasteners now
2x #10
2x #22
2x #16
1. Attach the back pad to the back bad frame
and secure it, using 4x M8 spring washers
(19) and 4x M8*45mm bolts (18).
2. Tighten all fasteners now
4x #19
4x #18

8
“ASSEMBLY INSTRUCTIONS”
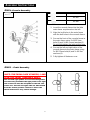
STEP3–Seat Installation and Handlebar Assembly
1. Insert the seat adjustment knob into the
mainframe by turning the knob 5 times
clockwise.
2. After threading the adjustment knob in to
the mainframe, pull the knob outward
while inserting the seat post into the
mainframe.
3. Once the seat is at the preferred height,
release the knob and slide the seat
downward until the seat locks in place.
4. Confirm that the seat is locked in place
by lifting upward on the seat verifying that
is does not move upward.
5. Turn the knob clockwise until the knob is
completely tight.
Seat Adjuster
Knob
1. Place the seat handlebars onto the
handlebar mounting bracket and align the
two holes on the handlebar with the two
holes on the handlebar bracket.
Note: Make sure the handlebar is facing forward
as pictured on the left
2. Secure the handlebar to the bracket using
2x M8*55mm bolts(15), 2x M8 spring
washers(19) and 2x M8 flat washers(22)
3. Completely tighten all fasteners now
2x #19
2x #22
2x #15

9
“ASSEMBLY INSTRUCTIONS
STEP4–Console Assembly
1. Insert the console frame into the bike
main frame as pictured on the left.
2. Align the bolt holes in the main frame
with the bolt holes in the console frame.
3. Secure the front of the console frame to
the main frame using 2x M6*12mm
bolts(4) and 2x M6 curved washers(5).
Do not fully tighten the bolts at this time.
4. Secure the left and right sides of the
console frame to the main frame using
2x M6*12mm bolts(4) and 2x M6 flat
washers(6).
5. Fully tighten all fasteners now
4x #4
2x #5
2x #6
STEP5 – Pedal Assembly
NOTE: THE PEDALS ARE STAMPED, L AND
R ON THE PEDAL THREADED SHAFT.
The left and right pedals are not interchangeable.
You must only assemble the right pedal to the right
side crank arm and the left pedal to the left side
crank arm. The left and right side are determined
from the seated position. Failure to follow the
above instructions may cause damage.
L
R
L
R

10
ASSEMBLY INSTRUCTIONS”
STEP5–Pedal Assembly
2. Using your hands, thread the
Right Pedal CLOCKWISE onto the
RIGHT crank arm. After the pedal is
hand tightened use the supplied
wrench to completely tighten the
pedal.
1. Using your hands, thread the
Left Pedal
COUNTER-CLOCKWISE onto
the LEFT crank arm. After the
pedal is hand tightened use the
supplied wrench to completely
tighten the pedal.
LEFT SIDE
RIGHT SIDE

11
“ASSEMBLY INSTRUCTIONS”
STEP6–Battery Installation
1. Open the battery door on the back of the
computer
2. Insert the batteries in the direction shown on
the left.
3. Replace the battery door
.
Note: Batteries should be recycled or disposed of as
per state and local guidelines.
“SEAT INSTALLATION and ADJUSTMENT”
Seat Installation
4. To insert the seat, turn the adjustment knob
counter clockwise to loosen.
5. Pull the knob outward and insert the seat at
the same time, until the seat post is fully
inserted and the seat rests on the main
frame.
6. Release the knob and slowly pull up on the
seat until it locks in place.
7. After releasing the pin and the seat is locked
in place, verify that the seat will not move up
or down.
8. Tighten the knob by turning it clockwise until
it is completely tight.
Note: Do not completely remove the
adjustment knob from the frame. To
adjust the seat you will need to loosen the
knob and then pull the knob outward.
Pull
Note: The computer monitor will not
function without 2 AA batteries.

12
“SEAT INSTALLATION and ADJUSTMENT”
Warning: Do not use the Smooth XBIKE without verifying that the seat
is locked in place. Before moving or using the bike, pull upward on the
seat to verify it cannot be removed.
1. Turn the seat adjustment
knob counter-clockwise to
loosen. (do not completely
remove the adjustment knob)
2. Pull back the seat
adjustment knob to
release the seat.
3. While holding the knob out,
move the seat up or down.
There are 7 different seat
positions. The seat will move
in a 45 degree motion. Once
the required height is
reached, release the knob
and slowly push the seat
downward until the pin snaps
in place. Verify that the seat is
locked in place by pulling
upward on the seat. If the seat
is properly locked, the seat
will not move up or down.
4. Turn the seat
adjustment knob
clockwise to tighten
the adjuster knob.
Completely tighten
the knob prior to use.
MOVING the SMOOTH XBIKE
Check that the frame is
locked in the folded
position. Tilt the bike
forward on to the front
wheels. Then roll the bike
to the new location
Fold the back pad
down
Remove the
frame locking pin
Fold the upper
portion of the
bike inward
Place the locking
pin in the first pin
hole to lock the
frame together

13
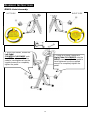
UNFOLDING the SMOOTH XBIKE
“RESISTANCE ADJUSTMENT”
1. There are numbers on the resistance dial
ranging from 1 through 8. Number 1 is the least
amount of resistance offered and number 8 is
the maximum amount offered.
2. To increase the resistance, turn the dial
clockwise.
3. To decrease the resistance, turn the dial
counter-clockwise.
Place the locking pin in the first
pin hole, to lock the frame in
place. Before using the bike; test
to make sure that the bike does
not fold.
Remove the frame locking pin
from the first locking position.
Open the frame of the bike by
pulling the upper portion of the
bike outward. Then rotate the
seat back pad upward.
Adjusting the Resistance
Just below the computer console there is a
resistance dial. To adjust the resistance
settings please follow the steps below

14
“COMPUTER DISPLAY”
Note:The computer will not function without 2 AA batteries.
A
Scan: This function allows the computer to scan through each workout data readout
automatiallly(Time, Speed, Distance, Odometer (ODO) Pulse, Calories) To enable the scan
function press the selection button (I) until the selection symbol (H) is pointing at scan.
B
Time: Displays the time spent during your workout.To view the time press the selection button
(I) until the selection symbol (H) is pointing at time.
C
Speed: Displays the workout speed.To view the speed press the selection button (I) until the
selection symbol (H) is pointing at speed.
D
Distance: Displays the distance you have traveled during your workout.To view the distance
press the selection button (I) until the selection symbol (H) is pointing at distance.
E
ODO: Displays the total distance you have traveled on the bike.To view the odometer press
the selection button (I) until the selection symbol (H) is pointing at ODO.
F
Pulse: Displays your pulse when using the pulse handgrips. To use the pulse grips place the
palm of you hands on the silver pulse grips located on the computer handlebars. After placing
your hands on the pulse grips your heart rate will be displayed in approximately 10 seconds.To
view the pulse press the selection button (I) until the selection symbol (H) is pointing at pulse.
(Note: This is not to be used for medical purposes. The heart rate reading may be affected by
outside interference and poor connections and can be inaccurate.
G
Distance: Displays the calories you have burned during your workout.To view the calories
press the selection button (I) until the selection symbol (H) is pointing at calories. The calorie
count is based on an average weight therefore the results are only an estimate. This result
should not be used for medical purposes.
H
Selection Symbol: This is a small triangle that indicates which workout data is being displayed
at the moment.
I
The Selection Button: This button is used to select which workout data will be displayed on
theLCD screen. Press and hold the selection button to reset the workout data.
A
B
C
D
E
F
G
I
H

15
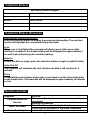
“COMPUTER DISPLAY”
Workout Data Ranges
Time
00:00 to 99:59 Min
Speed
0.0 to 999.9MPH
Distance
0.00 to 999.9Mi
Calories
0 to 9999 Cal
Pulse
40 to 240 BPM
“COMPUTER DISPLAY OPERATION”
Selecting the Data on the Display
Press the selection button to display the preferred data reading. The selection
symbol will highlight the current data being displayed.
Scan
When scan is highlighted the computer will display each of the seven data
readings in sequence. Each data reading will be displayed for approximately 5
seconds before displaying the next data reading.
Auto On
To turn the bike on simply press the selection button or begin to pedal the bike.
Auto Shut Off
The computer will automatically shut off when the bike is left inactive for 4
minutes.
Pulse
To operate the pulse feature simply place your hands over the silver hand grips
on the handle bars. The heart rate will be displayed in approximately 10 seconds
or less
TROUBLE SHOOTING”
Symptom
Solution
Computer does not
function
Make sure all computer connections are properly
connected.
Replace the batteries
Seat is not stable
Check that the seat pin is locked in place
Check that the seat knob is tightened completely
Seat will not adjust
Loosen the seat knob

16
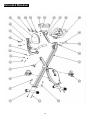
EXPLODED DIAGRAM”

17
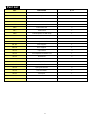
“PART LIST”
NO.
Item Name
Q'TY
XB-1
Seat pad
1
XB-2
Computer
1
XB-3
Handlebar
1
XB-4
Bolt M6X12
4
XB-5
Curved washer M6
2
XB-6
Flat washer M6
2
XB-7
Main frame
1
XB-8
Pedal(right)1/2-20 with strap
1
XB-13
Pedal(left)1/2-20 with strap
1
XB-9
Curved washer M8
6
XB-10
Carriage bolt M8*50
6
XB-11F
Front support
1
XB-11R
Rear support
1
XB-12
Cap nut M8
4
XB-14
Seat adjuster knob M12*1.75
1
XB-15
Bolt M8*15
2
XB-16
Nylock nut M8
5
XB-17
Back pad frame
1
XB-18
Bolt M8*45
4
XB-19
Spring washer M8
6
XB-20
Seat handlebar
1
XB-21
Back pad
1
XB-22
Flat washer M8
7
XB-23
Seat post frame
1

18
LIMITED HOME USE WARRANTY – SMOOTH FITNESS Bikes Warranty
Warranty Coverage: Smooth Fitness LLC. ("Smooth Fitness") warrants to the original owner that each new product will be
free from defects in workmanship and material, under normal use and conditions.
Period of Coverage: The Warranty on this product runs from the date of original purchase using the following schedule:
Model Name
Plastics, Upholstery and Wear and Tear Parts
Frame and Mechanical Parts
SMOOTH XBIKE
90 days
1 year
Smooth Fitness reserves the right to inspect damaged parts for misuse. Your Original Receipt is proof of purchase and
should be kept with the product manual. You may be required to show proof of purchase prior to warranty fulfillment.
Remedy Provided by Smooth Fitness: Smooth Fitness will provide a replacement part free of charge if a defect is found
during the Warranty period. Smooth Fitness may at its discretion choose to provide any of the stipulated parts or repair
options. In the event that a part is determined to be in need of replacement, upon receipt of the defective part by Smooth
Fitness, Smooth Fitness may send out the part by UPS Ground or another such carrier directly to the customer’s home at
the customer’s expense.
Any redemption may be by repair or replacement of the affected part(s) and/or product at the sole discretion of Smooth
Fitness, by personnel approved by Smooth Fitness.
Parts repaired or replaced pursuant to this Warranty shall be warranted for the unexpired portion of the Warranty applying to
the original product. Any technical advice furnished before or after delivery in regard to the use or application of Smooth
Fitness products is furnished without charge and on the basis that it represents Smooth Fitness' best judgment under the
circumstances, however, the advice is used solely at the customer’s discretion.
Procedure for Obtaining Your Remedy Under This Warranty: To help the technician assist you over the phone, please
have the following information ready:
Model name or number from the cover of the manual;
Serial number located on the frame of the unit; and
The part description and the order number.
Limitations on Warranty: This Warranty does not cover any problems, damage or failure that are caused by accident,
improper assembly, failure to observe cautionary labels on the product, failure to operate the product correctly, power grid
failures or spikes from your local electricity provider, abuse or freight damage. Smooth Fitness does not warrant against any
damage or defects that may result from repair or alterations made to the product by an unauthorized repair facility. In order
for this warranty to be valid, all Smooth Fitness exercise equipment must be stored and used in a fully finished and livable
room within the residence (not including an indoor swimming pool room).
This Warranty shall terminate if you sell or otherwise transfer this product. This Warranty does not apply to any product
shipped or handled outside of the United States or Canada. This Warranty does not apply if the product is used as a rental
product or in commercial use. Consequential and incidental damages are not recoverable under this Warranty. (Some
states do not allow the exclusion or limitation of incidental or consequential damages, so the above limitation or exclusion
may not apply to you.)
THIS WARRANTY IS EXPRESSLY IN LIEU OF ALL OTHER WARRANTIES. ALL IMPLIED WARRANTIES,
INCLUDING WARRANTIES OF MERCHANTABILITY OR FITNESS FOR ANY PARTICULAR PURPOSE ARE LIMITED IN
DURATION TO ONE (1) YEAR FROM THE EFFECTIVE DATE OF THIS WARRANTY. SMOOTH FITNESS IS NOT
LIABLE FOR CONSEQUENTIAL OR INCIDENTAL DAMAGES RESULTING FROM ANY DEFECT IN PARTS NOR FOR
ANY BREACH OF EXPRESS OR IMPLIED WARRANTIES. SMOOTH FITNESS' SOLE LIABILITY UNDER THIS
WARRANTY IS LIMITED TO THE TERMS DESCRIBED IN THIS FORM. THIS WARRANTY GIVES YOU SPECIFIC
LEGAL RIGHTS, AND YOU MAY ALSO HAVE OTHER RIGHTS WHICH VARY FROM STATE TO STATE.
FORM WS-1 (rev. 03/2012)

19
··
Customer Service Toll Free
855-663-5643
-
 1
1
-
 2
2
-
 3
3
-
 4
4
-
 5
5
-
 6
6
-
 7
7
-
 8
8
-
 9
9
-
 10
10
-
 11
11
-
 12
12
-
 13
13
-
 14
14
-
 15
15
-
 16
16
-
 17
17
-
 18
18
-
 19
19


Smooth Fitness SMB-XBIKE Owner's manual
- Type
- Owner's manual
Ask a question and I''ll find the answer in the document
Finding information in a document is now easier with AI
Related papers

Other documents
-
Hooker 638-85001 Assembly Instructions
-
 Flash Furniture BZ100NVY Operating instructions
-
Exerpeutic 1220.2 Owner's manual
-
Fitness Reality Air Elliptical Owner's manual
-
Ironman Fitness 6155 Owner's manual
-
-
-
-
-
