
OPD 800
TRAGBARER DVD/CD/MP3-PLAYER // PORTABLE DVD/
CD/MP3 PLAYER // REPRODUCTOR PORTÁTIL DE DVD/
CD/MP3 // LECTEUR DVD/CD/MP3 PORTABLE
HU
IT
FELHASZNÁLÓI KÉZIKÖNYV
MANUALE DELL’UTENTE
FR
MODE D’EMPLOI
ES
MANUAL DE INSTRUCCIONES
EN
USER MANUAL
EL
ΟΗΓΙΕΣ ΧΡΗΣΗΣ
DE
GEBRAUCHSANWEISUNG
Page is loading ...

English
Deutsch
Ελληνικά
Español
Français
Magyar
Italiano
4 - 18
19 - 33
34 - 48
49 - 63
64 - 78
79 - 93
94 - 108
Page is loading ...
Page is loading ...
Page is loading ...
Page is loading ...
Page is loading ...
Page is loading ...
Page is loading ...
Page is loading ...
Page is loading ...
Page is loading ...
Page is loading ...
Page is loading ...
Page is loading ...
Page is loading ...
Page is loading ...
Page is loading ...
Page is loading ...
Page is loading ...
Page is loading ...
Page is loading ...
Page is loading ...
Page is loading ...
Page is loading ...
Page is loading ...
Page is loading ...
Page is loading ...
Page is loading ...
Page is loading ...
Page is loading ...
Page is loading ...

34
EN
35
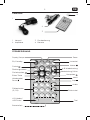
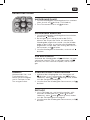
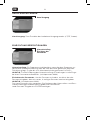
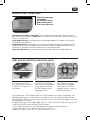
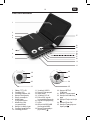
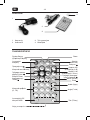
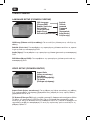
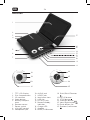
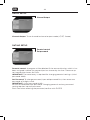
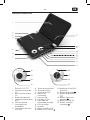
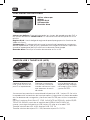
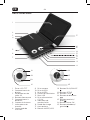
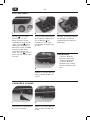
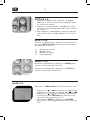
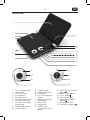
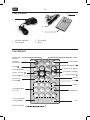
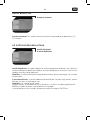
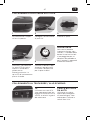
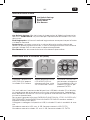
MAIN UNIT
1 TFT LCD Display
2 Disc Compartment
3 SD card slot
4 Open button
5 Battery compart-
ment
6 Remote sensor
7 Power switch
8 VOLUME control
9 Headphone jack
1
2
7
3
4
5
6
17
16
15
14
13
12
11
10
9
8
21
25
19
18
23
22
20
24
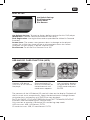
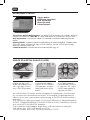
10 AUDIO jack
11 VIDEO jack
12 Ventilation slots
13 USB slot
14 DC 9V in-jack
15 Power/Standby
indicator
16 Charge LED
17 Speaker
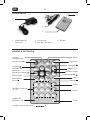
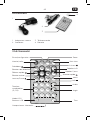
18 MODE/USB button
19 PLAY/PAUSE button
20 SETUP button
21 STOP button
22 Direction button
23 Next/Right button
24 Enter button OK
25 Previous/Left button

34
35
EN
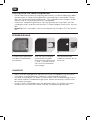
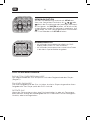
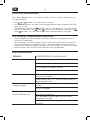
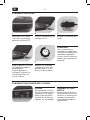
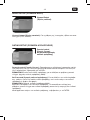
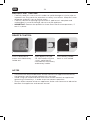
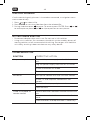
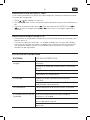
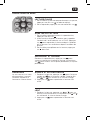
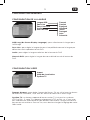
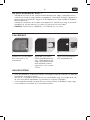
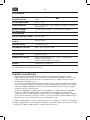
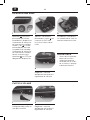
ACCESSORIES
3
2
1
4
1 Power adapter
2 Earphones
3 Remote control
4 Battery
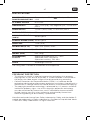
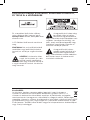
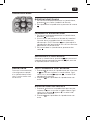
REMOTE CONTROL
Display/Setup
Title
Angle
Audio
Menu
Stop
Repeat A-B
Repeat 1/All
Next
Zoom
Subtitle
Previous
Power/Standby
Direction buttons
Enter button
Fast Reverse
Fast Forward
Play/Pause
Number buttons
(0, 1-9)
LCD Mode/
USB buttons
Battery compartment

36
EN
37
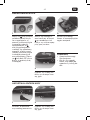
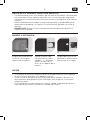
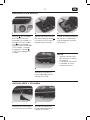
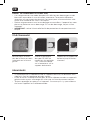
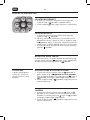
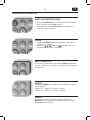
BEFORE FIRST TIME USE
Carefully read this user manual in order to avoid damage or injuries due to •
incorrect use. Pay particular attention to safety instructions. Keep for future
reference and pass it on to further users.
Carefully remove all packaging and check if appliance is complete and •
undamaged. In case of damage, do not use the appliance.
IMPORTANT: • Remove the protective sheet from the disc compartment, if
one is in place.
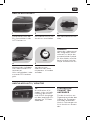
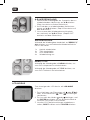
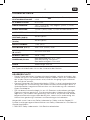
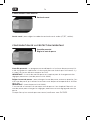
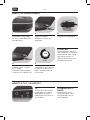
REMOTE CONTROL
Push in direction of
arrow and slide battery
holder out.
If the distance required between remote control and appliance decreases, •
the batteries are exhausted; replace with new ones.
Avoid using the remote control near other remote controls or appliances •
generating infrared rays, in order to ensure correct operation.
Always direct remote sensor on appliance. Make sure there are no obstacles •
between the appliance and remote control.
Insert battery of type
CR 2025 observing the
+ and – polarities as
indicated on the battery
and battery holder.
Push battery holder
back in until locked.
1
NOTES
2
3

36
37
EN
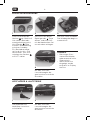
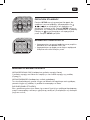
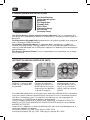
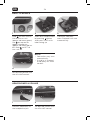
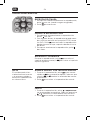
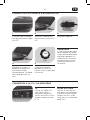
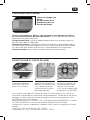
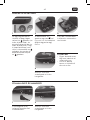
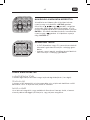
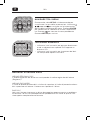
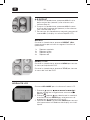
CONNECTING TO POWER SOURCE
Plug the power adapter
into the DC 9V jack.
Make sure the power
switch is set to OFF.
2
4
3
5
Plug the unit in.
1
Charge battery for at
least 4 hours before
using first time!
4 h
CONNECTING TO TV / MONITOR
During charging: Charge
LED will light up red.
Full battery: Charge LED
will turn green.
If the built-in battery
power is low, the low
battery icon will flash
for a while, then the
player will turn itself off
automatically.
Use car plug to connect
to cigarette lighter sock-
et. Not for use in 24V
vehicles.
Use A/V cable (not
provided) to connect
AUDIO and VIDEO
outputs to respective
inputs of TV.
NOTE
CAR PLUGTV

38
EN
39
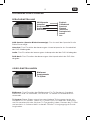
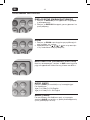
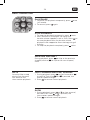
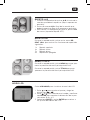
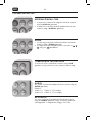
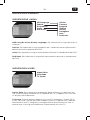
BASIC PLAYBACK
Slide
on main unit to
ON to turn on unit
(power indicator green).
Use
on remote to
toggle standby on
(power indicator red) or
off. Slide to OFF to
turn unit off.
1
4
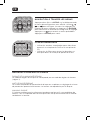
2 3
Open disc compartment
by pressing button
and insert a DVD with
label facing up.
Close disc compart-
ment. Playback will start
automatically.
Set desired volume with
the VOLUME control.
Some discs may start •
automatically.
If no disc is inserted, •
the display will show
No disc.
NOTE
HEADPHONES & VOLUME
Connect earphones to
the headphone jack.
1 2
Set desired volume with
the VOLUME control.

38
39
EN
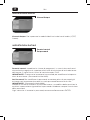
BASIC OPERATIONS
PLAY/PAUSE
SLOW
1. To pause the playback temporarily, press once
(still mode).
2. To resume, press again.
1. During playback, press or to slow-reverse/
forward. Each time or is pressed, the
slow-motion speed changes.
2. Press to resume normal playback.
STOP PLAYBACK
1. To stop the playback temporarily, press once.
2. With some discs the player can recall the
location where stopped, such as DVD. Press to
resume playback from the location where
playback had stopped or from the beginning of
the disc.
3. To stop the playback completely, press twice.
FAST FORWARD AND FAST REVERSE
1. During playback, press to fast forward or
to rewind. Each time or is pressed, the
motion speed changes.
2. Press to resume normal playback.
PREVIOUS AND NEXT
During playback, press to skip to the previous
chapter/track or to skip to the next chapter/
track.
Sound will be muted
during fast-forward/
fast-reverse and
slow-motion playback.
NOTE

40
EN
41
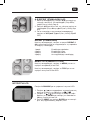
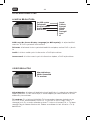
NAVIGATING THROUGH THE MENUS
NUMERIC KEYPAD
DISC ERRORS MESSAGES
Press SETUP on remote control twice, the setup
menu will be displayed. Use , , or to
navigate through the settings of respective menu
option. Press ENTER to confirm the selection and
save the setting. Press to return to previous
menu. Press SETUP to exit.
Use the number buttons to skip directly to a DVD •
chapter or CD track.
Use the digits to input numeric data in menu •
option fields.
WRONG REGIONAL DISC
The region code of the disc does not match the player’s region code (Region
1).
WRONG PASSWORD
The parental rating level of the disc is higher than the parental rating level
setting of the player. The player will not play the disc.
BAD DISC
If the player detects a disc that is damaged or has a format problem, it may
play the disc at a lower quality or stop play completely.

40
41
EN
ADVANCED OPERATIONS
DISPLAY/SETUP
1. Press DISPLAY to show playback information.
2. Press DISPLAY twice to enter Setup Menu.
ZOOM
1. Press ZOOM repeatedly to enlarge/reduce the
picture.
2. Use , , or to move the picture when
enlarged.
MULTI-SUBTITLE
During playback, press SUB repeatedly until the
desired subtitle language is displayed.
AUDIO
ANGLE
Press AUDIO to change the audio mode.
For example:
Audio 1/2: Dolby D 2 CH English
Audio 2/2: Dolby D 5.1 CH English
For discs with these function press ANGLE to view
action from different angles (depending on DVD).

42
EN
43
A-B REPEAT
MENU/TITLE
REPEAT
1. During playback, press A-B at the beginning of
the section that should be repeated (Rep A
appears on the screen).
2. Press A-B again at the end of the section that
should be repeated (Rep A-B appears on the
screen).
3. To return to normal playback, press A-B again.
(RepAB OFF appears).
During playback, press MENU to return to the DVD
main menu.
During playback, press TITLE to return to the DVD
title menu.
During playback, press REPEAT 1/ALL repeatedly to
activate the following repeat functions:
1x Repeat chapter
2x Repeat title
3x Repeat disc
4x Repeat off
LCD MODE
Press LCD MODE to display the LCD menu.
1. Press or to highlight item and then make
adjustment by or .
2. Press or to select Mode and confirm with
ENTER to toggle the screen dimension between
16:9 and 4:3.
3. Select RESET and press ENTER to return to LCD
factory default settings.

42
43
EN
LANGUAGE SETUP
OSD Lang (On Screen Display Language): To select language for on-screen
display.
Subtitle: To set the preferred subtitle language as the default when playing
DVD.
Audio: To set the preferred audio language when playing DVD.
DVD Menu: To set the preferred menu language when playing DVD.
– OSD Language – English
– Subtitle – French
– DivX subtitle – Spanish
– Audio – German
– DVD menu – Italian
– Portuguese
– Auto
– Off
GENERAL SETUP
Aspect Ratio: To set the aspect ratio of the display. 3:4 is used with standard
television displays; 16:9 is used with widescreen television displays.
TV System: This player supports different TV output, including NTSC and PAL
systems. If your TV supports only NTSC or PAL and you have inadvertently
selected the wrong TV type, the TV image will flicker and become black-and-
white. In this case, you should change TV output setting.
VIDEO SETUP
– Aspect Ratio
– View Mode
– TV System

44
EN
45
Channel Output: To set the audio channel output mode (LT/RT, Stereo).
AUDIO SETUP
– Channel Output
RATING SETUP
Parental control: A program will be blocked if the censorship class which it has
been assigned is above the censorship class chosen by the user. There are up
to 8 censorship classes for DVDs.
IMPORTANT: Password entry is required for changing parental settings. (Initial
password 8888).
Set Password: To change password, input old password first, then enter new
password of 4 digits twice.
IMPORTANT: (Initial password 8888)
Be sure to remember new password. Changing parental and any password
setting requires input of password.
Each time when entering the password, confirm with ENTER.
– Parental control
– Set password

44
45
EN
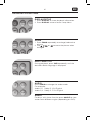
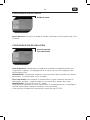
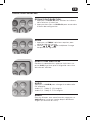
USB AND SD CARD FUNCTION (MP3)
Connect USB device
(USB 2.0) or SD card to
the player.
Press and hold LCD
MODE/USB button on
remote control until
mode menu appears.
Use navigation buttons
to select either USB or
CARD mode and press
ENTER.
The contents of the USB device/SD card will show on the display. Playback of
the first track starts automatically. Select the desired tracks through remote
navigation keys and confirm with ENTER to start playback.
For PLAY/PAUSE, STOP, NEXT/PREVIOUS and FAST FORWARD/REVERSE
functions, refer to chapter BASIC OPERATIONS.
Only connect or remove USB device/SD card during stop mode.
USB size: max. 8GB; USB format: FAT32
SD card size: max. 2GB; SD card format: FAT32
1 2 3
MISC SETUP
Use Default Settings: To reset to factory default settings for this DVD player.
IMPORTANT: Parental Control password will not reset.
DivX Registration: Use registration code as provided for Video On Demand
functions.
Screen Saver: The screen saver prevents burn-in damage to the player’s
screen. Set to ON, then there will be an animated picture on the screen
whenever the DVD player is idle for a certain time.
Disc Resume: To set the Disc Resume On or Off.
– Use Default Settings
– DivX Registration
– Screen Saver
– Disc Resume

46
EN
47
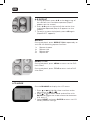
JPEG DISC PLAYBACK
If a disc containing only pictures is inserted or connected, a navigation menu
starts automatically.
1. Press or to select a file.
2. Press ENTER to start the slideshow from the selected file.
3. During slideshow press to pause. To resume, press ENTER. Press or
to rotate picture; press or to skip to previous or next picture.
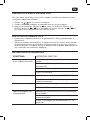
TROUBLESHOOTING
SYMPTOM CORRECTIVE ACTION
No power or picture Connect the power supply cord with the main
unit.
Plug the power supply cord into an AC outlet.
Ensure the correct AV mode.
Check the connections.
No sound Turn up the volume with the VOLUME control.
Ensure TV and amplifier connections are
correct.
Failed to play Check the disc is properly inserted.
Clean the disc.
Failed to respond to
remote control
Remove obstacles between remote control and
unit.
Aim remote control at the sensor on the front
panel.
Check batteries and replace them if necessary.
12V CAR POWER ADAPTOR
Disconnect adaptor when not in use. Do not use in 24V vehicles. •
Using unit in vehicles: On no account should this unit be used by drivers of •
moving vehicles, or left unsecured whilst driving. Passengers shall hold the
unit safely, ensuring it does not obstruct any safety device.

46
47
EN
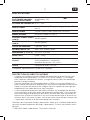
SPECIFICATIONS
POWER SUPPLY
POWER CONSUMPTION
Power adaptor: DC 9V (AC adapter Terminal)
≤ 6W
VF SIGNAL SYSTEM NTSC/PAL
VIDEO OUTPUT
1.0+/– 0.2V (p-p), 75Ω, Negative sync., 3.5 mm mini
jack x1
AUDIO OUTPUT 1.2 Vrms (1KHz, 0 dB), 3.5 mm mini jack x1
EARPHONE TERMINAL 3.5 mm stereo mini jack x1
SIGNAL/NOISE RATIO
(audio)
90 dB typical
DYNAMIC RANGE (audio) 90 dB typical
PANEL SIZE 7 inch (16:9)
RESOLUTION (H x V) 480 x 234 (QVGA) Pixels
DIMENSIONS (W x H x D) 251 x 234 x59 mm
WEIGHT (N.W.) Unit: 700g
ENVIRONMENT/
CLIMATE
Operating temperature: 0°C - 40°C
Operation status: Horizontal
Operation humidity: 30%-80%
LASER Wavelenght: 650 nm
Manufactured under license from Dolby Laboratories. Dolby and the double-D
symbol are trademarks of Dolby Laboratories. Confidential Unpublished Works.
© 1992-1997 Dolby Laboratories. All rights reserved.
The rating label is located at the bottom of the appliance.
COPYRIGHT PROTECTION
This player has a built-in copyright protection technology that prevents •
copying from a DVD disc to any media. If a video recorder is connected to
the player, the video output image will be distorted during recording.
Content Protection for Removable Media (CPRM) is a hardware-based •
technology designed to enforce copy protection restrictions through built-in
mechanisms in storage media that would prevent unauthorized file copying.
The copyright protection technology is protected by U.S. patents and other •
intellectual property rights. Use of this copyright protection technology
must be authorized by Macrovision, and is intended for home and other
limited viewing uses only unless otherwise authorized by Macrovision.
Reverse engineering or dissasembly is prohibited.

48
EN
49
The crossed-out wheeled bin logo requires the separate collection of
waste electric and electronic equipment (WEEE). Electric and electronic
equipment may contain dangerous and hazardous substances. Do not
dispose of this appliance as unsorted municipal waste. Return it to a
designated collection point for the recycling of WEEE. By doing so, you will
help to conserve resources and protect the environment. Contact your retailer
or local authorities for more information.
DISPOSAL
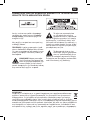
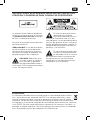
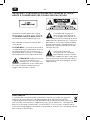
IMPORTANT SAFETY INSTRUCTIONS. READ CAREFULLY AND
KEEP FOR FUTURE REFERENCE.
The lightning flash with
arrowhead within an
equilateral triangle is
intended to alert the user to the
presence of uninsulated “dangerous
voltage” inside the enclosure of this
appliance, which may be of sufficient
magnitude to constitute a risk of
electric shock to persons and animals.
The exclamation point within
an equilateral triangle is
intended to alert the user to
the presence of important operating
and maintenance instructions in the
literature accompanying this
appliance.
This label on the product informs the
user that this is a class 1 laser product
containing a laser component.
Do not touch the lens inside the disc
compartment.
CAUTION! Use of controls or
adjustments of procedures other than
those specified herein may result in
hazardous radiation exposure.
DANGER! Invisible laser
radiation when open and
safety interlock failed or
defeated. Avoid direct
exposure to the beam. Do not touch
the lens.
Page is loading ...
Page is loading ...
Page is loading ...
Page is loading ...
Page is loading ...
Page is loading ...
Page is loading ...
Page is loading ...
Page is loading ...
Page is loading ...
Page is loading ...
Page is loading ...
Page is loading ...
Page is loading ...
Page is loading ...
Page is loading ...
Page is loading ...
Page is loading ...
Page is loading ...
Page is loading ...
Page is loading ...
Page is loading ...
Page is loading ...
Page is loading ...
Page is loading ...
Page is loading ...
Page is loading ...
Page is loading ...
Page is loading ...
Page is loading ...
Page is loading ...
Page is loading ...
Page is loading ...
Page is loading ...
Page is loading ...
Page is loading ...
Page is loading ...
Page is loading ...
Page is loading ...
Page is loading ...
Page is loading ...
Page is loading ...
Page is loading ...
Page is loading ...
Page is loading ...
Page is loading ...
Page is loading ...
Page is loading ...
Page is loading ...
Page is loading ...
Page is loading ...
Page is loading ...
Page is loading ...
Page is loading ...
Page is loading ...
Page is loading ...
Page is loading ...
Page is loading ...
Page is loading ...
Page is loading ...
Page is loading ...
Page is loading ...
Page is loading ...
Page is loading ...
-
 1
1
-
 2
2
-
 3
3
-
 4
4
-
 5
5
-
 6
6
-
 7
7
-
 8
8
-
 9
9
-
 10
10
-
 11
11
-
 12
12
-
 13
13
-
 14
14
-
 15
15
-
 16
16
-
 17
17
-
 18
18
-
 19
19
-
 20
20
-
 21
21
-
 22
22
-
 23
23
-
 24
24
-
 25
25
-
 26
26
-
 27
27
-
 28
28
-
 29
29
-
 30
30
-
 31
31
-
 32
32
-
 33
33
-
 34
34
-
 35
35
-
 36
36
-
 37
37
-
 38
38
-
 39
39
-
 40
40
-
 41
41
-
 42
42
-
 43
43
-
 44
44
-
 45
45
-
 46
46
-
 47
47
-
 48
48
-
 49
49
-
 50
50
-
 51
51
-
 52
52
-
 53
53
-
 54
54
-
 55
55
-
 56
56
-
 57
57
-
 58
58
-
 59
59
-
 60
60
-
 61
61
-
 62
62
-
 63
63
-
 64
64
-
 65
65
-
 66
66
-
 67
67
-
 68
68
-
 69
69
-
 70
70
-
 71
71
-
 72
72
-
 73
73
-
 74
74
-
 75
75
-
 76
76
-
 77
77
-
 78
78
-
 79
79
-
 80
80
-
 81
81
-
 82
82
-
 83
83
-
 84
84
-
 85
85
-
 86
86
-
 87
87
-
 88
88
-
 89
89
-
 90
90
-
 91
91
-
 92
92
-
 93
93
-
 94
94
-
 95
95
-
 96
96
-
 97
97
-
 98
98
-
 99
99
-
 100
100
-
 101
101
-
 102
102
-
 103
103
-
 104
104
-
 105
105
-
 106
106
-
 107
107
-
 108
108
-
 109
109
-
 110
110
-
 111
111
-
 112
112


Ask a question and I''ll find the answer in the document
Finding information in a document is now easier with AI
in other languages
- italiano: OK OPD 800 Manuale del proprietario
- français: OK OPD 800 Le manuel du propriétaire
- español: OK OPD 800 El manual del propietario
- Deutsch: OK OPD 800 Bedienungsanleitung