
Precautions
Location
Using the unit in the following locations can result in a malfunction.
• In direct sunlight
• Locations of extreme temperature or humidity
• Excessively dusty or dirty locations
• Locations of excessive vibration
• Close to magnetic fields
Handling
To avoid breakage, do not apply excessive force to the switches or controls.
Care
If the exterior becomes dirty, wipe it with a clean, dry cloth. Do not use liquid
cleaners such as benzene or thinner, or cleaning compounds or flammable
polishes.
Keep this manual
After reading this manual, please keep it for later reference.
Keeping foreign matter out of your equipment
Never set any container with liquid in it near this equipment. If liquid gets
into the equipment, it could cause a breakdown, fire, or electrical shock. Be
careful not to let metal objects get into the equipment.
THE FCC REGULATION WARNING (for USA)
This equipment has been tested and found to comply with the limits for a
Class B digital device, pursuant to Part 15 of the FCC Rules. These limits
are designed to provide reasonable protection against harmful interfer-
ence in a residential installation. This equipment generates, uses, and
can radiate radio frequency energy and, if not installed and used in ac-
cordance with the instructions, may cause harmful interference to radio
communications. However, there is no guarantee that interference will
not occur in a particular installation. If this equipment does cause harm-
ful interference to radio or television reception, which can be determined
by turning the equipment off and on, the user is encouraged to try to
correct the interference by one or more of the following measures:
• Reorient or relocate the receiving antenna.
• Increase the separation between the equipment and receiver.
• Connect the equipment into an outlet on a circuit different from that to
which the receiver is connected.
• Consult the dealer or an experienced radio/TV technician for help.
Unauthorized changes or modification to this system can void the user’s
authority to operate this equipment.
Notice regarding disposal (EU only)
When this “crossed-out wheeled bin” symbol is displayed on the
product, owner’s manual, battery, or battery package, it signifies
that when you wish to dispose of this product, manual, package or
battery you must do so in an approved manner. Do not discard this
product, manual, package or battery along with ordinary house-
hold waste. Disposing in the correct manner will prevent harm to
human health and potential damage to the environment. Since the
correct method of disposal will depend on the applicable laws and
regulations in your locality, please contact your local administrative body
for details. If the battery contains heavy metals in excess of the regu-
lated amount, a chemical symbol is displayed below the “crossed-out
wheeled bin” symbol on the battery or battery package.
IMPORTANT NOTICE TO CONSUMERS
This product has been manufactured according to strict specifications
and voltage requirements that are applicable in the country in which it is
intended that this product should be used. If you have purchased this
product via the internet, through mail order, and/or via a telephone sale,
you must verify that this product is intended to be used in the country in
which you reside.
WARNING: Use of this product in any country other than that for which it
is intended could be dangerous and could invalidate the manufacturer’s
or distributor’s warranty.
Please also retain your receipt as proof of purchase otherwise your prod-
uct may be disqualified from the manufacturer’s or distributor’s warranty.
- Mac, Mac logo and Mac OS are trademarks of Apple Inc., registered in the
U.S. and other countries.
- Windows XP, Windows Vista and Windows 7 are trademarks of Microsoft
Corporation in the U.S. and other countries.
- All product names and company names are the trademarks or registered
trademarks of their respective owners.
Précautions
Emplacement
L’utilisation de cet instrument dans les endroits suivants peut en entraîner le
mauvais fonctionnement.
• En plein soleil
• Endroits très chauds ou très humides
• Endroits sales ou fort poussiéreux
• Endroits soumis à de fortes vibrations
•A proximité de champs magnétiques
Maniement
Pour éviter de les endommager, manipulez les commandes et les boutons
de cet instrument avec soin.
Entretien
Lorsque l’instrument se salit, nettoyez-le avec un chiffon propre et sec. Ne
vous servez pas d’agents de nettoyage liquides tels que du benzène ou du
diluant, voire des produits inflammables.
Conservez ce manuel
Après avoir lu ce manuel, veuillez le conserver soigneusement pour toute
référence ultérieure.
Evitez toute intrusion d’objets ou de liquide
Ne placez jamais de récipient contenant du liquide près de l’instrument. Si
le liquide se renverse ou coule, il risque de provoquer des dommages, un
court-circuit ou une électrocution. Veillez à ne pas laisser tomber des objets
métalliques dans le boîtier (trombones, par ex.).
Note concernant les dispositions (Seulement EU)
Quand un symbole avec une poubelle barrée d’une croix apparait
sur le produit, le mode d’emploi, les piles ou le pack de piles, cela
signifie que ce produit, manuel ou piles doit être déposé chez un
représentant compétent, et non pas dans une poubelle ou toute
autre déchetterie conventionnelle. Disposer de cette manière, de
prévenir les dommages pour la santé humaine et les dommages
potentiels pour l'environnement. La bonne méthode d'élimination
dépendra des lois et règlements applicables dans votre localité,
s’il vous plaît, contactez votre organisme administratif pour plus de dé-
tails. Si la pile contient des métaux lourds au-delà du seuil réglementé,
un symbole chimique est affiché en dessous du symbole de la poubelle
barrée d’une croix sur la pile ou le pack de piles.
REMARQUE IMPORTANTE POUR LES CLIENTS
Ce produit a été fabriqué suivant des spécifications sévères et des be-
soins en tension applicables dans le pays où ce produit doit être utilisé.
Si vous avez acheté ce produit via l’internet, par vente par correspon-
dance ou/et vente par téléphone, vous devez vérifier que ce produit est
bien utilisable dans le pays où vous résidez.
ATTENTION: L’utilisation de ce produit dans un pays autre que celui pour
lequel il a été conçu peut être dangereuse et annulera la garantie du
fabricant ou du distributeur. Conservez bien votre récépissé qui est la
preuve de votre achat, faute de quoi votre produit ne risque de ne plus
être couvert par la garantie du fabricant ou du distributeur.
- Mac, Mac logo et Mac OS sont des marques commerciales de Apple Inc.,
déposées aux États-Unis et dans d´autres pays.
- Windows XP, Windows Vista et Windows 7 sont des marques deposees
de Microsoft Corporation aux Etats-Unis et dans d´autres pays.
-Tous les noms de produits et de sociétés sont des marques commerciales
ou déposées de leur détenteur respectif.
Vorsichtsmaßnahmen
Aufstellungsort
Ver meiden Sie das Aufstellen des Geräts an Orten, an denen
• es direkter Sonneneinstrahlung ausgesetzt ist;
• hohe Feuchtigkeit oder Extremtemperaturen auftreten können;
• Staub oder Schmutz in großen Mengen vorhanden sind;
• das Gerät Erschütterungen ausgesetzt sein kann.
•in der Nähe eines Magnetfeldes.
Bedienung
Vermeiden Sie bei der Bedienung von Schaltern und Reglern unangemes-
senen Kraftaufwand.
Reinigung
Bei auftretender Verschmutzung können Sie das Gehäuse mit einem trocke-
nen, sauberen Tuch abwischen. Verwenden Sie keinerlei Flüssigreiniger wie
beispielsweise Reinigungsbenzin, Verdünnungs- oder Spülmittel. Verwenden
Sie niemals brennbare Reiniger.
Bedienungsanleitung
Bewahren Sie diese Bedienungsanleitung gut auf, falls Sie sie später noch
einmal benötigen.
Flüssigkeiten und Fremdkörper
Stellen Sie niemals Behältnisse mit Flüssigkeiten in der Nähe des Geräts
auf. Wenn Flüssigkeit in das Gerät gelangt, können Beschädigung des Ge-
räts, Feuer oder ein elek-trischer Schlag die Folge sein. Beachten Sie, daß
keinerlei Fremdkörper in das Gerät gelangen.
Hinweis zur Entsorgung (Nur EU)
Wenn Sie das Symbol mit der „durchgekreuzten Mülltonne“ auf
Ihrem Produkt, der dazugehörigen Bedienungsanleitung, der Bat-
terie oder dem Batteriefach sehen, müssen Sie das Produkt in
der vorgeschriebenen Art und Weise entsorgen. Dies bedeutet,
dass dieses Produkt mit elektrischen und elektronischen Kompo-
nenten nicht mit dem normalen Hausmüll entsorgt werden darf.
Für Produkte dieser Art existiert ein separates, gesetzlich festge-
legtes Entsorgungssystem. Gebrauchte elektrische und elektro-
nische Geräte müssen separat entsorgt werden, um ein umweltgerech-
tes Recycling sicherzustellen. Diese Produkte müssen bei benannten
Sammelstellen abgegeben werden. Die Entsorgung ist für den Endver-
braucher kostenfrei! Bitte erkundigen sie sich bei ihrer zuständigen Be-
hörde, wo sie diese Produkte zur fachgerechten Entsorgung abgeben
können. Falls ihr Produkt mit Batterien oder Akkumulatoren ausgerüstet
ist, müssen sie diese vor Abgabe des Produktes entfernen und separat
entsorgen (siehe oben). Die Abgabe dieses Produktes bei einer zustän-
digen Stelle hilft ihnen, dass das Produkt umweltgerecht entsorgt wird.
Damit leisten sie persönlich einen nicht unerheblichen Beitrag zum Schutz
der Umwelt und der menschlichen Gesundheit vor möglichen negativen
Effekten durch unsachgemäße Entsorgung von Müll. Batterien oder Ak-
kus, die Schadstoffe enthalten, sind auch mit dem Symbol einer durch-
gekreuzten Mülltonne gekennzeichnet. In der Nähe zum Mülltonnen-
symbol befindet sich die chemische Bezeichnung des Schadstoffes.
Cd oder NiCd steht für Cadmium, Pb für Blei und Hg für Quecksilber.
WICHTIGER HINWEIS FÜR KUNDEN
Dieses Produkt wurde unter strenger Beachtung von Spezifikationen und
Spannungsanforderungen hergestellt, die im Bestimmungsland gelten.
Wenn Sie dieses Produkt über das Internet, per Postversand und/oder
mit telefonischer Bestellung gekauft haben, müssen Sie bestätigen, dass
dieses Produkt für Ihr Wohngebiet ausgelegt ist.
WARNUNG: Verwendung dieses Produkts in einem anderen Land als
dem, für das es bestimmt ist, verwendet wird, kann gefährlich sein und
die Garantie des Herstellers oder Importeurs hinfällig lassen werden.
Bitte bewahren Sie diese Quittung als Kaufbeleg auf, da andernfalls das
Produkt von der Garantie des Herstellers oder Importeurs ausgeschlos-
sen werden kann.
- Mac, Mac logo und Mac OS sind in den USA und anderen Ländern einge-
tragene Warenzeichen der Apple Inc..
-Windows XP, Windows Vista und Windows 7 sind eingetragene Marken-
zeichen der Microsoft Corporation in den USA und anderen Landern.
-Alle Produkt- und Firmennamen sind Warenzeichen oder eingetragene
Warenzeichen der betreffenden Eigentümer.
Page is loading ...

Introduction
Thank you for purchasing the Korg nanoPAD2 slim-line USB controller. To
help you get the most out of your new instrument, please read this manual
carefully.
In order to take full advantage of this product, you’ll need to adjust
settings in the host application that you’re using. Please follow the
directions as described in the owner’s manual of your host application
to define these settings.
Do not leave heavy objects resting on the trigger pads for long period of
time.
The Korg KONTROL Editor software enables you to edit the MIDI
messages that are transmitted from the controllers on the nanoPAD2.
For more information on the nanoPAD2 parameters, refer to the
nanoPAD2 Parameter Guide. You can download the Korg KONTROL
Editor software and the nanoPAD2 Parameter Guide from the Korg
website.
http://www.korg.co.jp/English/Distributors/ or http://www.korg.com
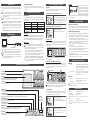
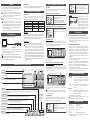
Getting ready
Connections and power
Computer
USB connector
USB cable
nanoPAD2
1. Use a USB cable to connect the nanoPAD2 to a USB port on your computer.
The power to the nanoPAD2 will turn on and the power LED will light up.
Never use any USB cable other than the one that’s included.
When you first connect the nanoPAD2 to a computer running Windows
XP/Vista/7, the standard USB-MIDI driver for your operating system
will be installed automatically.
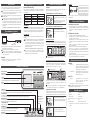
Various playing techniques
X-Y pad
While touching the X-Y pad with your finger, move the finger along the X-
axis (left and right) and Y-axis (up and down).
Transmitting control change messages (CC)
Pad touch
CC
CC
X-Y pad
CCCC
X and Y-axis: Moving your fingers along the
X or Y-axis transmits control change messages.
Pad touch: Touching the X-Y pad with your
finger, or releasing your finger from the pad,
transmits a control change message.
Playing notes in a scale (Touch scale mode)
Note messages
CC
X-Y pad
X-axis: Transmits note messages.
Y-axis: Transmits control change messages.
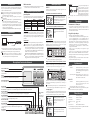
Selecting a scale
You can select one of 16 scales for note messages that are transmitted when
you move your finger along the X-axis on the X-Y pad. While pressing and
holding down the SCALE/TAP button, press the trigger pad where the desired
scale is assigned.
Scale
For scales that are assigned to the trigger pads, please refer to the scale
assignment chart.
Setting Key or Note Range, or Octave Shift
The Key setting determines the base pitch for a scale. The Note Range
determines the range of notes assigned to the X-axis on the X-Y pad, in the
range of one to four octaves. The Octave Shift determines the Key range in
the range of –2 to +2 octaves.
Note Range
Octave Shift
Key
Key is set to “C.”
While pressing and holding down the KEY/RANGE button, press the trigger
pad where the desired Key, Note Range, or Octave Shift setting is assigned.
To reset the Octave Shift to ±0, press and hold down the KEY/RANGE
button and press the Oct– and Oct+ pads simultaneously.
Gate Arpeggiator
The Gate Arpeggiator automatically transmits note messages from the trigger
pads or the X-Y pad in sync with the specified tempo. You can adjust the
length of each note using the Gate Time parameter.
Gate Speed
Velocity
X-Y pad
X-axis: Adjusts the Gate speed.
Y-axis: Controls the Velocity of note
messages transmitted by the Gate Arpeggiator.
Note messages
Gate Time
X-Y pad
X-axis: Transmits note messages.
Y-axis: Controls the Gate Time. The top end
of the pad will play notes in legato.
Turning off the power
1. Disconnect the USB cable that’s connected to the nanoPAD2 and the
computer. The power to the nanoPAD2 will turn off and the power LED
will go dark.
nanoPAD2 and driver ports
Driver ports
As shown in the following table, the name of the ports will depend on which
operating system you’re using, and whether or not you’ve installed the Korg
USB-MIDI driver.
OS MIDI IN MIDI OUT
Mac OS X nanoPAD2 PAD nanoPAD2 CTRL
Windows Vista/7 nanoPAD2 nanoPAD2
Windows XP USB audio device USB audio device
Windows XP/Vista/7 + nanoPAD2 1 PAD nanoPAD2 1 CTRL
KORG USB-MIDI Driver
MIDI IN port
This is where MIDI messages from the nanoPAD2’s various controllers are
received. If you want to use the nanoPAD2 to control an application on your
computer, then select this port in the MIDI input settings of your application.
This is also used by the Korg Kontrol Editor to control the nanoPAD2.
MIDI OUT port
This port is used by the Korg Kontrol Editor to control the nanoPAD2.
If you are using Windows XP/Vista/7, the standard USB-MIDI driver
that is automatically installed will not allow you to use the nanoPAD2
with multiple applications simultaneously.
If you want to use the nanoPAD2 with multiple applications
simultaneously, you must install the Korg USB-MIDI driver.
You can download the Korg USB-MIDI driver from the Korg website,
and install it as described in the included documentation.
http://www.korg.co.jp/English/Distributors/ or http://www.korg.com
Even if you don't need to use the nanoPAD2 with multiple applications
simultaneously, we recommend that you install the Korg USB-MIDI
driver for more stable operation.
Tap Tempo
You can set the tempo of the Gate
Arpeggiator by pressing the SCALE/
TAP button several times at the tempo
that you desire. The GATE ARP button
indicator will flash in sync with the
tempo. Pressing the SCALE/TAP
button twice or more will change the
tempo accordingly. The more times you press the button, the more precisely
you can set the tempo.
Troubleshooting
Power does not turn on
• If you’re using a passive (non-powered) USB hub, the nanoPAD2 may fail
to power-on because it’s not getting enough power. If this is so, please
connect the nanoPAD2 to a powered USB hub or directly to your computer.
Software does not respond
• Make sure that the nanoPAD2 has been detected by the connected computer.
If you are using Windows XP, go to the Control Panel, open “Sounds, Speech,
and Audio Devices” -> “Sounds and Audio Devices,” and check the
“Hardware” tab page to see if the nanoPAD2 is connected.
If you are using Windows Vista/7, go to the Control Panel, open “Hardware
and Sounds” -> “Device Manager,” and check the “Sound, Video, and Game
Controllers” tab to see if the nanoPAD2 is connected.
If you are using Mac OS X, open “Applications” -> “Utilities,” then start
“Audio MIDI Setup.”
On Mac OS X 10.5 or earlier, check the “MIDI Devices” tab.
On Mac OS X 10.6 or later, open and check the “MIDI Studio” window by
selecting “Show MIDI Window” from the “Window” menu.
•Make sure that the nanoPAD2 is selected in the MIDI port settings of the
application that you’re using.
• The application that you’re using might not support certain functions. Please
check the owner’s manual of your host application.
Operating requirements
Windows
Computer: Any computer that has a USB port and satisfies
the requirements for running Microsoft Windows
XP/Vista/7 (a USB chipset made by the Intel
Corporation is recommended)
Operating system: Microsoft Windows XP SP3 (32bit) or later,
Microsoft Windows Vista SP2 (32bit, 64bit) or
Windows 7 (32bit, 64bit)
Mac OS X
Computer: Apple Macintosh computer with an Intel or
PowerPC processor that has a USB port
Operating system: Mac OS X 10.4 or later
nanoPAD2 operation is not guaranteed with all computers that satisfy
these system requirements.
Specifications
Connectors: USB connector (mini B type)
Power supply: USB bus power mode
Current consumption: 100 mA or less
Dimensions (W x D x H): 12.80 x 3.27 x 0.63 inches / 325 x 83 x 16 mm
Weight: 10.05 oz / 285 g
Included items: USB cable, Owner’s manual
* Specifications and appearance are subject to change without notice for
improvement.
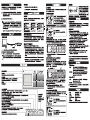
Parts and their functions
Power LED
X-Y pad
Transmits control change messages in normal mode.
In Touch Scale mode, it transmits note messages.
USB connector
Use a USB cable to connect the unit to a computer.
Trigger pads
Transmit note messages.
HOLD button
Maintains the point (value) at which you released your finger
from the X-Y pad.
GATE ARP button
Turns the Gate Arpeggiator on or off. When the Gate Arpeggiator
is on, the button indicator flashes in sync with the tempo.
TOUCH SCALE button
Turns Touch Scale mode on or off.
SCALE/TAP button
Used in combination with a trigger pad in Touch Scale mode to set the scale.
Pressing this button repeatedly enables you to set the tempo of the Gate Arpeggiator.
KEY/RANGE button
Used in combination with a trigger pad in Touch Scale mode to set
the Key or Note Range, or Octave Shift.
Scene LEDs
The LED of the
selected scene
number lights up.
SCENE button
Switches scenes. A set of parameter settings assigned to each trigger pad is called
a “scene.” The nanoPAD2 features four scenes, which are collectively called a “scene set.”
Page is loading ...
Page is loading ...
Page is loading ...
Page is loading ...
-
 1
1
-
 2
2
-
 3
3
-
 4
4
-
 5
5
-
 6
6
-
 7
7


Ask a question and I''ll find the answer in the document
Finding information in a document is now easier with AI
in other languages
- français: Korg 4019.2 Manuel utilisateur
- español: Korg 4019.2 Manual de usuario
- Deutsch: Korg 4019.2 Benutzerhandbuch