Sony MEX-BT2500 User manual

Category
Bluetooth music receivers
Type
User manual

This manual is also suitable for

Operating Instructions
Manual d e instr uc c i o nes
©
2007 Sony Corporation
3-100-199-32 (1)
GB
ES
CS
MEX-BT2500
To cancel the demonstration (DEMO) display, see page 15.
Para cancelar la pantalla de demostración (DEMO), consulte la página 16.
Bluetooth
Audio System
2
Be sure to install this unit in the dashboard of
the car for safety. For installation and
connections, see the supplied installation/
connections manual.
Warning if your car’s ignition has no
ACC position
Be sure to set the Auto Off function (page 15).
The unit will shut off completely and
automatically in the set time after the unit is
turned off, which prevents battery drain.
If you do not set the Auto Off function, press
and hold (OFF) until the display disappears
each time you turn the ignition off.
This label is located on the bottom of the
chassis.
3
Table of Contents
Welcome ! . . . . . . . . . . . . . . . . . . . . . . . . . . . . . 4
Getting Started
Resetting the unit. . . . . . . . . . . . . . . . . . . . . . . . 5
Preparing the card remote commander . . . . . . . 5
Setting the clock . . . . . . . . . . . . . . . . . . . . . . . . 6
Adjusting the volume level of each device . . . . 6
Detaching the front panel . . . . . . . . . . . . . . . . . 6
Attaching the front panel . . . . . . . . . . . . . . . 7
Location of controls and basic
operations
Main unit. . . . . . . . . . . . . . . . . . . . . . . . . . . . 8
Card remote commander RM-X304 . . . . . . . 8
CD
Display items . . . . . . . . . . . . . . . . . . . . . . . 10
Repeat and shuffle play. . . . . . . . . . . . . . . . 10
Radio
Storing and receiving stations . . . . . . . . . . . . . 10
Storing automatically — BTM . . . . . . . . . . 10
Storing manually. . . . . . . . . . . . . . . . . . . . . 10
Receiving the stored stations . . . . . . . . . . . 10
Tuning automatically . . . . . . . . . . . . . . . . . 11
Bluetooth function
Bluetooth operations . . . . . . . . . . . . . . . . . . . . 11
Pairing . . . . . . . . . . . . . . . . . . . . . . . . . . . . . . . 11
About Bluetooth icons . . . . . . . . . . . . . . . . 12
Connection. . . . . . . . . . . . . . . . . . . . . . . . . . . . 12
To switch the Bluetooth signal output of
this unit to on . . . . . . . . . . . . . . . . . . . . . . . 12
Connecting a cellular phone . . . . . . . . . . . . 12
Connecting an audio device . . . . . . . . . . . . 13
Handsfree talk . . . . . . . . . . . . . . . . . . . . . . . . . 13
Receiving calls . . . . . . . . . . . . . . . . . . . . . . 13
Making calls . . . . . . . . . . . . . . . . . . . . . . . . 13
Call transfer. . . . . . . . . . . . . . . . . . . . . . . . . 13
Music streaming . . . . . . . . . . . . . . . . . . . . . . . 14
Listening to music from an audio
device . . . . . . . . . . . . . . . . . . . . . . . . . . . . . 14
Operating an audio device with this
unit . . . . . . . . . . . . . . . . . . . . . . . . . . . . . . . 14
Deleting registration of all paired devices. . . . 14
Other functions
Changing the sound settings . . . . . . . . . . . . . . 15
Adjusting the balance and fader
— BAL/FAD . . . . . . . . . . . . . . . . . . . . . . . 15
Customizing the equalizer curve
— EQ lite . . . . . . . . . . . . . . . . . . . . . . . . . . 15
Adjusting setup items — SET . . . . . . . . . . . . 15
Using optional equipment. . . . . . . . . . . . . . . . 16
Auxiliary audio equipment. . . . . . . . . . . . . 16
Additional Information
Precautions . . . . . . . . . . . . . . . . . . . . . . . . . . . 17
Notes on discs . . . . . . . . . . . . . . . . . . . . . . 17
About MP3/WMA files . . . . . . . . . . . . . . . 17
About Bluetooth function. . . . . . . . . . . . . . 18
Maintenance . . . . . . . . . . . . . . . . . . . . . . . . . . 19
Removing the unit. . . . . . . . . . . . . . . . . . . . . . 19
Specifications . . . . . . . . . . . . . . . . . . . . . . . . . 20
Troubleshooting . . . . . . . . . . . . . . . . . . . . . . . 21
Error displays/Messages. . . . . . . . . . . . . . . 23
4
Welcome !
Thank you for purchasing this Sony Bluetooth™
Audio System. You can enjoy your drive with the
following functions.
CD playback
You can play CD-DA (also containing CD
TEXT*) and CD-R/CD-RW (MP3/WMA files
also containing Multi Session (page 17)).
Radio reception
You can store up to 6 stations per band (FM1,
FM2, FM3, MW, SW1 and SW2).
BTM (Best Tuning Memory): the unit selects
strong signal stations and stores them.
Bluetooth function
Handsfree talking with your cellular phone in
the car. This unit can answer and redial.
Music streaming from your cellular phone or
portable audio device.
HFP 1.0, HSP, A2DP and AVRCP profiles
supported.
Sound adjustment
EQ lite: You can choose any one of 6 preset
equalizer curves.
Auxiliary equipment connection
An AUX input jack on the front of the unit
allows connection of a portable audio device.
* A CD TEXT disc is a CD-DA that includes
information such as disc, artist and track name.
The Bluetooth word mark and logos are owned
by the Bluetooth SIG, Inc. and any use of such
marks by Sony Corporation is under license.
Other trademarks and trade names are those of
their respective owners.
Caution
IN NO EVENT SHALL SONY BE LIABLE FOR
ANY INCIDENTAL, INDIRECT OR
CONSEQUENTIAL DAMAGES OR OTHER
DAMAGES INCLUDING, WITHOUT
LIMITATION, LOSS OF PROFITS, LOSS OF
REVENUE, LOSS OF DATA, LOSS OF USE OF
THE PRODUCT OR ANY ASSOCIATED
EQUIPMENT, DOWNTIME, AND
PURCHASER’S TIME RELATED TO OR
ARISING OUT OF THE USE OF THIS
PRODUCT, ITS HARDWARE AND/OR ITS
SOFTWARE.
IMPORTANT NOTICE!
Safe and efficient use
Changes or modifications to this unit not expressly
approved by Sony may void the user’s authority to
operate the equipment.
Please check for exceptions, due to national
requirement or limitations, in usage of Bluetooth
equipment before using this product.
Driving
Check the laws and regulations on the use of cellular
phones and handsfree equipment in the areas where
you drive.
Always give full attention to driving and pull off the
road and park before making or answering a call if
driving conditions so require.
Connecting to other devices
When connecting to any other device, please read its
user guide for detailed safety instructions.
Type of discs Label on the disc
CD-DA
MP3
WMA
Microsoft, Windows Media,
and the Windows logo are
trademarks or registered
trademarks of Microsoft
Corporation in the United States and/or other
countries.
5
Radio frequency exposure
RF signals may affect improperly installed or
inadequately shielded electronic systems in cars,
such as electronic fuel injection systems, electronic
antiskid (antilock) braking systems, electronic speed
control systems or air bag systems. For installation
or service of this device, please consult with the
manufacturer or its representative of your car. Faulty
installation or service may be dangerous and may
invalidate any warranty that may apply to this
device.
Consult with the manufacturer of your car to ensure
that the use of your cellular phone in the car will not
affect its electronic system.
Check regularly that all wireless device equipment
in your car is mounted and operating properly.
Emergency calls
This Bluetooth car handsfree and the electronic
device connected to the handsfree operate using
radio signals, cellular, and landline networks as well
as user-programmed function, which cannot
guarantee connection under all conditions.
Therefore do not rely solely upon any electronic
device for essential communications (such as
medical emergencies).
Remember, in order to make or receive calls, the
handsfree and the electronic device connected to the
handsfree must be switched on in a service area with
adequate cellular signal strength.
Emergency calls may not be possible on all cellular
phone networks or when certain network services
and/or phone features are in use.
Check with your local service provider.
Getting Started
Resetting the unit
Before operating the unit for the first time, or
after replacing the car battery or changing the
connections, you must reset the unit.
Detach the front panel and press the RESET
button with a pointed object, such as a ball-point
pen.
Note
Pressing the RESET button will erase the clock setting
and some stored contents.
Preparing the card remote
commander
Before using the card remote commander for the
first time, remove the insulation film.
RESET
button
6
Setting the clock
The clock uses a 12-hour digital indication.
1 Press and hold the select button.
The setup display appears.
2 Press the select button repeatedly
until “CLOCK-ADJ” appears.
3 Press (SEEK) +.
The hour indication flashes.
4 Rotate the select button to set the
hour and minute.
To move the digital indication, press (DSPL).
5 Press the select button.
The setup is complete and the clock starts.
To display the clock, press (DSPL). Press
(DSPL) again to return to the previous display.
With the card remote commander
In step 4, to set the hour and minute, press M or m.
Adjusting the volume level of
each device
When connecting to a portable audio device via
Bluetooth connection or AUX input jack, we
recommend adjusting the volume level of the
connected device, or adjusting the volume level
for each connected device in the setup menu on
this unit. See “Adjusting the volume level”
(page 14) for Bluetooth device, and “Adjusting
the volume level” (page 16) for a device
connected to AUX.
Detaching the front panel
You can detach the front panel of this unit to
prevent theft.
Caution alarm
If you turn the ignition switch to the OFF
position without detaching the front panel, the
caution alarm will sound for a few seconds.
The alarm will only sound if the built-in
amplifier is used.
1 Press (OFF).
The unit is turned off.
2 Press , then pull it off towards you.
Notes
Do not drop or put excessive pressure on the front
panel and display window.
Do not subject the front panel to heat/high
temperature or moisture. Avoid leaving it in a parked
car or on a dashboard/rear tray.
7
Attaching the front panel
Engage part A of the front panel with part B of
the unit, as illustrated, and push the left side into
position until it clicks.
Note
Do not put anything on the inner surface of the front
panel.
B
A
8
Location of controls and basic operations
Main unit
Card remote commander
RM-X304
Refer to the pages listed for details. The
corresponding buttons on the card remote
commander control the same functions as those
on the unit.
A OFF button
To power off; stop the source.
B EQ (equalizer)/BLUETOOTH button
15
CD/Radio/Bluetooth audio:
To select an equalizer type (XPLOD,
NATURAL, HARD, UPBEAT, VOCAL,
CUSTOM or OFF).
Power off:
For Bluetooth signal on/off, pairing.
C Volume control dial/select/
(handsfree) button 13, 15
To adjust volume (rotate); select setup items
(press and rotate); receive/end a call (press).
D SOURCE button
To power on; change the source (Radio/CD/
AUX/Bluetooth audio/Bluetooth phone).
OFF
BTM
SCRLDSPL
SEEK SEEK
PAUSE
ALBMDIM REP SHUF
EQ
AUX
123456
MODE
SOURCE
BLUETOOTH PUSH SELECT
/
1
qa qsq;9
2
qd qh qjqg
5 8673
MEX-BT2500
qf
4
RESET
qlqk
OFF
DSPL
SCRL
SEL
SOURCE
MODE
132
465
ATT
VOL
+
+
4
wd
qs
1
qh
w;
qd
ws
wa
wg
wf
9
E Disc slot
To insert the disc (label side up). Playback
starts automatically.
F Display window
G AUX input jack 16
To connect a portable audio device.
H Z (eject) button
To eject the disc.
I (front panel release) button 6
J BTM button 10
To start the BTM function (press and hold).
K SEEK –/+ buttons
CD:
To skip tracks (press); skip tracks
continuously (press, then press again within
about 1 second and hold); reverse/fast-
forward a track (press and hold).
Radio:
To tune in stations automatically (press); find
a station manually (press and hold).
Bluetooth audio device*
1
:
To skip tracks (press).
L MODE button 10
To select the radio band (FM/MW/SW).
M DSPL (display)/DIM (dimmer) button
10
To change display items (press); change the
display brightness (press and hold).
N Frequency select switch (located on the
bottom of the unit)
See “Frequency select switch” in the
supplied installation/connections manual.
O Number buttons
CD:
(1)/(2): ALBM –/+*
2
To skip albums (press); skip albums
continuously (press and hold).
(3): REP 10
(4): SHUF 10
(6): PAUSE*
3
To pause playback. To cancel, press
again.
Radio:
To receive stored stations (press); store
stations (press and hold).
Bluetooth audio device*
1
:
(6): PAUSE
To pause playback. To cancel, press
again.
P SCRL (scroll) button 10
To scroll the display item.
Q Receptor for the card remote
commander
R RESET button (located behind the front
panel) 5
S Microphone 13
Note
Do not cover the microphone, the handsfree
function may not work properly.
The following buttons on the card remote
commander have also different buttons/functions
from the unit. Remove the insulation film before
use (page 5).
w; < (.)/, (>) buttons
The same as (SEEK) –/+ on the unit.
wa VOL (volume) +/– button
To adjust volume.
ws ATT (attenuate) button
To attenuate the sound. To cancel, press
again.
wd SEL (select)/ (handsfree) button
The same as the select button on the unit.
wf M (+)/m (–) buttons
To control CD, the same as (1)/(2)
(ALBM –/+) on the unit.
wg Number buttons
To receive stored stations (press); store
stations (press and hold).
*1 When a Bluetooth audio device (supports AVRCP
of Bluetooth technology) is connected. Depending
on the device, certain operations may not be
available.
*2 When an MP3/WMA is played.
*3 When playing back on this unit.
Note
If the unit is turned off and the display disappears, it
cannot be operated with the card remote commander
unless (SOURCE) on the unit is pressed, or a disc is
inserted to activate the unit first.
Tip
For details on how to replace the battery, see
“Replacing the lithium battery of the card remote
commander” on page 19.
10
CD
Display items
*1 Album number is displayed only when the album is
changed.
*2 When playing an MP3, ID3 tag is displayed, and
when playing a WMA, WMA tag is displayed.
To change display items, press (DSPL); scroll
display items, press (SCRL) or setA.SCRL-
ON” (page 15).
Tip
Displayed items will differ, depending on the disc type,
recorded format and settings. For details on MP3/
WMA, see page 17.
Repeat and shuffle play
1 During playback, press (3) (REP) or
(4) (SHUF) repeatedly until the
desired setting appears.
* When an MP3/WMA is played.
To return to normal play mode, select “ OFF”
or “SHUF OFF.
Radio
Storing and receiving stations
Caution
When tuning in stations while driving, use Best
Tuning Memory (BTM) to prevent an accident.
Storing automatically — BTM
1 Press (SOURCE) repeatedly until
“TUNER” appears.
To change the band, press (MODE)
repeatedly. You can select from FM1, FM2,
FM3, MW, SW1 or SW2.
2 Press and hold (BTM) until “BTM”
flashes.
The unit stores stations in order of frequency
on the number buttons.
A beep sounds when the setting is stored.
Storing by the setup menu
1 After step 1 above, press and hold the select
button.
The setup display appears.
2 Press the select button repeatedly until “BTM
appears.
3 Press (SEEK) +.
Storing manually
1 While receiving the station that you
want to store, press and hold a
number button ((1) to (6)) until
“MEMORY” appears.
The number button indication appears in the
display.
Note
If you try to store another station on the same number
button, the previously stored station will be replaced.
Receiving the stored stations
1 Select the band, then press a number
button ((1) to (6)).
Select To play
TRACK track repeatedly.
ALBUM* album repeatedly.
SHUF ALBUM* album in random order.
SHUF DISC disc in random order.
Track number/Elapsed playing time, Disc/
artist name, Album number*
1
, Album
name, Track name, Text information*
2
,
Clock
11
Tuning automatically
1 Select the band, then press (SEEK) –/+
to search for the station.
Scanning stops when the unit receives a
station. Repeat this procedure until the
desired station is received.
Tip
If you know the frequency of the station you want to
listen to, press and hold (SEEK) /+ to locate the
approximate frequency, then press (SEEK) /+
repeatedly to fine adjust to the desired frequency
(manual tuning).
Bluetooth function
Bluetooth operations
To use the Bluetooth function, the following
procedure is necessary.
1 Pairing:
When connecting Bluetooth devices for the
first time, mutual registration is required. This
is called “pairing.” This registration (pairing)
is required only for the first time, as this unit
and the other devices will recognize each
other automatically from the next time. You
can pair up to 8 devices. (Depending on the
device, you may need to input a passcode for
each connection.)
2 Connection
Sometimes pairing allows to connect
automatically. To use the device after pairing
is made, start the connection.
3 Handsfree talk/Music streaming
You can call a cellular phone and listen to
music when the connection is made.
Pairing
First, register (“pair”) a Bluetooth device
(cellular phone, etc.) and this unit with each
other. You can pair up to 8 devices. Once pairing
is established, there is no need for pairing again.
1 Press (OFF).
Be sure the clock or the demonstration
appears.
The Auto off function is set, if the unit is
turned off and the display disappears, press
and hold (OFF) to set the power on.
2 Place the Bluetooth device within 1 m
(3 ft) of this unit.
3 Press and hold (EQ/BLUETOOTH) until
” flashes (about 7 seconds).
The unit enters pairing standby mode.
continue to next page t
flashing
12
4 Set the Bluetooth device to search for
this unit.
A list of detected devices appears in the
display of the connecting device. This unit is
displayed as “XPLOD” on the connecting
device.
5 If Passcode* input is required on the
display of a connecting device, input
“0000.
This unit and the Bluetooth device memorize
each other’s information, and when pairing is
made, the unit is ready for connection to the
device.
” flashes and then stays lit after pairing is
complete.
6 Set the Bluetooth device to connect to
this unit.
” or “ ” appears when the connection is
made.
* Passcode may be called “passkey,” “PIN code,” “PIN
number” or “Password,etc., depending on the
device.
Note
Pairing standby mode is not released until the
connection is made.
About Bluetooth icons
The following icons are used by this unit.
Connection
If pairing has already been achieved, start
operation from here.
To switch the Bluetooth signal
output of this unit to on
To use the Bluetooth function, switch the
Bluetooth signal output of this unit to on.
1 While the unit is turned off, press and
hold (EQ/BLUETOOTH) until “ ” lights
(about 3 seconds).
Bluetooth signal is switched to on.
Connecting a cellular phone
1 Be sure that both this unit and a
cellular phone are switched to
Bluetooth signal on.
2 Connect to this unit using your
cellular phone.
”appears when the connection is made.
XXXXXXX
DR-BT30Q
XPLOD
XXXX
Input passcode.
“0000”
lit:
flashing:
off:
Bluetooth signal on
Pairing standby mode
Bluetooth signal off
lit:
flashing:
off:
Connection successful
Connecting
No connection
lit:
flashing:
off:
Connection successful
Connecting
No connection
13
Connecting the last-connected
cellular phone from this unit
1 Be sure that both this unit and the cellular
phone are switched to Bluetooth signal on.
2 Press (SOURCE) repeatedly until “BT
PHONE” appears.
3 Press (handsfree).
” flashes while the connection is being
made. And then “ ” stays lit when the
connection is made.
Note
While streaming Bluetooth audio, you cannot connect
from this unit to the cellular phone. Connect from the
cellular phone to this unit instead. A connecting noise
may be heard over playback sound.
Tip
With Bluetooth signal on: when the ignition is switched
to on, this unit reconnects automatically to the last-
connected cellular phone. But automatic connection
also depends on the cellular phone’s specification. If
this unit does not reconnect automatically, connect
manually.
Connecting an audio device
1 Be sure that both this unit and the
audio device are switched to
Bluetooth signal on.
2 Connect to this unit using the audio
device.
” appears when the connection is made.
Connecting the last connected audio
device from this unit
1 Be sure that both this unit and the audio device
are switched to Bluetooth signal on.
2 Press (SOURCE) repeatedly until “BT
AUDIO” appears.
3 Press (6).
” flashes while the connection is being
made. And then “ ” stays lit when the
connection is made.
Handsfree talk
Receiving calls
When receiving a call, a ring tone is output from
your car speakers. Check that the unit and
cellular phone are connected beforehand.
1 Press (handsfree) when a call is
received with a ring tone.
The phone call starts.
To end a call
Press (handsfree) again.
To reject an incoming call, press and hold
(handsfree) for 2 seconds.
Note
The microphone of this unit is located on the rear of
the front panel (page 9). Do not cover the microphone
with tape, etc.
Making calls
In the case of making calls from this unit, only
redial is used.
1 Press (SOURCE) repeatedly until “BT
PHONE” appears.
2 Press and hold (handsfree) for 3
seconds or more.
The phone call starts.
To end a call
Press (handsfree) again.
To call another phone, use your cellular phone,
and then transfer the call.
For call transfer details, check the following.
Call transfer
In order to activate/deactivate the appropriate
device (this unit/cellular phone), check the
following.
1 Press and hold (handsfree) or use
your cellular phone.
For details on cellular phone operation, refer to
your cellular phone manual.
Note
Depending on the cellular phone, handsfree
connection may be cut off when call transfer is
attempted.
14
Music streaming
Listening to music from an audio
device
You can listen to music of an audio device on this
unit if the audio device supports A2DP
(Advanced Audio Distribution Profile) of
Bluetooth technology.
1 Turn down the volume on this unit.
2 Press (SOURCE) repeatedly until “BT
AUDIO” appears.
3 Operate the audio device to start
playback.
4 Adjust the volume on this unit.
Adjusting the volume level
The volume level is adjustable for any difference
between the unit and the Bluetooth audio device.
1 Start playback of the Bluetooth audio device at
a moderate volume.
2 Set your usual listening volume on the unit.
3 Press the select button repeatedly until “BT
AU” appears, and rotate the volume control
dial to adjust the input level (–8 dB to +18
dB).
Operating an audio device with this
unit
You can perform the following operations on this
unit if the audio device supports AVRCP (Audio
Video Remote Control Profile) of Bluetooth
technology. (The operation differs depending on
the audio device.)
* Depending on the device, it may be necessary to
press twice.
Operations other than the above should be
performed on the audio device.
Note
Even if the source is changed on this unit, playback of
the audio device does not stop.
Tip
You can connect a cellular phone that supports A2DP
(Advanced Audio Distribution Profile) as an audio
device and listen to music.
Deleting registration of all
paired devices
1 Press (OFF).
This unit is turned off.
2 If “ ” lights, press and hold
(EQ/ BLUETOOTH) until “ ” turns off.
3 Press and hold the select button.
4 Press the select button repeatedly
until “BT INIT” appears.
5 Press (SEEK) +.
Initializing starts.
It takes 8 seconds to cancel all registration.
Do not turn off the power while “INITIAL” is
flashing.
To Press
Play (6) (PAUSE) on this unit.
Pause (6) (PAUSE)* on this unit.
Skip tracks SEEK –/+ (
./>) [once for
each track]
15
Other functions
Changing the sound settings
Adjusting the balance and fader
— BAL/FAD
1 Press the select button repeatedly
until “BAL” or “FAD” appears.
The item changes as follows:
LOW*
1
t HI*
1
t BAL (left-right) t
FAD (front-rear) t AUX*
2
t BT AU*
3
*1 When EQ lite is activated (page 15).
*2 When AUX source is activated (page 16).
*3 When Bluetooth audio source is activated.
(page 14)
2 Rotate the select button to adjust the
selected item.
After 3 seconds, the setting is complete and
the display returns to normal play/reception
mode.
With the card remote commander
In step 2, to adjust the selected item, press <, M, ,
or m.
Customizing the equalizer curve
— EQ lite
“CUSTOM” of EQ lite allows you to make your
own equalizer settings.
1 Select a source, then press (EQ)
repeatedly to select “CUSTOM.
2 Press the select button repeatedly
until “LOW” or “HI” appears.
3 Rotate the select button to adjust the
selected item.
The volume level is adjustable in 1 dB steps,
from –10 dB to +10 dB.
Repeat steps 2 and 3 to adjust the equalizer
curve.
To restore the factory-set equalizer curve,
press and hold the select button before the
setting is complete.
After 3 seconds, the setting is complete and
the display returns to normal play/reception
mode.
Tip
Other equalizer types are also adjustable.
With the card remote commander
In step 3, to adjust the selected item, press <, M, ,
or m.
Adjusting setup items — SET
1 Press and hold the select button.
The setup display appears.
2 Press the select button repeatedly
until the desired item appears.
3 Rotate the select button to select the
setting (example “ON” or “OFF”).
4 Press and hold the select button.
The setup is complete and the display returns
to normal play/reception mode.
Note
Displayed items will differ, depending on the source
and setting.
With the card remote commander
In step 3, to select the setting, press < or ,.
The following items can be set (follow the page
reference for details):
z” indicates the default settings.
CLOCK-ADJ (Clock Adjust) (page 6)
BEEP
To set “BEEP-ON” (z) or “BEEP-OFF.
AUX-A*
1
(AUX Audio)
To turn the AUX source display “AUX-A-ON”
(
z) or “AUX-A-OFF” (page 16).
A.OFF (Auto Off)
To shut off automatically after a desired time
when the unit is turned off: “A.OFF-NO” (
z),
A.OFF-30S (Seconds),” “A.OFF-30M
(Minutes)” or “A.OFF-60M (Minutes).
B.OUT (Black Out)
To turn off the illumination automatically for
any source (for example, during CD playback/
radio reception, etc.).
“B.OUT-ON”*
2
: to turn off the illumination if
no operation is performed for 5 seconds.
“B.OUT-OFF” (
z): to deactivate the Black Out
function.
To bring the light back on, press any button.
DEMO*
1
(Demonstration)
To set “DEMO-ON” (z) or “DEMO-OFF.
DIM (Dimmer)
To change the brightness of the display.
“DIM-ON”: to dim the display.
“DIM-OFF” (
z): to deactivate the dimmer.
A.SCRL (Auto Scroll)
To scroll long displayed item automatically
when the album/track is changed.
A.SCRL-ON” (
z): to scroll.
A.SCRL-OFF”: to not scroll.
continue to next page t
16
Using optional equipment
Auxiliary audio equipment
By connecting an optional portable audio device
to the AUX input jack (stereo mini jack) on the
unit and then simply selecting the source, you
can listen on your car speakers. The volume level
is adjustable for any difference between the unit
and the portable audio device. Follow the
procedure below:
Connecting the portable audio
device
1 Turn off the portable audio device.
2 Turn down the volume on the unit.
3 Connect to the unit.
* Be sure to use a straight type plug.
Adjusting the volume level
Be sure to adjust the volume for each connected
audio device before playback.
1 Turn down the volume on the unit.
2 Press (SOURCE) repeatedly until “AUX”
appears.
“FRONT IN” appears.
3 Start playback of the portable audio device at a
moderate volume.
4 Set your usual listening volume on the unit.
5 Press the select button repeatedly untilAUX”
appears, and rotate the volume control dial to
adjust the input level (–8 dB to +18 dB).
LOCAL (Local Seek Mode)
LOCAL-ON” : to only tune into stations with
stronger signals.
“LOCAL-OFF” (
z): to tune normal reception.
MONO (Monaural Mode)*
3
To improve poor FM reception, select monaural
reception mode.
MONO-ON” : to hear stereo broadcast in
monaural.
MONO-OFF” (
z): to hear stereo broadcast in
stereo.
LOUD (Loudness)
To allow you to listen clearly at low volume
levels.
LOUD-ON” : to reinforce bass and treble.
“LOUD-OFF” (
z): to not reinforce bass and
treble.
BTM (page 10)
BT INIT*
1
(page 14)
*1 When the unit is turned off.
*2 When the black out function is activated, the unit
cannot be operated with the card remote
commander.
*3 When FM is received.
AUX
AUX
Connecting cord*
(not supplied)
17
Additional Information
Precautions
If your car has been parked in direct sunlight,
allow the unit to cool off before operating it.
Power antenna (aerial) will extend automatically
while the unit is operating.
Moisture condensation
On a rainy day or in a very damp area, moisture
condensation may occur inside the lenses and
display of the unit. Should this occur, the unit will
not operate properly. In such a case, remove the disc
and wait for about an hour until the moisture has
evaporated.
To maintain high sound quality
Be careful not to splash juice or other soft drinks
onto the unit or discs.
Notes on discs
To keep a disc clean, do not touch its surface.
Handle the disc by its edge.
Keep your discs in their cases or disc magazines
when not in use.
Do not subject discs to heat/high temperature.
Avoid leaving them in a parked car or on a
dashboard/rear tray.
Do not attach labels, or use discs with sticky ink/
residue. Such discs may stop spinning when used,
causing a malfunction, or may ruin the disc.
Do not use any discs with labels or stickers
attached.
The following malfunctions may result from using
such discs:
Inability to eject a disc (due to a label or sticker
peeling off and jamming the eject mechanism).
Inability to read audio data correctly (e.g.,
playback skipping, or no playback) due to heat
shrinking of a sticker or label causing a disc to
warp.
Discs with non-standard shapes (e.g., heart,
square, star) cannot be played on this unit.
Attempting to do so may damage the unit. Do not
use such discs.
You cannot play 8 cm (3
1
/4 in) CDs.
Before playing, clean the discs
with a commercially available
cleaning cloth. Wipe each disc
from the center out. Do not use
solvents such as benzine,
thinner, commercially available
cleaners, or antistatic spray
intended for analog discs.
Notes on CD-R/CD-RW discs
Some CD-Rs/CD-RWs (depending on the
equipment used for its recording or the condition
of the disc) may not play on this unit.
You cannot play a CD-R/a CD-RW that is not
finalized.
Music discs encoded with copyright
protection technologies
This product is designed to play back discs that
conform to the Compact Disc (CD) standard.
Recently, various music discs encoded with
copyright protection technologies are marketed by
some record companies. Please be aware that among
those discs, there are some that do not conform to
the CD standard and may not be playable by this
product.
About MP3/WMA files
MP3, which stands for MPEG-1 Audio Layer-3, is a
music file compression format standard. It
compresses audio CD data to approximately 1/10 of
its original size.
WMA, which stands for Windows Media Audio, is
another music file compression format standard. It
compresses audio CD data to approximately 1/22*
of its original size.
* only for 64 kbps
The unit is compatible with the ISO 9660 level 1/
level 2 format, Joliet/Romeo in the expansion
format, and Multi Session.
The maximum number of:
– folders (albums): 150 (including root and empty
folders).
MP3/WMA files (tracks) and folders contained
in a disc: 300 (if a folder/file names contain
many characters, this number may become less
than 300).
displayable characters for a folder/file name is
32 (Joliet), or 64 (Romeo).
continue to next page t
Note on DualDiscs
A DualDisc is a two sided disc product which
mates DVD recorded material on one side with
digital audio material on the other side. However,
since the audio material side does not conform to
the Compact Disc (CD) standard, playback on this
product is not guaranteed.
18
ID3 tag versions 1.0, 1.1, 2.2, 2.3 and 2.4 apply to
MP3 only. ID3 tag is 15/30 characters (1.0 and
1.1), or 63/126 characters (2.2, 2.3 and 2.4).
WMA tag is 63 characters.
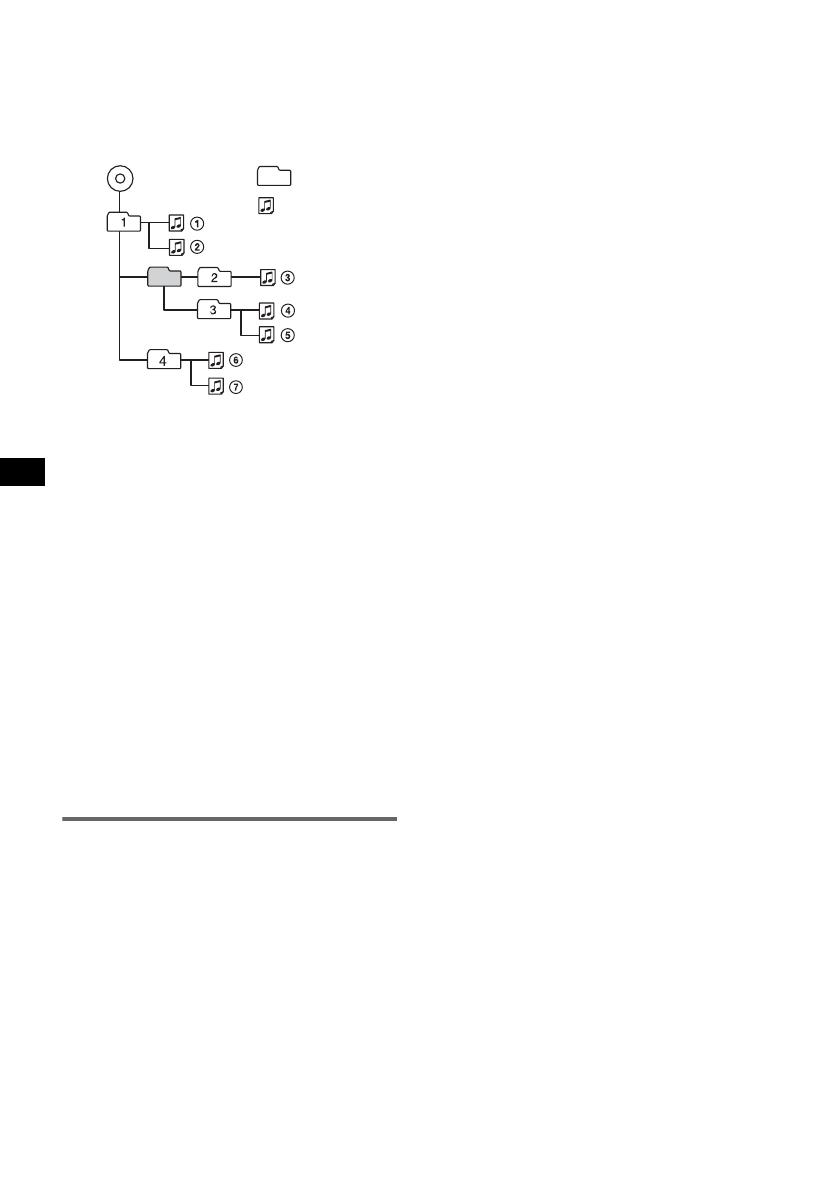
Playback order of MP3/WMA files
Notes
When naming an MP3 file/WMA file, be sure to add
the file extension “.mp3”/“.wma” to the file name.
During playback of a VBR (variable bit rate) MP3/
WMA file or fast-forward/reverse, elapsed playing
time may not display accurately.
When the disc is recorded in Multi Session, only the
first track of the first session format is recognized
and played (any other format is skipped). The
priority of the format is CD-DA and MP3/WMA.
– When the first track is a CD-DA, only CD-DA of the
first session is played.
– When the first track is not a CD-DA, an MP3/WMA
session is played. If the disc has no data in any of
these formats, “NO MUSIC” is displayed.
Notes on MP3
Be sure to finalize the disc before using on the unit.
If you play a high-bit-rate MP3, such as 320 kbps,
sound may be intermittent.
Notes on WMA
Files made with lossless compression are not
playable.
Files protected by copyright are not playable.
About Bluetooth function
What is Bluetooth technology?
Bluetooth wireless technology is a short-range
wireless technology that enables wireless data
communication between digital devices, such as a
cellular phone and a headset. Bluetooth wireless
technology operates within a range of about 10 m
(about 33 feet). Connecting two devices is
common, but some devices can be connected to
multiple devices at the same time.
You do not need to use a cable for connection
since Bluetooth technology is a wireless
technology, neither is it necessary for the devices
to face one another, such is the case with infrared
technology. For example, you can use such a
device in a bag or pocket.
Bluetooth technology is an international standard
supported by millions of companies all over the
world, and employed by various companies
worldwide.
On Bluetooth communication
Bluetooth wireless technology operates within a
range of about 10 m.
Maximum communication range may vary
depending on obstacles (person, metal, wall, etc.)
or electromagnetic environment.
The following conditions may affect the
sensitivity of Bluetooth communication.
There is an obstacle such as a person, metal, or
wall between this unit and Bluetooth device.
– A device using 2.4 GHz frequency, such as a
wireless LAN device, cordless telephone, or
microwave oven, is in use near this unit.
Because Bluetooth devices and wireless LAN
(IEEE802.11b/g) use the same frequency,
microwave interference may occur and resulting in
communication speed deterioration, noise, or
invalid connection if this unit is used near a
wireless LAN device. In such as case, perform the
following.
– Use this unit at least 10 m away from the
wireless LAN device.
– If this unit is used within 10 m of a wireless
LAN device, turn off the wireless LAN device.
– Install this unit and Bluetooth device as near to
each other as possible.
Microwaves emitting from a Bluetooth device may
affect the operation of electronic medical devices.
Turn off this unit and other Bluetooth devices in
the following locations, as it may cause an
accident.
where inflammable gas is present, in a hospital,
train, airplane, or a petrol station
near automatic doors or a fire alarm
This unit supports security capabilities that
comply with the Bluetooth standard to provide a
secure connection when the Bluetooth wireless
technology is used, but security may not be
enough depending on the setting. Be careful when
communicating using Bluetooth wireless
technology.
We do not take any responsibility for the leakage
of information during Bluetooth communication.
Connection with all Bluetooth devices cannot be
guaranteed.
– A device featuring Bluetooth function is
required to conform to the Bluetooth standard
specified by Bluetooth SIG, and be
authenticated.
– Even if the connected device conforms to the
above mentioned Bluetooth standard, some
devices may not be connected or work correctly,
depending on the features or specifications of the
device.
– While talking on the phone hands free, noise
may occur, depending on the device or
communication environment.
Depending on the device to be connected, it may
require some time to start communication.
Folder
(album)
MP3/WMA file
(track)
MP3/WMA
19
Others
Using the Bluetooth device may not function on
cellular phones, depending on radio wave
conditions and location where the equipment is
being used.
If you experience discomfort after using the
Bluetooth device, stop using the Bluetooth device
immediately. Should any problem persist, consult
your nearest Sony dealer.
If you have any questions or problems concerning
your unit that are not covered in this manual, consult
your nearest Sony dealer.
Maintenance
Replacing the lithium battery of the
card remote commander
Under normal conditions, the battery will last
approximately 1 year. (The service life may be
shorter, depending on the conditions of use.)
When the battery becomes weak, the range of the
card remote commander becomes shorter.
Replace the battery with a new CR2025 lithium
battery. Use of any other battery may present a
risk of fire or explosion.
Notes on the lithium battery
Keep the lithium battery out of the reach of children.
Should the battery be swallowed, immediately
consult a doctor.
Wipe the battery with a dry cloth to assure a good
contact.
Be sure to observe the correct polarity when
installing the battery.
Do not hold the battery with metallic tweezers,
otherwise a short-circuit may occur.
Fuse replacement
When replacing the fuse, be
sure to use one matching the
amperage rating stated on the
original fuse. If the fuse blows,
check the power connection and
replace the fuse. If the fuse
blows again after replacement,
there may be an internal
malfunction. In such a case,
consult your nearest Sony
dealer.
Cleaning the connectors
The unit may not function properly if the connectors
between the unit and the front panel are not clean. In
order to prevent this, detach the front panel (page 6)
and clean the connectors with a cotton swab. Do not
apply too much force. Otherwise, the connectors
may be damaged.
Notes
For safety, turn off the ignition before cleaning the
connectors, and remove the key from the ignition
switch.
Never touch the connectors directly with your fingers
or with any metal device.
Removing the unit
1 Remove the protection collar.
1 Detach the front panel (page 6).
2 Engage the release keys together with the
protection collar.
1
2
+ side up
c
WARNING
Battery may explode if mistreated.
Do not recharge, disassemble, or dispose of
in fire.
continue to next page t
Fuse (10A)
Main unit Back of the front
panel
Orient the release
keys as shown.
20
3 Pull out the release keys to remove the
protection collar.
2 Remove the unit.
1 Insert both release keys simultaneously
until they click.
2 Pull the release keys to unseat the unit.
3 Slide the unit out of the mounting.
Specifications
CD Player section
Signal-to-noise ratio: 95 dB
Frequency response: 10 – 20,000 Hz
Wow and flutter: Below measurable limit
Tuner section
FM
Tuning range:
87.5 – 108.0 MHz (at 50 kHz step)
87.5 – 107.9 MHz (at 200 kHz step)
FM tuning interval: 50 kHz/200 kHz switchable
Antenna (aerial) terminal:
External antenna (aerial) connector
Intermediate frequency: 10.7 MHz/450 kHz
Usable sensitivity: 9 dBf
Selectivity: 75 dB at 400 kHz
Signal-to-noise ratio: 67 dB (stereo), 69 dB (mono)
Harmonic distortion at 1 kHz: 0.5 % (stereo),
0.3 % (mono)
Separation: 35 dB at 1 kHz
Frequency response: 30 – 15,000 Hz
MW
Tuning range:
531 – 1,602 kHz (at 9 kHz step)
530 – 1,710 kHz (at 10 kHz step)
MW tuning interval: 9kHz/10kHz switchable
Antenna (aerial) terminal:
External antenna (aerial) connector
Intermediate frequency: 10.7 MHz/450 kHz
Sensitivity: 30 µV
SW
Tuning range:
SW1: 2,940 – 7,735 kHz
SW2: 9,500 – 18,135 kHz
(except for 10,140 – 11,575 kHz)
Antenna (aerial) terminal:
External antenna (aerial) connector
Intermediate frequency: 10.7 MHz/450 kHz
Sensitivity: 30 µV
Wireless Communication
Communication System:
Bluetooth Standard version 2.0
Output:
Bluetooth Standard Power Class 2 (Max. +4 dBm)
Maximum communication range:
Line of sight approx. 10 m (32.8 ft)*
1
Frequency band:
2.4 GHz band (2.4000 – 2.4835 GHz)
Modulation method: FHSS
Compatible Bluetooth Profiles*
2
:
A2DP (Advanced Audio Distribution Profile)
AVRCP (Audio Video Remote Control Profile)
HFP (Handsfree Profile) 1.0
HSP (Headset Profile)
*1 The actual range will vary depending on factors
such as obstacles between devices, magnetic
fields around a microwave oven, static electricity,
reception sensitivity, antenna's perfomance,
operating system, software application, etc.
*2 Bluetooth standard profiles indicate the purpose of
Bluetooth communication between devices.
Power amplifier section
Outputs: Speaker outputs (sure seal connectors)
Speaker impedance: 4 – 8 ohms
Maximum power output: 52 W × 4 (at 4 ohms)
General
Output:
Power antenna (aerial) relay control terminal
Inputs:
Antenna (aerial) input terminal
AUX input jack (stereo mini jack)
Tone controls:
Low: ±10 dB at 100 Hz (XPLOD)
High: ±10 dB at 10 kHz (XPLOD)
Loudness:
+ 9 dB at 100 Hz
+ 5 dB at 10 kHz
Power requirements: 12 V DC car battery
(negative ground (earth))
Dimensions: Approx. 178 × 50 × 179 mm
(7
1
/8 × 2 × 7
1
/8 in) (w/h/d)
Mounting dimensions: Approx. 182 × 53 × 162 mm
(7
1
/4 × 2
1
/8 × 6
1
/2 in) (w/h/d)
Hook facing
inwards.
  • Page 1 1
  • Page 2 2
  • Page 3 3
  • Page 4 4
  • Page 5 5
  • Page 6 6
  • Page 7 7
  • Page 8 8
  • Page 9 9
  • Page 10 10
  • Page 11 11
  • Page 12 12
  • Page 13 13
  • Page 14 14
  • Page 15 15
  • Page 16 16
  • Page 17 17
  • Page 18 18
  • Page 19 19
  • Page 20 20
  • Page 21 21
  • Page 22 22
  • Page 23 23
  • Page 24 24
  • Page 25 25
  • Page 26 26
  • Page 27 27
  • Page 28 28
  • Page 29 29
  • Page 30 30
  • Page 31 31
  • Page 32 32
  • Page 33 33
  • Page 34 34
  • Page 35 35
  • Page 36 36
  • Page 37 37
  • Page 38 38
  • Page 39 39
  • Page 40 40
  • Page 41 41
  • Page 42 42
  • Page 43 43
  • Page 44 44
  • Page 45 45
  • Page 46 46
  • Page 47 47
  • Page 48 48
  • Page 49 49
  • Page 50 50
  • Page 51 51
  • Page 52 52
  • Page 53 53
  • Page 54 54
  • Page 55 55
  • Page 56 56
  • Page 57 57
  • Page 58 58
  • Page 59 59
  • Page 60 60
  • Page 61 61
  • Page 62 62
  • Page 63 63
  • Page 64 64
  • Page 65 65
  • Page 66 66
  • Page 67 67
  • Page 68 68

Sony MEX-BT2500 User manual

Category
Bluetooth music receivers
Type
User manual
This manual is also suitable for

Ask a question and I''ll find the answer in the document

Finding information in a document is now easier with AI

in other languages