Page is loading ...
Page is loading ...

2
J
A
H
R
E
G
A
R
A
N
T
I
E
•
2
Y
E
A
R
S
W
A
R
R
A
N
T
Y
•
2
A
N
N
É
E
S
D
E
G
A
R
A
N
T
I
E
•
2
2
3
5
66
11
13
17
18
9
4
Page is loading ...
Page is loading ...
Page is loading ...
Page is loading ...
Page is loading ...

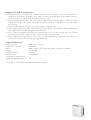
Congratulations! You have just acquired the exceptional Air Humidifier and
Airwasher «TOM». It will give you great pleasure and improve the indoor air
for you. As with all domestic electrical appliances, particular care is needed
with this model also, in order to avoid injury, fire damage or damage to the ap-
pliance. Please study these operating instructions carefully before using the
appliance for the first time and follow the safety advice on the appliance itself.
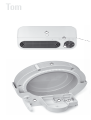
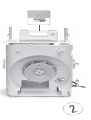
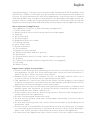
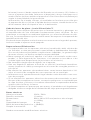
Description of Appliance
The appliance consists of the following components:
1. Lid of water tank
2. Water tank (6 litres) with integrated carrying handle
3. Tank lid
4. Air intake grill
5. Air outlet grill
6. Additional filter air intake
7. Floating switch
8. Ionic silver cube
9. Scent container
10. Disc packet
11. Motor for disc packet
12. Water container and disc packet
13. Ventilator
14. Control panel (on/off, mode, timer, speed, hygrostat)
15. Display
16. Front cover (fixed in place magnetically, not mapped)
17. Housing
18. Mains cable
Important safety instructions
Please read through the operating instructions carefully before you use •
the appliance for the first time and keep them safely for later reference; if
necessary pass them on to the next owner.
Stadler Form refuses all liability for loss or damage which arises as a •
result of failure to follow these operating instructions.
The appliance is only to be used in the home for the purposes described •
in these instructions. Unauthorised use and technical modifications to the
appliance can lead to danger to life and health.
People who are not familiar with the operating instructions, children, and •
people under the influence of alcohol or drugs should be allowed to use
the humidifier only under supervision.
Only connect the cable to alternating current. Observe the voltage infor- •
mation given on the appliance.
Do not use damaged extension cords. •
Do not run the power cord over sharp edges and make sure that it does •
not get trapped.
Do not pull the plug from the socket with wet hands or by holding on to •
the power cord.
Do not use this air humidifier in immediate vicinity of a bath tub, a shower •
or a swimming pool (observe a minimum distance of 3 m). Place the appli-
ance such that a person in the bath tub cannot touch the appliance.
Do not place the appliance near a heat source. Do not subject the power •
English

cord to direct heat (such as a heated hotplate, open flames, hot iron sole
plates or heaters for example). Protect power cords from oil.
See to it that the appliance is properly positioned to ensure a high stability •
during its operation and make sure that no one can trip over the power cord.
The appliance is not splash-proof. •
Do not store or operate the appliance outdoors. •
Store the appliance in a dry place inaccessible to children (pack the ap- •
pliance).
Setting-Up/Operation
Place Tom at the desired position on a flat floor. Connect the mains cable 1.
(18) to a suitable plug socket.
Remove the lid of the water tank (1) and fill the water tank (2) with water 2.
up to the maximum mark (6 litres). Then place the tank in the appliance.
Important: please do not transport Tom as long as it is filled with water.
The water could run out of the inner tub.
Then set Tom up by pressing the control (14) in the middle (on/off). After-3.
wards, the display (15) should light up and the appliance should start. If the
red lamp in the display (15) lights up there is no water in the appliance.
The humidifying performance depends on the speed of the ventilator 4.
(13). You can choose between 4 power levels in manual op eration: press
the ventilator symbol on the control panel (14) in order to set the desired
power (low, medium, high, turbo).
In manual mode, the desired air humidity (40-75% and continuous op-5.
eration “Co”) can be selected: press the air humidity symbol (%) on the
control panel (14) and select the desired air humidity by pressing several
times (the % symbol flashes during input). A few seconds after input, the
display will once again show the current measured air humidity.
Info: If the appliance has achieved the desired air humidity, the appliance
stops and the air display flashes on the display (15). The air humidity of the
appliance is measured approx. every 30 minutes (the ventilator is allowed
to run for 1-2 minutes for this). If the measured air humidity falls below the
set value, the appliance begins to humidify again.
Mode “M”: the appliance has 3 different pre-programmed modes: clean, 6.
auto, sleep. The modes can be changed by pressing the “M” symbol on
the control panel (14).
Clean: this mode is ideal for cleaning and decalcifying the appliance. The
disc packet is driven, but the ventilator is not running and so no air is
blown into the room.
Auto mode: Tom keeps the air humidity automatically at 45%. The lower
the current air humidity, the higher the speed level at which the ventilator
is automatically set (e.g. below 35% - level III, from 35% to 40% - level II,
from 40% to 45% - level I).
Sleep mode: ideal when you want peace and quiet or during the night.
The illumination is reduced to a minimum and the appliance is set to an air
humidity of 45%. The speed of the ventilator (humidifying performance) is
always at the lowest level.
Timer: Tom has an off-switch timer (1-8h). To activate, tap on the time
symbol on the control panel (14), select the desired duration (1-8h or “Co”
for continuous operation) – if 1-8h is selected, the appliance switches
itself off after the set time.

You can use Tom to distribute scent in the room. We ask that you be ex-7.
tremely sparing with scents, as an excessively large dose can lead to
malfunctioning and damage to the appliance. To use scents, remove the
scent container (9) from the appliance and drip the scent directly into the
container. Put a maximum of 1-2 drops of the scent into the container.
Tip: if you would like to change the scent, remove the scent container
from the appliance, replace the absorbent cotton and clean the plastic
with soap. Now Tom is ready again to distribute another scent of your
choice in the room.
As soon as the light “no water” lights up in red in the display (15), more 8.
water must be added. For this, remove the water tank (2) and fill it with tap
water. After the tank is inserted, Tom automatically resumes operation a
few seconds afterwards.
If you would like to refill the water during operation, you can remove and 9.
fill up the water tank. The appliance will continue to function for approx.
10-15 minutes with the remaining water. If you put the water tank back
in again during this period, Tom can carry on functioning without inter-
ruption.
Cleaning
Before all maintenance and after every use, switch off the appliance and
remove the mains cable from the plug socket. Before you clean Tom, the
mains cable (18) must be unplugged.
Attention: Never dip the appliance in water (danger of short circuit).
For external cleaning, rub with a damp cloth and then dry thoroughly. •
For internal cleaning, remove the lid to the water tank (1) and the water •
tank (2). Then loosen the magnetically attached front cover (16) on the
sides, using both hands, and place to one side. The water container and
the disc packet (12) can now be pulled out (grip on the underside of the
container).
Clean the water container (12) and the water tank (2) every • 2 weeks.
Clean the container thoroughly using a brush. If there are lime-scale de-
posits, the container should be soaked with decalcifier and then rinsed
thoroughly. In order to clean the water tank, rinse it out with hot water.
If lime-scale deposits can be seen, you can also de-scale the water tank.
Rinse the water tank out with tap water and dry it afterwards.
Cleaning of the disc packet (10) approx. every • 4 weeks: remove the re-
maining water from the water container (12). Then pour in decalcifier (mix
ratio to water according to manufacturer’s instructions) up to the upper
edge of the float in the container (12). Seal the appliance again (tank must
not be inserted) and leave it running in “Clean” mode (see also point 6 in
setting up/operation) depending on the extent of the calcination.
Info: The ventilator does not run in “Clean” mode; only the disc packet (10)
is turned in the decalcifying fluid and thus ideally decalcified, without air
being blown into the room.
Ionic Silver Cube ™
The ionic silver cube (8) prevents the growth of germs and bacteria in the
humidifier due to the continuous release of silver ions. The use of an ionic
silver cube leads to a hygienic room climate. The lifetime of the ionic silver
cube is around one year. We therefore recommend that you replace the ionic

silver cube at the beginning of every humidifying season. The ionic silver
cube starts working as soon as it comes into contact with water, and also
works when the unit is switched off.
Repairs/disposal
Repairs to electrical appliances must only be carried out by a qualified •
electrical technician. If improper repairs are carried out, the guarantee
lapses and all liability is refused.
Never operate the appliance if the adaptor or plug is damaged, after it has •
malfunctioned, if it has been dropped or has been damaged in any other
way (cracks/breaks in the casing).
Do not push any object into the appliance. Do not disassemble the puri- •
fier.
If the appliance is beyond repair, make it unusable immediately and hand •
it in at the collection point provided for the purpose.
Do not dispose of electrical appliances in the domestic waste. Please use •
the communal collection points.
Ask your local authority if you do not know where the communal collec- •
tion points are located.
If electrical appliances are disposed of thoughtlessly, exposure to the ele- •
ments may cause hazardous substances to find their way into the ground-
water and from there into the food chain, or to poison the flora and fauna
for many years to come.
If you are replacing the appliance with a new one, the seller is legally •
obliged to take back the old one at least free of charge for disposal.
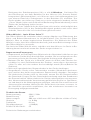
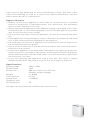
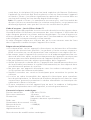
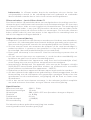
Specifications
Rated voltage 230V / 50Hz
Rated Power 19W
Dimensions 380 mm x 460 mm x 225 mm
(width x height x depth)
Weight ca. 8.8kg
Tank capacity 6 Liter
Sound level < 43dB(A)
Complies with
EU regulations CE
All rights for any technical modifications are reserved
Page is loading ...
Page is loading ...
Page is loading ...
Page is loading ...
Page is loading ...
Page is loading ...
Page is loading ...
Page is loading ...
Page is loading ...
Page is loading ...
Page is loading ...
Page is loading ...
Page is loading ...
Page is loading ...
Page is loading ...
Page is loading ...
Page is loading ...
Page is loading ...
Page is loading ...

www.stadlerform.ch
Thanks to all people involved in this project: Hong
Su-ju & Choung Jae seon for their engagement, ideas
and organisation, Yoon Jae-wook for the engineering,
development and CAD work, Lee Jae-phil for the timeless
design, Claudia Faganini for the photos and Matti Walker
for the graphic work.
Martin Stadler, CEO Stadler Form Aktiengesellschaft
-
 1
1
-
 2
2
-
 3
3
-
 4
4
-
 5
5
-
 6
6
-
 7
7
-
 8
8
-
 9
9
-
 10
10
-
 11
11
-
 12
12
-
 13
13
-
 14
14
-
 15
15
-
 16
16
-
 17
17
-
 18
18
-
 19
19
-
 20
20
-
 21
21
-
 22
22
-
 23
23
-
 24
24
-
 25
25
-
 26
26
-
 27
27
-
 28
28
-
 29
29
-
 30
30
-
 31
31
-
 32
32


Ask a question and I''ll find the answer in the document
Finding information in a document is now easier with AI
in other languages
- français: Stadler Form Tom Manuel utilisateur
- español: Stadler Form Tom Manual de usuario
- Deutsch: Stadler Form Tom Benutzerhandbuch
- Nederlands: Stadler Form Tom Handleiding
- dansk: Stadler Form Tom Brugermanual
Related papers
-
Stadler Form Robert Operating instructions
-
Stadler Form JACK User manual
-
Stadler Form Oskar big Operating instructions
-
Stadler Form O-020 Operating instructions
-
-
-
-
Stadler Form Anton Owner's manual
-
-
Other documents
-
Franke FKBSS Datasheet
-
-
-
-
Honeywell HTF090E Series Turbo on the Go User manual
-
Sonnenkönig Lufterfrischer Air Fresh 9 Operating instructions
-
Eurom 370874 User manual
-
 Pro Breeze PB-07-UK-FBA User manual
-
Boneco W2055D Owner's manual
-
 PR KLIMA TFN-114512.1 User manual

