Page is loading ...

Series 90LN — Aspiradora para
Líquidos/Sólidos
Para Uso Domestico y Empresarial
Series 90LN — Wet/Dry Vacuum
Household and Workshop Use
TO BEGIN/PARA COMENZAR
WARNING: REVIEW IMPORTANT SAFETY INSTRUCTIONS
BEFORE USE.
Check to make sure you have the following:
ADVERTENCIA: ANTES DE UTILIZAR EL ARTEFACTO, LEA CON
CUIDADO LAS IMPORTANTES INSTRUCCIONES DE SEGURI-
DAD.
Verifique para asegurarse de que tiene lo siguiente:
Questions? Visit Shop-Vac at www.shopvac.com or call (570) 326-3557. • Ante cualquier consulta, visite Shop-Vac en www.shopvac.com o llame al (570) 326-3557.
1
Phillips Screwdriver
Destomillador en cruz
Flathead Screwdriver
Destomillador plano
Safety Glasses
Anteojos de seguridad
7/16” Wrench or Socket
Llave de Tuercas O
Casquillo de 7/16”
5/16” Wrench or Socket
Llave de Tuercas O
Casquillo de 5/16”
Tools Required:
Herramientas Requeridas:
SHOP-VAC CORPORATION
2323 Reach Road, P.O. Box 3307, Williamsport, PA 17701-0307
(570) 326-3557
Web site: www.shopvac.com
Patents Issued and Pending
Printed in U.S.A.
Patentes expedidas y establecidas.
Impreso en E.U.A.
© 2005 Shop-Vac Corporation 87535-19

WARNING – ALWAYS DISCONNECT THE PLUG
FROM THE WALL OUTLET BEFORE REMOVING THE TANK
COVER.
DANGER!
Never operate this unit when flammable materials or
vapors are present because electrical devices produce
arcs or sparks that can cause a fire or explosion.
NEVER OPERATE UNATTENDED!
WARNING –
ALWAYS WEAR EYE PROTECTION TO
PREVENT ROCKS OR DEBRIS FROM BEING BLOWN OR RICO-
CHETING INTO THE EYES OR FACE WHICH CAN RESULT IN
SERIOUS INJURY.
This appliance must be grounded. If it should malfunction or breakdown, grounding provides a path
of least resistance for electric current to reduce the risk of electric shock. This appliance is
equipped with a cord having an equipment-grounding conductor and grounding plug. The plug must
be inserted into an appropriate outlet that is properly installed and grounded in accordance with all
local codes and ordinances.
WARNING – IMPROPER CONNECTION OF THE EQUIP-
MENT-GROUNDING CONDUCTOR CAN RESULT IN A RISK OF
ELECTRIC SHOCK. CHECK WITH A QUALIFIED ELECTRICIAN OR
SERVICE PERSON IF YOU ARE IN DOUBT AS TO WHETHER THE
OUTLET IS PROPERLY GROUNDED. DO NOT MODIFY THE PLUG
PROVIDED WITH THE APPLIANCE – IF IT WILL NOT FIT THE
OUTLET, HAVE A PROPER OUTLET INSTALLED BY A QUALIFIED
ELECTRICIAN.
This appliance is for use on a nominal 120-volt circuit, and has a grounded plug that looks like the
plug illustrated in sketch A. A temporary adapter that looks like the adapter illustrated in sketches
B and C may be used to connect this plug to a 2-pole receptacle as shown in sketch B if a properly
grounded outlet is not available. The temporary adapter should be used only until a properly ground-
ed outlet (sketch A) can be installed by a qualified electrician. The green colored rigid ear, lug or the
like extending from the adapter must be connected to a permanent ground such as a properly ground-
ed outlet box cover. Whenever the adapter is used, it must be held in place by a metal screw.
NOTE: IN CANADA, THE USE OF A TEMPORARY
ADAPTER IS NOT PERMITTED BY THE CANADIAN
ELECTRICAL CODE.
When using the appliance at a distance where an extension cord becomes necessary, a 3-conduc-
tor grounding cord of adequate size must be used for safety, and to prevent loss of power and
overheating. Use the table below to
determine A.W.G. wire size required. To
determine ampere rating of your
vacuum, refer to nameplate located on
rear of motor cover.
Before using appliance, inspect power
cord for loose or exposed wires and
damaged insulation. Make any needed
repairs or replacements before using
your appliance. Use only three-wire
outdoor extension cords which have three-prong grounding-type plugs and three-pole receptacles
which accept the extension cord’s plug. When vacuuming liquids, be sure the extension cord
connection does not come in contact with the liquid.
NOTE: STATIC SHOCKS ARE COMMON IN DRY AREAS OR WHEN THE RELATIVE HUMIDITY OF THE
AIR IS LOW. THIS IS ONLY TEMPORARY AND DOES NOT AFFECT THE USE OF THE APPLIANCE. TO
REDUCE THE FREQUENCY OF STATIC SHOCKS IN YOUR HOME, THE BEST REMEDY IS TO ADD
MOISTURE TO THE AIR WITH A CONSOLE OR INSTALLED HUMIDIFIER.
Volts
Total length of cord in feet
120V
Ampere Rating
More Not More
Than Than
0-6
6-10
10-12
12-16
25 50 100
150
AWG
18
18
16
14
16
16
16
12
16
14
14
14
12
12
Not recommended
bag in place. These are very fine particles that may pass through the foam and affect the
performance of the motor or be exhausted back into the air. Additional collection filter bags are
available (see enclosed order form).
19. Do not leave the cord lying on the floor once you have finished the cleaning job. It can become
a tripping hazard.
20. Use special care when emptying heavily loaded tanks.
21. To avoid spontaneous combustion, empty tank after each use.
22. The operation of a utility vac can result in foreign objects being blown into eyes, which can
result in eye damage. Always wear safety goggles when operating vacuum.
23. STAY ALERT. Watch what you are doing and use common sense. Do not use vacuum cleaner
when you are tired, distracted or under the influence of drugs, alcohol or medication causing
diminished control.
Series 90LN — Wet/Dry Vacuum
Household and Workshop Use
ATTENTION!
Read all safety rules carefully before attempting to oper-
ate. Retain for future reference.
SAVE THESE INSTRUCTIONS
IMPORTANT SAFETY INSTRUCTIONS
When using an electrical appliance, basic precautions should always be
followed, including the following: READ ALL INSTRUCTIONS BEFORE USING THIS
APPLIANCE.
WARNING – TO REDUCE THE RISK OF FIRE,
ELECTRIC SHOCK OR INJURY:
1. Do not leave appliance when plugged in. Unplug from outlet when not in use and before
servicing. Connect to a properly grounded outlet only. See Grounding Instructions.
2. Do not expose to rain – store indoors.
3. Do not allow to be used as a toy. Close attention is necessary when used by or near
children.
4. Use only as described in this manual. Use only Manufacturer’s recommended
attachments.
5. Do not use with damaged cord or plug. If appliance is not working as it should, has been
dropped, damaged, left outdoors or dropped into water, return to Shop-Vac Corporation.
6. Do Not: pull or carry by cord, use cord as a handle, close a door on cord or pull cord around
sharp edges or corners. Do not run appliance over cord. Keep cord away from heated
surfaces.
7. Do not unplug by pulling on cord. To unplug, grasp the plug; not the cord.
8. Do not handle plug or appliance with wet hands.
9. Do not put any object into openings. Do not use with any openings blocked; keep free of dust,
lint, hair and anything that may reduce air flow.
10. Keep hair, loose clothing, fingers and all parts of body away from openings and moving parts.
11. Do not pick up anything that is burning or smoking, such as cigarettes, matches or hot ashes.
12. Do not use without dust bag and/or filters in place.
13. Turn off all controls before unplugging.
14. Use extra care when cleaning on stairs.
15. Do not use to pick up flammable or combustible liquids such as gasoline or use in areas
where they may be present.
16. Do not use your cleaner as a sprayer of flammable liquids such as oil base paints, lacquers,
household cleaners, etc.
17. Do not vacuum toxic, carcinogenic, combustible or other hazardous materials such as
asbestos, arsenic, barium, beryllium, lead, pesticides or other health endangering materials.
Specially designed units are available for these purposes.
18. Do not pick up soot, cement, plaster or drywall dust without cartridge filter and collection filter
GROUNDING INSTRUCTIONS
EXTENSION CORDS
Questions? Visit Shop-Vac at www.shopvac.com or call (570) 326-3557. • Ante cualquier consulta, visite Shop-Vac en www.shopvac.com o llame al (570) 326-3557.
2

Questions? Visit Shop-Vac at www.shopvac.com or call (570) 326-3557. • Ante cualquier consulta, visite Shop-Vac en www.shopvac.com o llame al (570) 326-3557.
4
1. Pull lid latches in an outward motion, remove tank
cover and any accessories that may have been
shipped in the tank.
2. Attach tool holder following the instructions and
illustrations in this manual.
3. Before replacing tank cover, refer to Filter
Installation or Wet Pick-Up Operation in this
manual to ensure you have the proper filters installed
for your cleaning operation.
4. Replace tank cover, and apply pressure with thumb to each latch until it
snaps tightly in place. Make sure all lid latches are clamped securely.
5. Insert machine hose end into inlet of tank. Twist slightly to tighten the con-
nection
((FFiigguurree AA))
.
6. Attach the extension wands to the accessory end of the hose. Twist slightly
to tighten the connection
((FFiigguurree AA))
.
7. Attach one of the cleaning accessories (depending on your cleaning
requirements) on the extension wands. Twist slightly to tighten the connection
((FFiigguurree AA))
.
8. Plug the cord into the wall outlet. Your cleaner is ready for use.
Green = ON, Red = OFF
NNOOTTEE::
Many more useful tools are available at your local dealer, website, or
the enclosed mail order form for direct purchase from Shop-Vac.
UNPACKING AND SET-UP /DESEMPAQUE Y MONTAJE
A
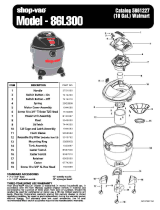
REAR WHEEL DOLLY,TOOL HOLDER AND FRONT CASTER DOLLY ASSEMBLY/
MONTAJE CARRETILLA FRONTAL, POSTERIOR Y PORTA-HERRAMIENTAS
You will find two casters
((FFiigguurree BB))
, two large rear wheels
((FFiigguurree CC))
, one axle
((FFiigguurree DD))
, one rear dolly
((FFiigguurree EE))
, two caster feet
((FFiigguurree FF))
, and four screws
& washers
((nnoott ppiiccttuurreedd))
with your wet/dry vacuum.
Su aspiradora para servicio húmedo/seco viene equipada con dos ruedas
((FFiigguurraa BB))
, dos grandes ruedas posteriores
((FFiigguurraa CC))
, un eje
((FFiigguurraa DD))
, un
carretilla posterior
((FFiigguurraa EE))
, dos bases
((FFiigguurraa FF))
, y cuatro tornillos y aran-
dela
((ssiinn iilluussttrraacciióónn))
con su aspiradora para líquidos/sólidos.
B C D E F
Assemble as follows:
9. With cord disconnected from receptacle and tank cover removed, turn tank
upside down so that the bottom is facing up.
Ensamble de la siguiente manera:
9. Con cable desconectado del tomacorriente y la cubierta del depósito
extraída, voltee el depósito de modo que el fondo quede mirando hacia
arriba.
10. Place axle upright on a
hard surface and hammer
on (1) cap nut. Place (1)
wheel on axle and slide
down to cap nut
((FFiigguurree 11))
.
Be sure flat side of wheel
hub is facing outward.
10. Coloque el eje en
forma vertical sobre una superficie dura y golpee
con un martillo sobre (1) la tuerca ciega. Coloque
(1) la rueda en el eje y deslícela hacia abajo en
dirección de la tuerrca ciega
((FFiigguurraa 11))
.
Asegúrese de que el lado plano del cubo de la
rueda está mirando hacia afuera.
11. Slide axle through holes
provided in dolly
((FFiigguurree 22))
.
11. Deslice el eje a través
de los orificios
suministrados en la
carretilla
((FFiigguurraa 22))
.
12. Slide remaining wheel
onto axle and hammer on
second cap nut
((FFiigguurree 33))
.
12. Deslice la parte resante
de la rueda en el eje y
golpee con un martillo en
la segunda tuerca ciega
((FFiigguurraa 33))
.
1 2 3
13. With a pair of scissors, trim the enclosed template to fit your size tank.
Sizes will be 11”, 14” or 16” diameters.
13. Con un par de tijeras, corte la plantilla que se adjunta para que se ajuste a
la medida del depósito. Las medidas serán 11”, 14” o 16” de diámetro.
1. Tire los seguros de la tapa hacia afuera y retire la cubierta del depósito y
cualquier accesorio que esté empacado con el depósito.
2. Acople el portaherramientas siguiendo las instrucciones e ilustraciones de
este manual.
3. Antes de volver a colocar la cubierta del depósito, remítase a Instalación
del Filtro u Operación de Aspiración de Líquidos en este.
4. Vuelva a colocar la cubierta del depósito y aplique presión con el pulgar
a cada seguro hasta que se trabe en su posición. Asegúrese de que ambos
seguros se sujeten apropiadamente.
5. Inserte el extremo de la manguera de la máquina dentro de la entrada de
la manguera. Tuerza ligeramente para apretar la conexión
((FFiigguurraa AA))
.
6. Acople las varillas de extensión al extremo del accesorio de la manguera.
Tuerza ligeramente para apretar la conexión
((FFiigguurraa AA))
.
7. Acople uno de los accesorios de limpieza (dependiendo de los requerim-
ientos de limpieza que tenga) a las varillas de extensión. Tuerza ligeramente
para apretar la conexión.
((FFiigguurraa AA))
8. Enchufe el cable al tomacorriente de pared. Su aspiradora está lista para
usarse.
VERDE = Encendido ROJO = Apagado
NNOOTTAA::
Existen muchas más herramientas útiles disponibles con su distribuidor
local, sitio en la web, o mediante el formulario de pedido por correo para
comprar directamente de Shop-Vac.

14. Once template is cut
out, place on bottom of
tank, align inlet arrow on
template with center of
inlet on tank
((FFiigguurree 44))
.
14. Una vez que se haya
cortado la plantilla,
colóquela sobre el fondo
del depósito, alinee la flecha de entrada en la
plantilla con el centro de la entrada del depósito
((FFiigguurraa 44))
.
15. Align cutouts in center
of rear dolly with bars on
template
((FFiigguurree 55))
.
15. Alinee los recortes en
el centro de la carretilla
posterior con barras en la
plantilla
((FFiigguurraa 55))
.
16. Place groove of rear
dolly over rim of tank and
push until the dolly is tight
against bottom of tank
((FFiigguurree 66))
.
16. Coloque la ranura de la
carretilla posterior sobre
el borde del depósito y
empuje hasta que la carretilla esté firme contra el
fondo del depósito
((FFiigguurraa 66))
.
Questions? Visit Shop-Vac at www.shopvac.com or call (570) 326-3557. • Ante cualquier consulta, visite Shop-Vac en www.shopvac.com o llame al (570) 326-3557.
5
INSTALLING FOAM SLEEVE AND REUSABLE DRY FILTER/
INSTALACIÓN DEL MANGUITO DE ESPUMA Y FILTRO PARA ASPIRACIÓN DE SÓLIDOS REUTILIZABLE
WARNING: ALWAYS DISCONNECT THE PLUG FROM THE WALL OUTLET
BEFORE REMOVING THE TANK COVER
ADVERTENCIA: SIEMPRE DESCONECTE EL ENCHUFE DEL TOMACORRI-
ENTE DE PARED ANTES DE RETIRAR LA CUBIERTA DEL DEPÓSITO.
(Not standard with all models)
(No es común a todos los modelos)
26. To pick up dust and dry material, you must install foam sleeve and reusable
dry filter to ensure proper filtration. If the vacuum has been used to pick up liq-
uids, the foam sleeve must be cleaned and dried before installing for dry pick up.
26. Para aspirar polvo y material seco, es necesario instalar el manguito de
espuma y el filtro para servicio en seco reutilizable para garantizar un filtrado
adecuado. Si la aspiradora ha sido utilizada para aspirar líquidos, se deberá
limpiar y secar el manguito de espuma antes de instalarlo para una aspiración
en seco.
B
B
A
A
Template
Bottom of Tank
4 5 6
17. Secure dolly with
screw and washer provid-
ed.
((FFiigguurree 77))
.
17. Asegure la carretilla
con el tornillo y la aran-
dela provistos
((FFiigguurraa 77))
.
18. If caster feet are
attached together, sepa-
rate by removing webbing.
Take caster foot marked
with the letter A
((FFiigguurree 88))
.
18. Si las bases de la rueda
están unidas, sepárelas
retirando la cinta gruesa.
Tome la base de la rueda marcada con letra A
((FFiigguurraa 88))
.
19. Align arrow A on foot
with arrow on template
also marked with the letter
A
((FFiigguurree 99))
.
19. Alinee la flecha sobre
la base con la flecha en la
plantilla también marcada
con la letra A
((FFiigguurraa 99))
.
A
Arrow
A
7 8 9
20. Place groove of foot
over rim of tank and push
until the caster foot is tight
against bottom of tank
((FFiigguurree 1100))
.
20. Coloque la ranura de
la base sobre el borde del
depósito y empuje hasta
que la base de la rueda se encuentre firme contra
el fondo del depósito
((FFiigguurraa 1100))
.
21. Secure feet with screw
and washer provided
((FFiigguurree 1111))
.
21. Asegure las bases con
tornillo y la arandela pro-
vistos
((FFiigguurraa 1111))
.
22. Insert casters into
holes provided in feet and
push until casters snap into
place
((FFiigguurree 1122))
.
22. Inserte las ruedas en
los orificios de las bases y
empuje hasta que las
ruedas se fijen a presión
en su lugar
((FFiigguurraa 1122))
.
Tank Bottom
10 11 12
24. Place tool basket, with curved surface against tank, on rear wheel dolly assem-
bly
((FFiigguurree 1133))
.
24. Coloque la cesta de herranientas, con la superficie curvada contra el depósi-
to, sobre el montaje de la carretilla de rueda posterior
((FFiigguurraa 1133))
.
13
CARRIAGE HANDLE ASSEMBLY /MONTAJE DE LA MANIJA DEL CARRO
25. Be sure to spread ends of carriage han-
dle when assembling to prevent damage to
tank. Attach carriage handle to tank by
inserting bolt through the center hole of han-
dle and tank, secure with nut provided.
Attach side handles with screws provided.
((FFiigguurree 1144))
.
25. Asegúrese de extender los extremos de
la manija del carro durante el montaje para evitar daños al depósito. Acople
la manija del carro al depósito insertando el perno a través del orificio cen-
tral de la manija y del depósito, asegure con la tuerca provista. Acople las
manijas laterales con los tornillos suministrados
((FFiigguurraa 1144))
.
14
23. Repeat steps 18-22 with caster foot marked
with the letter B.
23. Repita los pasos 18-22 con la base de la rueda
marcada con letra B.

32. The cartridge filter can be used for wet or dry pick-up; installation is the
same for both. When picking up large quantities of water we recommend
using the foam sleeve
((nnoott ssttaannddaarrdd wwiitthh aallll mmooddeellss))
in position over lid cage.
33. For dry pick-up be sure the opening of the inlet
deflector is facing the tank bottom
((FFiigguurree 2200))
. Use
the cartridge filter in position over the lid cage for
most general dry material pick-up.
Questions? Visit Shop-Vac at www.shopvac.com or call (570) 326-3557. • Ante cualquier consulta, visite Shop-Vac en www.shopvac.com o llame al (570) 326-3557.
6
27. With tank cover in an
upside down position,
slide foam sleeve down
over lid cage pulling until
foam sleeve completely
covers lid cage
((FFiigguurree 1155))
.
27. Con la cubierta del
depósito en posición
invertida, deslice el manguito de espuma hacia
abajo sobre el alojamiento de la tapa tirando
hasta que el manguito de espuma cubra comple-
tamente el alojamiento de la tapa.
((FFiigguurraa 1155))
NOTE: Bottom of foam sleeve must be positioned
on the outside of groove around lid cage for the
reusable dry filter to fit properly
((FFiigguurree 1166,, 1166aa))
.
NOTA:
El fondo del manguito de espuma debe
estar posicionado en la PARTE EXTERIOR de la
muesca alrededor del alojamiento de la tapa
para que el filtro para servicio en seco reutiliz-
able se ajuste correctamente.
((FFiigguurraa 1166,, 1166aa))
15 16 16a
28. Center the reusable
dry filter on lid cage
((FFiigguurree 1177))
.
28. Coloque en el centro
el filtro para servicio en
seco reutilizable sobre el
alojamiento de la tapa.
((FFiigguurraa 1177))
29. Slide mounting ring
down over filter until ring is
positioned against the ribs
of the lid cage
((FFiigguurree 1188))
.
The reuseable dry filter
should always be in posi-
tion over the foam sleeve
for dry pick-up.
29. Desilce el anillo de montaje hacia abajo
sobre el filtro hasta que el anillo se posicione
contra los motantes del alojamiento de la tapa.
((FFiigguurraa 1188))
. El filtro para servicio en seco reutiliz-
able siempre debe estar en posición sobre el
manguito de espuma para la aspiración en seco.
30. To remove the filter for
cleaning, remove mounting
ring and filter from lid
cage
((FFiigguurree 1199))
.
30. Para sacar el filtro
para limpiarlo, quite el
anillo de montaje y el fil-
tro del alojamiento de la
tapa
((FFiigguurraa 1199))
.
17 18 19
31. To clean reusable dry filter, shake off excess dirt and dust or (depending on
condition of filter) rinse with water. Allow the filter to dry completely and
re-install. DO NOT MACHINE WASH OR DRY.
31. Para limpiar el filtro para servicio en seco reutilizable, quite el exceso de
suciedad y polvo sacudiéndolo o (dependiendo de la condición del filtro)
enjuague con agua. Deje secar el filtro completamente y vuela a instalarlo. NO
LAVE O SEQUE EL FILTRO A MÁQUINA.
NOTE: Ensure that the mounting ring is completely secure and in position by
pressing down firmly around the ring in several places. Be sure the reusable dry
disc filter completely covers the foam sleeve. Check to ensure that all edges of
the reusable dry filter are secure under the mounting ring.
WARNING: KEEP FILTERS CLEAN.
EFFICIENCY OF THE VACUUM IS LARGELY DEPENDENT ON THE FILTER. A
CLOGGED FILTER CAN CAUSE OVERHEATING AND POSSIBLY DAMAGE THE
CLEANER. CHECK THE FILTER PERIODICALLY AND REPLACE AS REQUIRED.
NOTA:
Easegúrese de que el anillo de montaje esté completamente sujeto y
en su posición presionando firmemente alrededor del anillo en diversos
lugares. Asegúrese de que el filtro de disco para servicio en seco reutilizable
cubra completamente el manguito de espuma. Verifique para asgurarse de que
todos los bordes del filtro para servicio en seco reutilizable están bien sujetos
debajo del anillo de montaje.
PRECAUCIÓN:
MANTENGA LOS FILTROS LIMPIOS.
LA EFICIENCIA DE UNA ASPIRACION DEPENDE EN GRAN PARTE DE LOS FIL-
TRO. UN FILTRO TAPADO PUEDE CAUSAR UN SOBRECALENTAMIENTO Y
REVICE EL FILTRO PERIODICAMENTE Y REE, PLACELO SI ES NECASARIO.
INSTALLING THE CARTRIDGE FILTER/INSTALACIÓN DEL FILTRO DE CARTUCHO
20
(Not standard with all models)
(No es común a todos los modelos)
NOTE: If foam sleeve is in position over lid cage, it does not need to be
removed before installing cartridge. Foam must be positioned on the INSIDE of
groove around lid cage for cartridge to fit properly.
NOTA:
Si el manguito de espuma está ubicado sobre el alojamiento de la
tapa, no es necesario sacarlo antes de instalar el cartucho. El manguito debe
estar ubicado en la PARTE INTERIOR de la muesca alrededor del alojamiento
de la tapa para que el cartucho encaje correctamente.
32. El filtro de cartucho puede ser utilizado para aspiración de líquidos o
sólidos. El método de instalación es el mismo para ambos servicios. Cuando
aspire grandes cantidades de agua, recomendamos utilizar el manguito de
espuma
((nnoo eess ccoommúúnn ppaarraa ttooddooss llooss mmooddeellooss))
ubicado sobre el alojamiento
de la tapa.
33. Para aspiración de sólidos asegúrese que la abertura del deflector de
entrada esté mirando hacia la parte inferior del depósio
((FFiigguurraa 2200))
. Utilice el
filtro de cartucho ubicado sobre el alojamiento de la tapa para la mayoria
de las operaciones de aspiración de sólidos.
34. With the tank cover in an upside down position,
slide the cartridge filter down over the lid cage, push-
ing until the filter seals against the cover
((FFiigguurree 2211))
.
21
34. Con la cubierta del depósito en posición invertida, deslice el filtro de
cartucho hacia abajo sobre el alojamiento de la tapa, empujando hasta que
el filtro se selle contra la cubierta
((FFiigguurraa 2211))
.

39. To clean cartridge fil-
ter shake or brush off
excess dirt
((FFiigguurree 2266))
or
rinse (from the inside of
the filter) with water
((FFiigguurree 2277))
. Dry complete-
ly (approximately 24
hours) and re-install.
Questions? Visit Shop-Vac at www.shopvac.com or call (570) 326-3557. • Ante cualquier consulta, visite Shop-Vac en www.shopvac.com o llame al (570) 326-3557.
7
35. Place filter retainer
into the top of the cartidge
filter
((FFiigguurree 2222))
.
35.Coloque el retenedor
del filtro dentro de la
parte superior del filtro de
cartucho
((FFiigguurraa 2222))
.
36. Hold the tank cover
with one hand, turn the
handle on the filter retainer
clockwise to tighten, lock-
ing the filter into place
((FFiigguurree 2233))
.
36. Sostenga la cubierta
del depósito con una
mano, gire la manija sobre el retenedor del filtro
en sentido de las agujas del reloj para ajustar,
trabando el filtro en su lugar
((FFiigguurraa 2233))
.
22 23
37. To remove the filter for
cleaning, again hold the
tank cover and turn the fil-
ter retainer counter-clock-
wise to loosen and remove
((FFiigguurree 2244))
.
37. Para quitar el filtro
para propósitos de
limpieza, nuevamente sostenga la cubierta del
depósito y gire el retenedor del filtro en sentido
contrario a las agujas del reloj para aflojarlo y
extraerlo
((FFiigguurraa 2244))
.
24
38. Slide the cartridge fil-
ter off the lid cage
((FFiigguurree
2255))
.
38. Deslice el filtro de car-
tucho fuera del alojamien-
to de la tapa
((FFiigguurraa 2255))
.
25
26
27
39. Para limpiar el filtro de cartucho sacuda o
limpie con cepillo el exceso de polvo
((FFiigguurraa 2266))
o
enjuague (desde el interior del filtro) con agua
((FFiigguurraa 2277))
. Seque por completo (aproximada-
mente 24 horas) y vuelva a instalar.
NOTE: If filter has been used for wet pick-up, it must be cleaned and dried
before using it for dry pick-up.
NOTA:
Si el filtro ha sido utilizado para aspirar líquidos, debe limpiarse y
secarse antes de utilizarlo para aspiración de sólidos.
INSTALLING THE DISPOSABLE FILTER BAG/INSTALACIÓN DE LA BOLSA FILTRANTE DESECHABLE
(Not standard with all models)
(No es común a todos los modelos)
42. Unscrew hose locking-
nut and remove hose from
inlet
((FFiigguurree 2288))
.
42. Desatomille la tuerca
de seguridad de la
manguera y retire la
manguera de la entrada
((FFiigguurraa 2288))
.
43. Remove inlet deflector
from deflector guide
((FFiigguurree 2299)).. NNOOTTEE::
Hose
must be removed before
inlet deflector be taken
out.
43. Retire el deflector de
entrada de la guía del
deflector
((FFiigguurraa 2299)).. NNOOTTAA::
Debe retirar la
manguera antes de poder sacar el deflector de
entrada.
28 29
44. With the opening of
the inlet deflector facing
the bottom of the filter
bag, slide collection bag
collar over deflector
matching notches of bag
collar to tabs on inlet
deflector, bag will only fit
properly one way.
((FFiigguurree 3300))
.
44. Con la abertura del deflector de entrada miran-
do hacia el fondo de la bolsa filtrante, deslice el col-
larín de la bolsa colectora sobre el deflector hacien-
do coincidir las muescas del collarín de la bolsa con
las pestañas en el deflector de entrada. La bolsa
solamente ajusta adecuadamente en una posición
((FFiigguurraa 3300))
.
30
45. Slide deflector with
collection bag attached
into deflector guide
((FFiigguurree 3311))
.
45. Deslice el deflector
con la bolsa colectora
acoplada dentro de la
guía del deflector
((FFiigguurraa 3311))
.
46. Reinsert hose into inlet
and tighten locking-nut
((FFiigguurree 3322))
.
46. Vuelva a insertar la
manguera en la entrada y
apriete la tuerca de
seguridad
((FFiigguurraa 3322))
.
31 32
40. Use for dry pick-up only. Use in conjunction with cartridge filter for picking
up soot, cement, plaster or drywall dust.
41. With cord disconnected from receptacle, pull latches in an outward motion
and remove tank cover.
40. Utilice solamente para aspiración de sólidos. Utilice junto con el filtro de
cartucho para recoger hollín, cemento, yeso o polvo de muro de mam-
postería.
41. Con el cable desconectado del tomacorriente, tire de los seguros hacia
afuera para retirar la cubierta del depósito.
WET PICK-UP OPERATION/OPERACIÓN DE ASPIRACIÓN DE LÍQUIDOS
47. Remove ALL dirt and debris found in the tank. The vacuum requires only a minimum of conversion when going from dry to wet pick-up. The cartridge filter may
be used for wet or dry pick-up, installation is the same for both. However, when picking up large quantities of liquids we recommend removing the cartridge filter.
You may vacuum ONLY liquids with no filter in place, or purchase a foam sleeve by visiting our website at www.shopvac.com, contacting our customer service
department, or purchasing at your local Shop-Vac Distributor. For proper installation instructions for wet pick-up using the cartridge refer to Installing the Cartridge
Filter. Do not use the reusable dry filter for wet pick-up.
47. Extraiga TODA la suciedad y escombros encontrados en el depósito. La aspiradora requiere únicamente un mínimo de conversión para pasar de aspiración de sóli-
dos a aspiración de líquidos. El filtro de cartucho puede utilizare para aspiración en húmedo o seco; la instalación es la misma para ambos servicios. Sin embargo, cuan-
do se aspiran grandes cantidades de líquidos, recomendamos sacar el filtro de cartucho. Puede aspirar SOLO líquidos sin el filtro en su lugar, o comprar una manga de
hule-espuma visitando nuestro sitio web en www.shopvac.com, poniéndose en contacto con nuestro Departamento de Atención al Cliente, o comprando a su distribuidor
local de Shop-Vac. Para las instrucciones de instalación adecuadas para aspiración de líquidos utilizando el filtro de cartucho, remítase a Instalación del Filtro de
Cartucho. No utilice el filtro para sólidos reutilizable para aspiración de líquidos.

Questions? Visit Shop-Vac at www.shopvac.com or call (570) 326-3557. • Ante cualquier consulta, visite Shop-Vac en www.shopvac.com o llame al (570) 326-3557.
8
48. Remove inlet deflector from the deflector guide
sliding in an upward motion.
NNOOTTEE::
Hose must be
removed before inlet deflector can be taken out. Be
sure the opening of the inlet deflector is facing the
top of the tank
((FFiigguurree 3333))
, misting may occur if inlet
deflector is not inserted properly.
48. Retire el deflector de entrada de la guía del deflector deslizando con un
movimiento hacia arriba.
NNOOTTAA
: Debe retirar la manguera antes de poder sacar
el deflector de entrada. Asegúrese de que la abertura del deflector de entrada
esté mirando hacia la parte superior del depósito
((FFiigguurraa 3333))
. Puede ocurrir una
condensación si el deflector de entrada no está insertado adecuadamente.
49. La condensación en el aire de emisión puede ocurrir si el filtro se satura
durante la aspiración de líquidos. Si hay condensación, retire y deje secar el
filtro, reemplácelo con otro filtro seco para eliminar la condensación y el
escurrimiento de líquido alrededor de la tapa. Apague inmediatamente la
unidad después de terminar un trabajo de aspiración de líquidos o cuando el
depósito esté lleno y listo para ser vaciado. Eleve la manguera para drenar
cualquier exceso de líquido hacia el depósito. El interior del depósito debe
limpiarse periódicamente.
49. Misting in exhaust air may occur if the filter becomes saturated during wet
pick-up. If misting occurs, remove filter and allow to dry or, replace with
another dry filter to eliminate the misting and possible dripping of liquid
around the lid. Turn the unit off immediately upon completing a wet pick-up
job or when tank is full and ready to be emptied. Raise the hose to drain any
excess liquid into the tank. The interior of the tank should be periodically
cleaned.
50. The foam sleeve should be cleaned periodically as described in the fol-
lowing steps:
a. Always disconnect the plug from the wall receptacle before removing the
tank cover. Place tank cover in an upside down position. Remove foam
sleeve by sliding it up and off the lid cage.
b. Shake excess dust off foam sleeve with a rapid up and down movement.
c. Hold foam sleeve under running water for a minute or two, rinsing from the
inside. A water wash is not always required, depending on the condition of
the foam sleeve.
d. Gently wring out excess water, blot foam sleeve with a clean towel, and
allow to dry. The foam sleeve is now ready to be reinstalled on the lid
cage.
NNOOTTEE::
Wet pick-up accessories should be washed periodically, especially
after picking up wet, sticky kitchen accidents. This can be accomplished with a
warm solution of soap and water.
50. El manguito de espuma debe limpiarse periódicamente como se describe
en los siguientes pasos:
a. Desconecte siempre el enchufe del tomacorriente de pared antes de reti-
rar la cubierta del depósito. Coloque la cubierta del depósito en una posi-
ción invertida. Retire el manguito de espuma deslizándolo hacia arriba y
afuera del alojamiento de la tapa.
b. Sacuda el exceso de polvo del manguito con un movimiento rápido hacia
arriba y abajo.
c. Sostenga el manguito bajo el agua corriente enjuagándolo desde el interi-
or. No siempre se requiere un lavado con agua, dependiendo de la condi-
ción del manguito.
d. Elimine el exceso de agua, seque el manguito con una toalla limpia y deje
que se seque. El manguito de espuma está listo para ser reinstalado en el
alojamiento de la tapa
NNOOTTAA::
Los accesorios utilizados para la aspiración de líquidos deben
lavarse periódicamente, especialmente después de aspirar líquidos, y de acci-
dentes en la cocina con sustancias pegajosas. Esto puede llevarse a cabo con
una solución tibia ce agua y jabón.
51. This vacuum can be used as a powerful blower. To
use your unit as a blower unscrew blower port cover
located on the backside of the motor housing
((FFiigguurree
3344))
. The blower port cover is equipped with a
retaining strap to prevent loss of the port cover while
blower is in use. Insert hose end with locking-nut into
blower port on rear of unit and tighten. Caution
should be used when using as a blower due to the
powerful force of air when using certain
attachments.
34
51. Esta aspiradora puede ser usada como un potente soplador. Para utilizar
su unidad como soplador, desatornille la cubierta del orificio del soplador
localizada en la parte posterior del alojamiento del motor
((FFiigguurraa 3344))
. La
cubierta del orificio del soplador está equipada con una cinta de sujeción
para prevenir la pérdida de la cubierta del orificio mientras el soplador se
está utilizando. Inserte el extremo de la manguera con la tuerca de seguridad
en el orificio del soplador del depósito y apriete. Debe tener cuidado cuan-
do utilice el aparato como soplador debido a la potente fuerza del aire
cuando utiliza ciertos aditamentos.
BLOWER FEATURE/FUNCIÓN DE SOPLADOR
WARNING:
ALWAYS WEAR EYE PROTECTION TO PREVENT ROCKS
OR DEBRIS FROM BEING BLOWN OR RICOCHETING INTO THE EYES OR
FACE WHICH CAN RESULT IN SERIOUS INJURY.
ADVERTENCIA:
UTILICE SIEMPRE PROTECCIÓN OCULAR PARA PRE-
VENIR EL INGRESO DE PIEDRECILLAS O RESIDUOS EN LOS OJOS O LA
CARA, YA QUE PODRÍA SUFRIR LESIONES GRAVES.
EMPTYING LIQUID WASTE FROM THE TANK/VACIADO DEL DESECHO LÍQUIDO DEL DEPÓSITO
52. Your Shop-Vac Wet/Dry can be emptied of liquid waste by removing the
drain cap. To empty, turn unit off and remove plug from the wall receptacle.
Remove the drain cap and deposit the liquid waste contents in a suitable drain.
After the tank is empty, return the drain cap to its original position. To continue
use, plug the cord into the wall receptacle and turn the unit on. Use side carry
handles for lifting vac when draining tank into drains that are located above
floor level.
52. Su aspiradora para líquidos y sólidos Shop-Vac puede vaciarse de dese-
chos líquidos retirando la tapa de drenaje. Para vaciar, apague la unidad y
retire el enchufe del tomacorriente de pared. Retire la tapa de drenaje y
deposite el contenido de desperdicio líquido en un drenaje adecuado. Una vez
que haya vaciado el depósito, regrese la tapa de drenaje a su posición origi-
nal. Para continuar usando el aparato, enchufe el cable en el tomacorriente y
encienda la unidad. Utilice las manijas de transporte laterales para levantar la
aspiradora cuando drene el depósito en drenajes que estén localizados por
encima del nivel del piso.
33

Questions? Visit Shop-Vac at www.shopvac.com or call (570) 326-3557. • Ante cualquier consulta, visite Shop-Vac en www.shopvac.com o llame al (570) 326-3557.
9
53. The vacuum is equipped with an automatic suction shut-off that operates
when picking up liquids. As the level of the liquid rises in the tank, an internal
float rises until it seats itself against a seal at the intake of the motor, shutting
off suction. When this happens, the motor will develop a higher than normal
pitch noise and the suction is drastically reduced. If this occurs, turn unit off
immediately. Failure to turn unit off after float rises and shuts off suction will
result in extensive damage to the motor. To continue use, empty the liquid
waste from the tank as outlined in the previous paragraph.
NOTE: If accidentally tipped over, the vacuum could lose suction. If this
occurs, turn unit off and place vac in upright position. This will allow the float
to return to its normal position, and you will be able to continue operation.
53. La aspiradora está equipada con una función de apagado automático
cuando está aspirando líquidos. A medida que se incrementa el nivel del líqui-
do en el depósito, un flotador electrónico interno asciende hasta que se
asienta contra un sello en la entrada del motor, cerrando la succión. Cuando
ocurre esto, el motor producirá un ruido con un tono superior a lo normal y la
succión se reducirá considerablemente. De ocurrir esto, apague la unidad de
inmediato. Si no se apaga la unidad después que el flotador asciende y cierra
la succión, podría resultar en un daño importante al motor. Para continuar
utilizando la aspiradora, vacíe los residuos líquidos del depósito como se
describe en el párrafo anterior.
NOTA:
Si se inclina accidentalmente, la aspiradora podría perder succión.
Si esto ocurre, apague la unidad y coloque la aspiradora en posición vertical.
Esto permitirá que el flotador regrese a su posición normal y usted podrá
continuar con la operación.
AUTOMATIC SUCTION SHUT-OFF/APAGADO AUTOMÁTICO
STORAGE/ALMACENAMIENTO
55. Before storing your vacuum cleaner the tank
should be emptied and cleaned. The power cord can
be wrapped around the cord wraps provided on the
tank cover on rear of unit
((FFiigguurree 3355))
.
55. Antes de almacenar su aspiradora deberá vaciar
y limpiar el depósito. Puede doblar el cable de corri-
ente alrededor de las grapas en la cubierta del
depósito en la parte posterior de la unidad
(
FFiigguurraa 3355
).
35
56. A hose holder has been provided for easy stor-
age of the hose. Install hose holder end with fastener
onto hose. Slide or snap fastener into notch securing
in place. Remove extension wands and/or accessory
from end of hose and place hose end into open end
of hose holder to secure hose in place for easy stor-
age
((FFiigguurree 3366))
.
56. También cuenta con un soporte para manguera
para su fácil almacenamiento. Instale el extremo del soporte para
mangueras en la manguera. Deslice o abroche el sujetador en la muesca
para sujetarla en su lugar. Retire las varillas de extensión y/o los acceso-
rios del extremo de la manguera y coloque el extremo de la manguera en el
extremo abierto del soporte para mangueras a fin de que pueda almace-
narla fácilmente (
FFiigguurraa 3366
).
36
PROBLEMA CAUSA SOLUCIÓN
Pérdida de succión Filtro tapado Limpie el filtro, ve los pasos
en la aspiración en la página 7 y
de líquidos en la página 8.
Pérdida de succión Depósito lleno Vacíe y limpie el depósito.
en la aspiración
de sólidos Filtro tapado Limpie el filtro, ve los pasos
en la página 6 y
en la página 7.
Pérdida de Despósito lleno Drene y limpie el depósito, ve
succión o rocío el paso en la página 8.
durante la
aspiración de Filtro saturada Limpie la filtro, vea los pasos
líquidos y en la página 8.
PROBLEM CAUSE SOLUTION
Loss of suction Clogged filter Clean filter, see steps
wet pick-up on p. 7 and on pg. 8.
Loss of suction Full tank Empty and clean tank
dry pick-up
Clogged filter Clean filter, see steps
on p. 6 and on pg. 7.
Loss of suction or Full tank Drain and clean tank, see
misting during wet step on pg. 8.
pick-up
Saturated filter Clean filter, see steps
and on pg. 8.
TROUBLESHOOTING /GUÍA DE AVERÍAS
Minor problems often can be fixed without calling Shop-Vac Customer
Service. Before doing any work on your Shop-Vac
®
Wet/Dry Vacuum, shut off
power supply and remove plug from wall outlet.
Los problemas menores con frecuencia pueden resolverse sin llamar al
Servico de Atención al Cliente de Shop-Vac. Antes de realizar cualquier tra-
bajo con su aspiradora para servicio seco/húmedo Shop-Vac
®
, desconecte el
suministro eléctrico y desenchufe el artefacto del tomacorriente de pared.
39
50
31
39
39
50
31
39
49
50
52
52
49 50
LUBRICATION/LUBRICACIÓN
54. No lubrication is neccessary as the motor is equipped with lifetime lubri-
cated bearings.
54. No se requiere lubricación ya que el motor está equipado con rodamien-
tos sellados lubricados de por vida.

Questions? Visit Shop-Vac at www.shopvac.com or call (570) 326-3557. • Ante cualquier consulta, visite Shop-Vac en www.shopvac.com o llame al (570) 326-3557.
10
Your Shop-Vac
®
vacuum cleaner is warranted in normal household use, in
accordance with the User Manual, against original defects in material and
workmanship for a period of five years from date of purchase. Should this
product be used for commercial or rental use, a 90 day limited warranty will
apply. Shop-Vac Corporation warrants placing this vacuum cleaner in correct
operating condition, by repair or parts replacement, during the warranty
period, without charge. This warranty does not cover accessories. Use of
non-recommended filters and/or accessories may void the manufacturer’s
warranty.
For product service contact Shop-Vac Corporation, Customer Service, at
(570) 326-3557 or e-mail service@shopvac.com. Shop-Vac assumes no
responsibility for damage or faulty performance caused by misuse or careless
handling, or where repairs or modifications have been made or attempted by
others. Proof of purchase date is required. This warranty gives you specific
legal rights, and you may also have other rights, which vary from state to
state. This warranty is void outside of the United States.
Su aspiradora Shop-Vac
®
está garantizada para uso doméstico normal, de
acuerdo con el Manual del Usuario, contra defectos originales en los materi-
ales y en la mano de obra por un período de cinco años desde la fecha de
compra. Si este producto se utilizara para fines comerciales o de alquiler, se
aplicará una garantía limitada de 90 días. Shop-Vac Corporation garantiza
la puesta de esta aspiradora en condiciones operativas correctas, ya sea
reparando o reemplazando sus piezas, durante el período de garantía, y sin
cargo alguno. Esta garantía no cubre los accesorios. La utilización de filtros
y/o accesorios no recomendados puede anular la garantía del fabricante.
Para realizar alguna consulta sobre el producto, póngase en contacto con el
Servicio de Atención al Cliente de Shop-Vac Corporation, al (570) 326-3557
o envíe un correo electrónico a [email protected]. Shop-Vac no asume
ninguna responsabilidad por daños o funcionamiento defectuoso del equipo
causados por la utilización incorrecta, la manipulación descuidada del
mismo, o cuando terceras partes han realizado o intentando llevar a cabo
reparaciones o modificaciones. Es necesario presentar comprobante de com-
pra. Esta garantía le otorga derechos legales específicos, y usted también
puede tener otros derechos, que varían de un estado a otro. Esta garantía no
es válida fuera del territorio de los Estados Unidos.
FIVE-YEAR HOME USE WARRANTY /GARANTÍA LIMITADA POR CINCO AÑOS

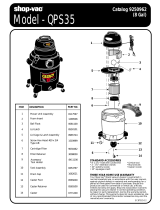
ITEM DESCRIPTION PART NO.
Handle
Switch Button - Green
Switch Button - Red
Grill - Right
Grill - Left
Outer Motor Cover Assembly
Screw 10 x 3/4” Trilobe T25 Head
Foam Insert Cover
Switch Button Extension
Spring
Inner Motor Cover
Power Unit Assembly
Float
Lid Latch
Lid Cage and Latch Assembly
Cartridge Filter
Filter Retainer
Collection Bag
Tank Assembly
Inlet Deflector
Carriage Handle
Handle and Hardware Package
(includes 23-26)
Side Tank Handle
Screw #10 x 3/4” Hex Head
Bolt 1/4” - 20 x 1/2”
1/4” - Hex Nut
Accessory Basket
Drain Cover
Rear Wheel Dolly
Axle
8” Wheel
Cap Nut
Caster Foot A
Caster Foot B
Washer
Screw #10 x 1” SL Hex Head
Caster
Model 90LN650C
Series 90LN — Wet/Dry Vacuum
Household and Workshop Use
21
1
4
7
6
8
16
34
10
2
3
18
17
20
27
23
25
23
19
24
26
28
29
30
31
32
36
37
33
35
5
9
11
7
12
13
15
14
7
STANDARD ACCESSORIES
• 14’ x 1-1/2” locking hose
• (2) metal extension wands
• 14” metal nozzle
• 14” brush insert
• hose holder
• 1-1/2” to 1-1/4” accessory adapter
• 1-1/2” to 2-1/2” accessory adapter
Questions? Visit Shop-Vac at www.shopvac.com or call (570) 326-3557. • Ante cualquier consulta, visite Shop-Vac en www.shopvac.com o llame al (570) 326-3557.
11
1
2
3
4
5
6
7
8
9
10
11
12
13
14
15
16
17
18
19
20
21
22
23
24
25
26
27
28
29
30
31
32
33
34
35
36
37
3753580
7441500
7441510
3748560
3748550
1944354
1516599
1290534
7414250
2802899
1944350
8135697
3545000
7441604
1944351
9030411
3008000
9066211
5140697
7413100
2088600
9355596
9355100
1503999
6401299
1300199
9065800
7446526
3487502
2442400
2425010
4300299
8568103
8568113
2781018
1509699
6773900
/