Toastmaster WST5002ZE is an Adjustable Steam & Dry Iron. With this multi-purpose iron, you can iron almost any fabric. It produces both steam and dry heat to ensure effective ironing. The iron can be used to iron both dry and wet fabrics. It comes with a spray bottle that can be used to dampen the fabric before ironing. The spray bottle can also be used to apply starch or fabric softener to the fabric. The iron has a variable steam dial that allows you to control the amount of steam produced.
Toastmaster WST5002ZE is an Adjustable Steam & Dry Iron. With this multi-purpose iron, you can iron almost any fabric. It produces both steam and dry heat to ensure effective ironing. The iron can be used to iron both dry and wet fabrics. It comes with a spray bottle that can be used to dampen the fabric before ironing. The spray bottle can also be used to apply starch or fabric softener to the fabric. The iron has a variable steam dial that allows you to control the amount of steam produced.


-
 1
1
-
 2
2
-
 3
3
-
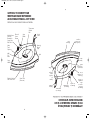 4
4
-
 5
5
-
 6
6
-
 7
7
-
 8
8
-
 9
9
-
 10
10
-
 11
11
-
 12
12


Toastmaster WST5002ZE is an Adjustable Steam & Dry Iron. With this multi-purpose iron, you can iron almost any fabric. It produces both steam and dry heat to ensure effective ironing. The iron can be used to iron both dry and wet fabrics. It comes with a spray bottle that can be used to dampen the fabric before ironing. The spray bottle can also be used to apply starch or fabric softener to the fabric. The iron has a variable steam dial that allows you to control the amount of steam produced.
Ask a question and I''ll find the answer in the document
Finding information in a document is now easier with AI
in other languages
- français: Toastmaster WST5002ZE Manuel utilisateur
Related papers
Other documents
-
Hamilton 14015-CN Instructions Manual
-
Black & Decker BXIR2401E User manual
-
Hamilton Beach 14750 User manual
-
-
Black & Decker D3032G User guide
-
-
-
-
BLACK DECKER BXIR3000E Steam Iron 3000 Ceramic Black User manual
-