
www.6EApp/iances.cem
°v,.._
Safety Instructions .......... 9-0
Operating Instruc_tions
Microwave Control Pane] .... ] O, ] ]
Microwave Oven Controls ..... 10-91
Lower Oven Control Panel .... 99, 23
Lower Oven Controls ........ 92-32
Lower Oven Thmmostat ........ 30
Self-Cleaning Lower Oven .... 31,39
Sensor Controls ............ 16, 17
Care and Cleaning
Broiler Pan and Grid ........... 36
Door . ...................... 34
Light Bulb ...................... 35
Microwax e Oxen .............. 33
Shehes ...................... 36
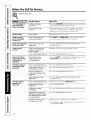
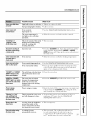
Troubleshooting Tips ...... 37-39
Consumer Support
Consumer Support ..... Back Co_er
Product Registration ........ 41-49
X4'arrantv .................... 43
JKP86"27" Double Wall Oven
6 6"
fl'PS _-37 Double W_dl ChJen,
The microwave oven in this
cooking center is I000 watts.
©
©
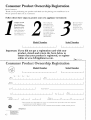
Write the model and serial
numbers here:
Model #
Serial #
You can find them on a label inside
the upper oven on the lelt side.
164D4290P090-2 49-80132-2 02-03 JR

IMPORTANTSAFETYINFORMATION.
READALLINSTRUCTIONSBEFOREUSING.
WARNING!
For your safety;,the information in this manual must be followed to minimize the risk of fire or
explosion, electric shock, or to prevent property damage, personal injury, or loss of life.
PRECAUTIONSTOAVOIDPOSSIBLEEXPOSURETOEXCESSIVE
MICROWAVEENERGY
Do not attempt to operate fills oxen with
tim door open since open-door operation
can result in hal_nflfl exposure to
microwme energ?'. It is importantnot to
defeat or tamper with the safety interlocks.
Do not place any object between tile oxen
flont face and tile door or allow soil or
cleaner residue to accumulate on sealing
SHrlCaces.
Tile oxen should not be adjusted or
repaired by anyone except properly
qualified service personnel.
Do not operam ti_e oven if it is damaged.
It is particularly important that tile oxen
door close properly and tilat there is no
damag_ to tile:
[] door (bent),
[] hing>s and latches (broken or
loosened),
[] door seals and sealing surPaces.
IMPORTANTSAFETYNOTICE
The California Safe Drinking Water and ToxicEnforcement Act requires the Governor of California to
publish a list of substances known to the state to cause cancer, birth defects or other reproductive
harm, and requires businesses to warn customers of potential exposure to such substances.
The fiberglass insulation in self-clean ovens gives off a very small amount of carbon monoxide during
the cleaning cycle. Exposure can be minimized by venting with an open window or using a ventilation
fan or hood.
2

www.GEAppliances.com
SAFETYPRECAUTIONS
When using electrical appliances, basic safety precautions should be followed, including the following:
WARNING Groundinglnstructions:
This appliance must be connected to a
grounded, metallic, permanent wiring
system, or an equipment gronnding
conductor should be run wiflt the
circuit conductors attd connected
m rite eqnipment gronnding
mrminal or lead on the appliance.
WARNING Toreduce the risk ofburns,
electric shock, fire, injuryto personsor
exposure to excessive microwave energy:
Use dtis appliance only fox its intended
use as described in this manual. Do not
use conosive chemicals or vapors in
this appliance. This cooking cenmr is
specifically designed to heat or cook
food, and is not inmnded for laborato W
or industrial use.
Be sure your appliance is properly
installed and grounded by a qualified
mchnician in accordance with the
provided Installation Instructions.
Haxe the installer show you the location of
the cixvuit breaker or flxse. Mark it fox easy
reference.
Be sure dm cooking center is securely
installed in a cabinet that is firmly attached
to fire house suucture. V(eight on the oxen
door could cause the ox>n to tip and
result in injuU. Never allow attyone m
climl), sit or hang on flxe ox>n door
This appliance should be serviced only
1)yqualified service personnel. Contact
nearest authorized service tZacilitvfox
examination, repair or adjustment. Do not
repair or xeplace arty part of this appliance
unless specifically recommended in this
mannal. All other servicing should be
referred m a qualified mchnician.
Do not stoxe this appliance outdoors.
Do not use flxis product near water fox
example, in a wet basement, or near a
swimming pool.
Befoxe performing arty seiMce, disconnect
rite cooking center power supply at rite
household distribution panel by removing
the flxse or switching off the cixvuit
breaker
Do not operate this appliance if it has a
damag>d cord or ping, if it is not working
properly, or if it has been damag>d or
dropped.
Do not leme children alone---<'hildren
should not be left alone or unatmnded in
an area where appliance is in use. They
should nex>r be allowed m sit or stand on
arty part of the appliance.
Don't allow attyone m climb, stand or
hang on the door They could damage
the cooking cenmr attd cause sex>xe
personal itljm>
3

IMPORTANTSAFETYINFORMATION.
READALLINSTRUCTIONSBEFOREUSING.
WARNING!
SAFETYPRECAUTIONS
Do not use water on grease fires. Never pick up a flaming pan. Smother flaming pan by covering
pan completely with weft-fitting lid, cookie sheet or flat tray. Flaming grease outside a pan can be
put out by covering with baking soda or,if ava#able, a multi-purpose dry chemical or foam-type
fire extinguisher.
CAUTION:Itemsofinterestto
children should not be stored in cabinets
above an oven; children climhing oi1 the
oxen to reach imms could be seliously
i,_nred.
Teach children not m pl W with rite
controls or any other part of the
cooking center
im_g> scratches or impacts to glass door
can lead m broken or shattered glass.
_a:ear proper clothing. I,oose-fitdng or
hanging garments should nex>r be worn
while using the appliance. Hammable
mamHal could be ignimd if brought in
contact with hot heating elements and
may cause sex>re burns.
Use only &Y pot holders--moist or damp
pot holders on hot surthces may result in
httlXlS fronl steam. Do not let pot holders
much hot heating elements. Do not use a
towel or other bulky cloth. Such cloths can
catch fire on a hot element.
Always kee I) dish towels, dishcloths, pot
holders and other linens a safe distance
fron/vo/ti oxen.
Always kee I) wooden spoons and plastic
utensils and canned food a safe distance
away f1oi1/vo/ty oxen.
Mways kee I) combustible wall coxetings,
curtains or drapes a safe distance flom
VO/tI" oxen.
Do not store flammable mamrial in an
oxen or near the cooking cenmr
Do not cover or block any opening:s
oi1 the appliance.
For your safe_', nex>r use your appliance
for wanning or heating the room.
Do not leaxe paper products, cooking
umnsils or food in the ox>n when not
in use.
iiiiiiiiiiii_iii
Do not store or use combustible mamtials,
gvtsoline or other flammable vapors and
liquids in the vicinity of this or any other
appliance.
Do not let cooking grease or oflter
flammable materials accumulam in or
neat the cooking cenmr
Do not much heating elements or inmHor
surface of the oxen. These surfaces m W be
hot enougit to burn even though they are
dark in colon Dining and after use, do not
much, or let clothing or other flammable
mamtials contact any inmHor area of the
ox>n; allow sufficient time tbr cooling first.
Potentially hot surthces include o\'en \>nt
openings, surfaces near the openings, and
crevices around rite ox>n door
REMEMBER:The inside surface of the
oxen may be hot when the door is opened.
COOKMEATANDPOULTRYTHOROUGHLY...
Cookmeat andpoultry thoreughly--meat toat least an INTERNALtemperatureof 160°Fandpoultry
toat least an INTERNALtemperatureof 180°ECookingto thesetemperaturesusuallyprotects against
foodbomeillness.
4

vvww.GEAppliances.com
MICflOWAVEOVEN
Read and follow the specific "Precautions to Avoid Possible Exposure to Excessive Microwave
Energy" section in this manual
Toreduce therisk of fire in the evencavity:
Do not oxercook food. Carefully attend
appliance if paper, plastic or other
combustil)le materials are placed inside
rite oxen to thcilitam cooking.
Remoxe wire twist-ties flom paper or
plastic containers 1)efote placing bag:s
ix) oxen,
Do not use your microwave oven to dIT
newsI)aI)ers,
Do not pop popcorn ill your microwaxe
oxen unless ill a special microwave
popcorn accessot T or unless you use
popcorn labeled for use in microwave
oxens.
Do not oxercook potatoes. They could
dehydiam and catch fire, causing damage
to your oxen.
Do not operate rite oxen while empw to
axoid damage to file oxen and fl_e danger
of fire. If 1)yaccident the oxen should run
empty a minum or two, no harm is done.
Howexel; tiT m avoid operating the oxen
empty at any dine----it saxes energy' and
prolongs the life of the oxen.
Do not use file oven for storage puq)oses.
Do not leme paper products, cooking
umnsils or food in the oven when not
ill rise.
If mamrials inside the oxen should ig_lim,
kee I) oven door closed, turn oxen off,
and shut off power at file fltse or citvuit
1)reaker panel. If the door is opened, the
fire may spread.
This microwaxe oxen is not approxed or
msmd for mat-ine use.
Some pioducts such as whole eggs and
sealed containers for example, closed
jars will explode and should not be
heated ill this microwaxe oxen. Such use
of file microwaxe oven could result in
i jury.
Do not operate tile microwaxe oxen
wifllont file turntable and support ill
place.
_void heating 1)aby food ill glass jars, exen
with tile lid off. Make sure all iIffant food
is thorouOfly cooked. Stir food m
distribum tile heat exenl> Be carefltl m
prexent scalding when warming formula
or 1)reast milk. The container may feel
cooler titan rite milk really is. Always rest
the milk 1)etbte feeding tile 1)aby.
Do not boil eggs ill a microwaxe oxen.
Ptessule will 1)uild up inside the egg
yolk and will cause it to burst, possil)ly
resulting ill iojury.
Foods wiflt unl)roken outer "skill" such
as potatoes, sausages, tomatoes, apples,
egg yolks, chicken lixers and oilier giblets
should be pierced to allow steam to escape
during cooking.
Don't defrost fiozen bexerages ill natTow-
necked bottles (especially carbonated
bexerages). Exen if file container is
opened, pressure can build up. This can
c;mse the container to burst, possibly
resulting ill injm T.
Hot foods and steam can cause bums.
Be carefitl when opening aiU containers
of hot food, including popcorn bags,
cooking pouches and boxes. To prevent
possible injm T, direct steam away fiom
hands and l_ace.
As with any appliance, close snpervision is
necessat T when used 1)ychildren.
5

IMPORTANTSAFETYINFORMATION.
READALLINSTRUCTIONSBEFOREUSING.
WARNING!
MICROWAVE-SAFECOOKWARE
Make sure aft cookware used in your microwave oven is suitable for microwaving. Most glass
casseroles, cooking dishes, measuring cups, custard cups, pottery or china dinnerware which does
not have metallic trim or glaze with a metallic sheen can be used. Some cookware is labeled
"suitable for microwaving."
iiiiiiiiiiii_iii
ffyou are not sure if a dish is microwave-
safe, nse fllis test: Place in fl_e oxen both
the dish you are testing and a glass
measuling cup flled with ] cup ofwater_
set file measuring cup either in or next to
tile dish. Microwave 35-45 seconds at higil.
If the dish heats, it should not be used
for microwaving.
If tile dish remains cool and only tile
wamr in tile cup heats, then file dish is
microwaxe-safe,
If you use a meat them/ometer while
cooking, make sure it is safe for use in
microwax e o, ens.
Do not use recycled paper products.
ReQ'cled paper towels, napkins and waxed
paper can contain metal flecks which may
cause arcing or ignite. Paper products
containing nylon or nylon filaments
should be a,_ided, since flier may also
ignite.
Some Stvrofoam trays (like fllose fllat meat
is packaged on) ha, e a thin stlip of metal
embedded ill d_e bottom. When
microwa, ed, the metal can bum file floor
of the o, en or ignite a paper towel.
Not all plastic wrap is suitable for use in
microwa, e o, ens. Check file package for
proper rise.
Paper towels, waxed paper and plastic
wrap can be used to co, er dishes ill order
to retain moisture and prevent spattering.
Be snle to ,ent plastic wrap so steam
call escape.
()\ei_ized food or oversized metal
cookware should not be used in a
microwave oven. Electrical shock or
fire could occur.
_A]lile paper plates may be used for timed
cooking and deflosting, do not use fllem
with Auto Sensor cooking. Use microwa,e-
safe plains or bowls for ieheating. Co, er
with plastic wrap.
Cookware m W become hot because
of heat uanstbrred flom tim heated
food. Pot holders may be needed to
handle tile cookware.
"Boilable" cooking pouches and tightly
closed plastic bags should be slit, pierced
or ,ented as diIected by package. If they
are not, plastic could burst duling or
immediately after cooking, possibly
resnldng in injm T, Also, plastic storage
containers should be at least partially
unco, ered because fl_ey form a fight seal.
When cooking wifl_ containers tightly
co, ered with plastic wrap, remo, e
coveting carefillly and direct steam
away flom hands and tZace.
Use tbil only as direcmd in this manual.
TV dinners may be microwa, ed in foil
trws less than 3/4" higt_; remo, e the top
foil cover and rental fl_e tr W to file box.
_4]len using foil in tile microwaxe o, en,
keep file tbil at least 1 inch away from the
sides of file oven.

www.GEAppliances.com
Plastic cool<ware - Plastic cool<ware
designed for microwaxe cooking is xerv
useflfl, but should be used caIeflflly.
Exen microwaxe-safe plastic may not
be as tolerant of overcooking corrdifions
as are glass or ceramic materials and
may soften or char if subjected to short
periods of overcooking. In longer
exposures to overcooking, tile food
arrd cool<ware could ignite.
Follow theseguidelines:
[] Use microwaxe-safe i)lastics only and
use them in StlJCt compliance with
tile cool<ware manuiCacturer's
recommendations.
[] Do not microwme empty corrtainers.
[] Do not permit children to use
plastic cookware without complete
super\ ision.
ARCING
If you see arcing press the CLEAR/OFFpad and correct the problem.
Arcing is themicrowave term forsparks in the
oven.Arcing is caused by:
Metal or foil touching the side of tile oven.
Foil not molded to food (ui)turned edges
act like arrmnnas).
Metal, such as twist-ties, I)oultIT pins or
g_ld-fimmed dishes, ira tile microwm_.
Recycled paper towels corrtaining small
metal pieces being used in file microwme.
SUPERHEATEDWATER
Microwaved water and other liquids do not always bubble when they reach the boiling point.
They can actuafly get superheated and not bubble at all
Superheated liquid will btd)ble up out of the
cup when it is moxwd or whe_ somethi_g
like a spoon or tea bag is pt_t imo it.
To pre_ent this fiom happe_ing and ca, lsiirg
iqim > do not heat m_y liqtfid fL_rmore than
2 minutes per crop.
After heating, let the cup stand in the
microwave fLn"3(} se(onds bef_ne movi_g it
or putting anything into it.
Spontaneous boiling
Under certafi7special circumstances, liquids"
may start to boil during or shortly after removal
from #le microwave oven.
To prexent bums flom splashing liquid, we
recommend the fL}lloxqng bef_ne removi_g
the c(mtainer from the oxeye:
Allow tile corrtainer to stand in tile oven
for 30 to 40 seconds after tile oxen has
shut oft:
Do not boil liquids in nalTow-necked
corrtainers such :as soft drink bottles, wine
flasks arrd especially nanow-necked coffee
cups. Even if tile container is oi)ened,
excessive smam can build up and cause it
to bur'st of O\>FflO_X_

IMPORTANTSAFETYINFORMATION.
READALLINSTRUCTIONSBEFOREUSING.
ALLTHESETHINGSARENORMALWITHYOURMICROWAVE
iiiiiiiiiiii_iii
iiiiiiiiiiii_iii
iiiiiiiiiiii_iii
iiiiiiiiiiii_iii
Steam or xapor escaping from around
tile dooI:
Light reflection around tile door oi tile
outeF case.
Dimming of die oxen ligtlt and change
ira tim 1)lower sound may occ/li while
operating at power lexels othei than high.
Tile microwax_ fan m W operam with both
ovens off. It is cooling die control and will
turn itself off.
Some TV-radio inmrference might be
noticed while using youi microwa_> oven.
It's similar to the inmrference caused by
other small app]iances and does not
indicate a problem with your oven.
A dull thumping SOtlIld while tile o\_n
is operating.
MICROWAVETERMSANDDEFINITIONS
Arcing
ArcingIsthemicrowavetermforsparkslb theoven.
Arcingiscausedby.
metal or foil touchingthe side of the oven.
foil that isnot molded tofood(upturnededgesact
like antennas).
metalsuchastwist-ties,poultrypins,gold-rimmed
dishes.
recycledpaper towels contalhlbgsmallmetal pieces.
Covering
Coversholdinmoisture,allowformoreevenheatlbgand
reducecooklbgtlYne.Ventlbgplasticwraporcoveringwith
waxpaperallowsexcesssteamtoescape.
Shielding
Ina regularoven,you shieldchickenbreasts orbaked
foodsto preventoverbrowning. Whenmicrowaving, you
usesmaflstrips of foil to shield thlbparts, suchas the tips
of wlbgs and legsonpoultg which wouldcook before
largerparts.
StandingTime
Whenyoucookwithregularovens,foodssuchasroasts
orcakesareallowedtostandtofinishcookingorto
seLStandingtlYneisespeciallylYnportantlbmicrowave
cooking.Notethatamicrowavedcakeisnotplacedon
acoolingrack.
Venting
After coveringa dishwith plastic wrap, youvent the
plastic wrap by turningbackone cornerso excesssteam
can escape.
8

www.GEAppliances.com
t
WARNING!
SELF-CLEANINGLOWEROVEN
Donot use aluminum foil to line oven bottoms, except as suggested in this manual. Improper
installation of aluminum foil may result in a risk of electric shock or fire.
Stand away flora file oven when opening
the ox.en door Hot air or smam which
escapes can cause bums to hands, fi_ce
and/or eyes.
Do not heat unopened food containers.
Pressure could build up and the container
could burst, causing an ir)jm%
Kee I) the ox.en x.ent unobstructed.
Kee I) the ox.en free flora gxease buildup.
Kee I) the cooking cenmr clean and flee
of accnmnlafions of grease or spillox.ers,
which m W ignite.
Nex.er leax.e the oven door open when yon
ax.e not watching fire cooking cenmr
Place rite ox.en shelf in the desired
position while the oven is cool. If shelx.es
must be handled when hot, do not let pot
holder contact the heating elements.
When using cooking or roasting bags
ira the ox.en, follow the mamdnacmrer's
dit.ecdons.
Pulling ont the shelf to the stopqock is a
com.enience ira lifting heax?' foods. It is
also a precandon against burns flom
touching hot surfiaces of Ore door or
ox.en walls.
Do not use the oxen for a storage area.
hems stored ira an oxen can ignite.
Do not leme paper products, cooking
utensils or food in the oven when not
ira use.
Do not use the oven to dr T newspapers.
If oxerheated, they can catch on fire.
Nexer lemejars or cans of t_atdiippings
ira or near VO/lr oven.
i
Clean only parts listed ira this Owner's
Manual.
Do not clean the door gasket. The door
gasket is essential for a good seal. Care
should be token not to rub, damag.e or
move rite gasket.
Do not use ox.en cleaners. No commercial
ox.en cleaner or oven liner promcfive
coating of any kind should be used ira or
around any part of the ox.en. Residue fiom
ox.en cleaners will damag.e the inside of
the ox.en when the self-clean cycle is used.
Before self-cleaning tim ox.en, remox.e
the probe, broiler pan, grid and other
cookware.
Be sure to wipe up excess spillag.e before
stardng a selt)leaning Q'cle.
If the self-cleaning mode malflmcfions,
tnY/a the ox.en off and disconnect the
power supply. Hax.e it serviced by a
qualified mchnician.
Lismn for a fim--a Pan noise should be
heard sometime during the cleaning
cycle. If not, call for setMce before
selt_leaning ag:dn.
Alter broiling, always rake the broiler
pan out of the ox.en and clean it. i*_ftover
gt.ease ira the broiler pan can catch rit.e
next time you use rite ox.en.
READANDFOLLOWTHISSAFETYINFORMATIONCAREFULLY.
SAVETHESEINSTRUCTIONS
9

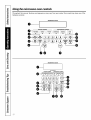
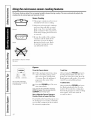
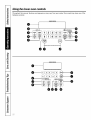
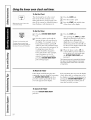
Usingthemicrowave ovencontrols.
Throughout this manual, features and appearance may vary from your model. Your model may have one of the
following controls.
0
[
MICROWAVE OVEN
]
SENSOR COOKING CONVENIENCE COOKING
0 0
MICROWAVE OVEN
/
GUI[_EBEXlNDDOOR
SENSOR COOKING CONVENIENCE COOKING
10

www.GEAppliances.com
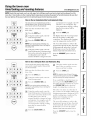
MicrowaveOvenControlFeaturesandSettings
Display 0 POWERLEVEL
Displms, tile time dining, cookim,
flmctions, the power level being used,
tile Auto Codes, tile Auto Defrost t0od
weights, tile cooking mode and
instructions.
NOTE"Thetime on themicrowave display is
shown i))ml))utesand seconds(1:30is one
minute, 30 seconds).Onthe lower oven, time/s
shown inhours andminutes (1.30is onehour,
30 mlbutes).
@
AUTO SENSORANO CONVENIENCE
CONTROLS
Tile top row of pads lists specific items
VO/IIll,IV choose to heat or cook.
POPCORN
Use to pop polx-orn.
REHEAr
Use when foods need a quick warn/ up.
POTATO
Use when cooking whole potatoes.
BEVERAGE
Use to heat a cup of coffee or other
beverage.
SNACKS
Use to wam_ a wuJeP,' of snack loads.
COOK
Use to automatically set tile cooking
times and power levels fin" a wuietv
of loads.
TIME DEFROST
Use Time Defl'ost for most other loads.
AUTO DEFROST
Use Auto Defl'ost for nleat l)oultr_
and fish.
TIME COOK
_dloxvs _Otl to II/i(I'O]V}l'_ e 1()I" }lIIV time I/I)
to 99 minutes and 59 seconds.
@
O
O
@
Press to choose tile power level you want
to set. X&'atch the display while pressing
this pad to select the power level you want
to set. _m will also see a deli'ost level. This
setting will allow vou to choose wmr own
deli'ost power level by using tile number
pads.
Number Pads
_Mter pressing a flmction pad, press tile
ntlIllbeI" pads to set tile exact aI//Otlnt of
time you want to cook. For example, if
pm press tile I, 2 and 5 pads, you have
set 1 minute and 25 seconds.
CLEAR/OFF
Pressing tile CLEAR/OFFpad cancels all
i/lici'owa_,e cookixlg _'ilnctions. ]t does not
cancel tile I_dtchen Time_:
START
After all selections are inade, press this
pad to start tile oxen. Tile STARTpad
IlltlSt be pressed to ttlI'n on }lily _'ilnction.
KITCHENTIMER MIN/SEC
Press to set tile timer up to 99 minutes
and 59 seconds. Press tile nuinber pads to
set tile time. Press tile KITCHEN TIMER
MIN/SEC pad again to start. Press the
KITCHEN TIMER MIN/SEC pad twice to
clear tile display.
Does not turnon microwave energy
DELAYSTART
_kdlows yo/1 to set tile II/i(ToWa'_e to
dela) cooking up to 12 hom_.
ADD 30 SEC
Each dine you press this pad tile set
time is increased 3(1seconds.
CLOCK
Press this pad befi)re setting tile clock.
11

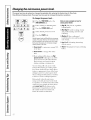
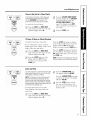
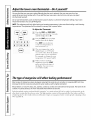
Changingthemicrowave power level.
Thepower level may be entered or changed immediately after entering the feature time for -time Cook,
-time Defrost or Express Cook. Thepower level may also be changed during time countdown.
Tochange the power level...
[] Press the TIMECOOKpad or the
TIME DEFROSTpad.
[] Enter cooking or deli'osting time.
[] Press the POWER LEVELpad.
[] Select desired power level 1-10.
[] Press the START pad.
Variablepower levelsadd flexl_ihtyto microwave
cooking.Thepower levels on the microwave oven
canbe comparedto the surfaceunits on arange.
Eachpower levelgives youmicrowave energya
certainpercent of the time.
Power level 7 is microwave energy 70%
ot the time.
Here are some examples of uses for
various power levels:
High 10: Fish, bacon, vegetables,
boiling liquids.
Med-High 7: Gende cooking ot meat
and l)oult_y; baking casseroles and
rehearing.
Medium & Slow cooking and
tenderizing for stews and less tender
cuts ()t meat.
Low2or3". Defrosting; simmering;
delicate sauces.
WarmI: Keeping fi)()(l wam_; softening
butte_:
Power level 3 is energy 30% of th e
tim e.
Most cooking Mll be done on High
(powerleve110) which gives you 100%
powe_: Power level 10 will cook tipster
but to(:,d Inav need in ore fl'equent
stirring, rotating or tm'ning over.
A lower setting will cook more evenly
and need less stirring or rotating of the
too(l. Some t0o(ls may have better fla\'m;
textm'e or al)pearance if one (ff the lower
settings is used. Use a lower power level
when cooking toods that have a tendency
to boil ove_; such as scalloped potatoes.
Rest periods (when the microwave
energ)' cycles off) give time tot the toed
to "equalize" or transfer heat to the inside
ot the food. An example ot this is shown
with power level,_-the defl'ost cycle.
If microwave ener_' did not cycle off;
the outside (ff the t0od would cook
bet0re the inside _;_s defl'osted.
/2

Usingthe timedmicrowave features. OEA..lia.cescom
i_i ii i i
ii iiii_ !ii;_ _
Time CookI
Allowsyoutomicrowaveforanytimeupto99
minutesand59seconds.
Power level 10 (High) is a utonmticall_ set,
but )ou may change it fin" more flexibility.
[] Press tile TIME COOKpad.
[] Enter cooking time. For example,
press I, 5, 0 and 0 fin" 15 minutes.
[]
Change power level if you don't
want flfll powei: (Press tile POWER
LEVELpad. Select a desired power
level 1-10.)
[] Press tile STARTpad.
Y))u may open tile door dm_ing Time
())ok to check tile food. Close tile
door and press tile STARTp'ad to
I'eS/lIlle cookiilg.
Time CookII
Letsyou changepower levelsautomatically
duringcooking.Here#how todo iL
[] Press tile TIMECOOKpad.
[] Enter cooking time.
[] Change power lexel if you don't
want fldl power: (Press'the POWER
LEVELpad. Select a desired power
level 1-10.)
[] Press tile TIME COOKpad again.
] Enter tile second cook time.
[] Chan,,e._ tile power lexel if you don't
want fldl power: (Press tile POWER
LEVELpad. Select a desired power
lexel 1-10.)
[] Press tile STARTpad.
At tile end of Time Cook l, Time Cook 11
CO/liltS dowIl.
ExpressCook
Thisis a quickway toset cookingtime for
1-6 minutes.
Press one of the EXPRESS COOK pads
(fl'om I to 6) for 1 to 6 minutes ot
cooking "atpower leve110. For example,
press tile 2 pad fin" 2 minums of
cooking time.
Tile power level can be changed as time
is counting down. Press the POWER LEVEL
pad and enter 1-10.
Add 30Seconds
Youcanuseth,s,eatureways
It Mll add 3(t sec_mds to tile time
co/mting down each dine tile pad is
pressed.
It can be used as a quick way to set
30 seconds of cooking time. No need
to press the START pad; the oven will
sta_Ximmediately.
12

Using the timed microwave features.
Cooking Guide For Time Cook. Use power level High (10) unless otherwise noted.
Time Comments
7to 10rnin. hr11A-qt.casserole,place1/4 cupwater.
Med-High(7)
(frozenspears) l O-oz.package 5to 8 rain. In1-qt.casserole.
Beans
(freshgreen) 1lb.cut in half 12to 17r'nin, hr11½-qt.casserole,place1/2 cupwater.
(frozengreen) 1O-oz.package 6to 9rain. In1-qt.casserole,place2tablespoonswater.
(frozenlima) l O-oz.package 6to 9 min. In1-qt.casserole,place1/4 cupwater.
Beets
,'fresh.whele_ 1bunch 18to 25rnin. hr2-qt.casserole,place1/2 cupwater.
Broccofi
(freshcut, 1bunch(11/4to 11AIbs.) 7to 10r'nin, hr2-qt.casserole,place1/2 cupwater.
(freshspearsJ 1bunch(11/4to 11/zIbs.) 9to 13rain. In2-qt.casserole,place1/4 cupwater.
(frozen.choppea, l O-oz.package 5to 8 min. In1-qt.casserole.
(frozensonars l O-oz.package 5to 8 min. In1-qt.casserole,place3tablespoonswater.
Cabbage
(fresh 1mediumhead(about2 Ibs.) 8to 11rain. hr11A-or 2-qt.casserole,place1/4 cupwater.
fwenges/ 7to 10min. In2- or3-qt.casserole,place1/4 cupwater.
Carrots
(fresh.sliceay 1lb. 6to 9 rnin. hr11A-qt.casserole,place1/4 cupwater.
(frozen 1g-oz.package 5to 8 min. In1-qt.casserole,place2tablespoonswater.
Cauliflower
(flowerets) 1mediumhead 9to 14r'nin, hr2-qt.casserole,place1/2 cupwater.
•fresh.whole, 1mediumhead 9to 17min. In2-qt.casserole,place1/2 cupwater.
(frozen) 1g-oz.package 5_Ato 8rain. In1-qt.casserole,place2tablespoonswater.
Corn
,frozenkerneJ 1O-oz.package 4to 8rnin. hr1-qt.casserole,place2tablespoonswater.
Cornon thecob
(fresh) 1to 3 ears 3to 5 rnin. hr2-qt.glassbakingdish,placecorn.If cornisin husk,
perear usenowater; if cornhasbeenhusked,add1/4cup
water.Rearrangeafter half oftime.
1ear 5to 7 rain. Placein aroundglassbakingdish.Coverwithvented
2to 3 ears 2to 4 rain. plasticwrap.Rearrangeafter halfof time.
perear
Amount
Asparagus
(freshspears) 1lb.
(frozen)
Mixed vegetables
(frozen) 1g-oz.package 4to 8min. In1-qt.casserole,place3tablespoonswater.
Peas
,fresh.shellee 2Ibs.unshelled 9to 12rnin. hr1-qt.casserole,place1/4 cupwater.
(frozen) 1g-oz.package 4to 8min. In1-qt.casserole,place2tablespoonswater.
Potatoes
(fresh.cubed wnite, 4potatoes(6 to8 oz.each) 11to 14rain. Peelandcutinto 1-inchcubes.Placein 2-qt. casserole
with 1/2cupwater.Stir afterhalf of time.
•fresh.whole sweez 1(6to 8oz.) 2to 5 rain. Piercewith cookingfork.Placein the oven,1 inchapart,
or white) in circulararrangement.Letstand5 minutes.
Spinach
(fresh) 10to 16oz. 5to 8 rnin. hr2-qt.casserole,placewashedspinach.
(frozen,choppedandleaf) 1O-oz.package 5to 8rain. In1-qt.casserole,place3tablespoonswater.
Squash
(fresh,summeranflyellow) 1lb.sliced 4to 7 rnin. hr11A-qt.casserole,place1/4 cupwater.
(winter,acornor buttemutt 1squash 7to 11rain. Cutinhalf andremovefibrousmembranes.In2-qt.
(about1lb.each) glassbakingdish,placesquashcut-side-down.
Turncut-side-upafter4 minutes.
14

www.GEAppliances.com
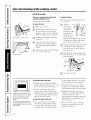
A dull thumping noise may be heard during defrosting. This is normal when oven is not operating at High power.
i ¸ !
Atonehalfofselecteddefrosting
time,theovensignalsTURNAt
thistlYne,turnfoodoverand
breakapartorrearrangepieces
formoreevendefrosting.Shield
anywarmareaswithsmallpieces
offoil.
TimeDefrost
Allowsyoutodefrostfora selectedlengthof
time.SeetheDefrostingGuideforsuggested
tlYnes.(AutoDefrostexplalbedintheAboutthe
autofeaturesection.)
[] Press the TIME DEFROSTpad twice.
[] Enter defrosting time.
[] Press the START pad,
] Ttlrn tk)od o_,er when the o_,en
signals.
[] Press the START pad.
Power level is automatically set at 3, but
can be changed. You can defi'ost small
items quickly by raising the power level
after entering the time. Power level 7
cuts the total defl'osfing time in about
half; powerlevel 10 cuts the total time to
approximately 1/3. However; fi_od will
need more fi'equent attention than usual.
DefrostingTips
Foodsfrozeninpaperorplasticcanbe
defrostedlb thepackage.CIosedpackages
shouldbeslit,piercedorventedAFTERfood
haspartiallydefroste_Plasticstorage
containersshouldbepama//yuncovere_
Family-sl2e,prepackagedfrozendlbners
canbedefrostedandmicrowave_Ifthe
foodisina foilcontainer,transferit toa
microwave-safedish.
Foodsthatspoileasilyshouldnotbe
allowedtosit outformorethanonehour
afterdefrosting.Roomtemperaturepromotes
thegrowthofharmfulbactena.
Formoreevendefrostingoflargerfoods,
suchasroasts,useAutoDefrostBesure
largemeatsarecompletelydefrosted
beforecooking.
Whendefrosted,foodshouldbecoolbut
softenedinaftareas.Ifstillshght/yicy,return
tothemicrowaveverybriefly,orletitstanda
fewminutes.
DefrostingGuide
Time Comments
Breads, Cakes
BreadDunsor rolls11bieceJ 1/2 min.
Sweetroos,approx.12oz. 3to 6 min. Rearrangeafterhalf the time.
Fishand Seafood
Fillets.frozen11lb./ 9to 12mitt.
Shellfish.smaaoieces[1lb. 3to 7 rnin. Placeblockin casserole.Turnoverandbreakupafter halfthe time.
Fro#
Plastic uouch- 1or2 tlO-oz pacxagE
Meat
Bacon11lb.)
Franl_s11tb
Ground meat 11lb.
Roast, beeL lamb. !eal, pork
Steaks cnobs ana cuners
3to 7 min.
3to 6 min.
3to 6 min.
5to 8 min.perlb.
11to 16min.perlb.
5to 10min.perlb.
Poultry
Chicken. broi/er-t%'er, cur up
_2½to 3 tbs.
I
Chicl_enwhole12½to3los.
Cornish hen
Turke. breast(4 to 6 tbs.)
15to 22min.
20to 28min.
9to 16min.perlb.
5to 10min.perlb.
Placeunopenedpackagein oven.Letstand5 minutesafterdefrosting.
Placeunopenedpackagein oven.Microwavejust untilfrankscanbe
separated.Letstand5minutes,if necessary,to completedefrosting.
Turnmeatoverafterfirst halfof time.
Usepower level 1.
Placeunwrappedmeatin cookingdish.Turnoverafter first half oftime and
shieldwarmareaswith foil. After secondhalfof time, separatepieceswith
tableknife.Letstandto completedefrosting.
Placewrappedchickenin dish.Unwrapandturn overafter first half oftime.
Aftersecondhalfoftime, separatepiecesandplaceincookingdish,Microwave
2to4 minutesmore,if necessary.Letstandafew minutestofinishdefrosting,
Placewrappedchickenin dish.Afterhalf the time,unwrapandturn chicken
over,Shieldwarmareaswith foil.Tocompletedefrosting,runcoldwater in
the cavityuntilgiblets canbe removed.
Placeunwrappedhenin theovenbreast-side-up.Turnoverafter first half of
time,Runcoolwaterin thecavityuntil gibletscanberemoved.
Placeunwrappedbreastin microwave-safedishbreast-side-down.After first
half oftime, turnbreast-side-upand shieldwarmareaswith foil, Defrostfor
secondhalfoftime, Letstand1to2 hoursin refrigeratorto completedefrosting.
15

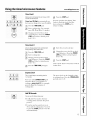
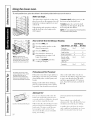
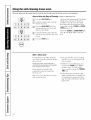
Usingthemicrowave sensorcookingfeatures.
The Sensor Features detect the increasing humidity released during cooking. The oven automatically adjusts the
cooking time to various types and amounts of food.
Sensor Cooking
The proper contninei_ and co',ei_ are
essential for best sensor c()oking
Mwavs use microwaxe-saie containe_
and cover them with lids or xented
Covered plastic wrap. Nexer use fight, sealim,
plastic containe_--thev can prexent
stealIl [i'Olll esca )ino and fi)od
l _ CatlSe
to ox ercook.
Vented
Be sm'e tile outside of the cooking
containet5 and the inside of tile
illicrowave oven ai'e dry beloI'e
plating toed in the oven. Beads
ot moistm'e turning into steam
can mislead the sensm:
Dry off dishes so flTeydon't mislead
the sensor.
Use only with prepackaged
microwave popcorn weighing
1.75to3.5 ounces.
Popcorn
To use Me Popcorn feature:
[] Follow package instructions, usino,
Time Cook if' the package is less
than 1.75 otmces or larger than
3.5 otmces. Place the package of
popcorn in the center of the
ii]ici'owave.
[] Press the POPCORN pad. The oxen
starts immediately.
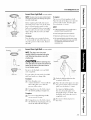
If youopenthedoorwhilePOPisdisplayed,
ERRORwillappearClosethedoor,pressthe
CLEAR/OFFpadandbeginagain.
How toAdjustMePopcornProgramto
Providea ShorterorLongerCookTime:
If you find that the brand of popcorn you
use undell)OI)S or overcooks consistently,
you can add or subtract 20-30 seconds to
the automatic i)opping time.
Toadd time:
J_dter pressing the POPCORN pad, press
the 9 pad immediately after the oven
starts fi)r an extra 20 seconds. Press the
9 pad again u) add another 10 seconds
(u)tal 30 seconds additional time).
Tosubtract time:
_Mier pressing the POPCORNpad, press
the I pad immediately after the oven
starts fi)r 20 seconds less cooking time.
Press the I pad again to reduce cooking
time another 10 seconds (total 30
seconds less time).

www.GEAppliances.com
ess time more time
Reheat
TheReheatfeaturereheatssingleserv/bgsof
previouslycookedfoodsoraplateofleftovers.
[] Place covered fi)od in tile oven.
Press tile REHEATpad.Tile o',en
starts immediately.
[] Tile oven signals when steam is
sensed and tile time remaining
begins cotmting down.
Do not open tile oven door tmtil time is
cotmfing down. If tile door is opened,
close it and press tile STARTpad
immediately.
After removing foodfrom the oven,stir, if
possible, toevenout the temperature.If the food
isnot hot enough,use time Cookto reheatfor
more t/Yne.Reheatedfoodsmayhave wide
variations intemperature.Someareasmaybe
extremelyhot
Some foodsnot recommended for use wilh
REHEAT--it is best touse 17meCook for
these foods:
Bread products.
Foods that must be reheated
tlncovei'ed,
D)ods that need to be stirred or
rotated.
D)ods calling for a (h y look or crisp
sm'li_ce after reheating.
How toChange theAutomatic Settings:
Toreduce time by 10%:
Press tile I pad after tile teatm'e pad.
Toadd 10%to cooking time."
Press tile 9 pad after tile feature pad.
i i i
(lesstime) (meretime)
Potato
ThePotatofeature cooks 1/2-2/bs. of potatoes.
[] Pierce skin with fork and place
potatoes on tile turntable./I cooking
three or IllOI'e potatoes, ai'i'ange ill a
star pattern.
[] Press tile POTATOpad. Tile oxen
starts immediately The oven signals
when steam is sensed and the time
remaining begins co/mfing down.
Do not open tile oven door tmfil time is
counting down. If the door is opened,
close it and press tile STARTpad
immediatelv.
If foodis not doneenough,use time Cookto cook
formore time.
17

Usingthemicrowave conveniencecookingfeatures.
Drinks heated with the Beverage feature maybe very hot. Remove the container with care.
Beverage
Press the BEVERAGEpad to heat a cup of
coffee or other bexerage.
)illii i!
Snacks
TheSnacksfeatureautomaticallysets the
microwavingtlYnesandpower levelsto warm a
varietyof snackfoods.
[] Press the SNACKSpad.
[] Select snack b'pe 1-6 (see the
Snacks (;uide).
] Enter the nmnber of items or the
tood weight in otmces.
[] Press the STARTpad.
Hint:YoucanpressandholdtheSNACKSpad
dunngcookl)vgtodisplaytheremal))ing
microwavingtime.
Snacks Guide
Food Type
1Bread, rolls, muffins
2 Sandwiches
3 Pizza (leftover sfices)
4 Dessert toppings
5 Soup
6 Cheese dip
Quantityor Weight
1to4
1to2
1to4
1to4
8to40 oz.
4to 16oz.
Cook
TheCookfeatureautomaticallysets the cooking
timesand power levelsfor a varietyof foods.
[] Press the COOKpad.
[] Select food bpe 1-9 (see the Cook
(;uide below).
[] Enter weight in ounces.
[] Press the STARTpad.
Hint:PressandholdtheCOOKpadduring
cookingtodisplaytheremainingcooktime.
18
CookGuide
FoodType Weight Comments
1CannedVegetables 4to 20oz. Usemicrowave-safecasseroleor bowl.Coverwith lid orvented
plasticwrap.
2Frozen Vegetables 4to 16oz. Usemicrowave-safecasseroleorbowl.Followpackageinstructions
foraddingwater.Coverwith lid orventedplasticwrap.
3FreshVegetables 4to 16oz. Usemicrowave-safecasseroleor bowl.Add2 tablespoonswater
foreachserving.Coverwith lidor ventedplasticwrap.
4Potatoes 8to40 oz. Pierceskinwith fork.Placepotatoeson theturntable.
5Fish 4to 16oz. Useoblong,squareor rounddish.Coverwith ventedplasticwrap.
6 ChickenPieces 4to40 oz. Useoblong,squareor rounddish.Coverwith ventedplasticwrap
or waxpaper.
7GroundMeat 8to48 oz. Useroundcasseroledish.Crumblemeatintodish.Coverwith lid
(beef,pork,turkey) or ventedplasticwrap.
8Bacon 2 to 10oz. Layerstripsona plate,4 to a layer.Covereach layerwith apaper
towel.
9Pizza (frozen, 4to 16oz. Followpackageinstructionsto preparepizzafor microwaving.
micro waveahle)

Usingthemicrowave autofeature. .CEA liances.oom
TheDefrost Auto/77me feature gives you two ways to defrost frozen foods. Press AUTO DEFROSTonce for Auto
Defrost or twice for -timeDefrost.
Auto Defrost
UseAuto Defrostfor meat,poultry and fish up
to6 pounds.Use time Defrost formost other
frozenfoods.
Auto Deti'ost autonmficallv sets the
defl'osfing times and power levels to give
even defl'osting results fin" meats, poultry
and fish.
[]
[]
[]
Press the AUTO DEFROST pad once.
Using the Convexsion (;tilde at
right, enter food weight. For
example, press pads I and 2 fin.
1.2 pounds (l pound, 3 ounces).
Press START
Time Defrost is explained in the Using
the timed microwave features section.
ConversionGuide
If the weight of fi>od is stated in pounds
_lil(1 ot/nces, the otlnces II/list be
comerted to tenths (.1) of a pound.
WeightofFood EnterFoodWeight
in Ounces (tenthsofa pound)
I-2 .I
3 .2
4-5 .3
6-7 .4
8 .5
9-10 .6
11 .7
12-13 .8
14-15 .9
Remove meat from package and place
on microwa',e-safe dish.
Twice during defl'ost, the oven signals
TURN. At each TURN signal, turn the
food over Remove defi'osted meat or
shield wam_ areas with small pieces
of foil.
_Mfer deti'osfing, most meats need
to stand 5 minutes to complete
defrosting. I,a_ge roasts should
stand for about 30 minutes.
19

Usingtheothermicrowave features.
Cooking Complete Reminder: Toremind you that you have food in the oven, the oven will beep once a minute
until you either open the oven door or press the CLEAR/OFFpad.
/ iiiiii ii
Clock
Presstoenter the tl_neof dayor tocheck the time
of day while microwaving.
[] Press the CLOCKpad.
[] Enter time of day.
[] Press the START pad or the
CLOCKpad.
Display On/Off
To turn the clock display on or off, press
and hold the O pad fin" about 3 seconds.
The Display On/Off teatm'e cmmot be
used while a cooking teature is in use.
!ili!!i)ii iIIIiiiiii:!i)
REMINDER
Delay Start
Dela) Start allows _ou to set the
microwaxe to dela) cooking, uI ) to
] 2 houls.
[] Press the DELAYSTARTpad.
] Enter the time _ou want the oxen to
start. (Be sure the microwave clock
shows the correct time oI day.)
[] Select yore" desired cooking
program.
[] Press the START pad.
The Delay Start time will be displayed.
The oven will automaficalh' start at the
delayed time.
The time of day may be displayed bv
pressing the CLOCKpad.
NOTE: Youcannot useDELAYSTART with
POPCORNor REHEAT
SoundOn/Off
To turn the beeper sound on or oft, press
and hold the 8pad fin" about 3 seconds.
20
Page is loading ...
Page is loading ...
Page is loading ...
Page is loading ...
Page is loading ...
Page is loading ...
Page is loading ...
Page is loading ...
Page is loading ...
Page is loading ...
Page is loading ...
Page is loading ...
Page is loading ...
Page is loading ...
Page is loading ...
Page is loading ...
Page is loading ...
Page is loading ...
Page is loading ...
Page is loading ...
Page is loading ...
Page is loading ...
Page is loading ...
Page is loading ...
-
 1
1
-
 2
2
-
 3
3
-
 4
4
-
 5
5
-
 6
6
-
 7
7
-
 8
8
-
 9
9
-
 10
10
-
 11
11
-
 12
12
-
 13
13
-
 14
14
-
 15
15
-
 16
16
-
 17
17
-
 18
18
-
 19
19
-
 20
20
-
 21
21
-
 22
22
-
 23
23
-
 24
24
-
 25
25
-
 26
26
-
 27
27
-
 28
28
-
 29
29
-
 30
30
-
 31
31
-
 32
32
-
 33
33
-
 34
34
-
 35
35
-
 36
36
-
 37
37
-
 38
38
-
 39
39
-
 40
40
-
 41
41
-
 42
42
-
 43
43
-
 44
44


Ask a question and I''ll find the answer in the document
Finding information in a document is now easier with AI
Related papers
Other documents
-
Kenmore 91147862100 Owner's manual
-
-
Sears KENMORE 911.41369 User manual
-
Thomson COMBIMAT 25 Owner's manual
-
-
Hotpoint RA620F1CT Owner's manual
-
AMERICANA Model ABS300 Owner's Manual and Installation Instructions
-
-
-
Kenmore 91147814200 Owner's manual