
FORZA10 CROSS
OUTDOOR SUBWOOFER INSTALL GUIDE
FORZA 10 Cross manual R3.indd 1 7/21/20 1:36 PM

FORZA 10 CROSS INSTALL GUIDE
Thank you for purchasing the FORZA-10CROSS Indoor/Outdoor Subwoofer with Built-in Crossover and through Output
for a pair of Satellite Speakers. This subwoofer is the perfect choice for creating a Subwoofer/Satellite System without
having to purchase a dedicated Subwoofer Amplier. It has four-conductor inputs that splits between a Low Pass Cross-
over connected to the Internal 8-ohm 10-inch woofer and a Left and Right Stereo Output for a Pair of 8-ohm satellite
speakers. The nominal load for the Full Range Amplier becomes 4-ohms (8 +8-ohm wired in Parallel). It is an ideal 2.1
system adding bass to an outdoor area such as a patio, pool, garden, and more.
Features
• Robust high excursion polypropylene woofer with stitched rubber surround
• IP66 weather-resistant composite enclosure
• Internal Low Pass Crossover with Satellite Speaker connections 8 + 8 Ohm Net 4-ohms
• Four Inputs and four outputs for a 2.1 System from a Single Stereo 4-ohm rated Amplier
• Can also be paired with a second 8-ohm FORZA10Cross and powered with a Dedicated Sub Amp for a 4-ohm Load.
1. Parts Inventory
• Security eyebolt
• Wire nuts x 4
• Mounting screws x 2
• Manual
3. Subwoofer Location
The subwoofer res downward and is omni directional, placement is less critical than full-range speakers.
For the best results, place the subwoofer near a wall and near the full-range speakers if possible. It is recommended
that the subwoofer be within 10-15 feet of the full-range speakers. It can also be placed under a deck or behind bushes
if you prefer a stealthy install.
4. Subwoofer Installation
Once you have selected the location for your subwoofer, you are ready to start your install. Run 12-14 gauge
4-conductor outdoor-rated speaker wire from your amplier to the location you have chosen for your subwoofer.
It will need to be buried or suspended so make sure you mark where it is in the ground for future reference. Your
subwoofer is designed to sit at on all four of its legs. If mounting on a deck or patio, it can be fastened down by using
the two key-hole slots in the bottom feet. To do this, simply measure the center to center distance between the key-hole
slots and install two mounting screws into the deck or patio, leaving ¼” of the screw exposed. Place the subwoofer feet
on the screws and rotate clockwise until the subwoofer is locked into the screw heads. For installation in a garden or
ower bed, place the subwoofer on a at and level surface It is recommended to place the subwoofer on pavers to pre-
vent debris, mulch or weeds gathering under the subwoofer as foreign objects can cause poor performance and could
damage the subwoofer.
Note: For anti-theft security and permanent placement,
the unit has a built-in eyebolt that enables you to
anchor it to its location.
6. Caring For Your Subwoofer
Outdoor speakers and subwoofers are designed to withstand outdoor environments, including incidental exposure
to water. They are not designed to be washed using a pressure washer or hose nozzle. If debris accumulates on the
housing of the speaker, use a damp sponge or cloth to remove it.
7. Troubleshooting
No sound from speakers or quiet/strange sound:
• Make certain you observed proper polarity for both inputs and outs on the subwoofer. Check the
connections at the back of the amplier, and then at the subwoofer
• Most stereo receivers have an A/B speaker selector switch. Make certain that this switch is in the
proper position, and that the proper audio source is selected.
• Mute feature or protection mode is activated. Check for short circuits in speaker wiring.
One speaker is playing while the other is not playing or plays quietly:
• Check the balance control on the receiver. Make sure it is centered.
• Loose connection at either the receiver or the speaker. Double check connections.
• Bad speaker cable. Replace suspect speaker cable.
Receiver cuts on and off:
• This could be caused by a short circuit between the positive and negative leads. Check the connections
at the back of the receiver, and then at the speaker; make sure that no strands of wire
from one connector is touching the other connector
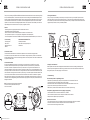
5. Wiring Your Subwoofer
Once you have you have installed your subwoofer you are ready to connect it to your amplier. Strip the wire outer
jackets back about 2” and strip each conductor back about ¼” to bare copper. See connection diagram below, locate
the 4-conductor input cable and connect the left and right channels from your amplier. Locate the 2-conductor left and
right speaker output cables, connect your satellite speakers to
FORZA 10 CROSS INSTALL GUIDE
2. Recommended Installation Tools
• #2 Phillips screwdriver
• Wire cutters & wire stripper/crimp tool
• Drill and bits
OLI GRN
FORZA 10 Cross manual R3.indd 2-3 7/21/20 1:36 PM

FORZA 10 CROSS INSTALL GUIDE
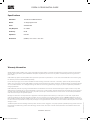
Specications
Warranty Information
All OSD AUDIO outdoor speakers have (1) year Limited Warranty against defects in materials and workmanship. Proof of purchase must accompany
all claims. During the warranty period OSD AUDIO will replace any defective part and correct any defect in workmanship without charge for either
parts or labor
OSD AUDIO may replace returned speakers with a product of equal value and performance. In such cases, some modications to the mounting may
be necessary and are not OSD AUDIO’s responsibility.
For this warranty to apply, the unit must be installed and used according to its written instructions. If necessary, repairs must be performed by OSD
AUDIO. The unit must be returned to OSD AUDIO at the owner’s expense and with prior written permission. Accidental damage and shipping damage
are not considered defects, nor is damaged resulting from abuse or from servicing performed by an agency or person not specically authorized in
writing by OSD Audio
OSD AUDIO sells products only through authorized dealers and distributors to ensure that customers obtain proper support and service. Any OSD
AUDIO product purchased from an unauthorized dealer or other source, including retailers, mail order dealers and online sellers will not be honored or
serviced under existing OSD AUDIO warranty policy. Any sale of product by an unauthorized source or other manner not authorized by OSD AUDIO
shall void the warranty on the applicable product.
Damage to or destruction of components due to application of excessive power voids the warranty on those parts. In these cases, repairs will be
made on the basis of the retail value of the parts and labor. To return for repairs, you must email customer service at [email protected] for a
Returned Merchandise Authorization (RMA) number then the unit must be shipped to OSD AUDIO at the owner’s expense, along with a note explaining
the nature of service required. Be sure to pack the product(s) in a corrugated container with at least 3 inches of resilient material to protect the unit from
damage in transit.
This Warranty Does Not Cover: Damage caused by abuse, accident, misuse, negligence, or improper operation (installation) • Any products that have
been altered or modied • Any product whose identifying number of decal, serial #, etc. has been altered, defaced or removed • Normal wear and
maintenance.
FORZA 10 CROSS Manual 7/20
OSD Audio | Brea, CA |
IP66 Rated Dust Proof and Water Resistant.
Woofer 10” Polypropylene Cone
Power 300 Watts Max
Freq Response 20 - 300Hz
Sensitivity 86 dB
Impedance 8+8 Ohm
Dimensions (HxWxD) 12.2” x 16.5” x 16.5” inch
FORZA 10 Cross manual R3.indd 4 7/21/20 1:36 PM
-
 1
1
-
 2
2
-
 3
3


Ask a question and I''ll find the answer in the document
Finding information in a document is now easier with AI
Related papers
-
OSD Audio FORZA User manual
-
OSD Audio FORZA-10 10" Weather-Resistant Outdoor Subwoofer Owner's manual
-
-
OSD Audio Forza 5 Weather-Resistant 5.25" 70V/8 Ohm Outdoor Pendant Speaker Owner's manual
-
-
-
OSD Audio 452SC800D Installation guide
-
-
OSD Audio ACE600ST Owner's manual
-
Other documents
-
Forza 1114784 User manual
-
Rotel RSDX-02 Owner's manual
-
-
Proficient Audio Systems M80 Owner's manual
-
Marantz SR4003 User manual
-
-
Rotel RSX-1550 Owner's manual
-
-
Sonance Patio Series 4.1 Owner's manual
-
Harman/Kardon AVR 156 Owner's manual