AEG L 87480 FL User manual

Category
Washing machines
Type
User manual

This manual is also suitable for

L 87480 FL
EN WASHING MACHINE USER MANUAL
CONTENTS
4 SAFETY INFORMATION
5 TECHNICAL INFORMATION
7 PRODUCT DESCRIPTION
7 ACCESSORIES
8 CONTROL PANEL
13 PROGRAMMES
16 BEFORE FIRST USE
16 USING THE APPLIANCE
16 LOADING THE LAUNDRY
16 FILLING DETERGENT AND ADDITIVES
18 SETTING AND STARTING A PROGRAMME
19 AT THE END OF PROGRAMME
20 HELPFUL HINTS AND TIPS
22 CARE AND CLEANING
27 TROUBLESHOOTING
30 INSTALLATION
36 WARRANTY
ENVIRONMENT CONCERNS
Recycle the materials with the symbol . Put the packaging in applicable containers to
recycle it.
Help protect the environment and human health and to recycle waste of electrical and
electronic appliances. Do not dispose appliances marked with the symbol
with the
household waste. Return the product to your local recycling facility or contact your
municipal office.
VISIT OUR WEBSITE FOR:
- Products
- Brochures
- User manuals
- Trouble shooter
- Service information
www.aeg.com/au
LEGEND
Warning - Important Safety information.
General information and tips
Environmental information
Subject to change without notice.
2
www.aeg.com/au
FOR PERFECT RESULTS
Thank you for choosing this AEG product. We have created it to give you
impeccable performance for many years, with innovative technologies that help
make life simpler – features you might not find on ordinary appliances. Please spend
a few minutes reading to get the very best from it.
CUSTOMER CARE AND SERVICE
We recommend the use of original spare parts.
When contacting Service, ensure that you have the following data available. The
information can be found on the rating plate.
Model
PNC
Serial Number
ENGLISH
3
SAFETY INFORMATION
CONDITIONS OF USE
This appliance is intended to be used in
household and similar applications such
as:
Farm houses.
By clients in serviced apartments, holi-
day apartments and other residential
type environments.
Before installation and use, read this man-
ual carefully:
For your safety and the safety of your
property
To help the environment
For the correct operation of the appli-
ance.
Always keep this instruction manual with
the appliance if you move or give it to an-
other person.
The manufacturer is not responsible if an
incorrect installation and use causes dam-
age.
CHILDREN AND VULNERABLE
PERSON SAFETY
This appliance is not intended for use
by persons (including children) with re-
duced phisical, sensory or mental capa-
bilities, or lack of experience and
knowledge, unless they have been giv-
en supervision or instruction concerning
use of th appliance by a person respon-
sible for their safety. Children should be
supervised to ensure that they do not
play with the appliance.
Keep all packaging away from children.
There is the risk of suffocation or injury.
Keep all detergents away from children.
Keep children and pets away from the
appliance when the door is open.
Before you close the appliance door,
ensure there are no children or pets in-
side the drum.
If the appliance has a child safety de-
vice, we recommend you activate it.
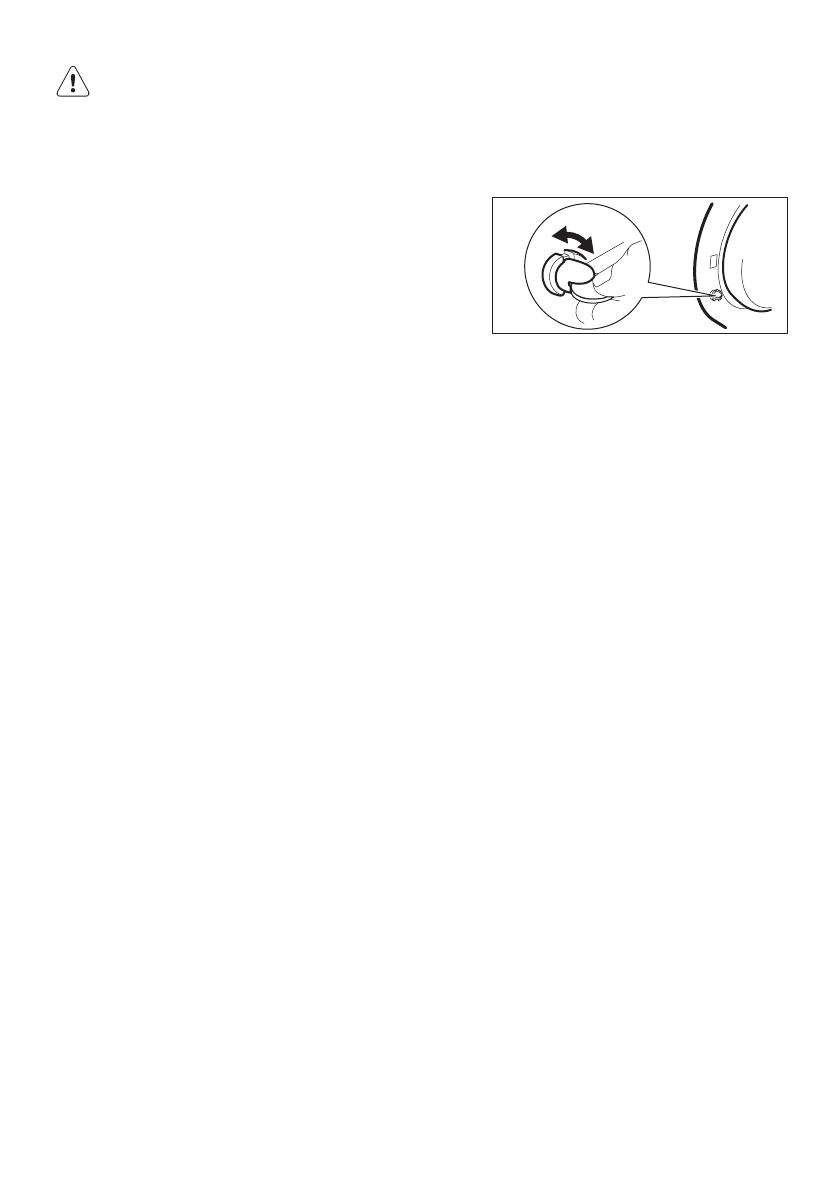
CHILD SAFETY DEVICE
When you activate this device, you can-
not close the door. This prevents chil-
dren or pets being closed inside. To ac-
tivate the device, turn it clockwise, until
the groove is horizontal. To deactivate
the device, turn it counterclockwise, un-
til the groove is vertical.
GENERAL SAFETY
Do not use the appliance for professio-
nal use. The appliance is only for do-
mestic use.
Do not change the specifications of this
appliance. There is the risk of injury and
damage to the appliance.
Do not put flammable products or
items that are wet with flammable
products in, near or on the appliance.
Risk of explosion or fire.
Obey the safety instructions on the de-
tergent packaging to prevent burns to
eyes, mouth and throat.
Make sure that you remove all metal
objects from the laundry. Hard and
sharp material can cause damage to
the appliance.
Do not touch the glass of the door
while a programme operates. The glass
can be hot (only for front-loading appli-
ances).
CARE AND CLEANING
Turn off the appliance and disconnect
the mains plug from the mains socket.
Do not use the appliance without the
filters. Make sure that the installation of
the filters is correct. An incorrect instal-
lation causes water leakages.
INSTALLATION
The appliance is heavy, be careful when
you move it.
Do not transport your appliance with-
out the transit bolts, you can damage
4
www.aeg.com/au
internal components and cause leak-
ages or malfunctions.
Do not install and connect a damaged
appliance.
Make sure to remove all packaging and
transit bolts before first use.
Make sure that the mains plug is dis-
connected from the mains socket dur-
ing installation.
Do not install or use the appliance
where the temperature is less than 0 °C.
When you install the appliance on a
carpet floor, make sure that there is air
circulation between the appliance and
the carpet. Adjust the feet to have the
necessary space between the appliance
and the carpet.
Water connection
Do not connect the appliance with old
hoses already used. Only use new ho-
ses supplied with the appliance.
Make sure not to cause damage to the
water hoses.
Do not connect the appliance to new
pipes or pipes not used for a long time.
Let the water flow for some minutes,
then connect the inlet hose.
The first time you use the appliance,
make sure that the water hoses and the
couplings do not have leakages.
Electrical connection
Make sure thet the appliance is connec-
ted to a correctly installed earthed
power outlet.
Make sure that the electrical informa-
tion on the rating plate agrees with the
power supply.
Do not use multiple plugs and exten-
sion cables. There is a risk of fire.
Do not replace or change the mains ca-
ble. Contact the service centre.
Make sure not to cause damage to the
mains plug and cable.
Connect the mains plug to the mains
socket only at the end of the installa-
tion. Make sure that there is access to
the mains plug after the installation.
Do not pull the mains cable to discon-
nect the appliance. Always pull the
mains plug.
If this appliance is supplied from a cord
extension set or electrical portable out-
let device, the cord extension set or
electrical portable outlet device must
be positioned so that it is not subject to
splashing or ingress of moisture.
If the supply cord of this appliance is
damaged, it must be replaced by the
manufacturer, its service agent or simi-
larly qualified persons to avoid a haz-
ard.
DISCARD THE APPLIANCE
1.
Disconnect the mains plug from the
mains socket.
2.
Cut off the mains cable and discard it.
3.
Discard the door catch. This prevents
children or pets being accidently
closed inside the appliance. There is
a risk of suffocation (only for front-
loading appliances).
TECHNICAL INFORMATION
Dimensions Width / Height / Depth 600 / 850 / 605 mm
Total depth 640 mm
Electrical connection: Voltage
Overall power
Frequency
230-240 V
2200 W
50 Hz
Level of protection against ingress of solid particles
and moisture ensured by the protective cover, except
where the low voltage equipment has no protection
against moisture
IPX4
ENGLISH
5
Water supply pressure Minimum 0,5 bar (0,05 MPa)
Maximum 8 bar (0,8 MPa)
Water supply
1)
Cold water
Maximum load Cotton 8 kg
Spin speed Maximum 1400 rpm
1)
Connect the water inlet hose to a water tap with a 3/4'' thread.
6
www.aeg.com/au
PRODUCT DESCRIPTION
1 2 3 8
9
5
6
7
4
1
0
1
1
1
2
1
Worktop
2
Detergent dispenser
3
Control panel
4
Door handle
5
Rating plate
6
Drain pump
7
Levelling feet
8
Water drain hose
9
Water inlet valve
10
Mains cable
11
Transit bolts
12
Levelling feet
ACCESSORIES
1 2
34
1
Spanner
To remove the transit bolts.
2
Plastic caps
To close the holes on the rear side of
the cabinet after the removal of the
transit bolts.
3
Anti-flood inlet hose
To prevent possible leakage
4
Plastic hose guide
To connect the drain hose on the
edge of a sink.
ENGLISH
7
CONTROL PANEL
Temp.
Spin
Start/Pause
Delay
Start
Time
Save
Extra
Rinse
Stains/
Prewash
Wool/Silk
Cottons
Extra Silent
Synthetics
Easy Iron
Delicates
Duvet
Anti-Allergy
Spin/Drain
Rinse
Jeans
20 Min. - 3 kg
Super Eco
Economy
Refresh
Anticrease
Auto Off
1 2 3
45678910
1
On/Off button
2
Programme knob
3
Display
4
Start Pause button
5
Delay Start button
6
Time Save button
7
Extra Rinse button
8
Stain/Prewash button
9
Spin reduction button
10
Temperature button
AUTO OFF BUTTON
1
Press this button to activate or deactivate
the appliance. A tune sounds when the
appliance is activated.
The AUTO OFF function automatically de-
activates the appliance to stop the energy
consumption when:
You do not use the appliance for 5 mi-
nutes before you press button
4
.
All settings are cancelled.
Press button
1
to activate the appli-
ance again.
Set again the washing programme
and all possible options.
After 5 minutes from the end of the
washing programme. Refer to 'At the
end of programme'.
PROGRAMME KNOB
2
Turn this knob to set a programme. The
related programme indicator comes on.
8
www.aeg.com/au
DISPLAY
3
A H
JKL
C D E F GB
I
The display shows:
A
The temperature of the set programme
Cold water
B
The spin speed of the set programme
No Spin symbol
1)
Rinse Hold symbol
1)
Only available for Spin/Drain programme.
C
Prewash phase
Washing phase
Rinse phase
Spin phase
The phase symbols
When a programme is set, all the symbols of the phases related to
the programme come on.
When the programme starts, only the symbol of the phase in opera-
tion flashes.
When the programme is complete, the symbol of the last phase is
on.
D
The steam symbol comes on when you set a Steam pro-
gramme.
E
The detergent overdosing comes on at the end of the cycle
when the appliance detects too much detergent.
ENGLISH
9
F
You cannot open the door when this symbol is on.
You can open the door only when the symbol goes off.
If the programme is completed but the symbol stays on:
The 'Rinse Hold' function is on.
There is water in the drum.
G
The delay start symbol comes on when you set the delay
start function.
H
The programme time
When the programme starts, the programme time decrea-
ses with steps of 1 minute.
The delay start
When you press the delay start button, the display shows
the delay start time.
•Alarm codes
If the appliance has a malfunction, the display shows alarm
codes. Refer to 'Troubleshooting'.
The display shows this message for some seconds when:
You set a function that is not applicable for the pro-
gramme.
You change the programme while it operates.
When the programme is complete.
I
The child safety lock symbol comes on when this device is
activated.
Graphic bars
The empty indicator bar appears only if the related function
is available for the set programme.
The indicator bar fills accordingly to the set functions.
If you make a wrong selection the message Err indicates that the selection
is not possible.
J
This symbol comes on when you set one of the following
functions:
Shortened duration
•Extra Quick
K
The extra rinse symbol comes on when this function is activa-
ted.
The value shows the total number of the rinses.
10
www.aeg.com/au
The indicator bar is fully filled when you set to the maximum
number of rinses.
L
The Stain symbol comes on when you activate the function.
The Prewash symbol comes on when you activate the func-
tion.
The indicator bar is not fully filled when you set only one of
the functions.
The indicator bar is fully filled when you set the two func-
tions.
START/PAUSE BUTTON
4
Press button
4
to start or interrupt a
programme.
DELAY START BUTTON
5
Press button
5
to delay the start of a
programme from 30 minutes to 20 hours.
TIME SAVE BUTTON
6
Press button 6 to decrease the duration of
the programme.
Press once to set 'Shortened duration'
for items with daily soil.
Press twice to set 'Extra Quick' for items
with light soil.
Some programmes accept only
one of the two functions.
EXTRA RINSE BUTTON
7
Press button
7
to add rinsing phases to
a programme.
Use this function for persons allergic to
detergents and in areas where the water
is soft.
THE STAIN-PREWASH
BUTTON
8
Press button
8
to add the stain and/or a
prewash phase to a programme.
Press this button repeatedly to activate
one or two options. The related symbol
and the indicator bar comes on in the dis-
play.
STAIN
Use this function for laundry with stains
that are hard to remove.
When you set this function, put the
stain remover into compartment
.
This function increases the programme
duration.
This function is not available with
a temperature lower than 40° C.
PREWASH
Use this function to add a prewash
phase before the washing phase. We
recommend that you use this function
when you have laundry with a high level
of soil.
The setting of this function increa-
ses the programme duration.
SPIN BUTTON
9
Press this button to:
Decrease the maximum speed of the
spin phase of the programme.
The display shows only the spin
speeds available with the set pro-
gramme.
Deactivate the spin phase.
Activate the 'Rinse Hold' function. Set
this function to prevent fabric creases.
The appliance does not drain the water
when the program is complete.
TEMPERATURE BUTTON
10
Press button
10
to change the default
temperature. When the display shows
- -, the appliance does not heat the water.
ENGLISH
11
ACOUSTIC SIGNALS
FUNCTION
You can hear the acoustic signals when:
You turn the appliance on.
You turn the appliance off.
You press the buttons.
The programme is complete
The appliance has a malfunction.
To deactivate/activate the acoustic sig-
nals, press button
8
and button
7
at
the same time for 6 seconds.
If you deactivate the acoustic sig-
nals, they continue to operate on-
ly when you press the buttons and
when a malfunction occurs.
CHILD LOCK FUNCTION
This function prevents children operating
the control panel.
To activate the function, press button
10
and button
9
at the same time un-
til the display shows the symbol
.
To deactivate the function, press but-
ton
10
and button
9
at the same time
until the symbol
goes off.
You can activate the function:
Before you press button
4
: the appli-
ance cannot start.
After you press button
4
, all the but-
tons and the programme knob are de-
activated.
PERMANENT EXTRA RINSE
FUNCTION
With this function you can keep the extra
rinse function permanently on when you
set a new programme.
•To activate the function press button
6
and button
5
at the same time un-
til the display shows the symbol
.
•To deactivate the function press but-
ton
6
and button
5
at the same time
until the symbol
goes off.
12
www.aeg.com/au
PROGRAMMES
Programme
Tempera-
ture
Type of load
Max. weight of load
Cycle de-
scription
Functions
Cottons
95° - Cold
White and coloured cotton with
heavy level of soil.
max. load 8 kg
Wash
Rinses
Long spin
SPIN REDUCTION
RINSE HOLD
PREWASH
1)
STAINS
2)
EXTRA RINSE
TIME SAVE
3)
Extra Silent
95° - Cold
White and coloured cotton.
max. load 8 kg
Wash
Stop with
water in
the drum
Rinses
PREWASH
1)
EXTRA RINSE
STAINS
2)
TIME SAVE
3)
Synthetics
60° - Cold
Synthetic or mixed fabric items
with normal soil.
max. load 4 kg
Wash
Rinses
Short spin
SPIN REDUCTION
RINSE HOLD
PREWASH
1)
STAINS
2)
EXTRA RINSE
TIME SAVE
3)
Easy Iron
4)
60 - 0°
Synthetic fabrics with normal soil.
max. load 4 kg
Wash
Rinses
Short spin
SPIN REDUCTION
RINSE HOLD
PREWASH
1)
EXTRA RINSE
TIME SAVE
3)
Delicates
40 - 0°
Delicate fabrics such as acrylics,
viscose, polyester items with nor-
mal soil.
max. load 4 kg
Wash
Rinses
Short spin
SPIN REDUCTION
RINSE HOLD
PREWASH
1)
STAINS
2)
EXTRA RINSE
TIME SAVE
3)
Wool / Silk
40 - 0°
Machine washable wool. Hand
washable wool and delicate fab-
rics with «hand washing» care
symbol.
max. load 2 kg
Wash
Rinses
Short spin
SPIN REDUCTION
RINSE HOLD
Duvets
60 - 30°
One synthetic blanket, duvet,
bedspread and so on.
max. load 2 kg
Wash
Rinses
Short spin
SPIN REDUCTION
ENGLISH
13
Programme
Tempera-
ture
Type of load
Max. weight of load
Cycle de-
scription
Functions
Anti-Allergy
60°
White cotton items.
This programme removes micro-
organisms due to the wash tem-
perature of 60° C and the adding
of an extra rinse. In this way the
wash is more effective.
Put a special additive for hygiene
in the Stain compartment and set
the Stain function.
max. load 8 kg
Wash
Rinses
Short spin
SPIN REDUCTION
RINSE HOLD
PREWASH
1)
STAINS
EXTRA RINSE
Spin / Drain
5)
All fabrics.
The maximum load of the laundry
is related to the type of laundry.
Drainage
of the wa-
ter
Spin
phase.
SPIN REDUCTION
NO SPIN
Rinse
All fabrics.
max. load 8 kg
One rinse
with addi-
tive
Spin
phase
SPIN REDUCTION
RINSE HOLD
EXTRA RINSE
6)
Jeans
60° - 0°
All items in denim.
max. load 8 kg
Wash
Rinses
Short spin
SPIN REDUCTION
RINSE HOLD
PREWASH
1)
EXTRA RINSE
20 Min. -
3kg
40° - 30°
Cotton and synthetic items with
light soil or worn only one time.
max. load 3 kg
Wash
Rinses
Short spin
SPIN REDUCTION
Super Eco
7)
Mixed fabrics (cotton and syn-
thetic items).
max. load 3 kg
Wash
Rinses
Short spin
SPIN REDUCTION
RINSE HOLD
EXTRA RINSE
Economy
8)
60°
9)
and
40°
White and fast coloured normally
soiled cotton.
max. load 8 kg
Wash
Rinses
Long spin
SPIN REDUCTION
RINSE HOLD
PREWASH
1)
STAINS
EXTRA RINSE
TIME SAVE
3)
1)
If you use liquid detergent, set a programme without PREWASH.
2)
The Stains function is not available with a temperature lower than 40°C.
3)
If you set the Extra Quick duration, we recommend that you reduce the maximum load. It is
possible to fully load the appliance, however the washing results are reduced.
4)
The wash and spin phase is delicate to prevent the creases of the laundry. The appliance
adds some rinses.
5)
The default phase of the spin speed is related to cotton items. Set the spin speed. Make
sure that it agrees with the laundry. To select the DRAIN programme only, set the function
NO SPIN.
14
www.aeg.com/au
6)
Press EXTRA RINSE button to add rinses. With a low spin speed the appliance performs
delicate rinses and a short spin.
7)
Set this programme to decrease the time and the consumption of energy and water. Use a
special detergent for very low temperature.
8)
Set this programme to have good washing results and decrease the energy consumption.
The time of the washing programme is extended.
9)
Cottons Economy at 60ºC is recommended for a full load of cotton and is the water and
energy rating label programme in accordance with AS/NZS2040 and AS/NZS6400.
STEAM PROGRAMMES
Programme
1)
Type of load Max load
Steam Refresh
This cycle removes odours from
the laundry.
Steam does not remove
animal odours.
Cotton and synthetic items
Do not set the Steam programme
for this type of items:
items where it is not specified
on the care label as being suita-
ble for tumble-drying
all items with plastic, metal,
wooden parts or alike.
up to 1.5
Kg
Steam Anticrease
This cycle helps to dewrinkle
the laundry.
up to 1.5
Kg
Steam can be used for dry, washed or laundry worn once. These pro-
grammes can reduce creases and odours and make your laundry more
soft.
Do not use any detergent. If necessary, remove stains by washing or using
localized stain removal.
Steam programmes do not perform any hygienic cycle.
1)
If you set a steam programme with dry laundry, at the end of the cycle the laundry will feel
humid. It is better to expose the items to the fresh air for about 10 minutes to let the
humidity dry. When the programme is complete, quickly remove the laundry from the
drum. After a steam cycle, items may be ironed straight away, but with less effort.
ENGLISH
15
BEFORE FIRST USE
1.
To activate the drain system, put 2 li-
tres of water in the main wash com-
partment of the detergent dispenser.
2.
Put a small quantity of detergent in
the main wash compartment of the
detergent dispenser. Set and start a
programme for cotton at the highest
temperature without laundry. This re-
moves all possible dirt from the drum
and the tub.
USING THE APPLIANCE
1.
Open the water tap.
2.
Connect the mains plug to the mains
socket.
3.
Press button
1
to activate the appli-
ance.
4.
Put the laundry in the appliance.
5.
Use the correct quantity of detergent
and additives.
6.
Set and start the correct programme
for the type of laundry and soil.
LOADING THE LAUNDRY
1.
Open the appliance door.
2.
Put the laundry in the drum, one item
at a time. Shake the items before you
put them in the appliance. Make sure
not to put too much laundry in the
drum.
3.
Close the door.
Make sure that no laundry stays between
the seal and the door. There is a risk of
water leakage or damage to the seal or
laundry.
FILLING DETERGENT AND ADDITIVES
16
www.aeg.com/au
The detergent compartment for the prewash phase and the soak
programme.
Add the detergent for prewash and soak before the start of the
programme.
The detergent compartment for the washing phase.
If you use a liquid detergent, put it in immediately before you
start the programme.
Liquid additives compartment (fabric conditioner, starch).
Put the product in the compartment before you start the pro-
gramme.
This is the maximum level for the quantity of liquid additives.
The compartment for the stain remover.
Put the product in the compartment and set the stain function be-
fore you start the programme.
Flap for powder or liquid detergent
Turn it (up or down) in the correct position to use powder or liquid
detergent.
Always obey the instructions that you find on the packaging of the deter-
gent products.
Check the position of the flap
1.
Pull out the detergent dispenser until
it stops.
2.
Press the lever down to remove the
dispenser.
3.
To use powder detergent, turn the
flap up.
ENGLISH
17
4.
To use liquid detergent, turn the flap
down.
With the flap in the position
DOWN:
Do not use gelatinous or thick
liquid detergents.
Do not put more liquid deter-
gent than the limit shown on
the flap.
Do not set the prewash phase.
Do not set the delay start func-
tion.
5.
Measure out the detergent and the
fabric conditioner.
6.
Carefully close the detergent dis-
penser. Make sure that the flap does
not cause a blockage when you close
the drawer.
SETTING AND STARTING A PROGRAMME
1.
Turn the programme knob. The rela-
ted programme indicator comes on.
2.
The indicator of button
4
flashes
red.
3.
The display shows the default tem-
perature, the spin speed and the
empty indicator bars of the available
functions.
4.
To change the temperature and/or
the spin speed, press the related but-
tons.
5.
Set the available functions.
6.
Press button
4
to start the pro-
gramme. The indicator of button
4
is on.
The appliance automatically
adjusts the cycle time to the
laundry you have put in the
drum to have perfect washing
results in the minimum neces-
sary time. After approximately
15 minutes from the start of
the programme, the display
shows the new time value.
INTERRUPT A PROGRAMME
1.
Press button
4
. The indicator flash-
es.
2.
Press button
4
again. The washing
programme continues.
CANCEL A PROGRAMME
1.
Press button
1
to cancel the pro-
gramme and to deactivate the appli-
ance.
2.
Press button
1
again to activate the
appliance. Now, you can set a new
washing programme.
The appliance does not drain the
water.
CHANGE A FUNCTION
You can change only some functions be-
fore they operate.
1.
Press button
4
. The indicator flash-
es.
2.
Change the function set.
SET THE DELAY START
1.
Press button
5
repeatedly until the
display shows the number of minutes
or hours. The related symbols comes
on.
2.
Press button
4
, the appliance starts
the countdown of the delay start.
18
www.aeg.com/au
When the countdown is complete,
the programme starts automatically.
Before you press button
4
to
start the appliance, you can cancel
or change the delay start.
You cannot set the delay start with
the Steam programme.
CANCEL THE DELAY START
1.
Press button
4
. The related indica-
tor flashes.
2.
Press button
5
repeatedly until the
display shows 0’.
3.
Press button
4
. The programme
starts.
OPEN THE DOOR
While a programme or the delay start op-
erates, the appliance door is locked.
To open the appliance door:
1.
Press button
4
. The door lock sym-
bol in the display goes off.
2.
Open the appliance door.
3.
Close the appliance door and press
button
4
. The programme or the
delay start continues.
If the temperature and level of the
water in the drum are too high,
the door lock symbol stays on and
you cannot open the door. To
open the door do the steps that
follow:
1.
Deactivate the appliance.
2.
Wait for some minutes.
3.
Make sure that no water is in
the drum.
If you deactivate the appliance, it
is necessary to set the programme
again.
AT THE END OF PROGRAMME
The appliance stops automatically.
The acoustic signals operate.
In the display
comes on.
The indicator of button
4
goes off.
The door lock symbol goes off.
Press button
1
to deactivate the ap-
pliance. After five minutes from the end
of the programme, the energy saving
function automatically deactivates the
appliance.
When you activate the appliance
again, the display shows the end
of the last set programme. Turn
the programme knob to set a new
cycle.
Remove the laundry from the appli-
ance. Make sure that the drum is emp-
ty.
Keep the door ajar, to prevent mildew
and odours.
Close the water tap.
The washing programme is complete,
but there is water in the drum:
The drum turns regularly to prevent
creases in the laundry.
The door stays locked.
You must drain the water to open the
door.
To drain the water:
1.
If necessary, decrease the spin speed.
2.
Press button
4
. The appliance
drains the water and then spins.
3.
When the programme is complete
and the door lock symbol goes off,
you can then open the door
4.
Deactivate the appliance.
The appliance drains and spins
automatically after approximately
18 hours.
ENGLISH
19
HELPFUL HINTS AND TIPS
THE LAUNDRY LOAD
Divide the laundry into: white, col-
oured, synthetics, delicates and wool.
Obey the washing instructions that are
on the laundry care labels.
Do not wash whites and coloured items
together.
Some coloured items may run with the
first wash. We recommend you wash
them separately the first time.
Button up pillowcases, close zippers,
hooks and poppers. Tie up belts.
Empty the pockets.
Any laundry with multilayered fabrics,
wool or items with painted illustrations
should be turned inside out before
washing.
Remove persistent stains before wash-
ing.
Rub particularly soiled areas with a spe-
cial detergent or detergent paste.
Treat curtains with special care. Re-
move hooks or tie them up in a bag or
net.
Do not wash in the appliance :
Laundry without hems or tears.
Bras with underwire.
Use a washing bag to wash small
items.
A very small load can cause balance
problems with the spin phase. If this oc-
curs, adjust the items in the tub man-
ually and start the spin phase again.
STUBBORN STAINS
For some stains, water and detergent is
not sufficient.
We recommend that you remove these
stains before you put the items in the ap-
pliance.
Special stain removers are available. Use
the special stain remover that is applica-
ble to the type of stain and fabric.
DETERGENTS AND ADDITIVES
Use only detergents and additives rec-
ommended for front load washing ma-
chines.
Do not mix different types of deter-
gents.
To help the environment, do not use
more than the correct quantity of deter-
gent.
Obey the instructions that you find on
the on packaging of these products.
Use the correct products for the type
and colour of the fabric, the pro-
gramme temperature and the level of
soil.
If you use liquid detergents, do not set
the prewash phase.
If your appliance does not have the de-
tergent dispenser with the flap device,
add the liquid detergents with a dosing
ball.
WATER HARDNESS
If the water hardness in your area is high
or moderate, we recommend that you use
a water softener for washing machine. In
areas where the water hardness is soft it is
not necessary to use a water softener.
To know the water hardness in your area,
contact your local water authority.
Obey the instructions that you find on the
packaging of the products.
Equivalent scales measure the water hard-
ness:
German degrees (°dH).
French degrees (°TH).
mmol/l (millimol for each litre - interna-
tional unit for the hardness of water).
Clarke degrees.
Water hardness table
Level Type
Water hardness
°dH °T.H. mmol/l Clarke
1 soft 0-7 0-15 0-1.5 0-9
20
www.aeg.com/au
  • Page 1 1
  • Page 2 2
  • Page 3 3
  • Page 4 4
  • Page 5 5
  • Page 6 6
  • Page 7 7
  • Page 8 8
  • Page 9 9
  • Page 10 10
  • Page 11 11
  • Page 12 12
  • Page 13 13
  • Page 14 14
  • Page 15 15
  • Page 16 16
  • Page 17 17
  • Page 18 18
  • Page 19 19
  • Page 20 20
  • Page 21 21
  • Page 22 22
  • Page 23 23
  • Page 24 24
  • Page 25 25
  • Page 26 26
  • Page 27 27
  • Page 28 28
  • Page 29 29
  • Page 30 30
  • Page 31 31
  • Page 32 32
  • Page 33 33
  • Page 34 34
  • Page 35 35
  • Page 36 36
  • Page 37 37
  • Page 38 38
  • Page 39 39
  • Page 40 40

AEG L 87480 FL User manual

Category
Washing machines
Type
User manual
This manual is also suitable for

Ask a question and I''ll find the answer in the document

Finding information in a document is now easier with AI