Electrolux EOG600BN User manual

Type
User manual

This manual is also suitable for

Introduction
This gas oven has been designed and manufactured to all the
necessary British Standards. It also carries the C.E. mark. The oven
complies with European Council Directive 90/396/EEC.
It is important that you understand how to use and care for the oven
properly before you use it for the first time.
We have written this booklet with your safety in mind. Read the
booklet thoroughly before you use the oven. Keep the booklet in a safe
place so that anyone who uses the oven can read it. Pass the booklet
on with the oven if you sell it to someone else.
We have included several drawings to show the right and wrong way
of doing things.
The right way will have a smiling face by it.
A sad face shows something is wrong.
Do not remove the rating plate from the cookers as this may
invalidate the guarantee.
For your safety
The oven is designed to cook food and you must not use it for
any other purpose.
Keep children, babies and toddlers away from the oven at all
times.
The installation instructions that came with the oven tell you how
and where it can be fitted. If the oven is already installed you
must make sure that all instructions have been followed. If you
are in any doubt ask a competent person. More details on
installation on page 4.
2
EOG 600
Contents
Installing the oven 4
General information 5
The cooling fan for the controls 5
Ignition 6
Lighting the oven/grill 7
The grill 9
The grill pan and handle 12
The oven 14
Baking trays and dishes 16
Oven cooking chart 17
Slow Cooking 20
The electronic minute minder 23
Care and cleaning 25
What is wrong and why? 28
Servicing 30
Installation Instructions 31
Technical Data 32
Safety requirements/ventilation 33
Location of appliance 34
Installation 35
Testing 38
Guarantee Conditions 41
3
EOG 600
Contents
Page
Installing the oven
Cabinet Dimensions
This oven must be fitted into a cabinet with a suitable sized aperture.
Minimum aperture height 575mm
Minimum aperture width 560mm
Minimum aperture depth 560mm
Location
4
EOG 600
Installation
For your safety
This oven must be installed and serviced by a competent person
as stated in the Gas Safety (Installation & Use) regulations
current edition.
It is important that the oven is suitable for your gas supply.
Your installer should check the data badge.
For your safety
The use of a gas cooking appliance results in the production of
heat and moisture in the room in which it is installed. Ensure that
the kitchen is well ventilated: keep natural ventilation holes open
or install a mechanical ventilation device (mechanical extractor
hood).
Prolonged intensive use of the appliance may call for additional
ventilation, for example opening of a window, or more effective
ventilation, for example increasing the level of mechanical
ventilation where present.
For further details see page 34.
General information
To get the best results from your new oven please read these
instructions carefully. You should pay particular attention to cooking
times and gas mark settings as these may differ from your previous
oven. You may find it necessary to adjust these until you are more
familiar with the oven.
Oven housing units vary widely in construction and finish. To avoid
possible damage to the housing unit, you must not leave cabinet doors
or flaps above the oven open or partially open when you are using the
grill or oven.
If you install your oven in a tall oven housing the storage area above
the oven will become warm when you use the oven. Do not store
perishable foods in the storage area above the oven.
The cooling fan for the controls
Your oven has a cooling fan. The cooling fan will start to work as soon
as you light the grill or oven. You will be able to hear the fan when it is
working.
The cooling fan may continue to work after you have turned off the
oven or grill. It may switch itself on and off until the oven has cooled
down.
If you want to turn off the electrical supply to the oven, you should
not do so until the cooling fan has stopped working.
5
EOG 600
General information
For your safety
Do not block any of the oven vents.
Never line any part of the oven with aluminium foil.
Do not let items which can catch fire or electric mains leads such
as kettle flexes trail over any part of the oven.
For your safety
When you are using the grill or oven warm air will exhaust from
the grill cavity and the vents below the control panel.
Take care not to stand too close to the oven or grill while in use.
Ignition
The grill and oven burners light automatically when you turn on the
control. If, for any reason either of the burners go out, the spark ignition
will automatically relight it.
Please note:
You can only use the grill with the door fully or partially open. You
cannot use the grill when the door is closed.
You cannot use the oven and grill together.
You cannot use the oven or grill in the event of a power failure.
Connecting to the electricity supply
The plug supplied with the oven can be fitted directly to a suitable three
pin earthed socket.
If you have to change the fuse replace it with a 3 amp fuse which has
been ASTA approved to BS 1362.
Do not use the plug until you have put the fuse cover back on. If the
fuse cover is lost you can get a replacement from an electrical retailer.
The correct replacement can be identified by marking or colour coding.
If you cut the plug off dispose of it safely as it will be a shock hazard
if it is inserted into a 13 amp socket elsewhere in the house.
If the ignition system doesn't work there may be a fault with the
electrical supply. First, check the socket by trying out another piece of
electrical equipment in it, if that works correctly renew the fuse in the
plug.
If the fuse keeps failing there is a fault in the oven which must be put
right. Do not use a fuse with a rating higher than 3 amps. Do not carry
out other electrical work. Unplug the oven and tell your installer.
6
EOG 600
General information
For your safety
This cooker must be earthed and protected by a 3 amp fuse.
Lighting the oven/grill
Grill
To light:
1 Open the door. Push in the control knob and turn it to the highest
setting. This is shown by a large flame symbol.
Oven
To light:
1 Open the oven door.
2 Push in the control knob and turn it to gas mark 9. When the burner
has lit there will only be small flames at first.
3 Now turn the control knob to the gas
mark you want.
4 Wait until the burner is showing large
flames.
5 Close the oven door.
7
EOG 600
Lighting the oven/grill
For your safety
Never cover the grill pan or grid with foil as this can lead to
grill fires
To turn off any burner
1 Push in the control knob and turn it to the off position.
This is shown by a large dot.
8
EOG 600
For your safety
When you are lighting any burner check that it has lit before you
leave the oven.
When you are turning off a burner do not leave the oven until the
flame has gone out.
Lighting the oven/grill
The grill
We suggest that you run the grill without food for approximately 5 - 10
minutes to burn off any residue from the surface. During this period an
odour may be emitted, it is therefore advisable to open a window for
ventilation.
Heat control
The grill gives variable heat settings.
The control knob turns to the left
from 'OFF' to 'HIGH' and then to 'LOW'.
The high setting should be used for fast
cooking such as toast. Use a lower
setting to cook thicker foods such as
chicken after it has been browned on
the high setting.
You should remember to turn the food regularly.
You should not use the grill to keep food warm as it will continue to
cook the food.
The grill pan should be used on the shelf without the metal plate
underneath it. The shelf can be positioned in any of the runner positions.
You can reverse the grill pan grid to suit different types of food.
If you close the door whilst the grill burner is lit, it will go out and you
will hear a continuous 'sparking'. The burner will automatically relight
when you open the door.
9
EOG 600
The grill
For your safety
You must keep the grill door open when the grill burner is lit.
Accessible parts may be hot when the grill is used. Young
children should be kept away.
Never cover the grill pan or grid with foil as this can lead to grill
fires.
Cooking positions
Most food should be cooked on the grid in
the grill pan. You can turn the grid over to
suit different thicknesses of food.
You can place some dishes straight on
the grill shelf. This is useful when you are
browning the top of food such as cauliflower
cheese.
Preheating
You don't usually need to preheat the grill. You may wish to preheat it for
a couple of minutes when you are cooking steak or browning food.
Putting food on the grid
Place food such as toast, tea-cakes and
muffins towards the centre of the grid. If you
put food outside this area it may require
rotating during cooking.
Place food which needs a more gentle
heat, such as tomatoes and mushrooms
towards the edge of the grid.
Arrange meat products and fish to suit
their thickness and how you like them
cooked.
Grill shelf
You should use the shelf without the metal plate when grilling. For safety
the shelf will only pull out so far. If you want to remove a shelf
completely, pull it forward as far as it will go, raise the front edge and lift
it out. To put the shelf into a different position, keep the front edge
raised, slot the shelf onto the runner, lower the front edge and slide the
shelf in.
Use shelf position one when toasting and adjust the height of the grid to
suit. Shelf positions are counted from the top downwards.
Use shelf position one when toasting and adjust the height of the grid to
suit. Shelf positions are counted from the top downwards.
10
EOG 600
The grill
Dishes, tins and trays should not be placed directly on the oven
base as it becomes very hot and damage will occur.
11
EOG 600
The grill
For your safety
Always remove the grill pan before attempting to adjust the shelf
position. Oven gloves should be used when removing or pulling
the shelf in and out.
For hygiene and safety reasons this cooker should be kept clean
at all times. A build-up of fats or other foodstuffs could result in a
fire, especially in the grill pan.
The grill pan and handle
The grill pan is supplied with a removable handle.
To attach the handle, place the wirework under the cut out in the pan so
that the metal plate hooks over the top of the grill pan.
Slide the handle to the left and over the central bump on the grill pan.
Ensure the handle is correctly located. It is not necessary to
remove the grill pan handle during grilling.
Place the grill pan on the shelf so that the pan is positioned centrally
beneath the grill.
To remove the handle, slide the handle to the right and lift the handle
away from the cut out on the grill pan.
Note
If you require an additional handle for your grill pan, this can be ordered
from your local Electrolux Service Force Centre by quoting part number
311479800\6.
12
EOG 600
The grill
To check the progress of the food when using the grill you should
withdraw the grill pan on the shelf to attend to food. After removing the
grill pan you can rest it on a heat resistant work surface if you need to.
Plate warming
When using the grill, you can use the shelf below the grill pan to warm
plates. Do not put plates on the shelf when the grill burner is turned on
and the grill pan is not in place. The heat from the burner will damage
the plates.
13
EOG 600
The grill
The oven
Before you use the oven you should wipe it out with a damp cloth. This
will remove any dust.
We suggest that you run the oven without food for 10 - 15 minutes at
Gas mark 7 to burn off any residue from the surface. During this period
an odour may be emitted, it is therefore advisable to open a window for
ventilation.
Heat zones
There are zones of heat within the oven. The
temperature in the middle is the gas mark you
have chosen. The top of the oven is slightly
hotter and the lower shelf slightly cooler. The
base of the oven is quite a lot cooler. You can
make use of these heat zones when you are
cooking foods that need different temperatures
all at the same time. You can use the base of
the oven to warm plates.
If you are cooking more than one tray of similar items, for example
cakes or biscuits, swap the trays around during cooking. Or you can
remove the top tray when the food is cooked and move the lower tray to
the higher shelf to finish cooking.
Preheating
You do not need to preheat the oven for casseroling and so on. Preheat
the oven for baking or when you are cooking sensitive food such as
Yorkshire puddings, soufflés and yeast mixtures.
When you are cooking or reheating frozen or chilled food read the
instructions on the packaging.
When you need to preheat the oven, we recommend you do so for
20 minutes.
14
EOG 600
The oven
For your safety
Never leave the cooker unattended when the oven door is
open.
Oven shelves
The two oven shelves can be slotted into
place in any of 5 positions. The top shelf
position should be reserved for grilling only.
For safety the shelves will only pull out so
far. If you want to remove a shelf completely,
pull it forward as far as it will go, raise the
front edge and lift it out. To put the shelf into a
different position, keep the front edge raised, slot the shelf onto the
runner, lower the front edge and slide the shelf in.
The shelf positions are counted from the top downwards and
recommended shelf positions are given in the cooking charts on pages
17, 18 and 19. When cooking always try to leave at least one runner
position between shelves to allow the heat to circulate properly.
You cannot use the shelf fitted with the metal plate in the top runner
position. When you only need to use one shelf you can store the other
shelf above or below the one you are using where there is more space.
Use the shelf with the metal plate in a higher runner position when
cooking on two levels. The recommended shelf positions given in the
oven cooking charts give the best results.
15
EOG 600
The oven
Baking trays and dishes
Leave a gap of 13mm (½") between all
dishes and the sides of the oven so the
heat can circulate properly.
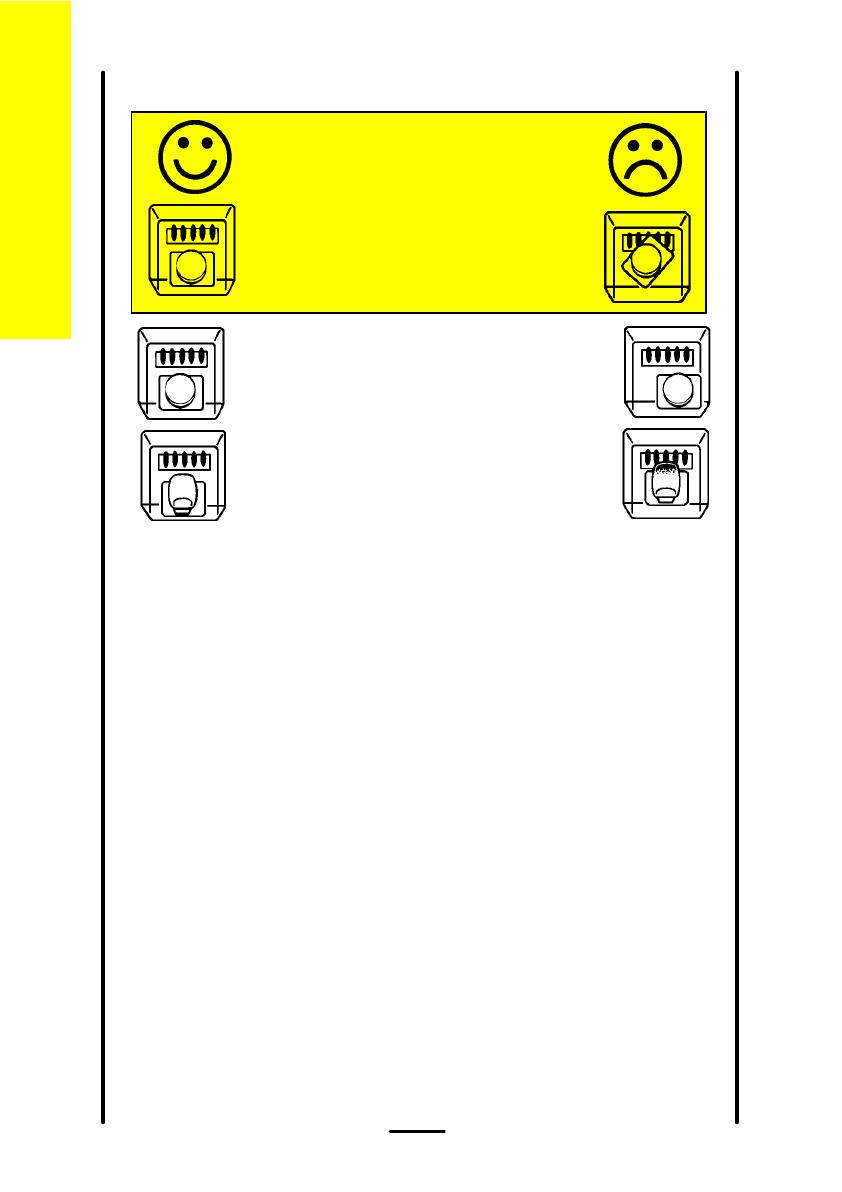
Do not push dishes too far back as food will
burn if it overhangs the burner flames.
For the best results we recommend that you use a baking tray which is
310mm (12") square. If you use a tray or tin which is larger than this,
you may need to turn it around during cooking.
Place single dishes on the centre of the shelf. You may need to turn
large items around during cooking.
Roasting
For best results we recommend open roasting using minimal fat or oil to
prevent splashing.
It is not necessary to cover meat or poultry or wrap food in foil when
roasting as this restricts the circulation of heat and will lead to extended
cooktimes.
If you are using a roasting bag or cover chicken breast with foil, be
prepared to allow an extra 10 - 15 minutes for each 1/2kg (1lb).
When cooking large items such as turkeys, the use of foil may be
required to prevent the breast becoming dry before the rest of the bird is
fully cooked.
Condensation
Condensation may form on the oven. This is quite normal and nothing to
worry about. The condensation forms when heat and moisture are
present, for example during cooking. Whenever possible try to make
sure that food which contains a lot of moisture for example casseroles
are covered. If you do notice any condensation, wipe it up straight away.
16
EOG 600
For your safety
Never place cooking dishes, trays
and so on over the oven burner.
This will damage the oven as well
as the ovenware and possibly the
cabinet underneath the oven.
The oven
Oven cooking chart
These instructions are for cooking in the oven after it has been pre-heated for 20 minutes.
When you are using two shelves use the shelf with the metal plate in the higher position.
If you are cooking more than one tray of similar items, for example cakes or biscuits, swap the trays around during cooking or you
can take the top tray out of the oven when the food is cooked and move the lower tray to the higher shelf to finish cooking.
Always leave at least one shelf position between shelves to allow heat to circulate.
The recommended shelf positions give the best results.
Put the dishes in the centre of the shelf.
You can change the gas marks and cooking times to suit your own tastes.
It is important to check that food is piping hot before serving.
Food
Gas
mark
Shelf
position
Approximate
cooking time
Roasting meat: Beef 5 4* Rare:
Medium:
Well Done:
20 mins. per ½kg (1 lb) and 30 mins.
25 mins. per ½kg (1 lb) and 25 mins.
30 mins. per ½kg (1 lb) and 30 mins.
Lamb 5 4* Medium:
Well Done:
25 mins. per ½kg (1 lb) and 25 mins.
30 mins. per ½kg (1 lb) and 30 mins.
Pork and Veal 5 4* Medium:
Well Done:
30 mins. per ½kg (1 lb) and 30 mins.
35 mins. per ½kg (1 lb) and 35 mins.
Thoroughly thaw frozen joints before cooking them.
* Recommended position for shelf with metal plate.
E 0 G 6 0 0
Oven cooking chart
17
Food
Gas
mark
Shelf
position
Approximate
cooking time
Poultry: Chicken
Turkey below 4.5kg (10lbs)
over 4.5kg (10 lbs)
Duck and duckling
5
4
4
5
4*
5
5
4*
20 mins. per ½ kg (1 lb) and 20 mins.
25 mins. per ½ kg (1 lb) and 25 mins.
15 mins. per ½ kg (1 lb) and 15 mins.
25 mins. per ½ kg (1 lb).
Stuffed poultry Cook as above but calculate weight including stuffing
Thoroughly thaw frozen joints before cooking them.
The times given above are for open roasting in a preheated oven. If you cover the food with foil or a lid allow an extra 10 - 15
minutes for each ½kg (1lb).
Yorkshire pudding - large
- individual
7
7
2*
2*
25-30 mins.
15-25 mins.
Cakes: Christmas cake 230mm (9")
Rich fruit cake 180mm (7")
205mm (8")
Madeira, 180mm (7")
Small cakes
Scones
Victoria sandwich
180mm (7")
205mm (8")
2
2
2
4
5
7
4
4
5*
4*
4*
5*
2* & 4
2* & 4
2* & 4
2* & 4
3½-4½ hours.
2¼ hours.
2½ - 2¾ hours.
1 hour.
15-25 mins.
10-20 mins.
20-30 mins.
20-35 mins.
* Recommended position for shelf with metal plate.
E 0 G 6 0 0
18
Oven cooking chart
Food
Gas
Mark
Shelf
Position
Approximate
cooking time
Pastries: Plate tart (shortcrust)
Fruit pie (shortcrust)
Mince pies (flan pastry)
Profiteroles (choux pastry)
6
6
5
4
2*
2*
2* & 4
2
50 mins. interchange after 25 mins.
15-25 mins.
25 mins.
To help pastry brown on the underside cook on a metal plate, or if plates are flat and have no rim underneath, place on baking
tray to cook.
Puddings: Milk puddings
Baked sponge pudding
Baked custard
2
4
3
3
4*
2
1½-2 hours.
45-60 mins.
50-60 mins.
Yeast mixtures: Bread 0.45kg (1lb loaves)
0.90kg (2lb loaves)
Rolls and buns
8
8
8
3*
3*
2*
30-40 mins.
30-40 mins.
10-20 mins.
Note: You must soak dried beans then boil them in an open pan for 15 minutes before you add them to any dish.
* Recommended position for shelf with metal plate.
E 0 G 6 0 0
19
Oven cooking chart
Slow cooking
The slow cook setting gives a very low heat in the oven. It is particularly
useful when you are cooking soups, stews and casseroles because the
long slow cooking will make cheaper, tougher cuts of meat more tender.
Some foods such as pastry and biscuits are not suitable for slow
cooking because the temperature is too low.
Cover all food during cooking to prevent it from drying out. You can
uncover food for the last half hour if it is normally served golden brown.
Food preparation - slow cooking
Joints of meat and poultry
Do not cook meat joints over 2.7kg (6lb).
Do not cook poultry over 2kg (4lb 8oz).
Cook on the middle shelf of the oven or above.
Cook stuffing separately.
Cook for at least 6 hours.
Only cook joints of pork if you can make sure, by using a meat
thermometer, that the temperature inside the joint is at least 88
o
C.
For good air circulation always stand joints on a rack in the roasting
tin or casserole.
Thaw all frozen meat and poultry before you cook it.
Prime cuts of meat do not benefit from slow cooking.
Cut off unwanted fat and skin unless it is browned first.
20
EOG 600
Slow cooking
  • Page 1 1
  • Page 2 2
  • Page 3 3
  • Page 4 4
  • Page 5 5
  • Page 6 6
  • Page 7 7
  • Page 8 8
  • Page 9 9
  • Page 10 10
  • Page 11 11
  • Page 12 12
  • Page 13 13
  • Page 14 14
  • Page 15 15
  • Page 16 16
  • Page 17 17
  • Page 18 18
  • Page 19 19
  • Page 20 20
  • Page 21 21
  • Page 22 22
  • Page 23 23
  • Page 24 24
  • Page 25 25
  • Page 26 26
  • Page 27 27
  • Page 28 28
  • Page 29 29
  • Page 30 30
  • Page 31 31
  • Page 32 32
  • Page 33 33
  • Page 34 34
  • Page 35 35
  • Page 36 36
  • Page 37 37
  • Page 38 38
  • Page 39 39
  • Page 40 40
  • Page 41 41
  • Page 42 42
  • Page 43 43
  • Page 44 44

Electrolux EOG600BN User manual

Type
User manual
This manual is also suitable for

Ask a question and I''ll find the answer in the document

Finding information in a document is now easier with AI