Page is loading ...

Apollo Tilt Wheelchair
18" and 20"
Instruction Manual

2
Table of Contents
Contents
Table of Contents................................................................................................................................................................ 2
Introduction ........................................................................................................................................................................ 3
Warning .............................................................................................................................................................................. 4
Safety Guidelines ................................................................................................................................................................ 5
Parts of the Tilt Wheelchair ................................................................................................................................................ 6
Setup & Operation .............................................................................................................................................................. 7
Safety Notes ...................................................................................................................................................................... 13
Maintenance...................................................................................................................................................................... 14
Warranty ........................................................................................................................................................................... 15
Specifications.................................................................................................................................................................... 16
Contact .............................................................................................................................................................................. 17

3
Introduction
Congratulations on the purchase of your Eclipse Medical Apollo Tilt Wheelchair. Please carefully
read this instruction manual before attempting to use your chair. After reading the manual, if you
still have any questions or concerns, please feel free to contact your local authorized dealer.
Before reading the rest of the manual, please register your product online at
www.eclipsemedical.com.
You must keep your receipt as proof of purchase for the warranty to be valid: you will need
to present the receipt when you service or repair your product under warranty.
Please fill in the information below for your records.
Model: __________________________
Serial #: __________________________
Date Purchased: __________________________
Dealer Name: __________________________
Dealer Telephone #: __________________________

4
Warning
Please read and follow all of the warnings, safety recommendations and instructions in this manual
before operating this tilt wheelchair for the first time.
If there is any information in this manual that you do not understand, or if you require additional
assistance to set up or operate it, please contact your authorized Eclipse Medical Inc. dealer.
Failure to follow the warnings, safety recommendations and instructions in this manual can result in
personal injury and product damage and will void this product’s warranty.
Notice: Information within this manual is subject to change without notice.

5
Safety Guidelines
You will need to be familiar with the operation of your Apollo tilt wheelchair before using it. Please
read the following notes carefully to ensure safety at all times. Always make certain your tilt wheel
chair is in full working order before use.
1. Before using, make sure all parts are secure.
2. Before each use check that rear anti tippers are in the correct position and locked.
3. Do not attempt to sit in the chair unless the frame of the chair is fully open.
4. A caregiver or attendant must be present at all times while the tilt wheelchair is in use.
5. Always engage the wheels locks when chair is stopped on any incline or decline.
6. Do not carry passengers or exceed the maximum weight.
7. Do not leave the occupant of the chair unattended.
8. Do not maneuver the chair independently.
9. Operate the chair only on flat ground.
10. Do not stand on the footrests while transferring in or out of the chair.
11. Do not tilt or swerve the chair while it is being used on sloping ground.
12. Do not reach for items while sitting in the chair. This may cause tipping.
13. Do not attempt tilt or reclining of the chair without an attendant.

6
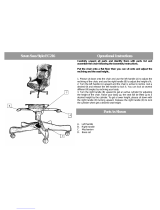
Parts of the Tilt Wheelchair
1
Footplate
9
Armrest Pad
2
Footrest
10
Backrest
3
Legrest
11
Trunk Support
4
Front Caster
12
Headrest
5
Rear Wheel
13
Wheel Lock
6
Wheelchair Frame
14
Anti-tipper
7
Seat
15
Tie Down
8
Armrest
16
Pommel
1
16
14
13
2
11
10
3
6
9
5
4
7
8
12
15

7
Setup & Operation
Out of the Box
The Apollo tilt wheelchair is a modern, comfortable and multifunctional wheelchair. It designed
especially for people with disabilities and for elderly people with nursing and transport purposes.
The tilt wheelchair is basically fully assembled within the box. A simple setup with some minor
adjustments is all that is needed to prepare the tilt wheelchair for use.
Note: Before setup check the contents of the box to see whether all parts, accessories, user
manual, etc. are included. If not, please contact your dealer or Eclipse Medical Inc.
Tilt Wheelchair Unfolding
1. Open the box and take out the wheelchair from the box.
2. Place the wheelchair on the ground.
3. Push down the tilt wheelchair seat until the wheelchair is completely opened and extended
ready for use.
Installation of Adjusting Cylinders
There are two adjusting cylinders, one is for adjusting the reclining angle of the backrest and the
other is for adjusting the reclining angle of the seat. The angles can be adjusted according to every
user for his/her comfort.
Installation of Backrest Adjusting Cylinder
The backrest adjusting cylinder is located at the
back of the wheelchair. Align the positioning hole of
the adjusting cylinder to the frame mounting point
and place the lock pin completely through the hole.
Note: after placing the bolt through the hole,
assure that the pin is locked in place
Installation of Seat Adjusting Cylinder
The seat adjusting cylinder is located at the back of
the wheelchair. Align the positioning hole of the
adjusting cylinder to the frame mounting point and place the lock pin completely through the
hole.
Note: after placing the lock pin through the hole, assure that the pin is locked in place

8
Installation & Adjustment of Footrests (Footplate)
Installation
1. Align and mount the arc plate hole of the leg support
into the pin.
2. Rotate gently the leg support from outside to inside
until the spring is fixed.
If it is necessary to remove the leg support, push the spring
lock from the inner side of the leg support, twist it outwards
until certain angle and elevate it to pull out from the frame pin.
Note: There is a right and left footrest assembly.
Adjustment of Footrest
The footrests have many different adjustments.
To change the angle of the footrest assembly, locate the
adjustment lever on the top outer side of the footrest. Loosen
and lift or lower the footrest to the correct angle. Tighten the
adjustment lever.
To lengthen or shorten the footrest, locate the inner tube lock at the base of the main footrest tube.
Use a Hex key tool to loosen the screw. The inner tube can now be made longer or shorter.
Tighten screw once desired length is achieved.
Installation & Adjustment of Armrests
1. Insert the square tube of the armrest into
the square hole of the wheelchair frame
2. Push in the armrest button to release the
lock to allow the armrest to slide freely
within the holder.
3. Release button at desired height. Gently
move the armrest up or down to make
sure lock is secure.

9
Installation & Adjustment of Headrest
Installation
1. Take out the headrest set from the box.
2. Insert the square tube of the headrest into the
wheelchair frame's square tube located at the back
of the backrest.
3. Push in the frame’s headrest button to release the
lock to allow the square tube to slide up and down
within the holder.
4. Release button at desired height. Gently move the
headrest up or down to make sure lock is secure.
Adjustment
1. Loosen the adjustment lever from the headrest folding blocks.
2. Adjust forward or backwards the headrest to the suitable position.
3. Tighten clockwise the adjustment lever to fix the headrest.
The user may adjust the movable blocks of the headrest according to his/her preferences.
Loosen the right or left side adjustment lever and angle the movable blocks to a comfortable
position and tighten clockwise the adjustment lever to fix the headrest block.
Adjustment of Trunk Supports
The trunk supports can maintain and protect the body
posture. The height of the trunk support and the distance
between them can be adjusted according to the body of
the user.
Adjustment can be done easily. Locate the triangle lock
knob at the back of the back rest. Loosen and slide tube
to desired width or height. Tighten triangle knob to lock in
place.

10
Wheel Locks
1. To lock the rear wheels, push the lever forward to
LOCK.
2. To unlock the rear wheels, pull the lever back to
UNLOCK.
Attendant Rear Drum Hand Brakes
The Apollo tilt wheelchair is equipped with rear drum hand brakes. This braking system is designed
to be used by the care attendant only. This braking system allows the attendant to slow the chair
down or to lock the rear tires in place while the chair is parked.
To apply the brakes place your hands over the right and left brake handgrips and pull towards you.
The right hand brake will slow the right side tire and the left hand brake will slow the left side tire.
You may also use the locking levers on both sides to temporarily lock the brakes to prevent the
chair from rolling.

11
Seat and Backrest Angle Adjustment
This wheelchair provides the option of adjusting the angle of the seat and backrest according to
every user's needs. The option of adjusting the angle of the seat and backrest brings more comfort
to the user on the wheelchair. The adjustment of seat and backrest angle will need the assistance
of an attendant.
Reclining the Back
While standing at the rear of the chair, locate the recline lever on the LEFT side of the push
handle. Slowly pull the recline lever to adjust the backrest angle. When the correct angle is
found release the lever. The backrest will now be locked in place.
Tilting the Seat
While standing at the rear of the chair, locate the tilt lever on the RIGHT side of the push
handle. Slowly pull the tilt lever to adjust the seat angle. When the correct angle is found
release the lever. The seat will now be locked in place.
Both levers can be used independently or simultaneously to adjust the chair to the most
comfortable position.

12
Seat Pan Depth Adjustment
The seat pan in the Apollo can be adjusted to fit different depth sizes.
1. Locate the left and right set screws
under the front seat rail.
2. Loosen set screws
3. Pull forward seat pan to desired
depth making sure the rear pan does
not extend past the rear metal frame.
4. Tighten set screws and confirm depth
size.

13
Safety Notes
Read these safety notes before operating your tilt wheelchair
1. Before using each time, make sure all parts are secure and the chair is in the full open
position.
2. Before transferring in or out of the chair:
a. Make sure the chair is on a flat surface.
b. Engage both rear wheel locks.
c. Check that the front casters are turned in the forward position.
3. The maximum weight capacity has been indicated on the frame label.
4. While transferring in or out of the chair, do not step on the footplates as this could cause
tipping.
5. Do not reach or lean without proper assistance as it could cause tipping.
6. Caution should be used when going downhill. Do not use the rear wheel locks to stop. The
caregiver should use the hand brakes to slow and stop the chair.
7. Unauthorized modification of parts and/or use of non-Eclipse Medical Inc. parts will void the
warranty of this chair and may lead to injury to the user and damage to the chair.

14
Maintenance
To keep your tilt wheelchair in good working order, some simple maintenance can be done along
with the regular periodic service inspections done by your local Eclipse Medical dealer. By doing
these simple inspections, you make sure that your chair will provide you with several years of
service.
1. During the first month of use, before using the chair, check all screws and nuts to see if
they need to be tightened. Then, every 3 months during normal use, check that all screws
and nuts are tight.
2. Monthly check the tires and brake mechanism. If service is needed, contact your dealer.
3. If the chair becomes wet, dry it immediately with a soft cloth.
4. Monthly wipe off chrome and aluminum parts with a clean soft dry cloth.
5. Auto wax can be applied on clean frame and other metal parts of the chair.
6. A mild soap solution can be used to clean upholstery, rinse and wipe dry.
7. Avoid oil or acid contact with tires to prevent deterioration.
8. Monthly check the tires for wear and or cracks. Replace as necessary.
9. Replace worn or torn upholstery immediately.
10. Monthly check of the tire tread wear on front and rear tires.

15
Warranty
LIMITED LIFETIME WARRANTY
The warranty period commences upon the date of purchase by the end user. If within the warranty
period, your wheelchair requires repair, as a result from a manufacturing or material defect, the
part or parts will be repaired or replaced if returned to an authorized service dealer.
This warranty is extended to the original purchaser only. Your original receipt will be
necessary as proof of purchase before any warranty performance is rendered. Without a proof of
purchase receipt date the warranty will start at the date when Eclipse Medical Inc. sent the invoice
to the dealer.
This warranty only covers failures due to defects in materials or workmanship which occur during
normal use and does not cover damage that occurs in shipment or failures which are caused by
products not supplied by Eclipse Medical Inc. or failures resulting from accident, misuse, abuse,
neglect, mishandling, misapplication, alteration, modification, commercial use, or by anyone other
than an authorized dealer, or damage that is attributable to acts of God.
This warranty does to cover neglect or abuse, use of non-Eclipse Medical parts or changes not
authorized by Eclipse Medical Inc. Exceeding weight limit specifications as outlined in your
Instruction Manual will void the warranty.
This warranty does not cover non-durable components which are subject to normal wear and tear,
unless these parts are worn as a direct result of an original manufacturer defect. These parts are
upholstery, cushion, arm pads, tires, inner tubes, plastic parts, brake pads and/or hubs and similar
kinds of parts.
This warranty does not include labour charges.
This warranty does not include shipping charges incurred by the purchaser when returning
defective parts for repair/replacement.
Warranty service must be performed by an authorized Eclipse Medical Inc. dealer.
This warranty applies to products purchased within Canada.
This warranty is void if the original serial number tag is removed from the product or altered in any
manner.
5 YEARS
FRAME ONLY
24 MONTHS
Front forks, foot rests, Wheels, Hand brakes, and all other
components not stated above

16
Specifications
18”
20”
Overall Width (Open)
in (cm)
28 (71)
30 (76)
Overall Height
in (cm)
47 (119)
47 (119)
Overall Length
in (cm)
49 (125)
49 (125)
Seat Width
in (cm)
18 (45)
20 (50.8)
With Spacer Kit
19 (48)
21 (53)
Seat Depth
in (cm)
17-20 (43-50.8)
17-20 (43-50.8)
Seat to Floor Height w/o Cushion
in (cm)
16-18 (41-45)
16-18 (41-45)
Back Height with Cushion
in (cm)
20.5-27 (52-68.5)
20.5-27 (52-68.5)
Wheel Size
Front
8”
8”
Rear
24”
24”
Optional Casters
Front
5” & 6”
5” & 6”
Rear
20” & 22”
20” & 22”
Weight Capacity
lb (kg)
330 (150)
330 (150)
Total Weight
lb (kg)
97.8 (44.4)
107.3 (48.7)
Recline Range
Degrees
65° to 90°
65° to 90°
Tilt Range
Degrees
-3° to 22°
-3° to 22°
**All specifications are subject to change without notice**

17
Contact
Distributed by:
Eclipse Medical Inc.
130 – 725 Eaton Way
Delta, British Columbia
Canada V3M 6S5
Tel: 604-540-0114
Fax: 604-540-0172
www.eclipsemedical.com
Eclipse Medical Inc.
106 Nordic Ave
Pointe-Claire, Québec
H9R 3Y2
Tel: 514-428-5996
Fax: 514-694-1299
www.eclipsemedical.com
/