Page is loading ...

Craftmade • P.O. Box 1037 • Coppell, TX USA • 75019
May 2002
Mounting Instructions
for Indoor & Outdoor
Ceiling or Wall Mount Fixtures
Installation is as Easy as 1, 2, 3!
Disconnect Power
Always shut off power at the circuit breaker or disconnect fuse
when installing or repairing this, or any other electric appliance.
FAILURE TO
DO SO MAY
RESULT IN
SEVERE
INJURY OR
DEATH.
CAUTION
–Tools Required–
Phillips
Screwdriver
Caulking
Caulk
Bulbs
or or
Guide
A
a. For two screw and multiple screw assembly roofs, remove assembly screws
on roof and remove roof. Insert bulb(s). Reattach roof (see figures 1 or 2).
b. For harp assembly roofs, unscrew top finial to remove font assembly and
roof from threaded nipple. Insert bulbs. Reattach roof, font assembly and
top finial (see figure 3).
c. For fixtures with a hinged door, lift latch upwards
to open door. Insert bulb(s) and re-latch the door
(see figure 4).
d. For open bottom fixtures, insert bulb(s) through
bottom opening (see figure 5).
e. For screw on glass fixtures, unscrew glass
counter-clock wise, insert bulb(s) and screw glass
back on (see figure 6).
f. To prevent water from entering the bullet light
fixture, do not position light beyond 65° in any
direction (see figure 7).
g. For small Louver fixture, unscrew assembly nuts
on bottom. Lift body of fixture slightly, insert
bulb and reattach body using assembly nuts. (see
figure 8)
Bulb Installation & Roof Assembly
Figure 1
Two Screw Assembly
Assembly
Screws
Roof
Figure 2
Multiple Screw Assembly
Roof
Assembly
Screws
Font
Assembly
Figure 3
Harp Assembly
Threaded
Nipple
Roof
Top Finial
Font
Assembly
Figure 4
Hinged Door Assembly
Latch
Figure 5
Open Bottom Assembly
Figure 6
Screw on Glass Assembly
Figure 7
Directional Bullet Lights
18W/840
Figure 8
Small Louver Fixtures
Assembly
Nuts
Mounting Screws
Crossbar
Fixture Screws
Electrical
Outlet Box
Wall Mount
Ceiling Mount
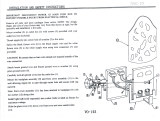
a.
Locate mounting
hardware included
with fixture.
b.
Pull black, white and ground
wires out of electrical outlet
box. For both interior and
exterior lighting, thread
fixture screws into crossbar
as shown.
c.
Mount crossbar or large
fixture mounting bracket to
outlet box using mounting
screws supplied with
electrical outlet box.
Prepare Wall or Ceiling Outlet
Electrical
Outlet Box
Crossbar
Mounting
Screws
Fixture
Screws
Large Fixture
Mounting Bracket
Electrical
Outlet Box
Crossbar
(for large
fixtures)
Mounting
Screw
Fixture
Screws
Mounting
Screw
g. For Cylinder fixtures, unscrew the
assembly nuts from bottom, lift
body of fixture slightly. Insert bulb.
Reattach body using assembly nuts.
h. For large Louver fixtures, unscrew
top finial, remove roof and insert
bulb. Reattach roof with top finial.
(see figure 10)
i. Turn power on.
Figure 10
Large Louver Fixtures
Top
Finial
Roof
Figure 9
Cylinder Fixtures
Assembly
Nuts
Cylinder
IMPORTANT! PLEASE READ:
All CRAFTMADE solid brass and cast aluminum lanterns are prepared with a durable lacquer finish or a
powder-coated/painted finish. Please note that the brass finish or painted finish on exterior lanterns will
weather or tarnish over time, depending upon the environmental conditions where the lantern is installed.
Your proper care of lanterns (see below) will enhance both the life and appearance of the lanterns. Post
treatments, such as clear lacquer, are not recommended.
PROPER CARE
In order to maximize the appearance of a CRAFTMADE brass lantern, it is important that dust and debris is
removed from the surface of the lantern periodically. It is recommended that the lanterns be wiped down
weekly using a soft, dry or damp cloth.
DO NOT use any abrasives such as car wax, brass cleaners or other polishes, glass cleaners or chemicals, as
this will scratch/remove/damage the protective coating, allowing moisture and pollutants to come in contact
with the brass, which will result in discoloration and pitting.
ALL CRAFTMADE cast aluminum lanterns receive a durable powder coat finish, which enhances the
durability of the lantern. This finish should also be wiped down weekly with a soft, dry or damp cloth to
remove the dust and debris that will accumulate on the surface. DO NOT use any abrasives such as car wax,
brass cleaners or other polishes, glass cleaners or chemicals as this may damage the finish.
FAILURE TO FOLLOW THE ABOVE CARE INSTRUCTIONS WILL VOID THE WARRANTY OF THE
LANTERN.
For information regarding replacement parts, please write to:
Craftmade, P.O. Box 1037, Coppell, TX 75019
LIMITED WARRANTY
Craftmade warrants against defects in materials or workmanship for a period of FIVE (5) YEARS from date
of purchase for use, and agrees to repair or, at our option, replace a defective unit without charge.
IMPORTANT: This Warranty does not cover damage resulting from accident, misuse or abuse, lack of
reasonable care (see above), the affixing of any attachment not provided with the product, alteration of any
attachments factory installed, loss of parts or subjecting the fixture to any but the specified electrical service.
This warranty does not cover failure of bulbs due to accidents, abuse, misuse, vandalism, power surges, and
acts of nature such as lightning damage or any bulbs purchased separately and installed by the consumer or
any damage to the fixture caused by a separately purchased bulb.
No responsibility is assumed for any special incidental or consequential damages. Damages occurring during
transit are not covered by this warranty.
To obtain warranty service, mail sales receipt as proof of purchase-date, and a brief explanation of the nature
of the defect, to P.O. Box 1037, Coppell, TX 75019. You will receive, by mail, a Return Goods Authorization
number issued by Craftmade, and returned freight prepaid.
For Installation or Technical Support, call 1-800-548-3788, 8 a.m. - 5 p.m., Central Time, Monday-Friday.
Please send the following information…
1. The Model Number and Finish – Polished, Antique,
White, etc.
2. The name of the part – if you have a parts problem.
3. Your name, mailing address and phone number
(with area code).

a. Tuck wires back into the electrical box.
b. Attach fixture to crossbar, making sure the insulation
material (if provided) stays between the ceiling and
the fixture. Attach lockwashers and nuts. Twist fixture
clockwise to lock screws into slotted holes in canopy.
Tighten nuts to secure fixture to ceiling.
c. Install bulb(s) before adding glass. Use screw cap and
finial to secure globe to fixture, being careful not to
over-tighten as excess pressure may cause glass to
break.
Interior Lighting
Mount Indoor Fixture to Ceiling
Install bulb(s) before
adding globe. Use
Fitter Screws to hold
globe to fixture,
being careful not to
over-tighten as
excess pressure may
cause glass to break.
Fitter Screws
Glass Dome
Insulation
Material
For Fixtures
without Finial
Fixture Screws
Nut
Finial
Crossbar
Lockwasher
Glass Dome
Cap
Canopy
Wire Fixture to Outlet
Interior Lighting
Exterior Lighting
a. Twist together white fixture wire with white outlet wire.
Next, twist together black fixture wire with black outlet
wire. Use wire nuts (which should be included in your
junction box) to secure connections.
b. Connect fixture ground wire (if provided) and outlet
ground wire to ground screw on crossbar as shown in
diagrams.
1
2
3
Wire Nuts
Ground Screw
Ground Wires
White Wires
Black Wires
Ground Screw
Black Wires
White Wires
Ground Wires
Wire Nuts
1
2
3
Crossbar
Mount Outdoor Fixture to Wall
Weep Hole
Bottom Finial
Weep Hole
Hex Nut
Short
Threaded
Nipple
Discard
Hex Nut
Remove
Attach
Long
Threaded
Nipple
Tail
Font Assembly
Bottom Finial
Remove bottom finial, font
assembly, short threaded nipple
(discard), and hex nut. Reattach
hex nut, then long threaded
nipple, tail, font assembly with
"weep hole" on bottom. Secure
with bottom finial as shown.
Adding Optional Tail Assembly
Wall Mount
Roof
Assembly
Screws
Cap Nuts
Roof
Bulb
Crossbar
a. Tuck wires back into the electrical outlet box.
b. Attach fixture to crossbar. Tighten cap nuts to hold fixture to
the wall.
c. Remove roof assembly screws. Remove roof and insert bulb.
Reattach roof (see Bulb Installation & Roof Assembly section).
d. To prevent moisture from entering the outlet box and causing a
short, use clear caulking to outline the outside of the fixture's
backplate where it meets the wall, leaving a space at the bottom to
allow moisture a means of escape.
e. Photocell fixtures will automatically turn
on at sunset and turn off at sunrise.
Caulking
Backplate
Caulk
Glass Installation
Remove roof by unscrewing roof assembly
screws. Carefully install glass by sliding
glass panels into channel guides.
/