A.O. Smith 1000 User manual

Category
Water heaters & boilers
Type
User manual
1
PRINTED IN U.S.A. 0906
COPPER BOILERS FOR
HYDRONIC HEATING AND
HOT WATER SUPPLY
CAUTION
TEXT PRINTED OR OUTLINED IN RED CONTAINS
INFORMATION RELATIVE TO YOUR SAFETY.
PLEASE READ THOROUGHLY BEFORE INSTALLING
AND USING THIS APPLIANCE.
212511-000
MC BEE, SC., RENTON, WA.,
STRATFORD-ONTARIO, VELDHOVEN-THE NETHERLANDS,
NANJING, CHINA
www.hotwater.com / email:parts@hotwater.com
PLACE THESE INSTRUCTIONS ADJACENT TO BOILER AND
NOTIFY OWNER TO KEEP FOR FUTURE REFERENCE.
Installation
Operation
Maintenance
Limited Warranty
Instruction Manual
GB/GW MODELS:
1000, 1300, 1500, 1850, 2100, 2500
SERIES: 400, 401, 402, 403, 404, 405
WARNING: If the information in this
manual is not followed exactly, a fire or
explosion may result causing property
damage, personal injury or loss of life.
Thank You
for buying this cost
efficient, high recovery unit from
A. O. Smith Water Products Co.
You should thoroughly read and understand this
manual before installation and/or operation of this
boiler. Please pay particular attention to the
important safety and operating instructions as well
as the WARNINGS and CAUTIONS.
CONTENTS PAGE
DIMENSIONS/CAPACITIES DATA .......................... 2 - 3
FOREWORD......................................................... 4 - 5
FEATURES/CONTROLS..................................... 5 - 7
INSTALLATION INSTRUCTIONS ....................... 7 - 9
VENTING ........................................................... 9 - 11
SYSTEM INSTALLATION ................................ 11 - 16
HYDRONIC INSTALLATION ............................ 16 - 18
HOT WATER SUPPLY INSTALLATION ........... 18 - 31
GAS CONNECTIONS...................................... 18 - 23
OPERATION .................................................... 31 - 34
LIGHTING AND OPERATING .......................... 32 - 33
CONTROL SYSTEM ....................................... 34 - 44
PREVENTATIVE MAINTENANCE.................. 44 - 46
TROUBLE SHOOTING .................................... 42 - 44
WIRING DIAGRAM/SCHEMATIC ................... 24 - 27
LIMITED WARRANTY ............................................. 47
Do not store or use gasoline or other
flammable vapors and liquids in the
vicinity of this or any other appliance.
WHAT TO DO IF YOU SMELL GAS:
Extinguish any open flame.
Do not try to light any appliance.
Do not touch any electrical switch; do
not use any phone in your building.
Immediately call your gas supplier
from a neighbor's phone. Follow the
gas supplier's instructions.
If you cannot reach your gas supplier,
call the fire department.
Installation and service must be
performed by a qualified installer,
service agency or the gas supplier.
2
DIMENSIONS/CAPACITIES DATA
Figure 1.
IMPORTANT!
Refer to "Installation Clearances" section of manual
(page 7) for recommended service clearances prior
to boiler placement.
TOP VIEW
LEFT SIDE
TABLE 2. DIMENSIONAL DATA
ABCD EF
Model Inches cm Inches cm Inches cm Inches cm Inches cm Inches cm
GW/GB-1000 14.1 35.8 12.2 31.0 40.3 102.4 31.6 80.3 26.0 66.0 46.8 118.9
GW/GB-1300 24.8 63.0 12.2 31.0 40.3 102.4 31.6 80.3 39.3 99.8 57.3 145.5
GW/GB-1500 30.2 76.7 12.2 31.0 40.3 102.4 31.6 80.3 44.6 113.3 64.3 163.3
GW/GB-1850 27.7 70.4 11.2 28.4 43.0 109.2 32.3 82.0 44.0 111.8 78.3 198.9
GW/GB-2100 31.0 78.7 11.2 28.4 43.0 109.2 32.3 82.0 49.5 125.7 85.3 216.7
GW/GB-2500 38.1 96.8 10.5 26.7 43.0 109.2 32.3 82.0 56.5 143.5 99.3 252.2
Input Rating Exhaust Air Intake
REAR VIEW
FRONT VIEW
BTU/Hr. KW BTU/Hr. KW Vent Diameter Diameter Water Conn. Gas Inlet
Model Natural Gas Natural Gas Propane Gas Propane Gas Inches cm Inches cm Size
GW/GB-1000 990,000 289.95 990,000 289.95 10 25.4 8 20.3 2 1/2 NPT 2 NPT
GW/GB-1300 1,300,000 380.74 1,300,000 380.74 12 30.5 10 25.4 2 1/2 NPT 2 NPT
GW/GB-1500 1,500,000 439.31 1,500,000 439.31 12 30.5 10 25.4 2 1/2 NPT 2 NPT
GW/GB-1850 1,850,000 541.82 1,850,000 541.82 14 35.6 10 25.4 2 1/2 NPT 2 1/2 NPT
GW/GB-2100 2,100,000 615.04 2,100,000 615.04 14 35.6 12 30.5 2 1/2 NPT 2 1/2 NPT
GW/GB-2500 2,490,000 729.26 2,490,000 729.26 16 40.7 12 30.5 2 1/2 NPT 2 1/2 NPT
TABLE 1: GAS AND ELECTRICAL REQUIREMENT
Manifold Pressure Electrical Characteristics
MODEL Type of Gas Inches W.C. kPa Volts/Hz Amperes
GW/GB-1000
thru 2500 NATURAL 3.5 0.87 120/60 30
GW/GB-1000
thru 2500 PROPANE 10 2.49 120/60 30
All Models - Maximum Supply Pressure: 14.0 In. W.C. (3.49 kPa)
Minimum Supply Pressure Natural Gas: 6.0 In. W.C. (1.22 kPa)
Minimum Supply Pressure Propane Gas: 11.0 In. W.C. (2.74 kPa)
Minimum Pressures must be maintained during operating conditions.
3
DIMENSIONS DATA FOR OUTDOOR CONFIGURATION
Figure 2.
TABLE 3. DIMENSIONAL DATA
AB C D E F G HJ
Model Inches cm Inches cm Inches cm Inches cm Inches cm Inches cm Inches cm Inches cm Inches cm
GBO/GWO-1000 14 35.5 31.6 80.3 71.8 182.4 15.5 39.4 39.75 101 58.25 148 15.9 40.83 16 40.64 46.8 118.9
GBO/GWO-1300 24.75 62.9 31.6 80.3 82 208.3 15.5 39.4 39.75 101 58.25 148 15.9 40.83 16 40.64 57.3 145.5
GBO/GWO-1500 30 76.2 31.6 80.3 89 226 15.5 39.4 39.75 101 58.25 148 15.9 40.83 16 40.64 64.3 163.3
GBO/GWO-1850 27.5 69.9 32.3 82 103 261.6 18.9 48 43 109.2 61.5 156.2 23.9 60.7 20 50.8 78.3 198.9
GBO/GWO-2100 31 78.7 32.3 82 110 279.4 18.9 48 43 109.2 61.5 156.2 23.9 60.7 20 50.8 85.3 216.7
GBO/GWO-2500 38 96.5 32.3 82 124 315 18.9 48 43 109.2 61.5 156.2 23.9 60.7 20 50.8 99.3 252.2
TOP VIEW
REAR VIEW
FRONT VIEW
LEFT SIDE
4
TABLE 5: PUMPING PERFORMANCE GUIDE
TABLE 4: RECOVERY CAPACITIES
TEMPERATURE RISE - DEGREES °F (°C)
Input Rating Water 40°F 50°F 60°F 70°F 80°F 90°F 100°F 110°F 120°F 130°F
MODEL BTU/Hr. (kW) Flow (22.2°) (27.7°) (33.3°) (38.8°) (44.4°) (50°) (55.5°) (61.1°) (66.7°) (72.2°)
GW - 1000 990,000 (290.1) GPH 2520 2016 1680 1440 1260 1120 1008 916 840 775
LPH 9526 7620 6350 5443 4763 4234 3810 3462 3175 2930
GW - 1300 1,300,000 (380.9) GPH 3309 2647 2206 1891 1655 1471 1324 1203 1103 1018
LPH 12508 10006 8339 7148 6256 5560 5005 4547 4169 3848
GW - 1500 1,500,000 (439.5) GPH 3818 3055 2545 2182 1909 1697 1527 1388 1273 1175
LPH 14432 11548 9620 8248 7216 6415 5772 5247 4812 4442
GW - 1850 1,850,000 (542.0) GPH 4709 3767 3139 2691 2355 2093 1884 1712 1570 1449
LPH 17800 14239 11865 10172 8902 7912 7122 6471 5935 5477
GW - 2100 2,100,000 (615.3) GPH 5345 4276 3564 3055 2673 2376 2138 1944 1782 1645
LPH 20204 16163 13472 11548 10104 8981 8082 7348 6736 6218
GW - 2500 2,490,000 (729.6) GPH 6338 5071 4225 3622 3169 2817 2535 2305 2113 1950
LPH 23958 19168 15971 13691 11979 10648 9582 8713 7987 7371
FOREWORD
Detailed installation diagrams are in this manual. These diagrams
will provide the installer with a reference of materials needed and a
suggested method of piping. IT IS NECESSARY THAT ALL WATER
AND GAS PIPING, AND THE ELECTRICAL WIRING BE INSTALLED
AND CONNECTED AS SHOWN IN THE DIAGRAMS.
CHECK DIAGRAMS THOROUGHLY BEFORE STARTING
INSTALLATION TO AVOID POSSIBLE ERRORS AND MINIMIZE
TIME AND MATERIALS COST. SEE FIGURES 1 THROUGH 5 AND
TABLES 1, 2, AND 3.
This design complies with the current edition of ANSI Z21.13-CSA
4.9 for Gas-Fired Low-Pressure Steam and Hot Water Boilers.
MAKE SURE THE GAS ON WHICH THE BOILER WILL OPERATE
IS THE SAME AS THAT SPECIFIED ON THE BOILER RATING
PLATE.
The boiler installation must conform to these instructions and the
local code authority having jurisdiction. In the absence of local
codes, the installation must comply with the latest editions of
the National Fuel Gas Code, ANSI Z223.1/NFPA 54 and the
National Electrical Code, NFPA 70 or CAN/CSA B149.1, and CSA
2 C22.1. The former is available from the Canadian Standards
Association, 8501 East Pleasant Valley Road, Cleveland, OH
44131, and both documents are available from the National Fire
Protection Association, 1 Batterymarch Park, Quincy, MA 02269.
GB MODELS-FLOW, HEAD LOSS AND TEMPERATURE RISE
20 Deg. F Rise 30 Deg. F Rise 40 Deg. F Rise Maximum Flow Rate Minimum Flow Rate
GPM PD-FT GPM PD-FT GPM PD-FT GPM PD-FT Deg. F GPM PD-FT Deg. F
MODEL Head Head Head Head Rise Head Rise
GB - 1000 83 5.1 55 2.7 41.6 1.5 154 12.2 11 42 1.5 40
GB - 1300 109 7.2 72.8 4.2 54.6 3.2 154 14.5 14 55 3.2 40
GB - 1500 126 10.1 84 6.3 63 4.3 154 16.3 17 64 4.3 40
GB - 1850 154 18.5 103.6 10.1 77.7 6.4 154 18.5 20 78 6.4 40
GB - 2100 n/a n/a 117.6 14.5 88 8.3 154 21.3 23 89 8.3 40
GB - 2500 n/a n/a 139.4 18.5 104.6 11.6 154 23.2 28 105 11.6 40
Note: GW models (GB optional) are equipped with pumps capable of handling 50 equivalent feet
(15.2 m) of normal pipe fittings.
5
At times you may not be able to smell an LP gas leak. One cause
is odor fade, which is a loss of the chemical odorant that gives LP
gas its distinctive smell. Another cause can be your physical
condition, such as having a cold or diminishing sense of smell with
age. For these reasons, the use of a propane gas detector is
recommended. IF YOU EXPERIENCE AN OUT OF GAS
SITUATION, DO NOT TRY TO RELIGHT APPLIANCES YOURSELF.
Call your local service agent. Only trained LP professionals should
conduct the required safety checks in accordance with industry
standards.
HIGH ALTITUDE INSTALLATION
WARNING
INSTALLATIONS ABOVE 4,500 FEET REQUIRE REPLACEMENT
OF THE BURNER ORIFICES. FAILURE TO REPLACE THE
ORIFICES WILL RESULT IN IMPROPER AND INEFFICIENT
OPERATION OF THE APPLIANCE, PRODUCING CARBON
MONOXIDE GAS IN EXCESS OF SAFE LIMITS, WHICH COULD
RESULT IN SERIOUS PERSONAL INJURY OR DEATH.
GENESIS BOILERS ARE EQUIPPED WITH SELF-REGULATING
PREJET ORIFICES WHICH AUTOMATICALLY COMPENSATE FOR
HIGHER ELEVATIONS AND ADJUST THE APPLIANCE'S INPUT
RATE ACCORDINGLY, MAKING IT UNNECESSARY TO REPLACE
ORIFICES FOR HIGH ALTITUDE (UP TO 4,500 FEET). CONSULT
THE FACTORY FOR HIGHER ALTITUDES.
Some utility companies derate their gas for altitude. You should
contact your gas supplier for any specific changes which may be
required in your area. Call the local gas utility to verify BTU content
of the gas supplied.
Input rating specified on the rating plate applies to elevations up to
4,500 feet (1350 m). For elevations above 4,500 feet (1350 m),
ratings must be reduced, consult the factory.
FEATURES/CONTROLS
MULTI-STAGE FIRING AND CONTROL SYSTEM
ALL MODELS - The control system consists of four basic
components: 1) Central Control Board 2) Flame Control Board 3)
User Interface Module 4) Power Distribution Board; see Figures
17, 18, 19 and 21. The Central Control Board, Flame Control
Boards and the Power Distribution Board are located in the
control box and can be accessed through panels on the left side
and top of the unit. The User Interface Module is attached to the
front jacket panel. The control system is a multi-stage control
capable of managing three or four firing stages. Models 1000,
1300, and 1500 operates with 3-stage fire. Models 1850, 2100
and 2500 operates with 4-stage fire. Every system will have one
Central Control Board (CCB), one Power Distribution Board
(PDB), one User Interface Module (UIM) and either two or three
Flame Control Boards (FCB) depending on the model.
The Control Boards Figure 17 and 18, contain dipswitches which
allow the user to control several system options. See Control System
Section.
GROUNDING INSTRUCTIONS
This boiler must be grounded in accordance with the National
Electrical Code, NFPA 70 or the Canadian Electrical Code CSA 2
C22.1
and/or local codes. The boiler is polarity sensitive, correct
wiring is imperative for proper operation.
This boiler must be connected to a grounded metal, permanent wiring
system, or an equipment grounding conductor must be run with the
circuit conductors and connected to the equipment grounding
terminal or lead on the boiler.
WARNING
YOUR BOILER IS NOT DESIGNED TO OPERATE WITH A BOILER
INLET WATER TEMPERATURE OF LESS THAN 120°F (49°C).
COLDER INLET WATER TEMPERATURE WILL RESULT IN
SIGNIFICANT CONDENSATION DEVELOPING ON THE HEAT
EXCHANGER. THIS SITUATION CAN CAUSE A CORROSIVE
ENVIRONMENT FOR THE HEAT EXCHANGER, BURNERS AND
VENTING RESULTING IN PREMATURE DAMAGE, WHICH COULD
RESULT IN SERIOUS PERSONAL INJURY OR DEATH.
FOR SYSTEMS THAT USE LARGE VOLUMES OF COLD WATER
OR SYSTEMS UTILIZING HEAVY WATER DRAWS, CONDENSATION
CAN BE PREVENTED BY USING A BYPASS LOOP.
CORRECT GAS
Make sure the gas on which the boiler will operate is the same as
that specified on the boiler rating plate. Do not install the boiler if
equipped for a different type of gas, consult your gas supplier.
PRECAUTIONS
IF THE UNIT IS EXPOSED TO THE FOLLOWING, DO NOT
OPERATE UNTIL ALL CORRECTIVE STEPS HAVE BEEN MADE BY
A QUALIFIED SERVICEMAN:
1. EXPOSURE TO FIRE.
2. IF DAMAGED.
3. FIRING WITHOUT WATER.
4. SOOTING.
IF THE BOILER HAS BEEN EXPOSED TO FLOODING, IT MUST BE
REPLACED.
LIQUID PETROLEUM MODELS
Boilers for propane or liquefied petroleum gas (LPG) are different
from natural gas models. A natural gas boiler will not function
safely on LP gas and no attempt should be made to convert a
boiler from natural gas to LP gas.
LP gas must be used with great caution. It is highly explosive and
heavier than air. It collects first in the low areas making its odor
difficult to detect at nose level. If LP gas is present or even suspected,
do not attempt to find the cause yourself. Leave the building, leaving
doors open to ventilate, then call your gas supplier or service agent.
Keep area clear until a service call has been made.
6
DIFFERENTIAL PRESSURE SWITCH
The differential pressure switch ensures that a sufficient differential
exists between the air pressure in the pre-mix chamber and the inlet
of the burner for safe, combustion and proper low NO
x
emission. The
switch has two pressure taps marked "+" (positive) and "-" (negative).
Silicone tubing is run from the positive pressure tap of the switch to a
tap on the control panel to measure the air pressure in the pre-mix
chamber. The negative pressure tap measures the pressure taken at
the burner's auxiliary tube. Connections can be seen by removing the
lower front jacket panel. It is important that this panel remain sealed
at all times while the boiler is operating.
The differential pressure switch is normally open and closes when
the combustion blower starts.
BLOCKED FLUE PRESSURE SWITCH
The blocked flue pressure switch ensures that the vent system is
clear. This pressure switch is normally closed and only opens on
fault conditions.
FLAME SENSOR
The flame sensor detects the flame presence on burner's ports. If
no flame is sensed, the gas valve(s) will close automatically. If no
flame is sensed on three ignition trials the boiler will lock out. In the
event of a lockout, depress the SELECT button on the UIM to restart
the boiler.
WATER FLOW SWITCH
The water flow switch is installed at the boiler outlet to prevent burner
operation in the event of inadequate water flow through the boiler. It
is a normally open switch that will close its contacts when increasing
water flow rate is detected. The water flow switch is factory-set, but
may require field adjustment. The contacts will open when the flow
rate drops below the adjusted setting causing the gas valve(s) to
close which will turn off the gas to the burners.
LIMIT CONTROLS
CAUTION
LIMIT CONTROLS ARE SAFETY DEVICES AND ARE NOT TO BE
USED AS AN OPERATING CONTROL (THERMOSTAT).
The "G(B/W)" models incorporate an outlet water probe consisting
of two limit controls:
1. An adjustable automatic reset limit control, that can be set
as high as either 210°F (99°C) or 235°F (113°C) depending on
the application.
2. A fixed manual reset limit (ECO) factory set at 244°F
(118°C). If the manual reset should open due to high
temperature, the gas valves will close and the unit will go into
lockout. If lockout occurs, push the SELECTION button on the
UIM to restart the boiler.
ON/OFF SWITCH
The ON/OFF switch is a single-pole, single-throw rocker switch.
The switch provides 120VAC from the line source to the boiler.
COMBUSTION AIR BLOWER
Provides air for combustion process. The blower settings are
adjustable through the use of the air shutter, however, blowers are
set at the factory and might require slight adjustment depending
on site installation.
TANK PROBE
FOR HOT WATER SUPPLY SYSTEMS (GW models), a tank probe
is supplied with each hot water supply boiler.
Note: The tank probe must be designated as the controlling probe
using dip switch "4" on Central Control Board (Figure 17) before it
can be used for (GW) hot water supply applications.
"Pigtails" of field-supplied wires should be spliced to "pigtails" of
tank probe and connected to terminal block in the 24VAC junction
box. See Figure 12 for the tank probe installation. Follow the
instructions in the "TANK PROBE INSTALLATION PROCEDURE".
See page 18.
FOR HOT WATER HEATING SYSTEMS (GB models), a tank probe
is not supplied with the GB models due to the many various
types of systems and operating conditions. A tank probe can
be used as an option to control loop temperature and unit
staging. Additionally, the inlet temperature probe can be used
as the loop thermostat in some heating applications. The tank
probe connects to designated wires in the junction box at the
rear of the boiler. Do not operate this boiler using the internal
high limits only, use a tank probe or operating thermostat to
control system temperatures.
Note: The tank probe or additional 24VAC devices must be identified
using Dipswitches on Central Control Board before they are
recognized as a part of the heating system; see Table 5. Refer to
"Control System" section for more information about dipswitch
settings.
CIRCULATING PUMP
The pump flow rate should not exceed the maximum
recommended flow rate; see Table 5.
FOR HOT WATER SUPPLY SYSTEMS (GW models), ordered with
the circulator as an integral part of the boiler; the pump has been
lubricated at the factory, and future lubrication should be in
accordance with the motor manufacturer's instructions provided
as supplement to this manual.
FOR HOT WATER HEATING SYSTEMS (GB models or GW models
ordered without circulator), the circulator is NOT provided and
must be field-installed.
LOW WATER CUTOFF (Not Supplied)
If low water level protection is required by the authorities having
jurisdiction, a low water cutoff switch should be installed
next to the boiler in the outlet water line as shown in
"HYDRONIC INSTALLATION" section; see page 16. The switch
should receive periodic (every six months) inspection to assure
proper operation. A low water cutoff device of the float type should
be flushed every six months.
7
DRAIN VALVE (Not Supplied)
Additional drain valves must be obtained and installed on each boiler
and tank for draining purposes.
SAFETY RELIEF VALVES
Your local code authority may have other specific relief valve
requirements not covered below.
WARNING
THE PURPOSE OF A SAFETY RELIEF VALVE IS TO AVOID
EXCESSIVE PRESSURE WHICH MAY CAUSE TANK EXPLOSION,
SYSTEM OR BOILER DAMAGE.
TO AVOID WATER DAMAGE A DRAIN LINE MUST BE CONNECTED
TO A SAFETY RELIEF VALVE FOR DIRECT DISCHARGE TO A SAFE
LOCATION. A DRAIN LINE MUST NOT BE REDUCED FROM THE
SIZE OF THE VALVE OUTLET AND IT MUST NOT CONTAIN ANY
VALVES BETWEEN THE BOILER AND THE RELIEF VALVE OR
THE RELIEF VALVE AND THE DRAIN EXIT. IN ADDITION, THERE
SHOULD NOT BE ANY RESTRICTIONS IN A DRAIN LINE NOR
SHOULD IT BE ROUTED THROUGH AREAS WHERE FREEZING
CONDITIONS MIGHT OCCUR. DO NOT THREAD OR CAP THE
DRAIN LINE EXIT. RESTRICTING OR BLOCKING A DRAIN LINE
WILL DEFEAT THE PURPOSE OF THE RELIEF VALVE AND MAY
CREATE AN UNSAFE CONDITION. INSTALL A DRAIN LINE WITH
A DOWNWARD SLOPE SUCH THAT IT NATURALLY DRAINS
ITSELF.
If any safety relief valve is replaced, the replacement valve must
comply with the latest version of the ASME Boiler and Pressure
Vessel Code, Section IV (HEATING BOILERS). Select a relief valve
with a discharge rating NOT less than the boiler input, and a set
pressure NOT exceeding the working pressure of any component
in the system.
The storage tank temperature and pressure relief valve must
comply with the applicable construction provisions of the Standard
for Relief Valves for Hot Water Supply Systems, ANSI Z21.22-CSA-
4.4 (current edition). The valve must be of the automatic reset type
and not embody a single-use type fusible plug, cartridge or linkage.
FOR HOT WATER HEATING SYSTEMS, the boilers are shipped
with a 50 psi pressure relief valve. This relief valve is factory
installed on the water outlet header of the boiler.
FOR HOT WATER SUPPLY SYSTEMS, the boilers are shipped
with a 125 psi pressure relief valve. This relief valve is factory
installed on the water outlet header of the boiler. This ASME-rated
valve has a discharge capacity that exceeds the maximum boiler
input rating and a pressure rating that does not exceed the
maximum working pressure shown on the boiler rating plate.
In addition, a CSA design-certified and ASME-rated temperature
and pressure (T & P) relief valve must be installed on every water
storage tank in the hot water supply system; see
Figures 11 and 13.
The T & P relief valve should have a temperature rating of 210°F
(99°C), a pressure rating NOT exceeding the lowest rated working
pressure of any system component, and a discharge capacity
exceeding the total input of the water boilers supplying water to the
storage tank.
Locate the T & P relief valve (a) in the top of the tank, or (b) in the
side of the tank on a center line within the upper six (6) inches
(15 cm) of the top of the tank. The tapping shall be threaded in
accordance with the latest edition of the Standard for Pipe Threads,
General Purpose (inch), ANSI/ASME B1.20.1. The location of, or
intended location for, the T & P relief valve shall be readily
accessible for servicing or replacement.
INSTALLATION INSTRUCTIONS
REQUIRED ABILITY
INSTALLATION OR SERVICE OF THIS BOILER REQUIRES ABILITY
EQUIVALENT TO THAT OF A LICENSED TRADESMAN IN THE FIELD
INVOLVED. PLUMBING, AIR SUPPLY, VENTING, GAS SUPPLY AND
ELECTRICAL WORK ARE REQUIRED.
LOCATION
When installing the boiler, consideration must be given to proper
location. The location selected should be as close to the stack or
chimney as practical with adequate air supply and as centralized
with the piping system as possible. The location should also be
such that the gas ignition system components are protected from
water (dripping, spraying, etc.) during appliance operation and
service (circulator replacement, control replacement, etc.)
THE BOILER MUST NOT BE INSTALLED ON CARPETING.
THE BOILER SHOULD NOT BE LOCATED IN AN AREA WHERE
IT WILL BE SUBJECT TO FREEZING.
THE BOILER SHOULD BE LOCATED NEAR A FLOOR DRAIN.
THE BOILER SHOULD BE LOCATED IN AN AREA WHERE
LEAKAGE FROM THE BOILER OR CONNECTIONS WILL NOT
RESULT IN DAMAGE TO THE ADJACENT AREA OR TO LOWER
FLOORS OF THE STRUCTURE.
WHEN SUCH LOCATIONS CANNOT BE AVOIDED, A SUITABLE
DRAIN PAN SHOULD BE INSTALLED UNDER THE BOILER. Such
pans should be fabricated with sides at least 2-1/2" (6.5 cm) deep,
with length and width at least 2" (5.1 cm) greater than the dimensions
of the boiler and must be piped to an adequate drain. The pan
must not restrict combustion air flow.
WARNING
THERE IS A RISK IN USING FUEL BURNING APPLIANCES IN
ROOMS OR AREAS WHERE GASOLINE, OTHER FLAMMABLE
LIQUIDS OR ENGINE DRIVEN EQUIPMENT OR VEHICLES ARE
STORED, OPERATED OR REPAIRED. FLAMMABLE VAPORS ARE
HEAVY AND TRAVEL ALONG THE FLOOR AND MAY BE IGNITED
BY THE IGNITER OR MAIN BURNER FLAMES CAUSING FIRE OR
EXPLOSION. SOME LOCAL CODES PERMIT OPERATION OF GAS
APPLIANCES IF INSTALLED 18 INCHES (46.0 CM) OR MORE
ABOVE THE FLOOR. THIS MAY REDUCE THE RISK IF LOCATION
IN SUCH AN AREA CANNOT BE AVOIDED.
FLAMMABLE ITEMS, PRESSURIZED CONTAINERS OR ANY
OTHER POTENTIAL FIRE HAZARDOUS ARTICLES MUST NEVER
BE PLACED ON OR ADJACENT TO THE BOILER.
OPEN CONTAINERS OF FLAMMABLE MATERIAL SHOULD NOT
BE STORED OR USED IN THE SAME ROOM WITH THE BOILER.
A hot water boiler installed above radiation level or as required by
8
the authority having jurisdiction, must be provided with a low water
cutoff device either as a part of the boiler or at the time of boiler
installation.
WARNING
UNDER NO CIRCUMSTANCES SHOULD THE EQUIPMENT ROOM
WHERE THE BOILER IS INSTALLED EVER BE UNDER NEGATIVE
PRESSURE. PARTICULAR CARE MUST BE TAKEN WHEN
EXHAUST FANS, COMPRESSORS, AIR HANDLING EQUIPMENT,
ETC., MAY INTERFERE WITH THE COMBUSTION AND
VENTILATION AIR SUPPLIES OF THIS BOILER.
CHEMICAL VAPOR CORROSION
Heat exchanger corrosion and component failure can be caused
by the heating and breakdown of airborne chemical vapors. Spray
can propellants, cleaning solvents, refrigerator and air conditioning
refrigerants, swimming pool chemicals, calcium and sodium
chloride, waxes, and process chemicals are typical compounds
which are corrosive. These materials are corrosive at very low
concentration levels with little or no odor to reveal their presence.
Products of this sort should not be stored near the boiler. Also, air
which is brought in contact with the boiler should not contain any of
these chemicals. If necessary, uncontaminated air should be
obtained from remote or outside sources. Failure to observe this
requirement will void the warranty.
INSTALLATION CLEARANCES
Sufficient area should be provided at the front and sides of the
unit for proper servicing. For ease of service, minimum
clearances of 24" (61.0 cm) in the front and 18" (46.0 cm) on
the sides are recommended. It is important that the minimum
clearances be observed to allow service to the control box and
other controls. Observing proper clearances will allow service to
be performed without movement or removal of the boiler from its
installed location. Failure to observe minimum clearances may
require removal of the boiler in order to service such items as the
heat exchanger and burners. In a utility room installation, the
door shall be wide enough to allow the boiler to enter or to permit
the replacement of another appliance.
Two inch (5.1 cm) clearance is allowable from combustible
construction to hot water pipes. Sufficient clearance should be
provided at one end of the boiler to permit access to heat exchanger
tubes for cleaning.
Access to control box items such as the Central Control Board,
Flame Control Boards, Power Distribution Board and wiring
harnesses is provided through a panel on the left side of the unit.
A minimum service clearance of 18" (46.0 cm) is required.
These boilers are approved for installation on noncombustible
flooring in an alcove with minimum clearance to combustibles of:
3 inches (7.6 cm) Right Side, and Back; 6 inches (15.2 cm) Top;
Front, Alcove; 12 inches (30.5 cm) Left Side; and 6 inches
(15.2 cm) surrounding the Vent.
For installation on combustible flooring use the Combustible Floor
Kit. The combustible floor kit base adds 4" (10.1 cm) to the overall
height of the boiler. See Figure 3.
MODEL COMBUSTIBLE BASE KIT NUMBER
G(B,W) - 1000 211093
G(B,W) - 1300 211093-1
G(B,W) - 1500 211093-2
G(B,W) - 1850 211093-3
G(B,W) - 2100 211093-4
G(B,W) - 2500 211093-5
Figure 3. Boiler on Combustible Floor Base and Kit Numbers.
LEVELLING
Each unit must be checked after installation to be certain that it is level.
AIR REQUIREMENTS
WARNING
FOR SAFE OPERATION, AN AMPLE SUPPLY OF AIR MUST BE
PROVIDED FOR PROPER COMBUSTION AND VENTILATION IN
ACCORDANCE WITH THE NATIONAL FUEL GAS CODE, ANSI
Z223.1 OR CAN/CSA-B149.1 CURRENT EDITION OR APPLICABLE
PROVISIONS OF THE LOCAL BUILDING CODES. AN
INSUFFICIENT SUPPLY OF AIR MAY RESULT IN A YELLOW,
LUMINOUS BURNER FLAME, CARBONING OR SOOTING OF THE
FINNED HEAT EXCHANGER, OR CREATE A RISK OF
ASPHYXIATION. DO NOT OBSTRUCT THE FLOW OF
COMBUSTION AND VENTILATION AIR.
UNCONFINED SPACE
In buildings of conventional frame, brick or stone construction,
unconfined spaces may provide adequate air for combustion.
If the unconfined space is within a building of tight construction
(buildings using the following construction: weather stripping, heavy
insulation, caulking, vapor barrier, etc.), air for combustion,
ventilation, must be obtained from outdoors or spaces freely
communicating with the outdoors. The installation instructions for
confined spaces in tightly constructed buildings must be followed
to ensure adequate air supply.
CONFINED SPACE
(a) U. S. INSTALLATIONS
When drawing combustion and dilution air from inside a
conventionally constructed building to a confined space, such a
space shall be provided with two permanent openings, ONE
WITHIN 12 INCHES OF THE ENCLOSURE TOP AND ONE WITHIN
12 INCHES OF THE ENCLOSURE BOTTOM. Each opening shall
have a free area of at least one square inch per 1000 Btu/hr
(22 cm
2
/k W) of the total input of all appliances in the enclosure.
9
SEE FIGURE 6). AT LEAST TYPE B VENTING MUST BE USED
WITH THE STANDARD VENTING OPTION (thru-the-roof) USING
THE NATIONAL FUEL GAS CODE VENT TABLES. TYPE B VENT
PIPE
CANNOT BE USED IF THE BOILER IS VENTED
HORIZONTALLY OR AS A DIRECT VENT (SEE PAGES 12
THROUGH 15). ALL LOCAL UTILITY, STATE/ PROVINCIAL,
REGULATIONS ON VENTING MUST BE FOLLOWED.
VENT SIZING, VENT CONNECTORS, INSTALLATION AND
TERMINATION SHALL BE IN ACCORDANCE WITH THE CURRENT
EDITION OF
NATIONAL FUEL GAS CODE, ANSI Z223.1 OR CAN/
CSA-B149.1 or applicable provisions of the local building codes.
Size and install proper size vent pipe; refer to Table 6.
Horizontal runs of vent pipe shall be securely supported by
adequately placed (approximately every 4 feet [1.2 m]),
noncombustible hangers suitable for the weight and design of the
materials employed to prevent sagging and to maintain a minimum
upward slope of 1/4" per foot (2 cm/m) from the boiler to the vent
terminals. Dampers or other obstructions must not be installed in
the vent. Be sure that the vent connector does not extend beyond
the inside wall of the chimney.
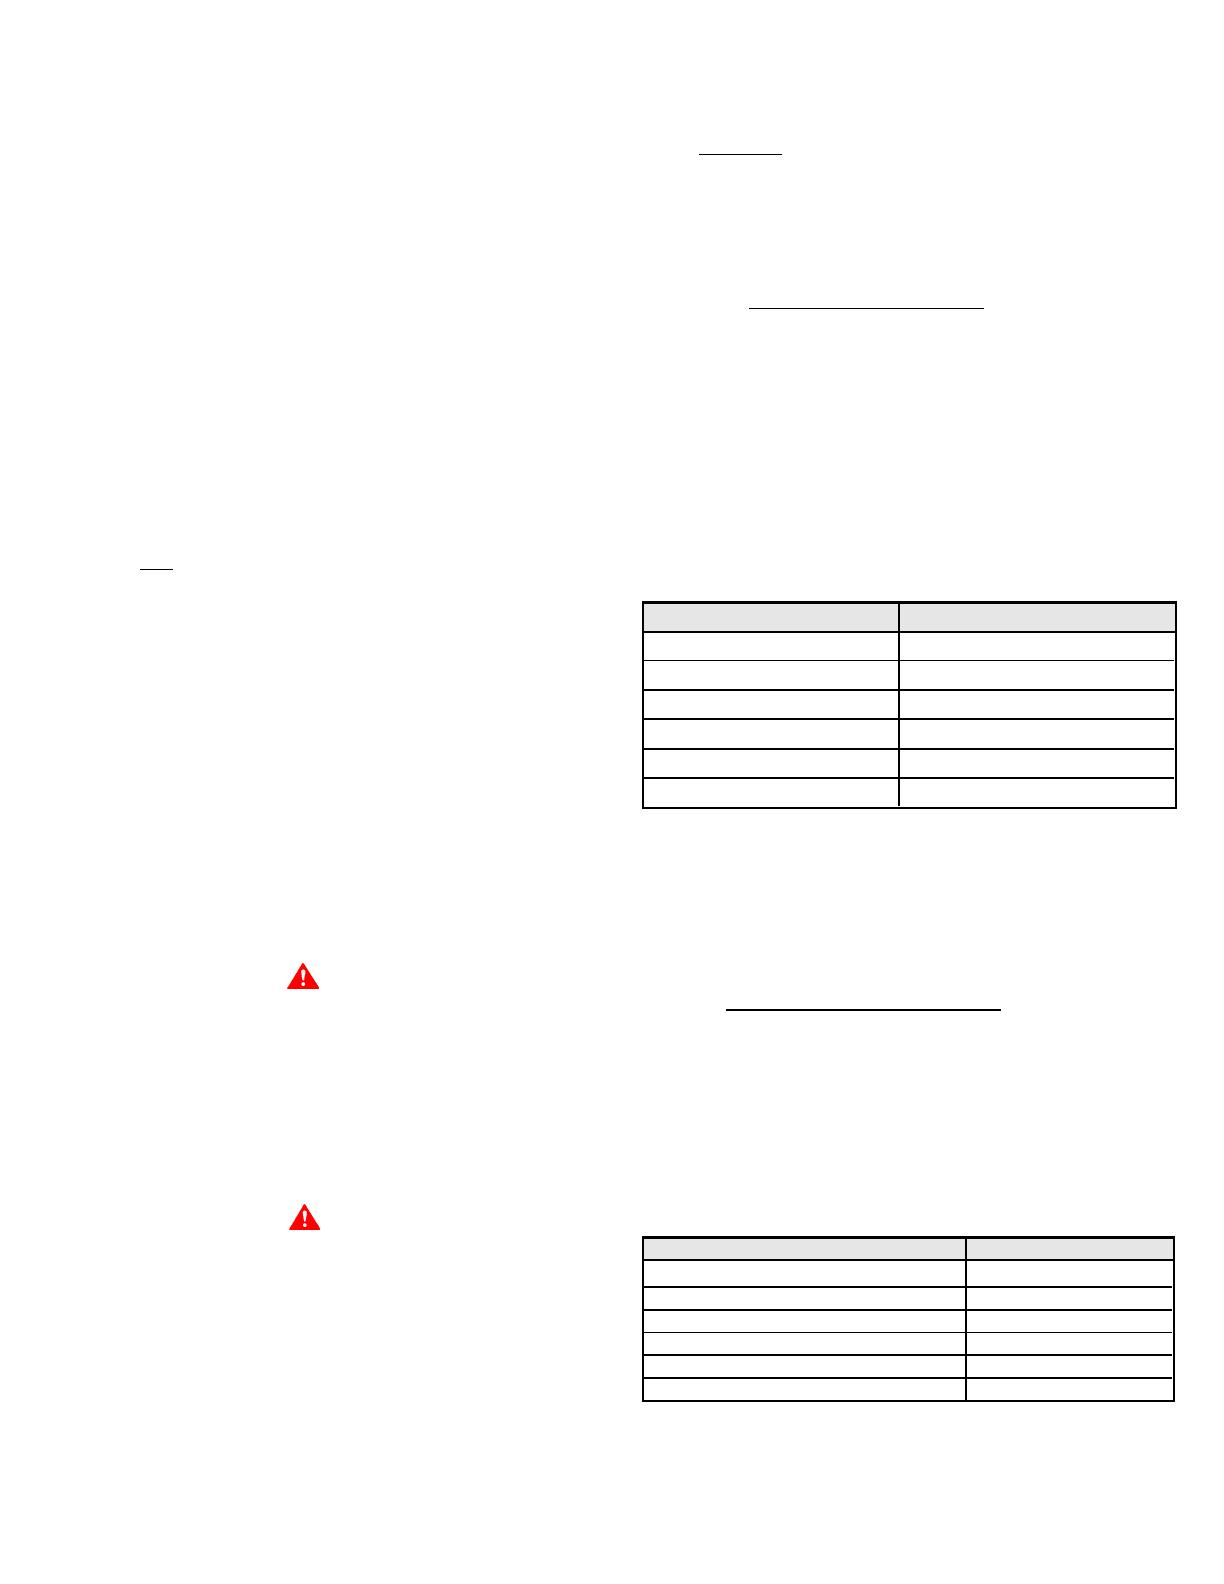
TABLE 6: VENT CONNECTION
MODEL NUMBER VENT CONNECTOR
G(B,W) 1000 10" (25.4 cm)
G(B,W) 1300 12" (30.5 cm)
G(B,W) 1500 12" (30.5 cm)
G(B,W) 1850 14" (35.6 cm)
G(B,W) 2100 14" (35.6 cm)
G(B,W) 2500 16" (40.6 cm)
For vent arrangements other than Table 10 and for proper boiler
operation, a barometric damper is required to maintain draft
between -0.02" W.C.. and -0.04" W.C. at 2 feet (0.6 m) above the
boiler vent collar.
STANDARD (HORIZONTAL) VENTING, CATEGORY III
Vent sizing, installation and termination shall be in accordance
with the
NATIONAL FUEL GAS CODE, ANSI Z223.1 OR
CAN/CSA-B149.1 (Current Editions). If applicable, all local, utility,
state/provincial regulations on venting must be followed. See Table
11, Figure 7 for venting specifications. The exhaust vent pipe must
be of a type listed for use with Category III gas burning heaters such
as "Saf-T-Vent" manufactured by Heat-Fab Inc.
For Category III installations, it is important that the Installed vent
be airtight. Please insure that all joints are sealed properly during
installation. For Horizontal Vent Kit part numbers, see Table 7.
TABLE 7: HORIZONTAL VENT KITS.
DIRECT VENT VERTICAL AND HORIZONTAL VENTING
For direct vent applications, this boiler may be vented according to
Tables 12 and 13; see Figures 8 and 9. For category III applications,
If the confined space is within a building of tight construction, air
for combustion, ventilation, and draft hood dilution must be
obtained from outdoors. When directly communicating with the
outdoors or communicating with the outdoors through vertical
ducts, two permanent openings, located in the above manner,
shall be provided. Each opening shall have a free area of not less
than one square inch per 4000 Btuh (5.5 cm
2
/kW) of the total input
of all appliances in the enclosure. If horizontal ducts are used, each
opening shall have a free area of not less than one square inch per
2000 Btuh (11 cm
2
/kW) of the total input of all appliances in the
enclosure.
(b) CANADIAN INSTALLATIONS
Ventilation of the space occupied by the boiler(s) shall be provided
by an opening for ventilation air at the highest practical point
communicating with outdoors. The total cross-sectional area shall
be at least 10% of the area of the combustion air opening but in no
case shall the cross-sectional area be less than 10 square inches
(64.5 cm
2
).
In addition to the above, there shall be permanent air supply
opening(s) having a cross-sectional area of not less than 1 square
inch per 7,000 BTUH (3.2 cm
2
/kW) up to and including 1,000,000
BTUH plus 1 square inch per 14,000 BTU (1.6 cm
2
/kW) in excess of
1,000,000 BTUH. This opening(s) shall be located at, or ducted to,
a point neither more than 18" (46.0 cm) nor less than 6 inches (15.2
cm) above the floor level.
Where power vented equipment is used in the same room as the
boiler, sufficient air openings must be supplied. UNDERSIZED
OPENINGS MAY RESULT IN INSUFFICIENT AIR FOR
COMBUSTION.
Where an exhaust fan is installed in the same room with a boiler,
sufficient openings for air must be provided in the walls.
UNDERSIZED OPENINGS WILL CAUSE AIR TO BE DRAWN INTO
THE ROOM THROUGH THE CHIMNEY, CAUSING POOR
COMBUSTION. SOOTING MAY RESULT WITH AN INCREASED
RISK OF ASPHYXIATION.
VENTING
CAUTION
WHEN VENTING THE GENESIS BOILER THROUGH AN
OVERSIZED CHIMNEY (INCLUDING MASONRY CHIMNEYS),
ADDITIONAL CARE MUST BE EXERCISED TO ASSURE PROPER
DRAFT. FOR PROPER OPERATION, A MINIMUM DRAFT OF -0.02"
W.C. AND A MAXIMUM DRAFT OF -0.04" W.C. MUST BE MAINTAINED.
IN INSTANCES OF EXCESSIVE DRAFT, A BAROMETRIC DAMPER
MAY BE REQUIRED TO ASSIST IN MAINTAINING THE PROPER
DRAFT. DRAFT SHOULD BE MEASURED 2 FEET (0.6 M) ABOVE
THE BOILER VENT COLLAR.
WARNING
THE INSTRUCTIONS IN THIS SECTION ON VENTING THE BOILER
MUST BE FOLLOWED TO AVOID CHOKED COMBUSTION OR
RECIRCULATION OF FLUE GASES. SUCH CONDITIONS CAUSE
SOOTING OR RISKS OF FIRE AND ASPHYXIATION.
This boiler is approved to be vented as a Category I, Category III
(horizontal venting), or a Direct Vent appliance. The Horizontal and
Direct Venting options require a special vent kit.
STANDARD (VERTICAL) VENTING, CATEGORY I
THIS BOILER MAY BE VENTED ACCORDING TO TABLE 10 (ALSO
HORIZONTAL VENT KIT MODEL
211426 G(B,W) 1000
211426-1 G(B,W) 1300
211426-1 G(B,W) 1500
211426-2 G(B,W) 1850
211426-2 G(B,W) 2100
211426-3 G(B,W) 2500
10
POWER VENT (OPTIONAL)
The length of vent used in horizontally vented installations can be
extended beyond the lengths shown in Tables 11 and 13 by
implementing the kits listed below:
TABLE 9: POWER VENT KITS.
CONNECTING BOILER TO A COMMON VENT
Do not connect the boiler to a common vent or chimney with solid
fuel burning equipment. This practice is prohibited by most local
building codes as is the practice of venting gas fired equipment to
the duct work of ventilation systems.
Where a separate vent connection is not available and the vent
pipe from the boiler must be connected to a common vent with an
oil burning furnace, the vent pipe should enter the common vent or
chimney at a point ABOVE the flue pipe from the oil furnace.
UL/ULC listed double wall type B-1 gas vents, through 16" diameter,
can be installed in heated and unheated areas and can pass
through floors, ceilings, partitions, walls and roofs, provided the
required clearance is observed.
At the time of removal of an existing boiler, the following steps shall
be followed with each appliance remaining connected to the
common venting system. Perform these steps while the other
appliances remaining connected to the common venting system
are not in operation.
1. Seal any unused opening in the common venting system.
2. Visually inspect the venting system for proper size and horizontal
pitch and determine there is no blockage or restriction, leakage,
corrosion or other unsafe condition.
3. Insofar as is practical, close all building doors, windows and
all doors between the space in which the appliances remaining
connected to the common venting system are located and other
spaces of the building. Turn on clothes dryers and any
appliance not connected to the common venting system. Turn
on any exhaust fans, such as range hoods and bathroom
exhausts, so they will operate at maximum speed. Do not
operate a summer exhaust fan. Close fireplace dampers.
4. Test fire the appliance(s) being inspected, making sure to follow
the manufacturers lighting and operating instructions.
Appliance(s) operating controls should be adjusted to provide
continuous service.
5. Check vent pressure of the appliance 24 inches (61.0 cm) above
boiler vent collar. Vent pressure should be maintained between
-0.02" W. C. and -0.04" W.C. to assure proper operation. For
appliances with a draft hood, check for spillage with mirror,
smoke or other device five minutes after placing appliance in
operation.
6. After it has been determined that each appliance remaining
connected to the common venting system properly vents when
tested as outlined above, return doors, windows, exhaust fans,
the exhaust vent pipe must be listed for use with category III gas
burning heaters such as "Saf-T-Vent" manufactured by Heat-Fab
Inc. This vent system must be 100% sealed with a condensate
trap located as close to the boiler as possible. When sizing exhaust
piping and intake air piping, 90-degree elbows are equivalent to 10
feet (3.1 m) of straight pipe and 45-degree elbows are equal to 5
feet (1.5 m) of straight pipe.
The intake air piping can be PVC, CPVC, ABS, Galvanized steel or
any suitable intake air piping that can be sealed. See Table 8 for
Direct Vent Kit numbers.
TABLE 8: DIRECT VENT KITS.
HORIZONTAL VENT INSTALLATION
This boiler can be vented through the rear of the cabinet with the
use of the fluebox and vent adaptor. Any of the previous venting
configurations can be installed with rear connections.
To change the unit to rear exhaust:
1. The vent collar and cover plates must be removed from the top
and rear of the unit.
2. Trim the insulation from around the rear flue hole in the jacket
and the fluebox. Support insulation from inside the fluebox to
facilitate cutting. Use safety precautions such as gloves. Place
the gasket and vent adaptor in the horizontal position. Place
the gasket and flue plate in the vertical position as shown in
Figure 4.
Figure 4. Switching from Vertical to Horizontal Venting.
POWER VENT KIT NO. MODEL MAX. LENGTH
211499 G(B,W) 1000 110' (33.5 m)
211499-1 G(B,W) 1300 100' (30.5 m)
211499-1 G(B,W) 1500 100' (30.5 m)
211499-2 G(B,W) 1850 100' (30.5 m)
211499-3 G(B,W) 2100 100' (30.5 m)
211499-4 G(B,W) 2500 100' (30.5 m)
HORIZONTAL DIRECT VENT KIT NO. MODEL
211090 G(B,W) 1000
211090-1 G(B,W) 1300
211090-1 G(B,W) 1500
211090-4 G(B,W) 1850
211090-2 G(B,W) 2100
211090-3 G(B,W) 2500
VERTICAL DIRECT VENT KIT NO. MODEL
211089 G(B,W) 1000
211089-1 G(B,W) 1300
211089-1 G(B,W) 1500
211089-4 G(B,W) 1850
211089-2 G(B,W) 2100
211089-3 G(B,W) 2500
AIR INTAKE TERMINAL MODEL
191965-2 G(B/W) 1000
211336 G(B/W) 1300,1500,1850
211336-1 G(B/W) 2100, 2500
11
Figure 5. Vent Termination Installation Clearances
CAUTION
DIRECT VENTING INTO DEAD AIR SPACES
SUCH AS ALLEYS, ATRIUMS AND INSIDE
CORNERS CAN CAUSE RECIRCULATION OF
FLUE GASES. RECIRCULATION OF FLUE
GASES WILL CAUSE SOOTING, PREMATURE
FAILURE OF THE HEAT EXCHANGER AND
ICING OF THE COMBUSTION AIR INTAKE
DURING SEVERE COLD WEATHER. TO
PREVENT THE RECIRCULATION OF FLUE
GASES, MAINTAIN AS MUCH DISTANCE AS
POSSIBLE BETWEEN THE COMBUSTION AIR
INTAKE AND THE EXHAUST VENT TERMINAL.
STANDARD VENTING DIRECT VENT APPLICATIONS
Note: Venting system of other than
direct-vent appliance shall terminate at
least 4 ft. (1.2 m) below, 4 ft. (1.2 m)
horizontally from, or 1 ft. (30.0 cm)
above any door window or gravity air
inlet.
fireplace dampers and other gas burning appliances to their
previous conditions of use.
All boiler venting systems shall be installed in accordance with
the National Fuel Gas Code, ANSI Z223.1 or CAN/CSA-B149.1
(current edition), or applicable provisions of the local building
codes.
INTAKE/EXHAUST INSTALLATION REQUIREMENTS
1. The termination must be 12 inches (30.5 cm) above snow
or grade level whichever is higher.
2. Due to normal formation of water vapor in the combustion
process, horizontal terminations must not be located over
areas of pedestrian or vehicular traffic, i.e. public walkways
or over areas where condensate could create a nuisance
or hazard. This is especially true in colder climates where
ice buildup is likely to occur. A.O. Smith Corporation will
not be held liable for any personal injury or property
damage due to any dislodging of ice.
3. The exhaust terminal of the venting system must maintain
a minimum clearance of 4 feet (1.22 m) horizontally from,
and in no case above or below, unless a 4-foot horizontal
distance is maintained, from electric meters, gas meters,
regulators and relief equipment.
4. The minimum distance from inside corner formed by two
exterior walls is 6 feet (1.8 m) but 10 feet (3.1 m) is
recommended where possible.
5. Maintain a minimum distance of 4 feet (1.2 m) from any
soffit or eve vent to the exhaust terminal.
6. Maintain a minimum distance of 10 feet (3.1 m) from
any forced air inlet. Fresh air or make up air inlet such
as a dryer or furnace area is considered to be a forced
air inlet.
7. Avoid areas where condensate drainage may cause
problems such as above planters, patios, or adjacent to
windows where the steam from the flue gases may cause
fogging.
8. Select the point of wall penetration where the minimum
1/4" per foot (2 cm/m) of slope up can be maintained.
9. The through the wall termination kit is suitable for zero
clearance to combustible materials.
10. The mid point of the termination elbow must be a minimum
of 12 inches (30.5 cm) from the exterior wall.
SYSTEM INSTALLATION
GENERAL
If the system is to be filled with water for testing or other purposes
during cold weather and before actual operation, care must be taken
to prevent a down draft entering the boiler or freezing air from contacting
the system. Failure to do so may cause the water in the system to
freeze with resulting damage to the system. Damage due to freezing
is not covered by the warranty.
Good practice requires that all piping, etc., be properly supported.
The boilers described in this manual may be used for space (hydronic)
heating or for the heating of potable water. If the heater is to be used for
hydronic space heating, follow the instructions on pages 16-17 given for
equipment required for installation as in Figure 10. However, if units
are to be used for heating potable water, the information describing
specific systems is found on pages 18-20; see Figures 11 and 13.
Installations must comply with all local codes.
INSTALLATION AS BOILER REPLACEMENT
Installation as boiler replacement on an old system with large water
12
STANDARD VENT - VERTICAL (CATEGORY I)
IMPORTANT!
VENT PRESSURE MUST BE MAINTAINED
BETWEEN -0.02" W.C. AND -0.04" W.C. AT 24"
(61.0 cm) ABOVE BOILER COLLAR.
• Connection for the appliance exhaust vent to the stack must be as direct as possible. Maximum and minimum venting length
for Category I appliances shall be determined per the latest edition of the National Fuel Code (U.S.) and CAN/CSA-B149.1
Installation Code (Canada).
• The horizontal breaching of a vent must have an upward slope of not less than 1/4 inch per linear foot (2 cm/m) from the boiler
to the vent terminal. The horizontal portion of the vent shall be supported to maintain clearances and to prevent physical damage
or separation of joints.
TABLE 10. STANDARD VERTICAL VENTING (CATEGORY I)
* Extending venting over 70 feet (21.3 m) may require special considerations.
APPLIANCE CERTIFIED EXHAUST MAXIMUM LENGTH
MODEL CATEGORY VENTING VENT SIZE WITHOUT BAROMETRIC DAMPER
MATERIAL INCHES (cm) FEET (m)
TYPE B OR 10”(25.4 cm) 35 Feet (10.7 m) without damper
EQUIVALENT *70 Feet (21.3 m) max. with damper
1300 TYPE B OR 35 Feet (10.7 m) without damper
1500 EQUIVALENT 12" (30.5 cm) *70 Feet (21.3 m) max. with damper
1850 TYPE B OR 14"(35.6 cm) 35 Feet (10.7 m) without damper
2100 EQUIVALENT *70 Feet (21.3 m) max. with damper
TYPE B OR 16" (40.6 cm) 35 Feet (10.7 m) without damper
EQUIVALENT *70 Feet (21.3 m) max. with damper
I
I
I
I
I000
2500
Figure 6.
13
TABLE 11. STANDARD HORIZONTAL VENTING (CATEGORY III)
STANDARD VENT - HORIZONTAL (CATEGORY III)
WARNING: No substitutions of flue pipe or vent cap material are allowed. Such substitutions would jeopardize the
safety and health of inhabitants.
A maximum of two elbows can be used on inlet and outlet vent piping respectively. Each elbow is equal to 10 feet (3 m) of
straight pipe.
• Use only special gas vent pipes listed for use with Category III gas burning heaters, such as stainless steel Saf-T-Vent
by Heat Fab, Inc., available from A.O. Smith, 500 Tennessee Waltz Parkway, Ashland City, TN 37015 Phone: 1-800-433-2545
or Fax: 1-800-433-2515. Pipe joints must be positively sealed.
Figure 7.
APPLIANCE CERTIFIED EXHAUST MAXIMUM
MODEL CATEGORY VENTING VENT SIZE VENT LENGTH
MATERIAL INCHES (cm) FEET (m)
STAINLESS
STEEL
1300 STAINLESS
1500 STEEL
1850 STAINLESS
2100 STEEL
STAINLESS
STEEL
III
III
III
III
I000
2500
10”(25.4 cm)
12" (30.5 cm)
14"(35.6 cm)
16" (40.6 cm)
70' (21.3 m)
70' (21.3 m)
35' (10.7 m)
35' (10.7 m)
14
DIRECT VENT - VERTICAL (CATEGORY I)
TABLE 12. DIRECT VENT (VERTICAL EXHAUST CONFIGURATIONS)
• Connection for the appliance exhaust vent to the stack must be as direct as possible. Maximum and minimum venting length
for Category I appliances shall be determined per the latest edition of the National Fuel Code (U.S.) and CAN/CSA-B149.1
Installation Code (Canada).
• The vent should be installed so as to prevent the accumulation of condensate and, where necessary, have means provided for
drainage of condensate. The horizontal breaching of a vent must have an upward slope of not less than 1/4 inch per linear foot
(2 cm/m) from the boiler to the vent terminal. The horizontal portion of the vent shall be supported to maintain clearances and to
prevent physical damage or separation of joints.
Figure 8.
APPLIANCE CERTIFIED EXHAUST VENT MAXIMUM AIR INTAKE AIR INTAKE MAXIMUM
MODEL CATEGORY EXHAUST VENT SIZE EXHAUST VENT MATERIAL SIZE AIR INTAKE
MATERIAL INCHES (cm) LENGTH FT (m) INCHES (cm) LENGTH FT (m)
GAL. STEEL
I PVC, ABS OR
CPVC
GAL.STEEL
I PVC, ABS CR
CPVC
GAL. STEEL
I PVC, ABS OR
CPVC
GAL. STEEL
I PVC, ABS OR
CPVC
GAL. STEEL
I PVC, ABS OR
CPVC
I000
1300
1500
1850
2100
2500
TYPE B OR
EQUIVALENT
TYPE B OR
EQUIVALENT
TYPE B OR
EQUIVALENT
TYPE B OR
EQUIVALENT
TYPE B OR
EQUIVALENT
10"
(25.4 cm)
12"
(30.5 cm)
14"
(35.6 cm)
14"
(35.6 cm)
16"
(40.6 cm)
35'
(10.7 m)
35'
(10.7 m)
20'
(6.1 m)
20'
(6.1 m)
20'
(6.1 m)
35'
(10.7 m)
35'
(10.7 m)
20'
(6.1 m)
20'
(6.1 m)
20'
(6.1 m)
8"
(20.3 cm)
10"
(25.4 cm)
10"
(25.4 cm)
12"
(30.5 cm)
12"
(30.5 cm)
15
DIRECT VENT - HORIZONTAL (CATEGORY III)
WARNING: No substitutions of flue pipe or vent cap material are allowed. Such substitutions would jeopardize the
safety and health of inhabitants.
A maximum of two elbows can be used on inlet and outlet vent piping respectively. Each elbow is equal to 10 feet (3 m) of
straight pipe.
• Use only special gas vent pipes listed for use with Category III gas burning heaters, such as stainless steel Saf-T-Vent by Heat
Fab, Inc. Inc., available from A.O. Smith, 500 Tennessee Waltz Parkway, Ashland City, TN 37015 Phone: 1-800-433-2545 or
Fax: 1-800-433-2515. Pipe joints must be positively sealed.
TABLE 13. DIRECT VENT (HORIZONTAL EXHAUST CONFIGURATIONS)
Figure 9.
APPLIANCE CERTIFIED EXHAUST MAXIMUM AIR INTAKE AIR INTAKE MAXIMUM
MODEL CATEGORY EXHAUST VENT VENT SIZE EXHAUST VENT MATERIAL SIZE AIR INTAKE
MATERIAL INCHES (cm) LENGTH FT (m) INCHES (m) LENGTH FT (m)
GAL. STEEL
III PVC, ABS OR
CPVC
GAL.STEEL
III PVC, ABS CR
CPVC
GAL. STEEL
III PVC, ABS OR
CPVC
GAL. STEEL
III PVC, ABS OR
CPVC
GAL. STEEL
III PVC, ABS OR
CPVC
I000
1300
1500
1850
2100
2500
STAINLESS
(SEALED)
STAINLESS
(SEALED)
STAINLESS
(SEALED)
STAINLESS
(SEALED)
STAINLESS
(SEALED)
10"
(25.4 cm)
12"
(30.5 cm)
14"
(35.6 cm)
14"
(35.6 cm)
16"
(40.6 cm)
35'
(10.7 m)
35'
(10.7 m)
20'
(6.1 m)
20'
(6.1 m)
20'
(6.1 m)
35'
(10.7 m)
35'
(10.7 m)
20'
(6.1 m)
20'
(6.1 m)
20'
(6.1 m)
8"
(20.3 cm)
10"
(25.4 cm)
10"
(25.4 cm)
12"
(30.5 cm)
12"
(30.5 cm)
16
HYDRONIC INSTALLATION
The following is a brief description of the equipment required for
installations noted in Figure 10. All installations must comply with
local codes.
TABLE 14: INSTALLATION ITEMS
NO. SUGGESTED ITEMS FOR INSTALLATION
1. PAIR OF SHORT PIPE NIPPLES, PAIR OF BOILER
LOOP TEES AND BALL VALVE BETWEEN SYSTEM
SUPPLY AND RETURN - ONE SET PER EACH BOILER
2. BOILER PIPE LOOP (See Table 5.)
3. BOILER CIRCULATING PUMP (See Table 5.)
4. THERMOMETER
5. PRESSURE GAUGE
6. LOW WATER CUTOFF (If Required By Local Code.)
7. FLOW SWITCH (Factory-Installed)
8. PRESSURE RELIEF VALVE (Factory-Installed)
9. BOILER INLET - OUTLET
10. SYSTEM SUPPLY TEMPERATURE THERMOMETER
11. DRAIN or BLOW-DOWN VALVE
WATER SUPPLY LINE
These boilers can be used ONLY in a forced circulation hot water
heating system. The pump must be interlocked with the boiler to
prevent boiler operation without water circulation. See maximum
and minimum flow rate information. Since most forced circulation
systems will be of the closed type, install the water supply line as
shown on piping diagram. See Figure 10. Severe damage will
occur if the boiler is operated without proper water flow
circulation.
Fast filling of large pipe, old radiator installations (where high
pressures are not available) requires bypassing of the pressure
reducing valve. Generally, pressure purging is not possible with a
well pump system. High point air venting is essential. For details,
refer to OPERATION section of this manual. If the system is of the
open type, a pressure reducing valve will not be required as the
water supply to the system will be controlled by a manually operated
valve. An overhead surge tank is required.
A MINIMUM PRESSURE
OF 15 PSI (100 kPa) MUST BE MAINTAINED ON THE BOILER AT
ALL TIMES to avoid potential damage to the boiler that may not be
covered by the warranty.
CONVENTIONAL SPACE HEATING INSTALLATION
Modern copper-finned tube type boilers are exceptionally fast heating
units. The low water volumes in relation to firing rates require special
attention to water flow rates for smooth, efficient operation. These
considerations for the A. O. Smith copper heat exchanger boilers
are covered below.
Refer to Table 5 showing flow rate vs. pressure drop and
temperature rise.
Figure 10 shows a typical installation of the boiler.
A system with several flow controlled zones, or with a 3-way mixing
valve system could present a flow rate to the boiler of less than
required for a maximum of 50°F (28°C)
temperature rise. Design
system with compensating bypasses to the boiler.
A system bypass should be installed as shown in Figure 10 to
prevent boiler circulation starvation when the system zones call for
reduced flow.
volume may result in condensation within the boiler on cold starts.
This condensing of water vapor in the combustion area can be
prevented if a portion of the system water flow is diverted past the
boiler to cause an increase in boiler temperature.
BYPASS BALANCING
With systems where water temperature can be expected to drop
appreciably due to long standby periods, or heavy draw down, a
bypass pipe of at least 1" size with a balancing cock should be
installed between the boiler inlet and outlet. See Figure 10. When
the system first starts, the valve should be slowly opened until the
condensing ceases. This adjustment remains at a permanent
setting to establish required temperature rise across the boiler.
AIR SEPARATOR
An air separator as shown in the piping diagram is recommended
especially for modern commercial hydronic systems.
VENT VALVES
It is recommended that automatic, loose key or screwdriver type
vent valves be installed at each convector or radiator.
SYSTEM HEADERS
Split systems with individual supply and return lines from the boiler
room should normally have this piping connected to supply and
return manifold headers near the boiler. To achieve good water
distribution with minimum pressure drop for several circuits,
manifolds should be larger than system loops.
The circuits should be spaced on the header at a minimum of
3" (7.6 cm) center to center. Install a balancing cock in each return line.
Manifold headers are recommended for split systems with or
without zone valves and also those installations with zone
circulators. If the system is to be split at remote points, good practice
requires special attention be given to main pipe sizing to allow
balancing of water flow.
COOLING PIPING
When the boiler is used in conjunction with a refrigeration system
it must be installed so that the chilled medium is piped in parallel
with the boiler. Appropriate valves, manual or motorized, must be
provided to prevent the chilled medium from entering the boiler.
Water temperature in the heating system must be reduced to less
than 100°F (38°C) before cooling system is started, or damage to
the chiller unit may occur.
If the boiler is connected to chilled water piping or heating coils
exposed to refrigerated air, the boiler piping system must be
equipped with flow control valves or other automatic means to
prevent gravity circulation through the boiler during the cooling cycle.
Primary/secondary pumping of both the chiller(s) and the boiler(s)
is an excellent winter-summer change-over method, because
cooling flow rates are much more than heating flow rates. In this
way each system (heating or cooling) is circulated independently.
EXPANSION TANK
Install an expansion tank as shown in Figures 10, 11, and 13. The
sizing of the expansion tank is very important and is directly related
to the total water volume of the system. Refer to ASME or other
reliable specifications for sizing.
17
Large systems with multiple boilers should include main water
temperature controls (with or without outdoor reset) to sequence the
boiler on and off, in relation to the load on the system.
24 VAC System Controller (Optional)
GB models require a field supplied 24VAC operating control to be
installed in the system such as: loop thermostat, indoor/outdoor reset
control, sequencing panel, or energy management system. The
connection for such devices is located in the 24 VAC junction box at
the rear of the unit. A 24 VAC thermostat/aquastat can only be used as
an "On/Off" switch for the unit. The actual controlling of the staging will
be through either the inlet or tank probe.
INTERNAL CONTAMINANTS
The system must be internally cleaned and flushed after a new or
replacement unit has been installed to remove contaminants that
may have accumulated during installation. This is doubly important
when a replacement unit is installed into an existing system where
Stop Leak or other boiler additives have been used.
All systems should be completely flushed with a grease removing
solution to assure trouble-free operation. Pipe joint compounds, soldering
paste, grease on tubing and pipe all tend to contaminate a system.
Failure to clean and flush the system can cause solids to form on
the inside of the heat exchanger, can produce acid concentrations
that become corrosive, can allow excessive amounts of air or other
gases to form which could block circulation, foul system
accessories and damage circulator seals and impellers.
It is recommended that after installation, the boiler and system
when filled should include the proper percentage of cleaning solution
This bypass may also be used with multiple boilers manifolded for
reverse-return flow. The system bypass would be installed from boiler
outlet to suction side of pump.
The boiler piping system of a hot water heating boiler connected to
heating coils located in air handling units where they may be
exposed to circulating refrigerated air, must be equipped with flow
control valves or other automatic means to prevent gravity circulation
of the boiler water during the cooling cycle. It is highly recommended
that the piping be insulated.
SPACE HEATING APPLICATIONS
Controlling of these systems is decided mainly by the type of
building system controlling that is desired. A single boiler installation
might be controlled directly from space temperature thermostat(s).
Multiple boiler installations are more effective when the boilers are
sequenced in and out of operation by some form of main water
temperature controller. With one or two boilers, individual control
settings at progressive temperature may be used. For more than
two boilers, electronic sequencing controlling is recommended.
Individual controls, or the separate stages of a step controller, should
start the boiler loop circulator and fire the boiler. Some large
installations may require the firing of more than one boiler per stage.
The system or primary circulator may or may not be controlled
by the boiler sequencer. When this pump is operated through
the first switch of any type of step controller, care should be
taken to determine if a motor starter is needed due to
insufficient switch capacity.
Multiple boiler installations are especially adapted to the use of
outdoor reset for main water temperatures. This feature is not
mandatory but offers smooth, efficient operation of a modern
system.
Normal use of flow control valves is required to prevent cross
circulation of zones as with any multiple pump system.
Figure 10. Single or Multiple Boiler Installation Diagram
18
related to approximate water volume of the system. The system
should be turned on to circulate water mix for about one hour and
then flush clean with fresh water.
Before operating the boiler, the entire system must be filled with
water, purged of air and checked for leaks. Do not use Stop Leak or
other boiler compounds.
THE WATER HEATER SHOULD BE LOCATED IN AN AREA WHERE
THE GENERAL PUBLIC DOES NOT HAVE ACCESS TO BOILER
CONTROLS.
HOT WATER SUPPLY
BOILER INSTALLATION
WATER LINE CONNECTIONS
Where excessive heat exchanger condensation exists due to
continued low inlet water temperatures below 120°F (49°C), a
bypass balance loop must be installed. See Figures 10 and 12.
HARD WATER CONDITIONS
Where hard water conditions exist, water softening or the threshold
type of water treatment is recommended. This will protect the
dishwashers, coffee urns, water heaters, water piping and other
equipment. When water softening or water treatment is not practical,
a comparatively easy method of periodic lime removal from the unit
must be employed.
WARNING
LIME ACCUMULATION CAN REDUCE THE LIFE OF THE
EQUIPMENT, REDUCE EFFICIENCY AND WASTE FUEL. BOILER
FAILURE DUE TO LIME OR SCALE BUILDUP VOIDS THE
WARRANTY.
Tank Probe (Optional)
In addition to the Inlet and Outlet/ECO Probes, units can be
optionally equipped with a tank probe. The connection for the tank
probe is located in the 24VAC junction box at the rear of the unit.
The tank probe can be configured to control the staging of the unit.
See "Tank Probe Installation Procedure" section below for
additional information.
TANK PROBE INSTALLATION PROCEDURE
A tank probe is supplied with each hot water supply boiler (GW). To
connect the tank probe to the boiler, remove the cover from the
24VAC junction box at the rear of the unit. Connect the probe wires
across terminals 1 & 2. (The wires leading to the terminals will be
yellow.) Check the field connection diagram located on this cover of
the junction box to assure proper wiring.
Once the tank probe has been connected to the boiler, it must be
designated as the controlling probe for the system. This is
accomplished by changing two Dip Switch settings on the Central
Control Board. First, Dip Switch “SW1-4” must be set to the “ON”
position to designate the tank probe as the controlling probe.
Second, Dip Switch “SW1-1” must be set to the “OFF” position to
limit the maximum tank probe temperature for GW applications.
Failure to do this will void the warranty. If the tank probe is not
designated as the controlling probe, the staging of the unit will be
controlled by the inlet probe and will not use the desired tank
temperature as its base.
Refer to "Connection Diagram" in order to connect the tank probe
to the boiler. See Figures 12 and 15.
See section titled "Temperature Setpoints" for instructions on how
to set the temperature.
GAS CONNECTIONS
WARNING
THIS BOILER IS NOT INTENDED TO OPERATE AT GAS SUPPLY
PRESSURE OTHER THAN SHOWN ON THE RATING PLATE.
EXPOSURE TO HIGHER GAS SUPPLY PRESSURE MAY CAUSE
DAMAGE TO GAS VALVES WHICH CAN RESULT IN FIRE OR
EXPLOSION. IF OVERPRESSURE HAS OCCURRED SUCH AS
THROUGH IMPROPER TESTING OF GAS LINES OR EMERGENCY
MALFUNCTION OF THE SUPPLY SYSTEM, THE GAS VALVES MUST BE
CHECKED FOR SAFE OPERATION. MAKE SURE THAT THE OUTSIDE
VENTS ON THE SUPPLY REGULATORS AND THE SAFETY VENT VALVES
ARE PROTECTED AGAINST BLOCKAGE. THESE ARE PARTS OF
THE GAS SUPPLY SYSTEM, NOT THE BOILER. VENT BLOCKAGE
MAY OCCUR DURING ICE BUILD-UP OR SNOW STORMS.
WHEN LOCAL CODES REQUIRE A MAIN MANUAL SHUT-OFF
VALVE OUTSIDE THE BOILER JACKET, A SUITABLE MAIN
MANUAL SHUT-OFF VALVE MUST BE INSTALLED IN A LOCATION
COMPLYING WITH THOSE CODES.
IT IS IMPORTANT TO GUARD AGAINST GAS VALVE FOULING
FROM CONTAMINANTS IN THE GAS WAYS. SUCH FOULING
MAY CAUSE IMPROPER OPERATION, FIRE OR EXPLOSION. IF
COPPER SUPPLY LINES ARE USED THEY MUST BE
APPROVED FOR GAS SERVICE.
BEFORE ATTACHING THE GAS LINE BE SURE THAT ALL GAS
PIPE IS CLEAN ON THE INSIDE.
TO TRAP ANY DIRT OR FOREIGN MATERIAL IN THE GAS
SUPPLY LINE, A DIRT LEG (SOMETIMES CALLED DRIP LEG)
MUST BE INCORPORATED IN THE PIPING. THE DIRT LEG
MUST BE READILY ACCESSIBLE AND NOT SUBJECT TO
FREEZING CONDITIONS. INSTALL IN ACCORDANCE WITH
RECOMMENDATIONS OF SERVING GAS SUPPLIERS. REFER TO
NATIONAL FUEL GAS CODE, ANSI Z223.1 OR CAN/CSA -B149.1
(current edition).
THE BOILER AND ITS INDIVIDUAL SHUTOFF VALVE MUST BE
DISCONNECTED FROM THE GAS SUPPLY PIPING SYSTEM
DURING ANY PRESSURE TESTING OF THAT SYSTEM AT TEST
PRESSURES IN EXCESS OF 1/2 PSI (3.5 KPA).
THE BOILER MUST BE ISOLATED FROM THE GAS SUPPLY
PIPING SYSTEM BY CLOSING ITS INDIVIDUAL MANUAL
SHUTOFF VALVE DURING ANY PRESSURE TESTING OF THE
GAS SUPPLY PIPING SYSTEM AT TEST PRESSURES EQUAL TO
OR LESS THAN 1/2 PSI (3.5KPA).
19
ONE GENESIS (MODEL GW) HOT WATER SUPPLY BOILER WITH HORIZONTAL TANK
Figure 12. Tank probe installation.
PRESSURE RELIEF VALVE RATING SHOULD
NOT EXCEED PRESSURE CAPACITY OF ANY
COMPONENT IN THE SYSTEM.
PIPING SHOULD CONFORM TO LOCAL CODES.
BALL VALVES ARE SHOWN FOR SERVICING
BOILER. HOWEVER, LOCAL CODES SHALL
GOVERN THEIR USAGE.
DANGER
TEMPERATURE SETTING SHOULD NOT EXCEED
SAFE USE TEMPERATURE AT FIXTURES.
SEE WATER TEMPERATURE CONTROL
WARNING ON PAGE 26. IF HIGHER PREHEAT
TEMPERATURES ARE NECESSARY TO OBTAIN
ADEQUATE BOOSTER OUTPUT, ADD AN
ANTI-SCALD VALVE FOR HOT WATER
SUPPLIED TO FIXTURES.
WARNING
THE WATER MANIFOLD IS NOT DESIGNED TO
SUPPORT THE WEIGHT OF THE WATER PIPING
SYSTEM. SPECIAL CARE MUST BE TAKEN TO
ENSURE PROPER SUPPORT.
Figure 11. Single boiler with horizontal tank.
IMPORTANT
WATER FLOW SWITCH PROTECTS THE
BOILER IN CASE OF WATER SERVICE
INTERRUPTION OR CIRCULATOR FAILURE.
PIPE TO OPEN DRAIN
X FACTORY-INSTALLED ON UNIT
== SUPPLIED WITH UNIT
= FIELD-INSTALLED
INSTALL THERMAL EXPANSION
TANK ON COLD WATER
SUPPLY LINE, IF CHECK VALVE
OR PRESSURE REDUCING
VALVE IS USED IN SUPPLY.
Encase field-supplied wires
between tank probe and junction
box with 1/2" field supplied
conduit. "Pigtails" of field-
supplied wires should be spliced
to "pigtails" of tank probe and
connected to 24 VAC junction box.
See figure 15. This conduit and
wiring should be separate from
any other conduit/wiring to guard
against EMI (electromagnetic
interference).
MINIMUM
PIPE SIZE
MODELS INCHES
GW-1000
THRU 2 1/2"
2500 NPT
FACTORY PUMP SIZING
BASED ON 50 EQUIVALENT
FEET (15.2 m) OF PIPE.
MODELS
CIRCULATING RETURN
LINE CONNECTIONS
TEMPERED WATER LOOP, IF USED,
CONNECT TO POINT R.
STORED TEMPERATURE WATER LOOP,
IF USED, CONNECT TO ANY OPENING
NEAR BOTTOM OF TANK.
TWO TEMPERATURE WATER
MIXING VALVE APPLICATION
20
ONE GENESIS (MODEL GW) HOT WATER SUPPLY BOILER WITH VERTICAL TANK
Figure 13. Single boiler with vertical tank.
PRESSURE RELIEF VALVE RATING SHOULD NOT EXCEED PRESSURE CAPACITY OF ANY COMPONENT IN THE SYSTEM.
PIPING SHOULD CONFORM TO LOCAL CODES.
BALL VALVES ARE SHOWN FOR SERVICING BOILER. HOWEVER, LOCAL CODES SHALL GOVERN THEIR USAGE.
IMPORTANT
WATER FLOW SWITCH PROTECTS THE BOILER IN CASE OF WATER SERVICE INTERRUPTION OR CIRCULATOR FAILURE.
PIPE TO OPEN DRAIN
X FACTORY INSTALLED ON UNIT
== SUPPLIED WITH UNIT
= FIELD-INSTALLED
DANGER
TEMPERATURE SETTING SHOULD NOT EXCEED SAFE USE
TEMPERATURE AT FIXTURES. SEE WATER TEMPERATURE
CONTROL WARNING ON PAGE 26. IF HIGHER PREHEAT TEM-
PERATURES ARE NECESSARY TO OBTAIN ADEQUATE
BOOSTER OUTPUT, ADD AN ANTI-SCALD VALVE FOR HOT
WATER SUPPLIED TO FIXTURES.
INSTALL THERMAL EXPANSION
TANK ON COLD WATER SUPPLY
LINE, IF CHECK VALVE OR
PRESSURE REDUCING VALVE
IS USED IN SUPPLY.
FACTORY PUMP SIZING BASED
ON 50 EQUIVALENT FEET
(15.2 m) OF PIPE.
MINIMUM
PIPE SIZE
MODELS INCHES
GW-1000
THRU 2 1/2"
2500 NPT
MODELS
CIRCULATING RETURN
LINE CONNECTIONS
TEMPERED WATER LOOP, IF USED,
CONNECT TO POINT R.
STORED TEMPERATURE WATER LOOP,
IF USED, CONNECT TO ANY OPENING
NEAR BOTTOM OF TANK.
TWO TEMPERATURE WATER
MIXING VALVE APPLICATION
  • Page 1 1
  • Page 2 2
  • Page 3 3
  • Page 4 4
  • Page 5 5
  • Page 6 6
  • Page 7 7
  • Page 8 8
  • Page 9 9
  • Page 10 10
  • Page 11 11
  • Page 12 12
  • Page 13 13
  • Page 14 14
  • Page 15 15
  • Page 16 16
  • Page 17 17
  • Page 18 18
  • Page 19 19
  • Page 20 20
  • Page 21 21
  • Page 22 22
  • Page 23 23
  • Page 24 24
  • Page 25 25
  • Page 26 26
  • Page 27 27
  • Page 28 28
  • Page 29 29
  • Page 30 30
  • Page 31 31
  • Page 32 32
  • Page 33 33
  • Page 34 34
  • Page 35 35
  • Page 36 36
  • Page 37 37
  • Page 38 38
  • Page 39 39
  • Page 40 40
  • Page 41 41
  • Page 42 42
  • Page 43 43
  • Page 44 44
  • Page 45 45
  • Page 46 46
  • Page 47 47
  • Page 48 48

A.O. Smith 1000 User manual

Category
Water heaters & boilers
Type
User manual

Ask a question and I''ll find the answer in the document

Finding information in a document is now easier with AI