13
Additional Information
Precautions
• Cool off the unit beforehand if your car has been
parked in direct sunlight.
• Power antenna (aerial) extends automatically.
Moisture condensation
Should moisture condensation occur inside the unit,
remove the disc and wait for about an hour for it to
dry out; otherwise the unit will not operate properly.
To maintain high sound quality
Do not splash liquid onto the unit or discs.
Notes on discs
• Do not expose discs to direct sunlight or heat
sources such as hot air ducts, nor leave it in a car
parked in direct sunlight.
• Before playing, wipe the discs
with a cleaning cloth from the
center out. Do not use solvents
such as benzine, thinner,
commercially available
cleaners.
• This unit is designed to
playback discs that conform to
the Compact Disc (CD)
standard. DualDiscs and some of the music discs
encoded with copyright protection technologies do
not conform to the Compact Disc (CD) standard,
therefore, these discs may not be playable by this
unit.
• Discs that this unit CANNOT play
– Discs with labels, stickers, or sticky tape or
paper attached. Doing so may cause a
malfunction, or may ruin the disc.
– Discs with non-standard shapes (e.g., heart,
square, star). Attempting to do so may damage
the unit.
–8 cm (3
1
/4 in) discs.
Notes on CD-R/CD-RW discs
• The maximum number of: (CD-R/CD-RW only)
– folders (albums): 150 (including root folder)
– files (tracks) and folders: 300 (may less than 300
if folder/file names contain many characters)
– displayable characters for a folder/file name: 32
(Joliet)/64 (Romeo)
• If the multi-session disc begins with a CD-DA
session, it is recognized as a CD-DA disc, and
other sessions are not played back.
• Discs that this unit CANNOT play
– CD-R/CD-RW of poor recording quality.
– CD-R/CD-RW recorded with an incompatible
recording device.
– CD-R/CD-RW which is finalized incorrectly.
– CD-R/CD-RW other than those recorded in
music CD format or MP3 format conforming to
ISO9660 Level 1/Level 2, Joliet/Romeo or
multi-session.
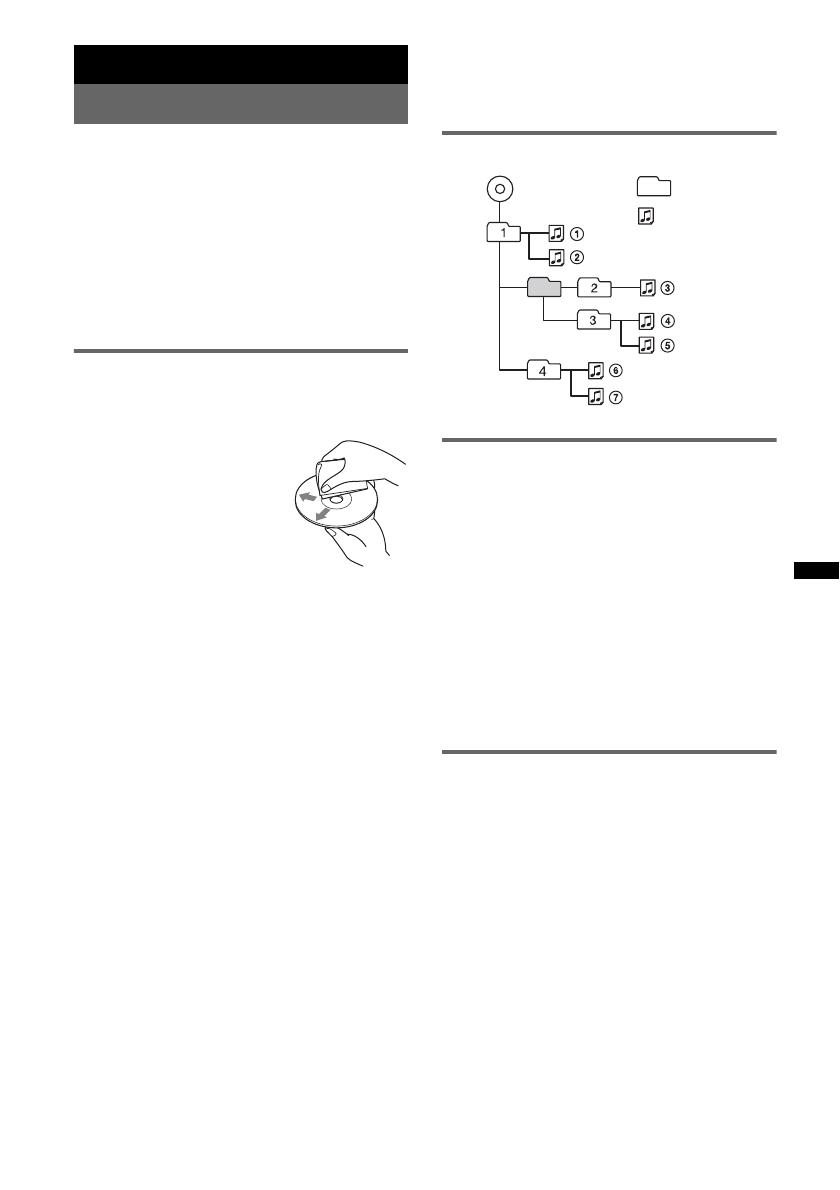
Playback order of MP3/WMA files
About MP3 files
• MP3, which stands for MPEG-1 Audio Layer-3, is
a music file compression format standard. It
compresses audio CD data to approximately 1/10
of its original size.
• ID3 tag versions 1.0, 1.1, 2.2, 2.3 and 2.4 apply to
MP3 only. ID3 tag is 15/30 characters (1.0 and
1.1), or 63/126 characters (2.2, 2.3 and 2.4).
• When naming an MP3 file, be sure to add the file
extension “.mp3” to the file name.
• During playback or fast-forward/reverse of a VBR
(Variable Bit Rate) MP3 file, elapsed playing time
may not display accurately.
Note
If you play a high-bit-rate MP3, such as 320 kbps,
sound may be intermittent.
About WMA files
• WMA, which stands for Windows Media Audio,
is a music file compression format standard. It
compresses audio CD data to approximately 1/22*
of its original size.
• WMA tag is 63 characters.
• When naming a WMA file, be sure to add the file
extension “.wma” to the file name.
• During playback or fast-forward/reverse of a VBR
(Variable Bit Rate) WMA file, elapsed playing
time may not display accurately.
* only for 64 kbps
Note
Playback of the following WMA files is not supported.
– lossless compression
– copyright-protected
If you have any questions or problems concerning
your unit that are not covered in this manual, consult
your nearest Sony dealer.
Folder
(album)
MP3/WMA file
(track)
MP3/WMA


