
Black
Cyan
Magenta
Yellow
Code: RP828-AUOXY IM
Date: 110427 Edition: 03 Op: DCR
INSTRUCTION MANUAL
RP828-AUOXY
300 AMP
Portable
Lithium-Ion
Jump Starter

2
CONTENTS
Warranty
For full details please visit us at www.909.com
Warranty 2
Introduction 3
Environmental protection 3
Specifications 3
Instruction manual 3
Safety instructions 3
Specific safety instructions for jump starters 4
Additional safety instructions
for batteries and chargers 5
Know your product 6
Charging / recharging 7
Operation guide 7
Troubleshooting 10

3
Specifications
Battery: Lithium - Ion 12V 6ah
Output (instant): 300A
Output
(constant for 5 seconds): 225A
USB: 5Vdc 500mA
AC Charger Input: 230V-240Vac
AC Charger Output: 12Vdc 500mA
Area Light: 2 white LED
Instruction manual
Please refer to and observe all safety instructions
before use.
To comply with the published safety standards, the following
must be observed when using this jump-starter:
1. Before attempting jump-starting procedures, read the
instructions.
2. Disconnect AC power supply before connecting to or
disconnecting from the battery.
3. Assure that this jump-starter is correctly connected
to the battery.
4. User must use output clamps provided by manufacturer
only.
Safety Instructions
Important specification note: This power system is to be
used ONLY on vehicles with 12 volt DC battery systems.
WARNING! When using battery-powered appliances, basic
safety precautions, including the following, should always be
followed to reduce the risk of fire, leaking batteries, personal
injury and material damage.
Note. Prior to using this appliance, persons fitted with a
heart pace maker or similar medical devices should obtain
medical advise before using this appliance.
• Read all of this manual carefully before using the
appliance.
• The use of any accessory or attachment or the
performance of any operation with this appliance other
than those recommended in this instruction manual may
present a risk of personal injury.
Using your appliance
• This appliance is not intended for use by young or infirm
persons without supervision.
• Use in a dry location only. Do not allow the appliance to
become wet.
• Do not immerse the appliance in water.
Introduction
Your new 909 appliance will more than satisfy
your expectations. It has been manufactured under
stringent 909 Quality Standards to meet superior
performance criteria.
You will find your new appliance easy and safe to operate,
and, with proper care, it will give you many years
of dependable service.
CAUTION. Carefully read through this entire Instruction
Manual before using your new 909 appliance. Take
special care to heed the Cautions and Warnings.
Your 909 appliance has many features that will make your
job faster and easier. Safety, performance, and
dependability have been given top priority in the
development of this tool, making it easy to maintain
and operate.
Environmental protection
Recycle unwanted materials instead
of disposing of them as waste. All tools,
hoses and packaging should be sorted,
taken to the local recycling centre and
disposed of in an environmentally safe way
.

4
• Do not open body casing. There are no user-serviceable
parts inside.
• Do not operate the appliance in explosive atmospheres,
such as in the presence of flammable liquids, gases or
dust.
• To reduce the risk of damage to plugs and cords never
pull the cable to remove the plug from a socket outlet.
After use
• When not in use, the appliance should be stored in a dry,
well ventilated place out of the reach of children.
• When the appliance is stored or transported in a vehicle
it should be placed in the boot or restrained to prevent
movement following sudden changes in speed or
direction.
• The appliance should be protected from direct sunlight,
heat and moisture.
Inspection and repairs
• Before use, check the appliance for damaged or defective
parts. Check for breakage of parts, damage to switches
and any other conditions that may affect its operation.
• Do not use the appliance if any part is damaged or
defective.
• Have any damaged or defective parts repaired or
replaced by an authorised repair agent.
• Never attempt to remove or replace any parts other than
those specified in this manual.
Specific safety instructions for jump-starters
WARNING! To reduce the risk of injury and/or property
damage:
• Follow these instructions and those published by
the battery manufacturer, vehicle manufacturer and
manufacturer of any equipment you intend to use with
this unit. Review warning labels on these products and on
the vehicle.
• Explosive gas may be vented from the lead acid batteries
when charging and under extreme conditions battery
leakage may occur. Ensure the area is well ventilated
when conducting jump-starting and charging procedures.
• The appliance must only be connected to a 12V lead-acid
battery. Do not use the appliance for charging dry-cell
batteries that are commonly used with home appliances.
These batteries may burst and cause injury to persons
and damage property.
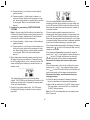
• Never allow the red and black clamps to touch each other
or another common metal conductor. This can cause
dangerous sparks, power arcing, and/or explosion.
• Check the polarity of the vehicle battery terminals before
connecting the appliance. Always disconnect the negative
(black) jumper cable first: followed by the positive (red)
jumper cable.
• The jump-starter power button should be in the off
position before connection to a power source or load,
when the unit is charging and when not in use.
• When using this unit in proximity to the vehicle’s battery
and engine, stand the unit on a flat, stable surface, and
be sure to keep all clamps, cords, clothing and body parts
away from moving parts of the vehicle.
• Replace worn or defective parts immediately.
• After use, press the jump-starter power button and the
unit on/off button to turn the jump-starter off.
CAUTION! To reduce the risk of property damage:
• Vehicles may have electrical and electronic systems (e.g.
engine management system, on-board computerized
system, mobile phone) that may be damaged if
subjected to high starting voltages and voltage peaks.
Before connecting the appliance to the vehicle read the
vehicle’s owner’s manual to confirm that external-starting
assistance is advised.

5
• Excessive engine cranking can damage the vehicle‘s
starter motor.
If the engine fails to start after the recommended number
of attempts, discontinue jump-starting procedures and
look for other problems that need to be corrected.
• This appliance is not designed to be used as a
replacement for a vehicular battery. Do not attempt to
operate a vehicle that does not have a battery installed.
• This appliance contains a Lithium-Ion battery. It is
recommended that the appliance is laid flat during
storage, use, and recharging.
• To reduce the risk of electric shock, disconnect the
appliance from any power source before attempting
maintenance or cleaning. Turning off controls without
disconnecting the appliance will not reduce this risk.
• Make sure the appliance is disconnected from all
charging power sources before beginning the jump-start
procedure.
• If the connections to the battery’s positive and negative
terminals are incorrect, the reverse polarity indicator will
light and the unit will sound a warning until the clamps
are disconnected. Rectify the connections immediately.
• If vehicle fails to start, turn off the ignition, turn off the
Jump-Starter Power Switch, disconnect the jump-start
system’s leads and contact a qualified technician to
investigate why the engine did not start.
• Recharge this unit fully after each use.
• Always store the battery clamps in the built-in holsters
when not in use.
Additional safety instructions
for batteries and chargers
Batteries
• Never attempt to open the unit’s body casing for any
reason.
• Do not expose the battery to water.
• Do not store in locations where the temperature may
exceed 40°C.
• Charge only at ambient temperatures between 4°C
and 40°C.
• Charge only using the chargers provided with the
appliance.
• When disposing of batteries, follow the instructions given
in the section “Protecting the environment”.
• Under extreme conditions, battery leakage may occur.
When you notice liquid on the batteries, carefully wipe
the liquid off using a cloth. Avoid skin contact.
Chargers
Your charger has been designed for a specific voltage.
Always check that the mains voltage corresponds to the
voltage on the rating plate.
WARNING! Never attempt to replace the charger unit with
a regular mains plug. Use your charger only to charge the
battery in the tool with which it was supplied. Other batteries
could burst, causing personal injury and damage.
WARNING! Use your charger only to charge the battery in
the tool with which it was supplied. Other batteries could
burst, causing personal injury and damage.
• Never attempt to charge non-rechargeable batteries.
• Have defective cords replaced immediately.
• Do not expose the charger to water.
• Do not open the charger.
• Do not probe the charger.
• The battery must be placed in a well ventilated area
when charging.

6
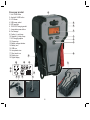
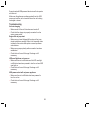
Know your product
1. Unit On/Off button
2. Area light On/Off button
3. LCD screen
4. USB power socket
5. LED area light
6. 12V AC/DC charging socket
7. Jump starter power button
8. Cord storage
9. Positive (+) red clamp
10. Negative (-) black clamp
11. AC charging adaptor
12. Clamps icon
13. Battery voltage indicator
14. Battery icon
15. USB icon
16. Jump-starter icon
17. Short circuit icon
18. Polarity icon
19 . Digital display
1
5
8
10
15
12
2
3
4
7
9
13
14
16
17
18
6
6
11
19

7
Charging / recharging
Lithium-Ion batteries require routine maintenance to
ensure a full charge and long battery life. All batteries lose
energy from self-discharge over time and more rapidly
when they are at higher temperatures. Therefore, batteries
need periodic charging to replace energy lost through
self-discharge. When the unit is not in frequent use,
manufacturer recommends the battery be recharged
at least every 6 months.
IMPORTANT: If you attempt to use the unit when the unit’s
battery charge level is too low, the unit will automatically
shut down. Immediately recharge the unit with all other
functions turned off.
Notes: This unit is delivered in a partially charged state
– you must fully charge it after purchase and before using
it for the first time. Initial AC charge should be for up to 20
hours or until the unit shows as fully charged.
Recharging battery after each use will prolong battery
life; frequent heavy discharges between recharges and/or
overcharging will reduce battery life.
Make sure all other unit functions are turned OFF during
recharging, as this can slow the recharging process.
AC charging
1. Insert the jack plug of AC (mains) charging adapter into
the 12V AC/DC charging socket on the side of the unit.
Insert the mains charging adapter into a mains power
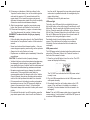
socket. A beep will sound, the LCD backlight will turn on
5 seconds and the LCD screen will display the following:
The bars on the battery icon represent the capacity level
of the unit’s internal battery. The bars on the battery icon
will change from empty to solid (bottom to top) repeatedly
to indicate the unit is charging.
Note: If the unit on/off button is pressed while the AC
charging adapter is plugged in, the LCD screen will display
the following:
The digital display shows the unit’s internal battery voltage.
The 5V USB icon will display and the bars on the battery
icon will continue to change from empty to solid (bottom to
top) repeatedly to indicate the unit is still charging.
2. Charge for up to 20 hours or until the unit is fully charged.
The unit is fully charged when the battery icon shows 4
solid bars.
3. When charging is complete, unplug the AC charging
adapter from the mains power socket, then disconnect
the jack plug of the AC charging adapter from the 12V
AC/DC charging port. Store the charger in a dry, safe
place.
Operation guide
Jump-starter
This unit is equipped with a jump-starter power button
that allows energy to flow only when proper connections
are made to battery and frame. Take the following steps,
observing all cautions and warnings in the “Safety
Instructions” section at the front of this manual
1. Turn off vehicle ignition and all accessories (radio, A/C,
lights, connected cell phone chargers, etc.). Place vehicle
in “park” and set the emergency brake.
2. Make sure the unit on/off button and jump-starter power
button are turned off.
3. Remove jumper clamps from clamp holders. Connect the
red clamp first, then the black clamp.
4. Procedure for jump-starting a NEGATIVE GROUNDED
SYSTEM (negative battery terminal is connected to
chassis) (MOST COMMON)

8
4a. Connect positive (+) red clamp to vehicle battery’s
positive terminal.
4b. Connect negative (–) black clamp to chassis or a
solid, non-moving, metal vehicle component or body
part. Never clamp directly to negative battery terminal
or moving part. Refer to the automobile owner’s
manual.
5. Procedure for jump-starting POSITIVE GROUND
SYSTEMS
Note: In the rare event that the vehicle to be started has
a Positive Grounded System (positive battery terminal is
connected to chassis), replace steps 4a and 4b above
with steps 5a and 5b, then proceed to step 6.
5a. Connect negative (–) black clamp to vehicle battery’s
negative terminal.
5b. Connect positive (+) red clamp to vehicle chassis or a
solid, non-moving, metal vehicle component or body
part. Never clamp directly to positive battery terminal
or moving part. Refer to the automobile owner’s
manual.
6. When clamps are connected properly, press the unit on/
off button to turn the jump-starter on. A beep will sound,
the LCD backlight will turn on for 5 seconds and the LCD
screen will display the following to indicate the unit is in
standby mode:
The digital display shows the unit’s internal battery
voltage. The 5V USB icon will display and the bars on the
battery icon will light solid to represent the capacity level
of the unit’s internal battery.
7. Press the jump-starter power button. The LCD screen
will display the following to indicate the unit is ready to
jump-start:
If the surrounding ambient temperature drops to an
extremely low level during operation, the jump starter icon
on the LCD screen will flash and all the functions will stop.
Disconnect the jump starter and allow the unit to warm up
for several minutes.
If the surrounding ambient temperature rises to an
extremely high level during operation, the jump starter icon
on the LCD screen will flash and all the functions will stop.
Disconnect the jump starter and allow the unit to cool down
for several minutes. Make sure there is adequate ventilation
around the unit before attempting to jump start again.
If the clamps are disconnected from the battery, the battery
clamps icons ( ) on the LCD screen will flash until the
clamps are connected.
If the clamps are incorrectly connected with regard to
polarity, the “–” and “+” signs under the battery clamps icon
( ) on the LCD screen will flash and an alarm will
sound continuously until the clamps are disconnected.
Disconnect the clamps and reconnect with proper
polarity.
If the unit encounters a short-circuit condition, the arrows
pointing to the “–” and “+” sign under the battery clamps
icon ( ) on the LCD screen will flash and the alarm will
sound continuously until the clamps are disconnected.
Disconnect the clamps, and discontinue the jump-
starting procedure:
a) Check the wires for damage. If damage is detected,
return to manufacturer for replacement immediately.
b) Assure that the vehicle has a 12 volt DC battery system.
This jump-starter is to be used ONLY on vehicles with
12 volt DC battery systems.
Note: The LCD will automatically return to standby mode
after 30 seconds.

9
8. If there are no indications of fault (as outlined in the
“Important” section above), turn on the vehicle’s ignition
and crank the engine in 5-6 second bursts until the
engine starts. Do not crank the engine continuously,
otherwise the temperature inside the unit will rise rapidly.
Allow a two-minute interval between attempts.
9. After the engine starts, press the jump-starter power
button, then the unit on/off button to turn the unit off.
10. Disconnect the negative (–) engine or chassis clamp
first, then disconnect the positive (+) battery clamp.
WARNING! To reduce the risk of injury or property
damage:
• Follow all safety instructions found in the “Specific Safety
Instructions for Jump-Starters” section of this instruction
manual.
• Never touch red and black clamps together — this can
cause dangerous sparks, power arcing, and/or explosion.
• Always turn the unit off when not in use.
• Replace worn or defective parts immediately. Contact the
manufacturer.
CAUTION. To reduce the risk of property damage:
• Vehicles that have on-board computerized systems may
be damaged if vehicle battery is jump-started. Before
jump-starting this type of vehicle, read the vehicle manual
to confirm that external-starting assistance is advised.
• Excessive engine cranking can damage the vehicle‘s
starter motor. If the engine fails to start after the
recommended number of attempts (refer to the Vehicle
Owner’s Manual), discontinue the jump-start procedure
and look for other problems that need to be corrected.
• If the connections to the battery’s positive and negative
terminals are incorrect, the LCD screen will display as
shown in the second part of step 7 of the directions.
Disconnect clamps and reconnect to battery with correct
polarity.
• If the vehicle fails to start, turn off the ignition; press the
jump-starter power button, then the unit on/off button to
turn the unit off; disconnect the jump-start system’s leads
and contact a qualified technician to investigate why the
engine did not start.
• Recharge this unit fully after each use.
LED area light
The built-in two-LED area light is controlled by the area
light on/off button on the control panel. Press the unit on/off
button first, then the area light on/off button once to turn the
light on. Press the area light on/off button to turn the area
light off, then, if desired, press the unit on/off button to turn
the unit off. Make sure the light and the unit are turned off
when the unit is being recharged or stored.
Periodically check the unit’s battery status on the LCD
screen. (Four solid bars in the battery icon indicate a
full battery. One bar indicates that the unit needs to be
recharged.)
USB power socket
The USB power socket is located under the protective cover
above the LCD screen. Refer to the “Features” section at
the front of this manual to locate.
1. Press the unit on/off button to turn the unit on. The LCD
screen will display the following:
The “5V USB” icon indicates that the USB power socket
is ready to use.
2. Plug the USB-powered device into the USB power socket
and operate normally.
3. Periodically check the unit’s battery status on the LCD
screen. (Four solid bars in the battery icon indicate a
full battery. One bar indicates that the unit needs to be
recharged.)
Notes: This unit’s USB power socket does not support data
communication. It only provides 5 volts/500mA DC power to
an external USB-powered device.

10
Some household USB-powered electronics will not operate
with this unit.
Make sure all appliances are disconnected from the USB
power port and the unit is turned off when the unit is being
recharged or stored.
Troubleshooting
Unit not charging
• Make sure all of the unit’s functions are turned off.
• Check that the charger is properly connected to a live
mains power socket.
Engine fails to jump-start
• Make sure you have followed all the steps in the jump-
starter instructions carefully. Refer to the important notes
included in this section that explain common problems
and solutions.
• Make sure a proper polarity cable connection has been
established.
• Check that unit has a full charge. Recharge unit if
necessary.
LED area light does not come on
• Make sure the unit on/off button and the LED area light
on/off button have been pressed to turn the unit and LED
area light on.
• Check that unit has a full charge. Recharge unit if
necessary.
USB power socket will not power appliance
• Make sure the unit on/off button has been pressed to
turn the unit on.
• Check that unit has a full charge. Recharge unit if
necessary.

11

-
 1
1
-
 2
2
-
 3
3
-
 4
4
-
 5
5
-
 6
6
-
 7
7
-
 8
8
-
 9
9
-
 10
10
-
 11
11
-
 12
12


Ask a question and I''ll find the answer in the document
Finding information in a document is now easier with AI
Related papers
Other documents
-
AVAPOW A27 User manual
-
-
Schumacher SL1 Owner's manual
-
-
Stanley J309 User manual
-
-
-
-
-