Page is loading ...

!"
"
CLASSICA28
E-BIKE INSTRUCTION MANUAL
READ ALL INSTRUCTIONS AND WARNINGS BEFORE USING THIS
PRODUCT.
This manual provides important information on proper operation & maintenance. Every effort
has been made to ensure the accuracy of this manual. These instructions are not meant to
cover every possible condition and situation that may occur. We reserve the right to change
this product at any time without prior notice.
IF THERE IS ANY QUESTION ABOUT A CONDITION BEING SAFE OR
UNSAFE, DO NOT OPERATE THIS PRODUCT!
DO NOT RETURN THIS EBIKE TO THE RETAILER!
If you experience a problem, have questions or need parts for this product, call Customer
Service at 1-888-287-6981, Monday-Friday, 8 AM - 4 PM Central Time. A copy of the sales
receipt is required.
FOR CONSUMER USE ONLY – NOT FOR PROFESSIONAL USE.
KEEP THIS MANUAL, SALES RECEIPT & APPLICABLE WARRANTY FOR
FUTURE REFERENCE.
CALIFORNIA PROPOSITION 65
This product may contain chemicals, including lead, known to the
State of California to cause cancer and birth defects or other reproductive harm. Wash hands
after handling.
0201310

#"
"
1 YEAR LIMITED WARRANTY
This eBike includes a 12-month warranty against manufacturing defects in materials or
workmanship on its frame, battery, controller, and motor assembly. This warranty is void in its
entirety by any modification of the frame, fork, or components. This warranty is expressly
limited to the repair or replacement of a defective item, and said repair or replacement is the
sole remedy of the warranty. This warranty extends from the date of purchase, is offered only to
the original owner, and is not transferable. This warranty applies only to Benelli by Buffalo Corp
eBike CLASSICA26 or CLASSICA28 purchased through an authorized dealer or distributor.
Benelli by Buffalo Corp is not responsible for incidental or consequential damages. Some states
do not allow the exclusion of incidental or consequential damages, so the above exclusion may
not apply to you. Proof of purchase is required. A bicycle must be registered with Buffalo
Corporation before a warranty claim may be processed. Claims made outside the country of
purchase may be subject to fees and additional restrictions.
THIS WARRANTY DOES NOT COVER:
• Normal wear and tear
• Damage or failure due to accident, misuse, abuse, or neglect
• Improper assembly
• Improper follow-up maintenance
• Non-compatible installation of components that were not part of the scope of delivery at
the time the product was handed over, or damage caused by unprofessional installation of
these add-on components.
• Labor charges for part replacement or changeover
Register your new eBike within 30 days after purchase in order to activate the warranty.
Register via mail with your warranty card, or via email at info@buffalotools.com
TERMS OF WARRANTY
For your reference, we’ve outlined the comprehensive terms of the warranty below:
• Frame, Battery, Controller, and Motor Assembly — are warranted to be free from defects
in material or workmanship for a period of TWELVE (12) months from purchase. After any
warranty period has elapsed, you may purchase spare and replacement parts by contacting us.
• Replacement Batteries (if provided) — are warranted to be free from defects in material
or workmanship for a period of SIX (6) months from purchase.

$"
"
IMPORTANT SAFETY INSTRUCTIONS BEFORE YOU RIDE
STOP!
Read all safety warnings and all instructions. Failure to follow the warnings and instructions
may result in electric shock, fire and/or serious injury.
Save all safety warnings and instructions for future reference.
Do not open the Pedal Assist Drive System (PAS) by yourself. The drive unit is maintenance-
free and must be repaired only by qualified experts and only with original spare parts. This will
ensure that the safety of the drive unit is maintained. Unauthorized opening of the drive unit
will void warranty claims.
All components mounted to the drive unit and all other components of the eBike drive may be
replaced only with identical components or components specifically approved for your eBike
by the bicycle manufacturer. This protects the drive unit against overload and damage.
Use only original Benelli by Buffalo Corp supplied battery packs approved for your eBike by
the manufacturer. Using other battery packs can lead to injuries and pose a fire hazard. When
using other battery packs, Benelli by Buffalo Corp shall not assume any liability and warranty.
Do not ride the electric bike without the battery pack. The battery pack must be on the bike
while riding; else the bike has no lights when needed.
Handle your battery pack with care. Do not drop or impact the battery pack. Mishandling of the
battery pack could lead to severe damage or over-heating. In an extremely rare case, a
battery pack that has been severely impacted or otherwise mishandled could potentially catch
fire. If you suspect damage to your battery pack, visit your dealer immediately for inspection.
Remove battery from bike before charging. Bring indoors and allow battery to reach room
temperature before charging. The battery pack can be stored at temperatures between -10°C
and +60°C. Take care that the maximal storage temperature is not exceeded. As an example,
do not leave the battery pack in a vehicle in summer and store it out of direct sunlight.
Store the battery pack in a dry, well-ventilated location. Protect the battery pack against
moisture and water. Under unfavorable weather conditions, it is recommended e.g. to remove
the battery pack from the bike and store it in an enclosed location until being used again.

%"
"
Always remove battery from Benelli by Buffalo Corp eBike before working on the bicycle or if
you transport the bike by car or plane. Accidental activation of the bicycle drive system can
result in serious injury.
Battery pack and charger contain regulated materials and must be dispose in accordance with
national and/or local laws. Do not discard the battery and charger into fire, water or ordinary
household waste/garbage. Take to a waste facility or recycler.
The battery of this bicycle is subject to transportation regulations for handling hazardous
materials. The battery must be removed before flying and may be subject to special handling
by the carrier.
Failure to observe these warnings can result in electrical fires, explosion, or severe burns or
electrocution.
YOU CAN BE YOU SERIOUSLY INJURED, PARALYZED OR
KILLED IF YOU IGNORE THESE WARNINGS.
Do not make any modifications to your Benelli by Buffalo Corp.
Do not sit on the bicycle with the kickstand down. Kickstand is not designed to support the
weight of a person. Make sure kickstand is up before riding.
Do not misuse the electric bike by riding it without a saddle. If the saddle gets stolen, it may
lead to hazardous situations when still riding on the electric bike without a saddle.
If you purchased the Classica26, do not overload the rear rack.
The maximum allowable weight for the rear rack is 40 lbs.
Correct tightening force on fasteners (nuts, bolts, screws) on your
bicycle is important. If too little force is applied, the fastener may not hold securely. If too
much force is applied, the fastener can strip threads, stretch, deform or break. Either way,
incorrect tightening force can result in component failure, which can cause you to lose control
and fall.
Please read and observe the safety warnings and instructions enclosed in the operating
instructions of the battery pack as well as in the operating instructions of your Benelli by
Buffalo Corp eBike.

&"
"
INTENDED USE
The Benelli by Buffalo Corp Classica eBike Series Classica26/Classica28 has an electric
pedal assist drive system (PAS). The drive assist system consists of a drive unit, a battery, a
computer control, and various electronic components (harness wires, sensors, and switches).
When the assist system is turned ON, the drive unit engages to provide power only while you
are pedaling. The amount of power provided by the drive unit depends on your pedaling force
and the assistance mode/level you set with the handlebar control unit. At anytime, if you stop
pedaling, the drive assist will disengage. The drive assist system power reduces progressively
and cuts off as the bike reaches a speed of 15.5 MPH or sooner if you stop pedaling. The
drive assist re-engages when speed drops below 15.5 MPH as long as the pedals are turning.
Whenever the drive assist system is turned OFF, you can pedal the bike normally. The drive
system will not engage.
The Benelli by Buffalo Corp Classica26/Classica28 is designed to be a city bike with the
intended use for paved roads, gravel or dirt roads that are in good condition and on bike
paths. Always observe the traffic rules when cycling on public roads. City bicycles are not
suitable for off-road use. Using this bicycle off road can result in serious injury and is never
recommended.
WHAT ARE E-BIKES?
Electric bicycles or “E-Bike” have a small electric motor that provides assistance to allow rides
to accelerate, climb hills, and overcome wind resistance more easily than manually powered
bikes. E-Bikes are not scooters or motorcycles although the classification of each State in the
United States is still very broad and sometimes put into similar categories. It’s important to
note the rules and regulations of the State you intend to ride in before use. The Benelli by
Buffalo Corp Classic E-Bike Series is associated with the general classification of bicycle-style
electric bicycles (BSEB) because it has an electric motor powered up to 750 watts that goes
slower than 20 miles per hour.
Even if you have ridden a bicycle for years, it is important for every person to read the
Owner’s Manual and understand it. Before your first ride, make sure you are comfortable and
confident when sitting on the bike. If an adjustment does not feel right or something feels
loose, check to ensure you are properly fitted to the bike. Pick a controlled environment, away
from cars, other cyclists, obstacles or other hazards for your first ride.

'"
"
Wear a helmet when riding your bicycle.
Become familiar with the brake levers against throttling, variable throttle performance while
pedaling and not pedaling. The first ride should be started with the Pedal Assist feature off
and then slowly throttling to feel the engagement of the HUB motor.
Riding a bicycle is an inherently dangerous activity, and it is your responsibility to ride safely
and within your abilities. Be aware that other road users do not expect that an electric bike can
ride faster than a normal bike. Riding faster also increases the risk of accidents. Do not ride
abusively. Ride only on paved roads with tires staying on the ground. Proper assembly is vital
to the safe operation of your bicycle.
NOTE TO PARENTS:
This eBike is intended for use by adult riders only. Many state laws require electric bicycle
riders to be a minimum age of 16 with some states having minimum ages set as low as 10
years old and other states up to 18 years old. As a parent you are responsible for the activities
and safety of your minor child including the following of your state and local laws in regards to
the riding of an electric bicycle by a minor (under the age of 18). That includes, if your state
allows a minor to ride, making sure that your minor child can safely ride and control all of the
operations of the bicycle, and fully understands all warnings and. Please read on if you have
determined that your minor child can legally and safely ride and control all of the operations of
the bicycle. That includes making sure that the bicycle is properly fitted to the child; that it is in
good repair and safe operating condition; that you and your child have learned and
understand the safe operation of the bicycle; and that you and your child have learned,
understand and obey not only the applicable local motor vehicle, bicycle and traffic laws, but
also the common sense rules of safe and responsible bicycling.
MAX WEIGHT CAPACITY
The maximum permitted gross weight of the bike comprises the weight of the bike, the weight
of the rider and the weight of the luggage. If you purchased the Benelli Classica26 do not over
load the rear rack.
MAX GROSS WEIGHT 300 lbs
MAX WEIGHT OF RIDER 250 lbs
REAR RACK 40 lbs (N/A on CLASSICA28)
The Benelli by Buffalo Corp eBike Pedal Assist System assists you with up to 250 watts of
power, which takes you up to the speed of 15.5 MPH.

("
"
GENERAL WARNING
Like any sport, bicycling involves the risk of injury and damage. By choosing to ride a bicycle,
you assume the responsibility for that risk, so you need to know — and to practice — the rules
of safe and responsible riding and of proper use and maintenance. Proper use and
maintenance of your bicycle reduces risk of injury.
This Manual contains many Warnings and Cautions concerning the consequences of failure to
maintain or inspect your bicycle and of failure to follow safe cycling practices.
This image followed by the word WARNING indicates a potentially
hazardous situation that, if not avoided, could result in serious injury or death.
This image followed by the word CAUTION indicates a potentially
hazardous situation, which, if not avoided, may result in minor or moderate injury, serious,
damage to the bicycle or the voiding of your warranty or is an alert against unsafe practices.
Many of the Warnings and Cautions say you may lose control and fall. Because any fall can
result in serious injury or even death, we do not always repeat the warning of possible injury
or death. Because it is impossible to anticipate every situation or condition that can occur
while riding, this manual makes no representation about the safe use of the bicycle under all
conditions. There are risks associated with the use of any bicycle which cannot be predicted
or avoided, and which are the sole responsibility of the rider.
GETTING STARTED
1.) Unpack The Bike And Check The Contents
Open the side of the box and roll the bike out using a two-person team. Contents include:
! 10.4AH Samsung Lithium Ion Battery
! 36V Charger & Power Cable
! Pair of pedals (marked L and R on the end of the spindle)
! Set of 2 keys for your eBike
! Assembly Tools (4mm, 5mm, 6mm Hex Keys & Double Sided Wrench)

)"
"
DIAGRAM
1.) Motor 2.) Tire 3.) Rim 4.) Front fork 5.) Brake 6.) Front Light Stem 7.) Stem 8.) Handle Bar
9.) Derailleur Shifter 10.) Saddle Post Clamp 11.) Seat Post 12.) Seat 13.) Rear Rack (Only
Available on Benelli CLASSICA26) 14.) Fender 15.) Rear Light 16.) Spoke 17.) Internal
Derailleur & Roller Brake 18.) Chain Cover 19.) Chain 20.) Crank 21.) Pedal 22.) Hand Grip
23.) Derailleur Shifter 24.) Brake Lever 25.) LCD Display 26.) Frame 27.) Battery
(NOTE: CLASSICA28 does not have a rear rack)

*"
"
2.) Charge The Battery
Once the bike is out of the box, put the kickstand down. Charging of the battery pack can be
done on or off the bike. To remove the battery first insert the key into the keyhole near the
battery and turn to unlock. The battery should then slightly pop out allowing you to pull the
battery off the bike.
NOTE: Connect the charger to the bicycle when it is not used. This will lengthen the life of the
battery pack.
A. Connect the charger to the main voltage. The charge indicator of charger will show green.
B. Connect the plug of the charger to the contact point of battery pack, the charge indicator of
charger will show red.
C. Once the battery pack has been completely charged it will change from red to green.
D. Remove the charger before you start cycling.
E. Attach the battery pack by aligning the battery pack to the card. Push hard and battery will
“click” if installed properly.
NOTE: Always charge indoors and allow battery to reach room temperature before charging.
Make sure charger and A/C outlet are the same voltage. Make sure the area is free from
combustibles to avoid fire from overheating.
DO NOT COVER THE CHARGER. DO NOT LEAVE FULLY
CHARGED BATTERY CONNECTED TO THE CHARGER. UNPLUG THE CHARGER FROM
THE WALL OUTLET WHEN NOT IN USE.
3.) Fitting The Pedals
Before attaching pedals apply lubricant grease to the threaded end of each pedal. The pedals
are marked “L” for left pedal and “R” for right pedal. You must make sure you have the correct
pedal before attempting to attach to the pedal arm crank.

!+"
"
The marking can be found at the end of the axel pedal that will be inserted into the pedal arm
crank.
Left Pedal must be tightened counter clockwise into left arm crank. Carefully tighten using the
supplied pedal wrench until the pedal is fully tightened.
• Right Peal must be tightened clockwise into right arm crank (located on the same
side as bike chain).
• Both pedals (each side L and R) thread toward the front of the bike to tighten, and
toward the back of the bike to loosen.
Screwing the right pedal into the left crank arm and/or vice versa will
seriously damage pedal and/or pedal crank arm.
4.) Adjust The Handlebars
Holding the tire in place, adjust the angle the handlebars by loosening the nut(s) on top of the
handlebar stem with provided hex key. Then align the handlebars with the frame and front tire.
Tighten two nuts on both sides of the handlebar.
The angle of the handlebar can be raised or lowered depending on your preference. To
change handlebar height, loosen the nut(s) on the side or front of the handlebar joint and
adjust the handlebars to a comfortable position before tightening. Consult the manual to
determine the correct handlebar height. Check to make sure the brake levers, gear shifts,
displayer, bar ends and other parts attached to the handlebars are positioned comfortably.
These can all be adjusted using one of the included hex keys.

!!"
"
5.) Adjusting the Seat Height
In order to obtain the most comfortable riding position and offer the best possible pedaling
efficiency, the seat height should be set correctly in relation to the rider’s leg length. The
correct saddle height should not allow leg strain from over-extension, and the hips should not
rock from side to side when pedaling. To determine the correct saddle height:
• Sit on the bike saddle. Try to reach the pedal
with your heel when it is in the bottom position. Your
knee should be more or less fully straightened out.
(Image A)
• Place the balls of your feet on the center of
the pedal. If your knee is now slightly bent, the
saddle height is correct. (Image B)
To adjust the seat height:
• Open the quick-release device as far as possible.
• Turn the adjusting nut anticlockwise to further slacken the quick-release
device.
To close the quick-release device, proceed as follows:
• Adjust the clamping strength by turning the adjusting nut.
• If the quick-release device closes too easily, open it again and turn the
adjusting nut clockwise.
• If the quick-release device still closes too easily repeat the previous step.
• If the quick-release device is too difficult to close, turn the adjusting nut
anticlockwise.
• Turn back the quick-release lever from the OPEN position so you can see the
outer side of the lever or the lettering CLOSE.

!#"
"
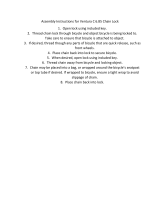
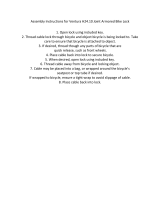
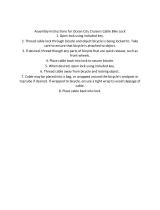
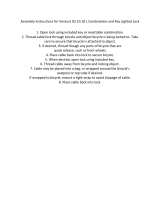
When closed, quick-release levers must lie flat against the
frame, fork and saddle clamp. Make sure that quick-release devices for the hubs point
backwards when closed, as otherwise they could snag on obstructions when the bike
is moving and open. This could lead to serious accidents.
All quick-release devices must be tightened securely before you set off. Check this
before every journey. If you leave your bike unattended, check that all quick-release
devices are correctly secured before setting off again. When closing the quick-release
lever to lock it, it must be necessary to apply a force that causes you to make a fist
with your hand as otherwise the quick-release device could come loose.
Never tighten the seat post if the maximum mark or stop mark is
above the top of the seat tube as otherwise you could injure yourself or damage the seat post.
Always observe the specified tightening torques.
The minimum insertion depth is marked on the seat post. If this is not the case, the minimum
insertion depth must be 7.5 cm. In frames with long seat tubes that project beyond the top
tube, the minimum insertion depth is 10 cm.
Adjusting The Saddle Angle
Your bike saddle should be as close as possible to horizontal. Make use
of longer bike rides to find out what your most comfortable seat position
is. If you want to tilt the saddle, tilt it very slightly forwards. If you tilt the
saddle back, this can quickly lead to pain or physical injury.
• Turn the clamping screw counterclockwise to loosen it.
• Tilt the bike saddle to the required angle.
• Turn the clamping screw clockwise to tighten it.
• Tilt the bike seat to the required angle by applying force on seat.
Do not set the seat so high that the max guide line on the seat post is visible.

!$"
"
6.) Check & Adjust Tire Pressure
The size & pressure rating are marked on the sidewall of the tire. The most important part of
this information for you is Tire Pressure. The best and safest way to inflate a bicycle tire to the
correct pressure is with a bicycle pump that has a built-in pressure gauge.
Never inflate a tire beyond the maximum pressure marked on
the sidewall. Exceeding maximum pressure may blow the tire off the rim, causing
damage to the bike and injury to the rider and bystanders.
There is a safety risk in using gas station air hoses or other
air compressors. They are not made for bicycle tires. They move a large volume of
air very rapidly, and will raise the pressure in your tire very rapidly, which could
cause the tube to explode.
Tire pressure is given either as maximum pressure or as a pressure range. How a
tire performs under different terrain or weather conditions depends largely on tire
pressure. Inflating the tire to near its maximum recommended pressure gives the
lowest rolling resistance; but also produces the harshest ride. High pressures work
best on smooth, dry pavement. Very low pressures, at the bottom of the
recommended pressure range, give the best performance on smooth, slick terrain
such as hard-packed clay, and on deep, loose surfaces such as deep, dry sand.
Tire pressure that is too low for your weight and the riding conditions can cause a
puncture of the tube by allowing the tire to deform sufficiently to pinch the inner
tube between the rim and the riding surface.
Pencil type automotive tire gauges can be inaccurate and
should not be relied upon for consistent, accurate pressure readings. Instead, use a
high quality dial gauge.
7.) Power On The Bike
Before you ride, insert the battery in the battery holder until it locks in place, and remove the
key. Turn on the bike’s pedal assist system on the handlebar control unit.
**IMPORTANT** HOW TO TURN ON BIKE WITH KEY You should not be pedaling when
turning on the power. If the battery is fully charged, all lights next to the power button will be
lit. See manual for more information on modes. As you pedal, the motor will provide
assistance at the selected power level.

!%"
"
8.) Check The Lights
To turn on front headlight twist power shifting handle forward for about 2 seconds and return
to original position. Front headlight should now be turned on. When ready to turn headlight off,
twist power shifting handle forward again for 2 seconds and return to original position.
CHECK THE FOLLOWING BEFORE EACH RIDE:
Make sure the battery is fully charged and locked in the rear bike rack.
Check tire pressure and wheel condition. Make sure wheel quick release are firmly closed.
Check the drive chain condition. Make sure it is clean and well lubricated.
Check the bicycle front and rear lighting to make sure it works properly.
Check the bicycle brakes, make sure they are working well.
Inspect condition of electrical cables so that cables are kinks free and no signs of abrasive
wear.
Check the fork for damage (fork legs, fork boot, crown, dropouts, accessories/brake mounts,
fender attachment)
Look for damage (e.g., loose parts, cracks, deep scratches, dents)
Make sure the fork works properly. Things that can indicate a serious problem are any
unusual “clunking” or knocking noises, changes in travel , an over extended or compressed
boot, any changes in the way the fork has been working, or any leaking fluids.
Frame
The form of the frame depends on the bike type and function. Frames are manufactured from
different materials – steel or aluminum alloys or carbon (carbon fiber), for example. Both the
Benelli CLASSICA26 and CLASSICA28 are made from alloy and are fixed position that cannot
be adjusted.
NOTE: The frame number of the bike is stamped on the seat tube, the head tube or the
bottom bracket housing. It may also be found on the motor suspension. If stolen the Benelli
eBike can be identified by the frame number. To identify the bike properly, it is important to
note down the whole number in the right order.

!&"
"
Never ride your bike if the frame is warped or cracked. On no account
should you attempt to repair damaged parts. This can lead to accidents. Replace defective
parts before you ride the bike again.
Accidents do happen. If you are involved in an accident or crash, have your bike checked by a
professional bike workshop before riding it again. If defects on the frame or components go
unnoticed this can lead to accidents. If your bike does not roll forwards easily in a straight line,
this could mean that the frame is warped. In this case, have the steering stability checked by a
professional bike workshop.
Headset
The headset is the bearing for the bike fork in the frame. If the headset has been properly
adjusted, it will turn easily. In doing so, no play should be evident.
The headset is subject to a large amount of stress due to impacts with the road surface. This
can cause it to come loose or affect its setting. Have the play and ease of movement of the
headset checked regularly by your specialist cycle shop
If you do not adjust the headset properly or tighten it too tightly, this
could cause breakages. This should therefore always be carried out by a professional bike
workshop. If you ride with the headset loose, this could damage the bearing shells or fork.
Fork
The front wheel is held in place by the bike fork. The bike fork
consists of two fork blades, the fork crown and steering tube.
They can be adjusted in different ways and provide a greater
degree of riding comfort.
Specific information on your suspension fork is provided in the
manufacturer's operating instructions which you can find on the CD or the manufacturer's
website.

!'"
"
Never ride with a damaged bike fork. Do not attempt to repair a
defective bike fork. This can lead to serious accidents. If you notice that the bike fork is
warped or otherwise damaged, replace it before using the bike again.
Avoid sudden changes in ground level and riding off road. This can damage the fork and lead
to serious accidents.
Check regularly that the screws on the bike fork are securely fastened. If screws are allowed
to come loose, this can cause serious accidents.
Chain rings
Chain rings are wear parts. Their service life depends on various factors like maintenance and
care, type of use and distance travelled.
Bottom bracket and cranks
The cranks must be securely fastened as this could otherwise damage
the crank set. The cranks can come loose which is why you should regularly check whether
they are securely fastened by attempting to rock If there is play in the cranks, have the bike
checked and the cranks fastened securely by a professional bike workshop.
Wheels
The wheels connect the bike with the surface you are riding on. The wheels are subject to a
particularly high level of stress due to unevenness of the riding surface and the weight of the
rider.
The wheels are carefully checked and trued prior to delivery. However, the spokes may settle
when you ride the first mile on your bike.
Have the wheels checked again and tuned if necessary after the first 50 miles by a specialist
cycle shop.
You should subsequently regularly check the tension in the spokes and have loose or
damaged spokes replaced, and/or have the wheel trued, by a specialist cycle shop.

!("
"
The wheel can be attached to the frame and fork in a number of different ways. In addition to
the standard systems in which the wheel is held on by axle nuts or quick-release devices,
different types of floating axles exist. These can be held in place by a screw connection or
different types of quick-release devices. If your bike has a floating axle, please also refer to
the enclosed manufacturer's user manual or visit the web pages of the relevant manufacturer
in the Internet.
Tighten all screws to the prescribed torque as otherwise screws could
shear off and components could come loose or detach altogether.
Checking the hubs
To check the hub bearings, proceed as follows:
Lift the wheel and spin it.
Check whether the wheel continues to turn through several revolutions before it stops moving.
If it stops suddenly, the bearing is damaged. This does not apply for front wheels with hub
dynamos.
To determine whether there is play in the hub bearing, try rocking the wheel in the bike fork or
rear triangle backwards and forwards perpendicular to the direction of travel.
If you notice that there is play between the bearings or if you encounter resistance when
turning the wheel, have the hub bearing adjusted by a specialist cycle shop.
Checking the Rims
If you are using a rim brake, the rim is subject to a higher degree of wear.
If a rim is worn it loses stability, which makes it more susceptible to
damage. If the rim is deformed, cracked or broken this can lead to serious accidents. If you
notice changes in a rim on your bike, do not ride on it. Have the problem checked by a
professional bike workshop.

!)"
"
TIRES
A large number of different tire types exist. The bike's off-road capability and rolling resistance
depend on tread profile.
Only inflate the tire to the maximum permissible tire pressure as
otherwise it may burst.
Inflate the tire at least to the specified minimum air pressure. If the tire pressure is too low, the
tire may detach from the rim.
The maximum permissible tire pressure, and normally also the
minimum permissible pressure, can be found on the tire sidewall.
Always replace the tire with a tire of the same type, dimension and
profile as otherwise the ride characteristics may be adversely affected. This can lead to
accidents.
Tires are wear parts. Check the tread depth; tire pressure and condition
of the tire sidewalls regularly. Replace worn tires before using the bike.
NOTE: Note the dimension of the fitted tire. Standard designations are used when stating
the tire dimension.
CLASSICA28 comes with 28” tire and tire width about 1.57”
CLASSICA26 comes with 26” tire and tire with of 1.5”
The inner tube maintains the pressure inside the tire. It is inflated via a valve. Three valve
types exist:

!*"
"
All three have a cap to protect them from ingress of dirt.
To inflate an inner tube with a Sclaverand or road valve, proceed as follows:
Unscrew the valve cap anticlockwise with your fingers.
Unscrew the knurled nut anticlockwise.
Push the knurled nut with your finger briefly into the valve until air escapes.
Inflate the inner tube using a suitable tire pump.
Screw the knurled nut back down.
Screw the cap clockwise back onto the valve.
NOTE: Ask a specialist cycle shop for advice on which tire pump is suitable for your valve.
If you find any damage, DO NOT ride the bike.
Contact Customer Service.
Pedal Assist System
The first ride should be started with the Pedal Assist feature off and then slowly throttling to
feel the engagement of the HUB motor.
The Benelli by Buffalo Corp eBike Pedal Assist System supports you when riding, as long as
you are pedaling. Without pedaling, there is no assistance. The motor output always depends
on the amount of your pedaling power.
When applying less pedaling power, the assistance or support will be lower than when
applying a lot of pedaling power. This applies independent of the assistance Level. The eBike
drive automatically switches off at speeds in excess of 15.5 MPH. When the speed falls below
15.5 MPH the drive is automatically available again. An exception applies for the push
assistance function, in which the eBike can be pushed at low speed without pedaling. The

#+"
"
eBike can also be ridden as a normal bicycle without assistance at any time, by either
switching off the eBike system or setting the assistance level to “OFF”. The same applies
when the battery pack is empty.
The fundamental idea behind the Pedal Assist System is not only to be able to cover greater
distances more quickly, but also do this comfortably. You can choose to relax and let the bike
do the work, exert yourself more physically, or simply to get from A to B as fast as possible.
You can decide this yourself by choosing an appropriate assist level. This gives you more
confidence on the road, as the powerful acceleration gives you more control and a greater
degree of security.
Factors Affecting Assistance Range
1. Battery Charge Level - A fully charged battery will provided the greatest range. Before
every ride, make sure the battery is fully charged.
2. Assistance Mode & Support Level - The assistance mode and support level you select
during the ride will affect the operating range.
3. Temperature & Wind Conditions - Extreme cold or hot conditions will result in more rapid
depletion of the battery’s energy, reducing available range. Overcoming strong winds on the
cycling route will shorten assistance range since more battery energy is required. Conversely,
a tailwind (wind behind you) acts to propel the cycle reducing the energy requirement.
4. Rider Weight & Cargo - Adding weight to the bicycle (rider or cargo) cycle will require the
drive unit to work harder, requiring more battery energy - shorter range. If you carry a
backpack or extra luggage on the rack, more energy will be needed, and overall range will be
reduced.
5. Tire Pressure/Condition- Make sure your tires are in good shape (e.g. good tread,
undamaged) and pressurized properly according to the tire sidewall markings. Poor tire
condition or inadequate air pressure will shorten range.
6. Shifting Gears & Braking - You should shift gears similarly to a normal pedaling bicycle.
Efficient gear changes will result in greatest available range. Maintaining a uniform speed and
effective braking will help you maximize the energy stored in the battery.
/