Page is loading ...

1 . Introduction
The TI032-3W programmable wall switch is
designed to control lighting loads such as incan-
descent, halogen, low voltage halogen with trans-
former, and fluorescent lights.
It features seven (7) ON/OFF programming
sequences which can be programmed daily or
weekly. The wall switch also includes a manual
override that can be activated at any time.
The timer may be used for a single pole, an exist-
ing 3-way switch or a new 3-way switch installa-
tion.
2. Installation
This wall switch can be used for either single pole
or multiswitch installation.
A multiswitch installation with an electronic wall
switch differs from conventional installation.
Read wiring instructions carefully and follow
guidelines applicable to your installation.
2.1 Guidelines
TURN OFF POWER AT THE MAIN POWER
PANEL TO AVOID ELECTRICAL SHOCK.
THE MAXIMUM LOAD MUST NOT EXCEED
500 W @ 120 V (MIN 40 W).
• The wall switch must be mounted onto a stan-
dard single or multi-gang electrical box.
• Avoid locations where ambient temperature
can exceed 50°C (122°F).
• Do not clean the timer with a solvent or an
abrasive cleaner; use a lint-free cloth and a
mild soap.
2.2 Installation Procedure
n If you are replacing an existing switch,
remove the switch. For an existing 3-way
installation, identify the wire connected to the
“common” screw.
o
Reconnect each disconnected wire to the
new programmable wall switch according to
your application.
p Push the wires into the electrical box leaving
space for the timer and secure the timer
using the provided screws.
q
Install the wall plate (not included).
r
Return power at the circuit.
s Power-on the switch and test the operation
of the switch(es). See Power-On and Test
Installation section for information.
NOTE: See also the Troubleshooting section.
NOTE A:
Thewhitewireisnottheneutral
wire but the wire going to the load.
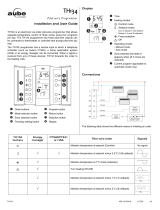
2.3 Single Pole Installation
When installing, ensure wire “2” is connected with the line wire identified as “C”.
2.4 Existing 3-way Installation
The “common” wire, previously identified upon removal of the old switch, must be con-
nected to the “C” wire of the programmable wall switch. Connect the two other wall
switch wires to the two remaining wires (see above).
Connect the supplied jumper wire from the “common” terminal screw to the screw ter-
minal where wire “1” of the wall switch is connected.
2.5 New 3-way Installation
For a new installation, a single pole switch can be used at the remote location. Refer
to the following wiring diagram:
NOTE: The provided jumper wire is not used for this type of installation.
3. Power-On and Test Installation
n Open the cover using a small flat tip screwdriver.
o
Set the ON/OFF switch to ON.
p
RESET using a pointed object (e.g. paper clip).
q The screen should display: 0:00, MO, MAN and
OFF.
If the screen is blank, check the following:
a) The ON/OFF switch may not be engaged in
the ON position; try pushing it further to the
right.
b) If the wall switch controls a lamp equipped with its own ON/OFF switch,
ensure the lamp switch is ON.
c) If the wall switch only controls one light bulb, turn the switch OFF and check if
the light bulb is good and tightly screwed in its socket.
r
Once the screen is back on, test the installation.
TI032-3W / 3-WAY
Programmable Wall Switch
Installation Instructions
400-032-001-A
http://waterheatertimer.org/Programmable.html#Aube

3.1 Test Installation
Push and release the cover to switch ON or OFF or press one of the four control but-
tons located in each corner. If you also have a remote switch, flip the switch.
• Lights ON: installation is successful.
• Lights OFF:
a) Turn power off and rewire.
b) If you have an existing 3-way installation, turn power off at the power panel
and try switching the jumper wire to the other terminal.
3.2 SettheTimeandDay
n
Select the time format (default is 24 hour). Ensure the MAN or
AUTO indicator is displayed, then press and maintain the MIN and
HOUR buttons simultaneously and release: 0:00 = 24 hour format,
12:00 = 12 hour format
o Use HOUR and MIN to set the time
(PM indicates an afternoon or evening time when using the 12-hour format).
p To set the day, press DAY several times until the current day is displayed
(e.g. Tuesday = TU).
q Close the wall switch cover or press one of the “control” buttons to return to nor-
mal operation.
4. Programming
4.1 Recording the Programs
You can record up to 7 program sequences. Each program consists of 2 sequences:
ON and OFF which can be programmed daily or weekly.
NOTE: Both ON and OFF sequences must be defined for a program to be active.
n Open the wall switch cover using a small flat tip screwdriver.
o Press PGM to select a program. The first sequence to be defined is
the ON time (lights on).
The program number (i.e. 1) and sequence (ON) are displayed. This symbol
— : — — indicates an inactive program.
p Select the DAY to be programmed for the active sequence.
To select all days, press DAY several times until all days are displayed.
q Set the time using HOUR and MIN for the active sequence.
Make sure the PM indicator is displayed if you are programming an afternoon period and
using the 12 hour format.
r Press PGM again to set the OFF time (lights off) of the program.
Repeat steps 3 and 4 to set the day and time.
s Repeat steps 2 to 5 for other programs (up to 7 programs).
t Close the cover or press any “control” button to return to normal operation.
4.2 To Clear a Program
Use the PGM button to select the program, then hold PGM for 3 seconds until the
screen displays
—:——. To view the programs, press PGM successively.
4.3 Select an Operating Mode
To select a mode, press and hold the cover until the indicator is displayed (MAN/
AUTO).
MANUAL—When activated, the wall switch operates as a regular
switch. Simply press the cover or activate the remote switch (3-way) to
turn the lights ON or OFF. The MAN indicator and status (ON or OFF)
are displayed.
AUTOMATIC—When activated, the recorded ON/OFF programs are
executed in sequence. The current program number and status (ON/
OFF) are displayed.
This timer features a manual override that can be activated at any time to temporarily
override programming until the beginning of the next program. Press the cover or flip
the remote switch (3-way) to override programming; the ON or OFF indicator flashes
to indicate the bypass.
Problem Cause Solution
Blank display Breaker open
The single light bulb on circuit is burnt
On/Off switch to of (see Section 3)
Set breaker to On
Change the light bulb
Set On/Off switch On
Faded or
irregular
display
Load is less than 40 W
The ambient temperature
is below 32°F
The total wattage of your light bulbs does not reach the required minimum
Designed to operate between 32 and 122°F
Cannot switch from
24 to 12 hour clock
MAN or AUTO is not displayed Press one of the control buttons to display MAN or AUTO, then resume process
Programs do not run as
expected
Programmed schedules are incorrect Check each program to find errors (AM, PM)
- : - - indicates an inactive program and 00:00 indicates midnight
Make sure the OFF sequence is correct
Metal plate is hot Maximum load exceeds 500 W In normal operation, at full capacity, the metal plate can get hot. However, exceeding
the maximum capacity increases the product temperature and may damage it
Technical Specifications
Model: TI032-3W
Supply: 120 VAC, 50 / 60 Hz
Load: 40 W min., 500 W max.
Approvals: CSA & UL
Storage temperature range: -4°F to 122°F
(-20°C to 50°C)
Operating temperature range: 32°F to 122°F
(0°C to 50°C)
Memory backup: programs are protected
against a power failure by a rechargeable bat-
tery. The screen is blank during a power outage.
Warranty and Service
AUBE TECHNOLOGIES INC ONE (1) YEAR
LIMITED WARRANTY
This product is guaranteed against workmanship
defects for a one year period following the initial
date of purchase. During this period, AUBE
Technologies Inc. will repair or replace, at our
option and without charge, any defective product
which has been used under normal conditions.
The warranty does not cover delivery costs and
does not apply to products poorly installed or ran-
domly damaged following installation. This war-
ranty cancels and replaces any other
manufacturer's express or implied warranty as
well as any other company commitment. AUBE
Technologies Inc. cannot be held liable for
related or random damages following the installa-
tion of this product. The defective product as well
as the purchase invoice must be returned to the
place of purchase or mailed, prepaid and
insured, to the following address:
Aube Technologies Inc.
705 Montrichard
Saint-Jean-sur-Richelieu, Quebec, Canada J2X
5K8
If you have any questions concerning the installa-
tion or programming of the wall switch, call our
technical support team at:
Phone: Montreal area:(450) 358-4600
Canada / U.S.: 1-800-831-AUBE (2823)
Fax: (450) 358-4650
Email: service@aubetech.com
Monday to Friday from 8:30 AM to 5:00 PM EST.
For more information on our products, visit us at
www.aubetech.com
06/11/2003 400-032-001-A
TROUBLESHOOTING
/