GE ZSC1001JSS Owner's manual
- Category
- Microwaves
- Type
- Owner's manual
This manual is also suitable for

OWNER’S
MANUAL
Built-In Advantium®
120V Speedcook Oven
Para consultar una version en español de este manual de
instrucciones, visite nuestro sitio de internet Monogram.com.
Monogram.com

2
Contents
Consumer Information
Built-In Advantium Oven
Introduction
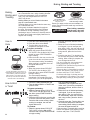
Your new Monogram Advantium 120V Oven makes an eloquent statement of style, convenience
and kitchen planning flexibility. Whether you chose it for its purity of design, assiduous attention
to detail—or for both of these reasons—you’ll find that your Monogram ovens’s superior blend of
form and function will delight you for years to come.
Your Monogram oven was designed to provide the flexibility to blend in with your kitchen
cabinetry. Its sleek design can be beautifully integrated into the kitchen.
The information on the following pages will help you operate and maintain your oven properly.
If you have any questions, visit our Website at: Monogram.com. In Canada: Monogram.ca.
Advantium
Safety ............................................... 4–8
Getting to know the Advantium ............ 9
Oven features ..................................... 10
Cooking controls ................................. 11
Quick Start .......................................... 12
Speedcooking
Cooking tips ........................................ 13
Speedcook cookware ......................... 13
Display prompts .................................. 14
Using the pre-set
speedcook menu ................................ 15
Power level ......................................... 16
Repeat last ......................................... 17
Resume feature .................................. 17
Custom speedcook ............................. 17
Favorite recipes ............................ 18, 19
Things that are normal ....................... 19
Other Cooking Functions
Convection baking .............................. 20
Broiling and toasting ........................... 20
Warming and proofing ........................ 21
Microwaving
Features ............................................. 22
Using pre-set
microwave selections ......................... 22
Cook by time ...................................... 23
Express............................................... 23
Microwave power level(s) ................... 23
Favorite Recipes ................................ 23
Cooking tips ........................................ 23
Defrost by time ................................... 24
Defrost by food type ........................... 24
Defrosting tips .................................... 25
Sensor cooking ............................. 26, 27
Things that are normal ....................... 27
Other Features
Cook time completed.......................... 28
Clock................................................... 28
Delay Start .......................................... 28
Beeper volume ................................... 28
Scroll speed ........................................ 28
Reminder ............................................ 28
Review ................................................ 28
Help .................................................... 29
Control lockout ................................... 29
Timer .................................................. 29
Automatic fan ..................................... 29
Care and Cleaning
Cleaning the inside ............................. 30
Removable turntable .......................... 30
Cooking trays and baking sheet ......... 31
Cleaning the outside........................... 31
Troubleshooting
Problem Solver ............................. 33, 34
Consumer Support
Warranty ............................................. 35
Consumer Support ...............Back Cover

3
If you
received a
damaged
oven
Immediately contact the dealer (or builder) that
sold you the oven.
Save time
& money
Read this manual. Inside you will find many
helpful hints on how to use and maintain your
oven properly. Just a little preventive care on
your part can save you a great deal of time and
money over the life of your oven.
You’ll find many answers to common problems
in the Before You Call for Service section. If
you review our chart of Troubleshooting Tips
first, you may not need to call for service at all.
If you
need
service
To obtain service, see the Consumer Services
page in the back of this manual.
We’re proud of our service and want you to be
pleased. If for some reason you are not happy
with the service you receive, here are some
steps to follow for further help.
FIRST, contact the people who serviced your
appliance. Explain why you are not pleased.
In most cases, this will solve the problem.
NEXT, if you are still not pleased, write all the
details—including your phone number—to:
Manager, Customer Relations
Monogram
Appliance Park
Louisville, KY 40225
Consumer Information
Built-In Advantium Oven
Before
using your
oven
Read this manual carefully. It is intended to
help you operate and maintain your new oven
properly.
Keep it handy for answers to your questions.
If you don’t understand something or need
more help, there is a list of toll-free consumer
service numbers included in the back section
of this manual.
OR
Visit our Website at: Monogram.com
In Canada: Monogram.ca.
Write
down the
model
& serial
numbers
You’ll find them on a label under the oven.
Fill out and return the Consumer Product
Registration Card that is packed with this
product.
Before sending in the card, please write the
numbers here:
Model Number
Serial Number
Use these numbers in any correspondence or
service calls concerning your oven.

4
Built-In Advantium Oven
IMPORTANT SAFETY INSTRUCTIONS
READ AND SAVE THESE INSTRUCTIONS
WARNING
To reduce the risk of burns, electric shock, fire, injury to persons, or exposure to excessive
microwave energy:
When using electrical appliances, basic safety precautions should be followed, including the following:
Ŷ 5HDGDOOLQVWUXFWLRQVEHIRUHXVLQJWKLVDSSOLDQFH
Ŷ 5HDGDQGIROORZWKHVSHFLILFSUHFDXWLRQVLQWKH
PRECAUTIONS TO AVOID POSSIBLE EXPOSURE
TO EXCESSIVE MICROWAVE ENERGY section on
page 7.
Ŷ 8VHWKLVDSSOLDQFHRQO\IRULWVLQWHQGHGXVHDV
described in this manual. Do not use corrosive
chemicals or vapors in this appliance. This oven is
specifically designed to heat, dry or cook food, and is
not intended for laboratory or industrial use.
Ŷ 7KLVDSSOLDQFHPXVWRQO\EHVHUYLFHGE\TXDOLILHG
service personnel. Contact nearest authorized service
facility for examination, repair or adjustment.
INSTALLATION
Ŷ ,QVWDOORUORFDWHWKLVDSSOLDQFHRQO\LQDFFRUGDQFHZLWK
the provided installation instructions.
Ŷ
This appliance must be grounded. Connect only
to properly grounded outlet. See “GROUNDING
INSTRUCTIONS” found on page 7.
Ŷ 7KLVPLFURZDYHLV8/OLVWHGIRUVWDQGDUGZDOO
installation. See installation instructions for approved
appliances to mount over and under the microwave.
Ŷ Do not operate this appliance if it has a damaged
power cord or plug, if it is not working properly, or if it
has been damaged or dropped.
Ŷ .HHSFRUGDZD\IURPKHDWHGVXUIDFHV
Ŷ Do not let cord hang over the edge of the table or
counter
Ŷ 'RQRWLPPHUVHFRUGRUSOXJLQZDWHU
Ŷ 'RQRWFRYHURUEORFNDQ\RSHQLQJVRQWKHDSSOLDQFH
Ŷ 'RQRWVWRUHWKLVDSSOLDQFHRXWGRRUV'RQRWXVHWKLV
product near water—for example, in a wet basement,
near a swimming pool, near a sink or in similar
locations.
Ŷ 'RQRWPRXQWWKLVDSSOLDQFHRYHUDVLQN
TO REDUCE THE RISK OF FIRE IN THE CAVITY:
Ŷ Do not overcook food. Carefully attend appliance
when paper, plastic or other combustible materials are
placed inside the oven
to facilitate cooking.
Ŷ 5HPRYHZLUHWZLVWWLHVDQGPHWDOKDQGOHVIURPSDSHU
or plastic containers before placing them in the oven.
Ŷ ,IPDWHULDOVLQVLGHWKHRYHQLJQLWHNHHSWKHRYHQGRRU
closed, turn the oven off and disconnect the power
cord or shut off power at the fuse or circuit breaker
panel.
Ŷ 'RQRWVWRUHDQ\PDWHULDOVLQWKLVRYHQZKHQQRWLQ
use. Do not leave paper products, cooking utensils or
food in the cavity when not in use. All racks should be
removed from oven when not in use.
Ŷ 'RQRWRSHUDWHWKHPLFURZDYHIHDWXUHZLWKRXWIRRGLQ
the oven.
Ŷ 'RQRWXVHWKH6HQVRU)HDWXUHVWZLFHLQVXFFHVVLRQ
on the same food portion. If food is undercooked after
the first countdown, use COOK BY TIME for additional
cooking time.
Ŷ 7KHZLUHRYHQUDFNVKRXOGQRWEHXVHGIRUVSHHGFRRN
or microwave cooking to prevent arcing
TO REDUCE THE RISK OF BURNS:
Ŷ %HFDUHIXOZKHQRSHQLQJFRQWDLQHUVRIKRWIRRG8VH
pot holders and direct steam away from face and
hands.
Ŷ 9HQWSLHUFHRUVOLWFRQWDLQHUVSRXFKHVRUSODVWLF
bags to prevent build-up of pressure.
Ŷ %HFDUHIXOZKHQWRXFKLQJWKHWXUQWDEOHGRRUUDFNVRU
walls of the oven which may become hot during use.
Ŷ Liquids and certain foods heated in the microwave
oven can present a risk of burn when removing them
from the microwave. The potential for a burn is greater
in young children, who should not be allowed to remove
hot items from the microwave.

5
Built-In Advantium Oven
IMPORTANT SAFETY INSTRUCTIONS
READ AND SAVE THESE INSTRUCTIONS
WARNING
Arcing can occur during both speedcooking and microwave cooking. If you see arcing,
press the CANCEL/OFF pad and correct the problem.
Arcing is the microwave term for sparks in the oven.
Arcing is caused by:
Ŷ 0HWDORUIRLOWRXFKLQJWKHVLGHRIWKHRYHQ
Ŷ )RLOQRWPROGHGWRIRRGXSWXUQHGHGJHVDFWOLNH
antennas).
Ŷ 8VHIRLORQO\DVUHFRPPHQGHGLQWKLVPDQXDO
Ŷ 0HWDOFRRNZDUHXVHGGXULQJHLWKHUVSHHGFRRNRU
microwave cooking (except for the pans provided with
the oven).
Ŷ 0HWDOVXFKDVWZLVWWLHVSRXOWU\SLQVRUJROGULPPHG
dishes, in the oven.
Ŷ 5HF\FOHGSDSHUWRZHOVFRQWDLQLQJVPDOOPHWDOSLHFHV
being used in the oven.
WARNING
Continued
OPERATING
Ŷ $VZLWKDQ\DSSOLDQFHFORVHVXSHUYLVLRQLVQHFHVVDU\
when used by children.
Ŷ 'RQRWRSHUDWHWKHRYHQZLWKRXWWKHWXUQWDEOHLQSODFH
The turntable must be unrestricted so it can turn.
Ŷ 'RQRWVWRUHDQ\WKLQJGLUHFWO\RQWRSRIWKHPLFURZDYH
oven surface when the microwave oven is in operation.
Ŷ 2YHUVL]HGIRRGVRURYHUVL]HGPHWDOXWHQVLOVVKRXOGQRW
be inserted in a microwave/convection oven as they
may create a fire or risk of electric shock.
Ŷ Do not use paper products in oven when appliance is
operating in any cooking mode except microwave.
Ŷ 6RPHSURGXFWVVXFKDVZKROHHJJVDQGVHDOHG
containers—for example, closed jars—are able to
explode and should not be heated in this oven.
Ŷ 'RQRWRYHUFRRNSRWDWRHV7KH\FRXOGGHK\GUDWHDQG
catch fire, causing damage to your oven.
Ŷ 'RQRWFRYHUUDFNVRUDQ\RWKHUSDUWRIWKHRYHQZLWK
metal foil. This will cause overheating of the oven.
Ŷ &RRNPHDWDQGSRXOWU\WKRURXJKO\²
meat to at least an INTERNAL temperature of 160°F,
and poultry to at least an INTERNAL temperature of
180°F. Cooking to these temperatures usually protects
against foodborne illness.
Ŷ 7KLVRYHQLVQRWDSSURYHGRUWHVWHGIRUPDULQHXVH
CLEANING
Ŷ .HHSWKHRYHQIUHHIURPJUHDVHEXLOGXS
Ŷ 'RQRWFOHDQZLWKPHWDOVFRXULQJSDGV3LHFHVFDQ
burn off the pad and touch electrical parts involving a
risk of electric shock.
Ŷ :KHQFOHDQLQJVXUIDFHVRIGRRUDQGRYHQWKDW
comes together on closing the door, use only mild,
nonabrasive soaps, or detergents applied with a clean
sponge or soft cloth. Rinse well.
SUPER HEATED WATER
Ŷ /LTXLGVVXFKDVZDWHUFRIIHHRUWHDDUHDEOHWREH
overheated beyond the boiling point without appearing
to be boiling. Visible bubbling or boiling when the
container is removed from the microwave oven is not
always present. THIS COULD RESULT IN VERY
HOT LIQUIDS SUDDENLY BOILING OVER WHEN
THE CONTAINER IS DISTURBED OR A SPOON OR
OTHER UTENSIL IS INSERTED INTO THE LIQUID.
Ŷ 7RUHGXFHWKHULVNRILQMXU\WRSHUVRQV
- Do not overheat the liquid.
- Stir the liquid both before and halfway through
heating it.
- Do not use straight-sided containers with narrow
necks.
- After heating, allow the container to stand in the
microwave oven for a short time before removing the
container.
- Use extreme care when inserting a spoon or other
utensil into the container.

6
Built-In Advantium Oven
IMPORTANT SAFETY INSTRUCTIONS
READ AND SAVE THESE INSTRUCTIONS
WARNING
SPEEDCOOK OVEN-SAFE COOKWARE
Ŷ The oven and door will get very hot when
speedcooking.
Ŷ Cookware will become hot because of heat
transferred from the heated food. Oven mitts will be
needed to handle the cookware.
Ŷ 'RQRWXVHFRYHULQJVFRQWDLQHUVRUFRRNLQJURDVWLQJ
bags made of foil, plastic, wax or paper when
speedcooking.
Ŷ 'RQRWFRYHUWKHWXUQWDEOHZLUHRYHQUDFNWUD\VRU
any part of the oven with metal foil. This will cause
arcing in the oven.
Ŷ 8VHWKHQRQVWLFNPHWDOWUD\LQWKHVDPHZD\\RX
would use a shallow baking pan or baking tray.
Ŷ 3ODFHIRRGGLUHFWO\RQWKHWUD\VZKHQFRRNLQJXQOHVV
prompted by the oven to do otherwise.
Ŷ $Q\RYHQVDIHGLVKFDQEHXVHGLQ\RXURYHQ
Recipes in the Advantium Cookbook were tested in
Pyrex
®
glass cookware and Corningware
®
ceramic
casseroles. Cook times and results may vary when
using other types of oven-safe dishes. Place them
directly on the trays.
Ŷ 8VHRIWKHFOHDUJODVVWUD\ZKHQVSHHGFRRNLQJZLOO
result in inferior cooking performance.
WARNING
OVEN-SAFE COOKWARE FOR BAKING, BROILING, WARMING,
PROOFING & TOASTING
Ŷ The oven and door will get very hot when baking,
broiling, warming, proofing or toasting.
Ŷ Cookware will become hot. Oven mitts will be
needed to handle the cookware.
Ŷ 'RQRWFRYHUGLVKHVRUXVHSODVWLFFRQWDLQHUVSODVWLF
cooking/roasting bags, plastic wrap, wax paper or
paper when broiling or toasting.
Ŷ 8VHWKHQRQVWLFNPHWDOWUD\LQWKHVDPHZD\\RX
would use a shallow baking pan or baking tray.
Ŷ 8VHWKHDOXPLQLXPEDNLQJVKHHWRQWKHZLUHRYHQ
rack, and place them on the non-stick metal tray when
baking on two levels, broiling or toasting foods.
Ŷ 3ODFHIRRGGLUHFWO\RQWKHWUD\VZKHQFRRNLQJXQOHVV
prompted by the oven to do otherwise.
Ŷ $Q\RYHQVDIHGLVKFDQEHXVHGLQ\RXURYHQ
Recipes in the Advantium Cookbook were tested in
Pyrex
®
glass cookware and Corningware
®
ceramic
casseroles. Cook times and results may vary when
using other types of oven-safe dishes. Place them
directly on the trays.
Ŷ 8VHRIWKHFOHDUJODVVWUD\ZKHQEDNLQJEURLOLQJ
warming, proofing or toasting will result in inferior
cooking performance.
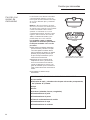
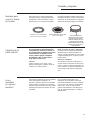
The turntable must always
be in place when using the
oven.
The turntable must always
be in place when using the
oven.
Put food directly on the non-
stick metal tray to speedcook.
Put food directly on the non-
stick metal tray to bake on
one level.
Put food directly on the
aluminum baking sheet on the
wire oven rack, and place them
on the non-stick metal tray,
when baking on two levels,
broiling or toasting foods.

7
Built-In Advantium Oven
IMPORTANT SAFETY INSTRUCTIONS
READ AND SAVE THESE INSTRUCTIONS
WARNING
MICROWAVE-SAFE COOKWARE
Make sure to use suitable cookware during microwave cooking.
Most glass casseroles, cooking dishes, measuring cups, custard
cups, pottery or china dinnerware which does not have metallic
trim or glaze with a metallic sheen can be used. Some cookware
is labelled “suitable for microwaving.”
Ŷ 3ODFHIRRGRUPLFURZDYDEOHFRQWDLQHUGLUHFWO\RQWKH
clear glass tray to cook your food.
Ŷ 8VHRIWKHQRQVWLFNPHWDOWUD\GXULQJPLFURZDYH
cooking will result in inferior cooking performance.
Ŷ &RRNZDUHPD\EHFRPHKRWEHFDXVHRIKHDW
transferred from the heated food. Oven mitts may be
needed to handle the cookware.
Ŷ 'RQRWXVHUHF\FOHGSDSHUSURGXFWV5HF\FOHGSDSHU
towels, napkins and waxed paper may contain metal
flecks which could cause arcing or ignite. Paper
products containing nylon or nylon filaments should
be avoided, as they may also ignite.
Ŷ 8VHIRLORQO\DVGLUHFWHGLQWKLVPDQXDO:KHQXVLQJ
IRLOLQWKHRYHQNHHSWKHIRLODWOHDVWƎDZD\IURPWKH
sides of the oven.
Ŷ ,I\RXXVHDPHDWWKHUPRPHWHUZKLOHFRRNLQJPDNH
sure it is safe for use in microwave ovens.
Ŷ 6RPHIRDPWUD\VOLNHWKRVHWKDWPHDWLVSDFNDJHG
on) have a thin strip of metal embedded in the bottom.
When microwaved, the metal can burn the floor of the
oven or ignite a paper towel.
Ŷ 3DSHUWRZHOVZD[HGSDSHUDQGSODVWLFZUDSFDQEH
used to cover dishes in order to retain moisture and
prevent spattering. Be sure to vent plastic wrap so
steam can escape.
Ŷ 1RWDOOSODVWLFZUDSLVVXLWDEOHIRUXVHLQPLFURZDYH
ovens. Check the package for proper use.
Ŷ ³%RLODEOH´FRRNLQJSRXFKHVDQGWLJKWO\FORVHGSODVWLF
bags should be slit, pierced or vented as directed by
package. If they are not, plastic could burst during or
immediately after cooking, possibly resulting in injury.
Also, plastic storage containers should be at least
partially uncovered because they form a tight seal.
When cooking with containers tightly covered with
plastic wrap, remove covering carefully and direct
steam away from hands and face.
Ŷ 3ODVWLFFRRNZDUH²3ODVWLFFRRNZDUHGHVLJQHGIRU
microwave cooking is very useful, but should be used
carefully. Even microwave-safe plastic may not be
as tolerant of overcooking conditions as are glass or
ceramic materials and may soften or char if subjected
to short periods of overcooking. In longer exposures
to overcooking, the food and cookware could ignite.
Ŷ 'RQRWXVHWKHZLUHRYHQUDFNIRUPLFURZDYLQJ
Follow these guidelines:
1. Use microwave-safe plastics only and use them in
strict compliance with the cookware manufacturer’s
recommendations.
2. Do not microwave empty containers.
3. Do not permit children to use plastic cookware without
complete supervision.
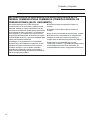
The turntable must
always be in place when
using the oven.
The clear glass tray
should always be in place
when microwaving.

Built-In Advantium Oven
IMPORTANT SAFETY INSTRUCTIONS
READ AND SAVE THESE INSTRUCTIONS
PRECAUTIONS TO AVOID POSSIBLE EXPOSURE
TO EXCESSIVE MICROWAVE ENERGY
(a) Do Not Attempt to operate this oven with the door
open since open-door operation can result in harmful
exposure to microwave energy. It is important not to
defeat or tamper with the safety interlocks.
(b) Do Not Place any object between the oven front
face and the door or allow soil or cleaner residue to
accumulate on sealing surfaces.
(c) Do Not Operate the oven if it is damaged.
It is particularly important that the oven door close
properly and that there is no damage to the:
(1) door (bent),
(2) hinges and latches (broken or loosened),
(3) door seals and sealing surfaces.
(d) The Oven Should Not be adjusted or repaired by
anyone except properly qualified service personnel.
GROUNDING INSTRUCTIONS
WARNING
Improper use of the grounding plug can result in a risk of electric shock.
This appliance must be
grounded. In the event of
an electrical short circuit,
grounding reduces the risk of
electric shock by providing an
escape wire for the electric
current.
This appliance is equipped with a power cord having a
grounding wire with a grounding plug. The plug must
be plugged into an outlet that is properly installed and
grounded.
Consult a qualified electrician or service technician if
the GROUNDING INSTRUCTIONS are not completely
understood, or if doubt exists as to whether the
appliance is properly grounded.
If the outlet is a standard 2-prong wall outlet, it is your
personal responsibility and obligation to have it replaced
with a properly grounded 3-prong wall outlet.
Do not under any circumstances cut or remove the third
(ground) prong from the power cord.
Do not use an extension cord. If the power cord is too
short, have a qualified electrician or service technician
install an outlet near the appliance.
For best operation, plug this appliance into its own
electrical outlet to prevent flickering of lights, blowing of
fuse or tripping of circuit breaker.
Ensure proper
ground exists
before use.
8
NOTICE: PACEMAKERS
Most pacemakers are shielded from interference from electronic products, including microwaves. However, patients
with pacemakers may wish to consult their physicians if they have concerns.
STATE OF CALIFORNIA PROPOSITION 65 WARNINGS
WARNING
This product contains one or more chemicals known to the State of California to cause cancer, and
birth defects or other reproductive harm.

Getting to Know the Advantium
Built-In Advantium Oven
The new Advantium oven uses
breakthrough Speedcook technology
to harness the power of light. The
Advantium oven cooks the outside of
foods much like conventional radiant
heat, while also penetrating the surface
so the inside cooks simultaneously.
While halogen light is the primary
source of power, a “microwave boost”
is added with certain foods. Foods cook
evenly and fast, retaining their natural
moisture.
Getting to know
Advantium
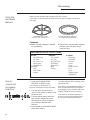
Turntable
Ŷ7KHWXUQWDEOHURWDWHVWRHQVXUHHYHQFRRNLQJ
Controls
Ŷ7KHRYHQFRQWUROFRQWDLQVSUHVHWUHFLSHV
Ŷ7XUQDQGSUHVVGLDOPDNHVPHQXVHOHFWLRQHDV\
Halogen Lamp and Ceramic Heaters
Ŷ2QHZDWWKDORJHQEXOEDQGRQHZDWWFHUDPLFKHDWHUFRRNIRRGIURP
above.
Ŷ2QHZDWWFHUDPLFKHDWHUFRRNVIRRGIURPEHORZ
Rear Convection Heat Element
Ŷ2SHUDWHVZKHQXVLQJEDNH
Microwave
Ŷ$PLFURZDYH³ERRVW´LVDXWRPDWLFDOO\DGGHGZLWKFHUWDLQIRRGV
Ŷ7KHRYHQFDQDOVREHXVHGDVDZDWWPLFURZDYHRYHQ
9

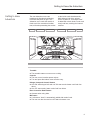
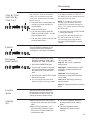
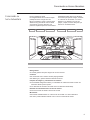
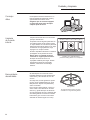
Oven Features
Built-In Advantium Oven
Oven
features
Throughout this manual, features and appearance may vary from your model.
120
Turntable
The turntable must always be in place,
on the oven floor, for all cooking. Be
sure the turntable is seated securely over
the spindle in the center of the oven.
Non-stick Metal Tray
Put food directly on the non-stick metal
tray and place on the turntable when
using the speedcook and bake features.
Wire Oven Rack and Aluminum
Baking Sheet
Put food directly on the aluminum baking
sheet on the wire oven rack, and place
them on the non-stick metal tray, when
baking on two levels, broiling or toasting
foods.
Clear Glass Tray
Place on the turntable when using the
microwave features. Place food or
microwave-safe cookware directly on the
tray.
Upper Halogen Lamp/Ceramic Heater
Operates when using speedcook or broil.
Window
Allows cooking to be viewed while
keeping microwaves confined in the
oven.
Door Handle
Pull to open the door. The door must be
securely latched for the oven to operate.
Door Latches
Lower Ceramic Heater
Operates when using speedcook.
Control Panel
The pads used to operate the oven are
located on the control panel.
Rear Convection Heat Element
Operates when using bake.
NOTE: Handle appearance may differ on some models.
10

11
Cooking
controls
Built-In Advantium Oven
Controls
With your Advantium oven, you can cook with high-intensity halogen lights, ceramic
heaters and convection heating element, and/or conventional microwave energy.
SPEEDCOOK/Repeat Last
Press this pad to access the pre-set
speedcook menu. Press and hold for
3 seconds to repeat the last cooking
selection.
CONV BAKE/BROIL
Press this pad to bake, broil or toast.
CUSTOM SPEEDCOOK
Press this pad to set your own
speedcook program.
WARM/PROOF
Select WARM to keep hot, cooked foods
at serving temperature.
Select PROOF to set for a warm
environment useful for rising yeast-
leavened products.
COOK (Microwave)
Press this pad to microwave food that is
not in the FAVORITE RECIPE section.
EXPRESS (Microwave)
Press for 30 seconds of microwave
cooking time. Each time the pad is
pressed adds an additional 30 seconds
to the remaining cooking time. The oven
starts immediately.
DEFROST (Microwave)
Press this pad to defrost, soften or melt
frozen foods.
REHEAT (Microwave)
Press this pad to reheat servings of
previously cooked foods or a plate of
leftovers.
FAVORITE RECIPE
Press this pad to add, edit (change) or
remove a recipe from the memory.
TIMER
Press this pad to set the minute timer.
DISPLAY
Shows and instructs the use of all
features on the oven.
SELECTOR DIAL–Turn to select,
Press to enter First turn, then press the
dial to make option, food power level or
temperature selections. Also use the dial
to increase (turn clockwise) or decrease
(turn counterclockwise) cooking times.
START/PAUSE
Press this pad to start or pause any
cooking function.
CANCEL/OFF
Press this pad to cancel ALL oven
programs except the clock and timer.
BACK
Press this pad to step back one or more
levels in the program process, such as
when entering custom recipes.
HELP
Press this pad to find out more about
your oven’s features.
POWER/TEMP
During cooking, press this pad and turn/
press the selector dial to change the
microwave power level, the convection
bake temperature or the speedcook
temperature by adjusting the upper and
lower lamp and heater settings.
OPTIONS
Press this pad to set the Clock and
access the Beeper Volume, Display
Scroll Speed, Delay Start and
Reminder features.

Advantium Quick Start
Built-In Advantium Oven
Set the
clock
When you first plug in the oven or after
a power outage:
1. Turn the selector dial to set the hour.
Press the dial to enter.
2. Turn the dial to set the minute. Press
the dial to enter.
3. Turn the dial to select AM or PM.
Press the dial to enter.
To change the time:
1. Press the OPTIONS pad.
2. Turn the dial to SET CLOCK.
Press the dial to enter and follow
the display directions to set.
The clock is designed to turn off when
unit is idle for 30 seconds to minimize
the standby power usage. The clock will
turn on when unit is in use or door is
opened. There is not an override option
available based on the DOE energy
requirements.
Begin speedcooking
1. Press the SPEEDCOOK pad.
2. Turn the dial to FOOD MENU. Press
the dial to enter.
3. Turn the dial to select the type of
food category you want. Press the
dial to enter it.
4. Turn the dial to select the specific
food. Press the dial to enter it.
5. Turn the dial to select the amount,
size, and/or doneness (if required,
the oven will prompt you). Press the
dial after each selection.
6. Once the display shows
ADJUST TIME OR START, either
press the dial or start pad to start
cooking.
Ŷ Press CANCEL/OFF at any time to
stop cooking.
Microwaving
with Express
Press EXPRESS repeatedly for
30-second increments of microwave
cooking time.
The oven starts immediately.
The turntable must
always be in place when
using the oven.
Put food directly on the
non-stick metal tray
to speedcook.
The turntable must
always be in place when
using the oven.
The clear glass tray
should always be in place
when microwaving.
12

13
Speedcooking
Built-In Advantium Oven
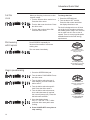
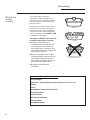
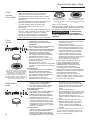
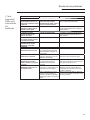
Cooking tips
for great
tasting results
To ensure consistent and even
browning when cooking foods directly
on the non-stick metal tray, arrange
food as shown below.
Foods can touch but should not
overlap.
Circular pattern
(Example: biscuits, cookies)
Spoke pattern
(Example: crescent rolls, breadsticks)
Single layer
(Example: appetizers)
Side by side pattern
(Example: meats and poultry)
Fresh meat, chicken, fish or seafood that has been frozen should be thawed
before cooking (the microwave defrost feature can be used). For other frozen
prepackaged foods, follow package directions.
Speedcook
cookware
Ŷ Follow cookware suggestions on the
oven display or in the Cookbook or
Cooking guide.
Ŷ Cookware will become hot because
of heat transferred from the heated
food. Oven mitts will be needed to
handle the cookware.
Ŷ Place food directly on the non-
stick metal tray when cooking,
unless prompted by the oven to do
otherwise.
Ŷ Use the non-stick metal tray in the
same way you would use a shallow
baking pan or baking tray.
Ŷ ,QDGGLWLRQWRWKHFRRNZDUHSURYLGHG
you can use non-metal casserole
dishes, pie plates and other heat-
safe cookware. Place them directly
on the turntable.
Ŷ Be sure to select a size that will
rotate easily.
Ŷ Place the non-stick metal tray on
the turntable. Place glass or ceramic
cookware on the tray.
Ŷ 'RQRWXVHFRRNZDUHRUFRYHULQJV
made of paper, plastic, or foil when
cooking during a speedcook cycle.

14
Speedcook Menu Guide
Built-In Advantium Oven
Display
prompts
1. Turn the dial until FOOD
MENU appears. Press
the dial to enter.
2. Turn the dial until
POULTRY appears.
Press the dial to enter.
3. Turn the dial until
CHICKEN, BONELESS
appears.Press the dial to
enter.
4. Turn the dial to
Select SIZE: MEDIUM
(7–9 oz each) Press the
dial to enter.
5. Turn the dial to Select
amount: 1–2 pieces
Press the dial to enter.
6. Use NON-STICK
METAL TRAY is
displayed.
NOTE: When
speedcooking, use the
non-stick metal tray.
After pressing the SPEEDCOOK
pad, the oven will prompt you to
make several selections, such as the
example below.
Pre-set
speedcook
menu
selections
Ŷ $IWHUDFRRNLQJF\FOHKDVEHHQ
completed, use the Resume feature
to cook for additional time.
Ŷ 7RUHYLHZVHWWLQJVGXULQJFRRNLQJ
press the selector dial.
Food Category Menu Selection
Appetizers Bagel Bites
Cheese Sticks
Egg Rolls (Frozen)
Hot Dip (2–4 Cups)
Jalapeno Poppers
Meat Balls (Frozen)
Nachos
Nuts Roasted
Onion Rings
Pizza Rolls
Soft Pretzels (Frozen)
Breads Bagels (frozen)
Biscuits
Bread Sticks
Cheese Bread
Crescent Rolls
Dinner Rolls
Garlic Bread
Quick Bread (9x5)
Sweet Rolls/Danish
Taco Shells (boxed)
Texas Toast
Breakfast Bagels (frozen)
Belgian Waffles
Breakfast Pizza
Casserole (egg 7x11)
Coffee Cake
French Toast
Pancakes (frozen)
Hashbrown Patties
Rolls (refrigerated)
Sausage Biscuit
Sausage
Strudel (frozen)
Sweet Rolls/Danish
Turnovers
Waffles (frozen)
Desserts Brownies
Cakes (mix 9x13)
Cobbler (fresh 7x11)
Coffee Cake
Cookies
Pie (fresh fruit)
Rolls (refrigerated)
Turnovers
Entree Burritos (frozen)
Chimichanga
Casserole
Egg Rolls (frozen)
Enchilada (fresh)
Lasagna
Meatloaf (9x5)
Quesidillas (fresh)
Stuffed Peppers (6)
Food Category Menu Selection
Meats Filet Mignon
Hamburger
Lamb Chops
Pork Chops
Roast – Pork
Roast – Beef
Ribeye Steak
Sirloin Steak
Strip Steak
T-Bone Steak
Tenderloin
Pizza Deli/Fresh
Use Precooked Crust
Frozen Pizza
Potatoes Baked Potato
Hashbrown Patties
Frozen Fries
Frozen Nugget
Sweet Potato/Yam
Poultry Chicken, Bone-In
Chicken, Boneless
Chicken Fillet (frozen)
Chicken Finger (frozen)
Chicken, Fried (frozen)
Chicken Nugget (frozen)
Chicken Patty (frozen)
Chicken Tender (frozen)
Chicken Wings (frozen)
Chicken, Whole
Turkey
Sandwich Corn Dog (frozen)
Crescent Roll Hot Dog
Grilled Sandwich
Hot Dog in a Bun
Pocket Sandwich
Taquitos (frozen)
Seafood Cod Fillets
Fish Sticks (frozen)
Frozen Breaded
Lobster Tails
Orange Roughy Fillet
Salmon
Sea Bass
Shellfish
Swordfish Steak
Tilapia
Tuna Steaks
Whitefish
Side Dish Refried Beans (16 oz)
Roasted Asparagus
Roasted Bell Pepper
Roasted Chilis (6)
Roasted Corn
Roasted Garlic
Roasted Mixed Vegetables
Stuffing (mix)
Stuffed Mushrooms
Stuffed Tomatoes

Built-In Advantium Oven
Speedcooking
Advantium is already pre-set to cook
over 175 popular dishes.
1. Press the speedcook pad.
If no selection is made within 15
seconds, the display will return to
blank.
2. Turn the selector dial to select the
type of food category you want.
Press the dial to enter.
3. Turn the selector dial to select the
specific food (menu selection). Press
the dial to enter.
4. Turn the selector dial to select
amount, size, and/or doneness (if
required, the oven will prompt you).
Press the dial after each selection.
5. Once the display shows:
ADJUST TIME or START either
press start or the selector dial to
start cooking.
Turn the food over when the oven
signals TURN FOOD OVER (for certain
foods).
When the oven signals CHECK for
DONENESS, check to see if your food
is done to your liking (for certain foods).
To review settings during cooking, press
the selector dial.
If you enter an undesired selection at
any time, simply press the BACK pad
and re-enter the desired selections.
Using
speedcook
features
WARNING
When using speedcook programs, remember that the oven, door and
dishes will be very hot!
The turntable must always be in
place when using the oven.
Put food directly on the non-
stick metal tray to speedcook.
SPEEDCOOK PRE-SET FOOD SELECTIONS:
ŶAppetizers ŶDesserts ŶPizza ŶSandwich
ŶBreads ŶEntrees ŶPotatoes ŶSeafood
ŶBreakfast ŶMeats ŶPoultry ŶSide Dish
To use a pre-
set speedcook
menu
Ŷ Early in a speedcook program, you will see OPTIMIZING
COOK TIME on the display. The oven automatically
senses the electrical voltage level in your home and
adjusts the cooking time up or down for proper cooking.
Ŷ If the door is opened during cooking, the oven will stop
and PAUSE will appear in the display. Close the door
and press the START/PAUSE pad to resume cooking.
Ŷ At anytime during cooking you can turn the selector dial
to change the cooking time. You can change power
levels by pressing POWER/TEMP.
Ŷ To assure consistent cooking results, the oven may
adjust power levels downward if the oven is hot at the
beginning of a program.
Ŷ At the end of cooking, the automatic fan may continue to
run for a short time to cool internal components.
Ŷ To cook for additional time after a cooking cycle has
been completed, use the resume feature.
3ULRUWRWKH¿UVWXVHRI\RXURYHQWKHFORFNPXVWEHVHW6HHWKH$GYDQWLXP4XLFN
Start section.
Before you begin, make sure the turntable is in place. Use the non-stick metal tray and
your own glass or ceramic cookware, if needed.
15

Speedcooking
Built-In Advantium Oven
Speedcook
power level
Advantium uses power from a high
intensity halogen light, ceramic heaters,
and microwaves to cook food from the
top, bottom, and interior simultaneously
to seal in moisture and flavor.
When using the pre-set speedcook
recipes on the food menu, the power
levels are already selected for you.
However, these power levels can be
adjusted before or during cooking. See
POWER/TEMP in the Cooking Controls
section. The custom speedcook feature
allows you to speedcook items not on
the pre-set food menu by selecting your
own cook time and power level settings.
Each power level gives you heater
power and microwave energy for a
certain percentage of the time.
UPPER POWER (U) controls both the
upper heater and microwave power.
A higher UPPER POWER setting
will utilize more upper heater power,
browning food faster on top. A lower
UPPER POWER setting utilizes more
microwave power, causing food to cook
more evenly throughout.
Select a higher setting for foods such as
pizza and baked goods. Select a lower
setting for foods such as casseroles,
meat and fish.
LOWER POWER (L) controls the lower
heater.
Select a higher setting to brown foods
more on the bottom. Select a lower
setting for less browning on the bottom.
1. Press the SPEEDCOOK pad
and turn the dial to select FOOD
MENU or FAVORITE RECIPE, or
press CUSTOM SPEEDCOOK to
manually set power level and timer.
Press the dial to enter.
2. Turn the dial to select a food, time or
power level as prompted. Press the
dial to enter.
3. To change the power level when
prompted by the display, turn
the dial clockwise to increase or
counterclockwise to decrease the
upper power level. Press the dial to
enter.
4. Microwave levels are set
automatically based on the upper
and lower lamp settings.
5. Press the START/PAUSE pad or the
selector dial to start cooking.
If you do not want to change one of the
settings, just press the dial to move to
the next selection.
NOTE: Be careful when adjusting
power levels so that you do not over- or
undercook food.
U = Select a higher setting for thin
foods requiring a golden brown
top (example: fish fillets, toast,
boneless chicken breasts). Select
a lower setting for thicker foods
and foods with high sugar or fat
content (example: cakes, roasts).
L = Select a higher setting for thick
or dense foods that may not cook
quickly in the center (example:
casseroles). Select a lower setting
for thin foods (example: cookies)
and foods containing high fat or
sugar content (example: pastry,
cakes).
Follow these general guidelines when selecting the best U= and L= settings for
your favorite recipes:
16
Speedcook
power level
tips

17
Speedcooking
Built-In Advantium Oven
Custom
speedcook
Advantium gives you the flexibility to
cook your favorite dishes.
If you want to cook a food item that is
not among the pre-set selections, use
custom speedcook.
1. Press the CUSTOM SPEEDCOOK
pad.
If no entries are made within 15
seconds, the display will return to blank.
2. Turn the selector dial to select the
cooking time. Press the dial to enter.
The display will prompt you to select
the power level(s).
3. Turn the dial clockwise to increase
or counterclockwise to decrease the
upper power level. Press the dial to
enter.
4. Turn the dial to change the lower
power level. Press the dial to enter.
5. Press the START/PAUSE pad
or press the selector dial to start
cooking.
For power level and cooking time
suggestions, use your cooking guide
or cook book.
Repeat last
1. Press and hold the SPEEDCOOK
pad for 3 seconds.
2. The last pre-set food will be
displayed.
3. Press the START/PAUSE pad or the
selector dial to start cooking.
Use this time saving feature for cooking
repetitive items like cookies
or appetizers.
NOTE: The last program used is stored
for two hours.
Resume
feature
1. If your food needs to cook a bit
longer, you can restart the oven by
pressing the START/PAUSE pad or
selector dial.
2. RESUME COOKING will be
displayed and the oven will restart
immediately at 10% of the original
time.
The program stays in memory for 10
minutes. After that you will need to
begin the program again. See To use a
pre-set speedcook menu.

Speedcooking
Built-In Advantium Oven
Favorite
recipe—
to enter
and save
Add and save up to 30 of your own
Speedcook or microwave recipes,
or pre-set Speedcook menu recipes
as a favorite recipe. Once it’s done,
you can quickly recall your favorite
so that your food cooks just the way
you want it every time!
1. Press the FAVORITE RECIPE or
the SPEEDCOOK pad.
2. Turn the dial until FAVORITE
RECIPE appears. Press the dial
to enter. (Skip this step if the
FAVORITE RECIPE pad was
pressed in step 1.)
3. Turn the dial until ADD RECIPE
appears. Press the dial to enter.
4. Turn the dial to COPY SPEED
RECIPE or to ADD NEW RECIPE.
Press the dial to enter.
If COPY SPEED RECIPE was
selected, turn dial to food type(s)
and press the FAVORITE RECIPE
pad to enter and save the recipe.
If ADD NEW RECIPE was selected,
turn the dial to select SPEEDCOOK
or MICROWAVE recipe. Press
the dial to enter and continue with
these steps.
5. SELECT COOK TIME appears.
Turn the dial to select the cooking
time. Press the dial to enter.
The display will prompt you to select the
power level(s).
6. Turn the dial clockwise to increase
or counterclockwise to decrease the
power level(s). Press the dial
to enter.
For power level and cooking time
suggestions, use your cooking guide
or cook book.
7. SPELL THE FOOD NAME appears.
Turn the dial to the first letter of your
food description and press the dial to
enter. Continue this process to spell
the rest of the food name. Press
the START/PAUSE pad to save the
recipe and its name.
To find and use stored favorite recipes:
1. Press the FAVORITE RECIPE or
the SPEEDCOOK pad.
2. Turn the dial until FAVORITE
RECIPE appears. Press the dial
to enter.
3. Turn dial to USE FAVORITE
RECIPE and press to enter.
4. The recipe names you entered will
appear.
5. Turn dial until the recipe you want
is displayed and press the dial to
enter.
6. Press the START/PAUSE pad
or press the selector dial to start
cooking.
Favorite
recipe—
to find
and use
18

19
Speedcooking
Built-In Advantium Oven
Favorite
recipe—
to adjust
or change
To adjust or change stored custom
speedcook recipes:
1. Press the FAVORITE RECIPE or
the SPEEDCOOK pad.
2. Turn the dial until FAVORITE
RECIPE appears. Press the dial to
enter.
3. Turn the dial until EDIT RECIPE
appears. Press the dial to enter.
4. Turn the dial to the recipe you want
to change. Press the dial to enter.
Current settings appear.
5. Press the dial to edit.
6. The display will prompt you to
select the power level(s) and edit
the name. Turn the dial and press
to enter the appropriate settings.
For power level and cooking time
suggestions, use your cooking guide or
cook book.
To delete stored custom speedcook
recipes:
1. Press the FAVORITE RECIPE or
the SPEEDCOOK pad.
2. Turn the dial until FAVORITE
RECIPE appears. Press the dial to
enter.
3. Turn the dial until DELETE RECIPE
appears and press the dial to enter.
4. Turn dial to the recipe you want to
delete and press the dial to enter.
Favorite
recipe—
to delete
Things that
are normal
Cooking Times
Ŷ :KHQVSHHGFRRNLQJSUHSURJUDPPHGIRRGV
you may see OPTIMIZING COOK TIME in
the display several seconds after you press
START/PAUSE. The oven automatically
senses the electrical voltage level in your
home and adjusts the cooking time up or
down for proper cooking.
Fan/Vent
Ŷ 7KHIDQZLOOEHRQGXULQJFRRNLQJ$WWKHHQG
of cooking, the automatic fan may continue to
run for a short time, and the display will read
Oven is Cooling. The fan will automatically
shut off when the internal parts of the oven
have cooled.
Ŷ 7KHRYHQYHQWZLOOHPLWZDUPDLUZKLOHWKH
oven is on.
Lights
Ŷ :KHQWKHRYHQLVRQOLJKWPD\EHYLVLEOH
around the door or outer case.
Ŷ 7KHKDORJHQOLJKWVZLOOGLPDQGF\FOHRQDQG
off during a speedcook cycle, sometimes
even at full power levels. This is normal.
The oven senses the heat level and adjusts
automatically.
Oven Heat
Ŷ 1RSUHKHDWLQJWLPHLVUHTXLUHGGXULQJ
Speedcook cycles. The oven begins cooking
immediately.
Ŷ 7KHGRRUDQGLQVLGHRIWKHRYHQZLOOEHYHU\
hot. Use caution when opening the door and
removing food.
Ŷ 'RQRWXVHFRRNZDUHRUFRYHULQJVPDGHRI
paper, plastic, or foil when cooking during a
speedcook cycle.
Ŷ :KHQFRRNLQJIRUDQH[WHQGHGSHULRGRIWLPH
the oven may automatically reduce the power
levels to maintain the appropriate level of
oven heat.
Sounds
Ŷ &OLFNVDQGDIDQEORZLQJDUHQRUPDOVRXQGV
during cooking. The relay board is turning
components on and off.

Baking, Broiling and Toasting
Built-In Advantium Oven
1. Press the CONV BAKE/BROIL pad.
2. Press the dial to select BAKE.
3. Turn the dial to set the oven
temperature and press to enter.
To bypass preheating:
1. When the prompt shows PREHEAT
THE OVEN? turn the dial to NO. Press
the dial or press START/PAUSE to
begin cooking.
2.
Place the food in the oven, turn the dial
to set the cook time and press to enter.
The oven starts cooking immediately.
When cooking is complete, the oven
will signal and turn off.
To preheat:
1. When the prompt shows PREHEAT
THE OVEN? turn the dial to YES.
Press the dial or press START/PAUSE
to begin cooking.
The oven starts preheating
immediately. Do not place the food
in the oven. (You will be prompted to
enter the cook time, after the oven is
preheated.)
2. When the oven is finished preheating,
it will signal. If you do not open the
door within 1 hour, the oven will turn off
automatically. Open the oven door and,
using caution, place the food in the
oven.
3.
Close the oven door. Turn the dial to set
the cook time and press to enter and start
cooking. When cooking is complete, the
oven will signal and turn off.
You may change the oven temperature
during preheating by pressing the
POWER/TEMP pad and turning the dial to
select the new temperature.
If the oven door is opened during cooking,
PAUSE will appear in the display. Close
the door and press START/PAUSE.
Cook times are shown in minutes and can
be a maximum of 179 minutes. Time can be
changed during cooking by turning the dial.
1. Press the CONV BAKE/BROIL pad.
2. Turn the dial to BROIL or TOAST and
press to enter.
To bypass preheating:
1. When the prompt shows PREHEAT
THE OVEN? turn the dial to NO. Press
the dial or press START/PAUSE to
begin cooking.
2. Place the food in the oven, turn the dial
to set the cook time and press to enter.
Press the dial to start cooking. When
cooking is complete, the oven will
signal and turn off.
To preheat:
1. When the prompt shows PREHEAT
THE OVEN? turn the dial to YES.
Press the dial or press START/PAUSE
to begin cooking.
The oven starts preheating
immediately. Do not place the food
in the oven. (You will be prompted to
enter the cook time, after the oven is
preheated.)
2. When the oven is finished preheating,
it will signal. If you do not open the
door within 1 hour, the oven will turn
off automatically. Open the oven door
and, using caution, place the food in
the oven.
3. Close the oven door. Turn the dial to set
the cook time and press to enter and
start cooking. When cooking is complete,
the oven will signal and turn off.
If the oven door is opened during cooking,
PAUSE will appear in the display. Close
the door and press START/PAUSE.
How to
Bake
How to Broil
or Toast
Baking,
Broiling and
Toasting
Baking allows you to cook foods the same way
as a conventional oven, using a heating element
to raise the temperature of the air inside the
oven. Any oven temperature from 250°F to
450°F may be set.
Broiling allows you to broil foods in the same
way as a conventional oven.
Toasting allows you to toast foods the same way
as a conventional oven.
A fan gently circulates heated air throughout
the oven, over and around the food. Because
the heated air is kept constantly moving, not
permitting a layer of cooler air to develop around
the food, some foods cook slightly faster than in
regular oven cooking.
Before you begin, make sure the turntable is in
place. Use the non-stick metal tray at all times
when baking.
WARNING
When baking, remember
that the oven, door and
dishes will be very hot!
The turntable must
always be in place when
using the oven.
Put food or oven-safe
cookware directly on the non-
stick metal tray to bake.
For two-level baking, place food in a
metal baking dish or directly on the non-
stick metal tray. Place the aluminum
baking sheet or your baking dish with
food on top of the wire rack. Stand the
rack with food on the metal tray.
20
Page is loading ...
Page is loading ...
Page is loading ...
Page is loading ...
Page is loading ...
Page is loading ...
Page is loading ...
Page is loading ...
Page is loading ...
Page is loading ...
Page is loading ...
Page is loading ...
Page is loading ...
Page is loading ...
Page is loading ...
Page is loading ...
Page is loading ...
Page is loading ...
Page is loading ...
Page is loading ...
Page is loading ...
Page is loading ...
Page is loading ...
Page is loading ...
Page is loading ...
Page is loading ...
Page is loading ...
Page is loading ...
Page is loading ...
Page is loading ...
Page is loading ...
Page is loading ...
Page is loading ...
Page is loading ...
Page is loading ...
Page is loading ...
Page is loading ...
Page is loading ...
Page is loading ...
Page is loading ...
Page is loading ...
Page is loading ...
Page is loading ...
Page is loading ...
Page is loading ...
Page is loading ...
Page is loading ...
Page is loading ...
Page is loading ...
Page is loading ...
Page is loading ...
Page is loading ...
-
 1
1
-
 2
2
-
 3
3
-
 4
4
-
 5
5
-
 6
6
-
 7
7
-
 8
8
-
 9
9
-
 10
10
-
 11
11
-
 12
12
-
 13
13
-
 14
14
-
 15
15
-
 16
16
-
 17
17
-
 18
18
-
 19
19
-
 20
20
-
 21
21
-
 22
22
-
 23
23
-
 24
24
-
 25
25
-
 26
26
-
 27
27
-
 28
28
-
 29
29
-
 30
30
-
 31
31
-
 32
32
-
 33
33
-
 34
34
-
 35
35
-
 36
36
-
 37
37
-
 38
38
-
 39
39
-
 40
40
-
 41
41
-
 42
42
-
 43
43
-
 44
44
-
 45
45
-
 46
46
-
 47
47
-
 48
48
-
 49
49
-
 50
50
-
 51
51
-
 52
52
-
 53
53
-
 54
54
-
 55
55
-
 56
56
-
 57
57
-
 58
58
-
 59
59
-
 60
60
-
 61
61
-
 62
62
-
 63
63
-
 64
64
-
 65
65
-
 66
66
-
 67
67
-
 68
68
-
 69
69
-
 70
70
-
 71
71
-
 72
72


GE ZSC1001JSS Owner's manual
- Category
- Microwaves
- Type
- Owner's manual
- This manual is also suitable for
Ask a question and I''ll find the answer in the document
Finding information in a document is now easier with AI
in other languages
Related papers
Other documents
-
Monogram ZSA1201JSS Owner's manual
-
 Cafe CSB9120SJSS User manual
-
 Cafe CSB9120SJSS Owner's manual
-
 GE Monogram ZSA1201JSS DL 9b8430882c908479613ccc1b5f9a
-
 GE Monogram ZSC2202JSS Owner's manual
-
-
-
-
Monogram Advantium Built-In Wall Oven 240V Owner's manual
-
 Kenmore Elite 36363692301 Owner's manual


