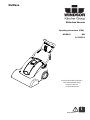
Windsor NuWave Owner's manual
- Category
- Vacuum cleaners
- Type
- Owner's manual

86400820-A 07/24/15
NuWave
Wide Area Vacuum
Operating instructions (ENG)
MODELS: NW
1.012-533.0
From Serial Number (Ref No1*)
*See Serial Number Page
in Spare Parts List
or call manufacturer

2
Warranty Registration
Thank you for purchasing a Kärcher North America product. Warranty registration is quick
and easy. Your registration will allow us to serve you better over the lifetime of the product.
To register your product go to :
http://warranty.karcherna.com/
For customer assistance:
1-800-444-7654
86400820 Operators Manual - NuWave
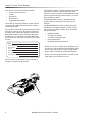
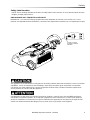
Machine Data Label
Overview
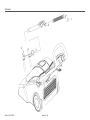
The NuWave™ is a electric motor powered, wide area vacuum intended for commercial use. The NuWave™
brushes and vacuums debris from carpeted surfaces and stores the collected debris in vacuum bags.

3
Table of Contents
Machine Data Label. . . . . . . . . . . . . . . . . . . . . . . . 2
Overview. . . . . . . . . . . . . . . . . . . . . . . . . . . . . . . . 2
Table of Contents . . . . . . . . . . . . . . . . . . . . . . . . . 3
How To Use This Manual . . . . . . . . . . . . . . . . . . . 4
Safety
IMPORTANT SAFETY INSTRUCTIONS . . . . . . . 5
CONSIGNES DE SÉCURITÉ IMPORTANTES . . 6
HAZARD INTENSITY LEVEL. . . . . . . . . . . . . . . . 7
NIVEAU D'INTENSITÉ DU DANGER. . . . . . . . . . 8
Safety Label Location . . . . . . . . . . . . . . . . . . . . . . 9
Grounding Instructions . . . . . . . . . . . . . . . . . . . . 10
Operations
Technical Specifications . . . . . . . . . . . . . . . . . . . 11
Controls & Components . . . . . . . . . . . . . . . . . . . 12
Set Up. . . . . . . . . . . . . . . . . . . . . . . . . . . . . . . . . 14
Cleaning Route. . . . . . . . . . . . . . . . . . . . . . . . . . 15
How this Machine Operates . . . . . . . . . . . . . . . . 15
Maintenance
Components . . . . . . . . . . . . . . . . . . . . . . . . . . . . 16
Brush Deck . . . . . . . . . . . . . . . . . . . . . . . . . . . . . 17
Brush Replacement . . . . . . . . . . . . . . . . . . . . . . 17
Belt Replacement . . . . . . . . . . . . . . . . . . . . . . . . 18
Remove Vac Motor And Filters. . . . . . . . . . . . . . 20
Daily Maintenance . . . . . . . . . . . . . . . . . . . . . . . 21
Regular/periodic Maintenance . . . . . . . . . . . . . . 21
Service Schedule . . . . . . . . . . . . . . . . . . . . . . . . 22
Suggested Spare Parts. . . . . . . . . . . . . . . . . . . . 23
86400820 Operators Manual - NuWave

4
How To Use This Manual
This manual contains the following sections:
• How to Use This Manual
•Safety
• Operations
• Maintenance
• Suggested Spare Parts
The HOW TO USE THIS MANUAL section will tell
you how to find important information for ordering
correct repair parts.
Parts may be ordered from authorized dealers. When
placing an order for parts, the machine model and
machine serial number are important. Refer to the
MACHINE DATA box which is filled out during the
installation of your machine. The MACHINE DATA
box is located on the inside of the front cover of this
manual.
The model and serial number of your machine is
located on the back of the machine.
The SAFETY section contains important information
regarding hazardous or unsafe practices of the
machine. Levels of hazards are identified that could
result in product damage, personal injury, or severe
injury resulting in death.
The OPERATIONS section is to familiarize the
operator with the operation and function of the
machine.
The MAINTENANCE section contains preventive
maintenance to keep the machine and its compo-
nents in good working condition. They are listed in
this general order:
• Belt/Brush Motor
• Vac Motor and Filters
• Vac Motor Carbon Brushes
• Daily Maintenance
• Regular/Periodic Maintenance
NOTE: If a service or option kit is installed on your
machine, be sure to keep the KIT INSTRUCTIONS
which came with the kit. It contains replacement
parts numbers needed for ordering future parts.
NOTE: The manual part number is located on the
lower right corner of the front cover.
Model:
Date of Purchase:
Serial Number:
Dealer:
Address:
Phone Number:
Sales Representative:
86400820 Operators Manual - NuWave

5
Safety
IMPORTANT SAFETY INSTRUCTIONS
When using this machine, basic precaution
must always be followed, including the following:
READ ALL INSTRUCTIONS BEFORE USING THIS MACHINE.
To reduce the risk of fire, electric shock, or injury:
Use only indoors. Do not use outdoors or expose to rain. This machine is for dry use only.
Use only as described in this manual. Use only manufacturer's recommended components and attachments.
If the machine is not working properly, has been dropped, damaged, left outdoors, or dropped into water, return
it to an authorized service center.
Do not operate the machine with any openings blocked. Keep openings free of debris that may reduce airflow.
This machine is not suitable for picking up hazardous dust.
Do not operate this machine near flammable fluids, dust or vapors.
This machine is suitable for commercial use, for example in hotels, schools, hospitals, factories, shops and
offices for more than normal housekeeping purposes.
Maintenance and repairs must be done by qualified personnel.
During operation, attention shall be paid to other persons, especially children.
When the machine is left unattended, ensure that it does not accidentally move.
The machine shall only be operated by instructed and authorized persons.
Do not handle the plug or machine with wet hands.
Do not unplug machine by pulling on cord. To unplug, grasp the plug, not the cord.
Do not use with damaged cord or plug. Follow all instructions in this manual concerning grounding the machine.
Do not pull or carry by cord, use cord as a handle, close a door on cord, or pull cord around sharp edges or
corners.
Do not pull/run machine over cord. Keep cord away from heated surfaces.
Do not use to pick up flammable or combustible liquids, such as gasoline, or use in areas where the maybe
present.
Do not operate without dust bag and filter in place.
Do not pick up anything that is burning or smoking, such as cigarettes, matches, or hot ashes.
Connect to a properly grounded outlet. See Grounding Instructions.
READ AND SAVE THESE INSTRUCTIONS
86400820 Operators Manual - NuWave

6
Safety
CONSIGNES DE SÉCURITÉ IMPORTANTES
Lors de l'utilisation de cette machine, des précautions de base
doivent toujours être prises, y compris les précautions suivantes :
LIRE TOUTES LES INSTRUCTIONS AVANT D'UTILISER CETTE MACHINE.
Pour réduire le risque d'incendie, d'électrocution ou de
blessure :
N’utiliser cette machine qu’en intérieur. Ne jamais l’utiliser à l’extérieur ou dans la pluie.
N’utiliser cette machine que comme décrit dans le présent manuel. N’utiliser que les composants et les acces-
soires conseillés par le fabricant.
Lorsque la machine ne fonctionnant pas correctement, a fait l’objet d’une chute ou d’une détérioration, a été
laissée à l’extérieur, est tombée dans l’eau, la retourner au centre de service agréé.
Ne pas opérer la machine lorsque les conduits de ventilation sont bloquées. Débarrasser les débris des
conduits, car ils peuvent réduire l’écoulement d’air.
Cette machine n’est pas adaptée au ramassage de poussières dangereuses.
Ne pas l’utiliser près de liquides, de poussières ou de vapeurs inflammables.
Cette machine est destinée à un usage commercial. Elle est recommandée davantage pour les domaines
hôtelier, scolaire, hospitalier, industriel ou pour les bureaux, les chaînes de magasin, que pour un usage domes-
tique normal.
L’entretien et les réparations de la machine doivent être effectuées par un personnel qualifié.
Durant la manoeuvre de la machine, prendre garde aux personnes environnantes et notamment aux enfants.
Lorsque la machine est laissée sans surveillance, s’assurer qu’elle ne se déplace pas de manière acciden-
telle.
Cette machine ne doit être manoeuvrée que par un personnel expérimenté et qualifié.
Lorsque la machine est laissée sans surveillance, la mettre hors tension ou verrouiller l’interrupteur principal
afin d’empêcher un emploi non autorisé.
Ne pas toucher la fiche ou l’appareil lorsque vos mains sont humides.
Ne pas débrancher en tirant sur le cordon. Tirer plutôt la fiche.
Ne pas utiliser si le cordon ou la fiche est endommagé
Ne pas tirer soulever ou traîner l’appareil par le cordon. Ne pas utiliser le cordon comme une poignée, le
coincer dans l’embrasure d’unée porte ou l’appuyer contre des arêtes vives ou des coins.
Ne pas faire rouler l’appareil sur le cordon. Garder le cordon à l’écart des surfaces chaudes.
Ne pas utiliser pour ramasser des liquides inflammables ou combustibles, tels que l'essence ; ne pas utiliser
dans les zones où ceux-ci peuvent être présents.
Ne pas utiliser sans sac à poussière et filtre en place.
Ne pas ramasser quelque chose qui brûle ou fume,comme des cigarettes, des allumettes ou des cendres
chaudes.
Cet appareil ne doit être connecter qu a des prises ayant une sortie de terre. Se reporter aux instructions de
mise à la terre.
LIRE ET CONSERVER CES INSTRUCTIONS
86400820 Operators Manual - NuWave

7
Safety
The following symbols are used throughout this guide as indicated in their descriptions:
HAZARD INTENSITY LEVEL
There are three levels of hazard intensity identified by signal words -WARNING and CAUTION and FOR
SAFETY. The level of hazard intensity is determined by the following definitions:
WARNING - Hazards or unsafe practices which COULD result in severe personal injury or death.
CAUTION - Hazards or unsafe practices which could result in minor personal injury or product or property
damage.
FOR SAFETY: To Identify actions which must be followed for safe operation of equipment.
Report machine damage or faulty operation immediately. Do not use the machine if it is not in proper operating
condition. Following is information that signals some potentially dangerous conditions to the operator or the
equipment. Read this information carefully. Know when these conditions can exist. Locate all safety devices on
the machine. Please take the necessary steps to train the machine operating personnel.
FOR SAFETY:
DO NOT OPERATE MACHINE:
Unless Trained and Authorized.
Unless Operation Guide is Read and understood.
In Flammable or Explosive areas.
In areas with possible falling objects
WHEN SERVICING MACHINE:
Avoid moving parts. Do not wear loose clothing; jackets, shirts, or sleeves when working on the machine. Use
manufacturer approved replacement parts.
86400820 Operators Manual - NuWave

8
Safety
Les symboles suivants sont utilisés dans tout ce manuel, tels que décrits ici :
NIVEAU D'INTENSITÉ DU DANGER
Il existe trois niveaux d'intensité du danger, identifiés par des termes d'avertissement - AVERTISSEMENT,
ATTENTION et POUR VOTRE SÉCURITÉ. Le niveau d'intensité du danger est déterminé par les définitions
suivantes :
AVERTISSEMENT - Les dangers ou des pratiques contraires à la sécurité qui POURRAIENT entraîner des
blessures personnelles ou la mort.
ATTENTION - Les dangers ou des pratiques contraires à la sécurité qui pourraient entraîner des blessures
personnelles légères ou des dégâts sur le produit ou d'autres biens.
POUR DES RAISONS DE SÉCURITÉ : Pour identifier les actions qui doivent être exécutées pour un
fonctionnement sûr de l'équipement.
Signaler immédiatement tout dommage subi par la machine ou fonctionnement défectueux. Ne pas utiliser la
machine si elle ne fonctionne pas correctement. Ci-dessous se trouvent les informations indiquant les condi-
tions potentiellement dangereuses pour l'opérateur ou l'équipement. Lire attentivement ces informations. Être
conscient que ces conditions peuvent survenir. Repérer tous les dispositifs de sécurité sur la machine. Suivre
les étapes nécessaires de formation du personnel qui utilise la machine.
POUR DES RAISONS DE SÉCURITÉ :
NE PAS FAIRE FONCTIONNER LA MACHINE :
Sauf si le personnel est formé et autorisé.
Sauf si le manuel d'utilisation est lu et compris.
Dans des zones inflammables ou explosives.
Dans des zones contenant des objets susceptibles de tomber
LORS DE L'ENTRETIEN DE LA MACHINE :
Éviter les pièces mobiles. Ne pas porter de vêtements, vestes, chemises ou manches vagues lors de l'entretien
de la machine. Utiliser les pièces de rechange approuvées par le fabricant.
86400820 Operators Manual - NuWave

9
Safety
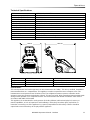
Safety Label Location
NOTE: These drawings indicate the location of safety labels on the machine. If at any time the labels become
illegible, promptly replace them.
EMPLACEMENT DE L'ÉTIQUETTE DE SÉCURITÉ
REMARQUE : Ces dessins indiquent l'emplacement des étiquettes de sécurité sur la machine. Si, à tout
moment, les étiquettes deviennent illisibles, contactez votre représentant autorisé pour un remplacement rapid
This appliance is not intended for use by persons (including children) with reduced physical, sensory or mental
capabilities, or lack of experience and knowledge, unless they have been given supervision or instruction
concerning use of the appliance by a person responsible for their safety. Children should be supervised to
ensure that they do not play with the appliance.
Cet appareil n'est pas prévu à l'usage des personnes (enfants y compris) avec des possibilités physiques,
sensorielles ou mentales réduites, ou le manque d'expérience et de connaissance, à moins qu'ils aient été
donnés la surveillance ou l'instruction au sujet de l'utilisation de l'appareil par une personne chargée de leur
sûreté. Des enfants devraient être dirigés pour s'assurer qu'ils ne jouent pas avec l'appareil.
CONTROL PANEL
README WARNING
86396530
86400820 Operators Manual - NuWave

10
Safety
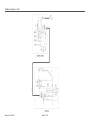
Grounding Instructions
THIS PRODUCT IS FOR COMMERCIAL USE
ONLY.
Electrical
In the USA this machine operates on a standard 15
amp 115 volt A.C. power circuit. The amp, hertz, and
voltage are listed on the data label found on each
machine. Using voltages above or below those
indicated on the data label will cause serious damage
to the motors
Extension Cords
If an extension cord is used, the wire size must be at
least one size larger than the power cord on the
machine, and must be limited to 50 feet (15.5m) in
length.
Grounding Instructions
This appliance must be grounded. If it should
malfunction or breakdown, grounding provides a path
of least resistance for electric current to reduce the
risk of electric shock. This appliance is equipped with
a cord having an equipment-grounding conductor
and grounding plug. The plug must be inserted into
an appropriate outlet that is properly installed and
grounded in accordance with all local codes and ordi-
nances.
120 Volt Models:
This appliance is for use on a nominal 120-volt circuit,
and has a grounded plug that looks like the plug illus-
trated in sketch A. A temporary adapter looks like
adapter illustrated in sketches B and C, may be used
to connect this plug to a 2-pole receptacle as shown
in sketch B if a properly grounded outlet is not avail-
able. The temporary adapter should be used only
until a properly grounded outlet (sketch A) can be
installed by a qualified electrician. The green colored
rigid ear, lug or the like extending from the adapter
must be connected to a permanent ground such as a
properly grounded outlet box cover. Whenever the
adapter is used, it must be held in place by a metal
screw.
Improper connection of the equipment-
grounding conductor can result in a risk of
electric shock. Check with a qualified electrician
or service person if you are in doubt as to
whether the outlet is properly grounded. Do not
modify the plug provided with the appliance - if it
will not fit the outlet, have a proper outlet
installed by a qualified electrician.
Une connexion non conforme du conducteur de
mise à la terre de l'appareil peut provoquer une
dé charge électrique. Consulter un électricien
qualifié ou une personne du service aprés vente
si vous suspectez que la prise de courant n'est
pas correctement mise à la terre. Ne pas modifier
la fiche fournie avec l'appareil - si elle ne rentre
pas dans la prise, faites installer une prise
apprropriée par un électricien qualifié.
86400820 Operators Manual - NuWave
GROUNDING
PIN
GROUNDED
OUTLET
ADAPTER
METAL SCREW
TAB FOR
GROUNDING SCREW
GROUNDED
OUTLET BOX
(A) (B)
(C)

11
Operations
Technical Specifications
Special Notes:
The sound pressure level at the operator's ear was measured to be 74dBA . This was a nearfield, broadband
measurement taken on a carpeted floor. This appliance contains no possible source of impact noise. The
instantaneous sound pressure level is below 63 Pa. The weighted root mean square acceleration at the
operator's arms was measured to be below 2.5m/s2. This was a tri-axial, third-octave-band measurement made
during normal operation on a composite tile floor. The measurement and related calculations were made in
accordance with ANSI S3.34-1986.
This appliance is not intended for use by persons (including children) with reduced physical, sensory or
mental capabilities, or lack of experience and knowledge, unless they have been given supervision or
instruction concerning use of the appliance by a person responsible for their safety. Children should be
supervised to ensure that they do not play with the appliance.
ITEM DIMENSION/CAPACITY
Rated Amperage (120V) 15 AMPS
Rated Amperage (230V) 7.5 AMPS
Brush Motor 0.5 HP (373 W)
Bag Capacity 792 in³ (13 L)
Brush Two 25.5 in. (647mm) by 4 in. (10 mm) diameter
Brush Speed (120 V) 1550 RPM
Brush Speed (230 V) 1350 RPM
Maximum flow rate of machine 129 cfm (61 L/sec)
Maximum suction of machine 20 inches of water ( 4.97 kPa)
Weight Empty 151 lbs (68 kg)
Tires 9.75 in. (247mm) non-marking
Frame Construction Powder coated steel
ITEM MAXIMUM STORAGE
Height 44 inches (1120 mm) 21 inches (530 mm)
Length 51.5inches (1310 mm) 33 inches (840 mm)
Width 30.5 inches (770 mm) 30.5 inches (770 mm)
WIDTH
LENGTH
86400820 Operators Manual - NuWave

12
Operations
Controls & Components
1. Main Handle
Adjust for operator comfort and storage.
2. Handle Adjustment Lever
Adjusts for operator comfort and storage.
3. Vac on/off switch.
Turns on and off vac motor.
4. Brush Motor Circuit Breaker
Protects brush motor from overheating.
5. Vac Motor Circuit Breakers
Protects the vac motors from overheating.
6. Bag Full Indicator Light
Indicates when filter bag requires replacement or
a clog in the vacuum system ducting.
1
2
86400820 Operators Manual - NuWave
4
6
3
5

13
Operations
7. Intake Filter
Filters intake air for extend vacuum motor life.
8. Filter Bag Cover
Raises to allow access to filter bag and vacuum
motors.
9. Filter Bag Basket
Locates filter bag for maximum fill efficiency and
easy changing.
10. Filter Bag
Lift out easily for service.
11. Accessory Port
Lift port to attach optional accessory hose. Brush
motor will be deactivated during accessory use.
10
9
7
8
11
86400820 Operators Manual - NuWave

14
Operations
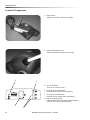
Setup
1. Take machine out of storage position by lowering
onto all four wheels.
2. Adjust handle to comfortable position at waist
level by opening adjustment lever on left side of
machine and moving handle. Lock back into
position by closing adjustment lever.
3. Install filter bag inside the main body by pushing
the rubber collar over the chute.
ADJUSTMENT
LEVER
FILTER BAG
INSTALLED
86400820 Operators Manual - NuWave

15
Operations
Cleaning Route
Accessory Port
Cord Hooks
How this Machine Operates
This machine is a portable, easy to use wide area
vacuum designed for use indoors, in a commercial or
light industrial environment.
When operating as a carpet vacuum, soil is lifted from
the carpet surface by two counter-rotating brushes
and carried into a removable bag by the vacuum
motors.
1. Large debris such as paper cups, plates, string,
etc., should be picked up before starting the
cleaning process.
2. Plan your cleaning route to work away from the
electrical source. Move machine forward at a
steady pace.
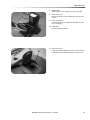
Cleaning
1. Adjust handle to comfortable position at waist
level or higher.
2. Use your finger to depress the Vacuum switch on
the control panel to activate the vacuum.
3. When using optional accessory tool, brushes will
be deactivated when accessory port is lifted.
Keep machine moving while brush engaged.
Damage to carpet could occur if not moving.
Gardez la machine en mouvement lorsque la
brosse est engagée. Sinon, des dommages
peuvent se produire au tapis.
4. Move forward or backwards at a steady pace for
thorough cleaning. Run machine more slowly
over extremely soiled areas.
5. Use the right side of the machine for edge
cleaning.
6. To keep the vacuum operating at maximum effi-
ciency, check the filter bag regularly. Use the
upper and lower access holes in basket to feel
level of fullness. Empty when 1/2 to 3/4 full.
7. When finished vacuuming, coil the cord by
wrapping around the three cord hooks provided
on the handle tubes and control panel. The upper
hook pivots for easy release of the cord.
FILTER BAG
PIVOT HOOK
86400820 Operators Manual - NuWave

16
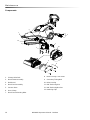
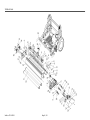
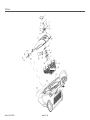
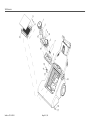
Maintenance
Components
1. Primary Drive Belt
2. Brush Motor Assembly
3. Belt Guard
4. Brush Deck Assembly
5. Vacuum Hose
6. Hose Clamp
7. Brush Deck Mounting Bolts
8. Drive Housing Cover Plate
9. Secondary Timing Belt
10. Drive Housing
11. Belt Tensioning Nut
12. Belt Tensioning Bracket
13. Retaining Clips
86400820 Operators Manual - NuWave
1
2
3
4
5
6
7
8
9
10
11
12
13

17
Maintenance
NOTE: The following service items should be
performed by an authorized service facility or
authorized service personnel. All parts referred to in
these instructions can be identified by using the
parts lists and illustrations on the following pages.
Remove machine power cord from electrical
source before making any repairs or adjustments
to the machine.
Retirez le cordon d'alimentation de la machine de
la source électrique avant de procéder à des répa-
rations ou des ajustements de la machine.
Brush Deck
The dual cylindrical brush deck is designed to effi-
ciently extract dirt from the carpet. Please note the
differences between the front/rear brushes. Installing
them in reverse position will significantly reduce the
performance of the machine. The brush part numbers
are marked on drive ends of the brush core as
follows:
8.621-612.0 - Front Brush
8.621-611.0 - Rear Brush
Brushes should be replaced as a set when bristle
length wears to height of yellow PerformAlertTM
bristles.
Brush Removal
The brushes are removed from the right side of the
machine.
1. Adjust handle into the vertical position and lock
the cam lever. Tilt machine on it's back using
handle to support it's position.
2. Pull out on the bottom of the retaining clip.
3. The brush assembly and end cap should drop
down. Then pull the brush down far enough to
clear the bottom of the housing.
4. Pull brush out with a rocking motion to free brush
from drive hub.
Bearing Cleaning
1. Remove bearing cap from end of brush.
2. Clean cap and bearings.
Brush Replacement
1. Make sure the brushes are in the correct position
(front/rear) by following the brush installation
label on the underside of the machine. Lift the
drive side of the brush and push it onto drive hub
until a positive stop is felt. The brush cannot be
installed until the brush is fully seated on the
drive hub.
2. Pull out on the bottom of the retaining clip.
3. Line up end cap with the flats to each side.
4. Slide brush up into retaining clip until it clicks in
place.
86400820 Operators Manual - NuWave
Brush PN: 8.621-611.0
Brush PN: 8.621-612.0
DRIVE END
FRONT BRUSH
REAR BRUSH
BRUSH
INSTALLATION
LABEL
RETAINING
CLIPS
Brush PN: 12543
Brush PN: 1254 0

18
Maintenance
Belt Replacement
The primary drive belt and secondary belt should be
replaced if they are damaged or broken. To
determine if a belt is damaged or broken, there will
be a noticeable drop in the performance of the
machine or the brushes will not spin when the
machine is turned on.
Primary Drive Belt Replacement
The primary drive belt is removed from the under side
of the machine.
1. Unplug power cord.
2. Adjust handle into vertical position and lock cam
lever. Tilt machine on it's back using handle to
support it's position.
3. Remove belt guard by loosening the (2)
mounting screws.
4. Remove brush motor assembly by loosening the
(4) mounting bolts.
5. Remove damaged or broken belt from drive
pulleys and replace with a new drive belt. Be
sure the grooves in the drive belt match the
grooves in the drive pulleys.
6. Install brush motor assembly with new drive belt
to the machine by using the (4) mounting bolts.
With mounting bolts in place but not fully tight-
ened, use weight of the brush motor assembly to
apply proper tension to the drive belt. Once the
belt is properly tensioned, fully tighten the
mounting bolts.
7. Attach belt guard to the frame by using the (2)
mounting screws.
8. Plug machine into a power supply and turn it on
to assure the machine is running properly.
86400820 Operators Manual - NuWave

19
Maintenance
Secondary Belt Replacement
The secondary belt can be accessed from the under
side of the machine.
1. Unplug power cord.
2. Adjust handle into the vertical position and lock
the cam lever. Tilt machine on it's back using the
handle to support it's position.
3. Remove belt guard by loosening the (2) mounting
screws.
4. Loosen the 4 mounting bolts for brush motor
assembly to relieve primary drive belt tension. Do
not fully remove the (4) mounting bolts. Remove
primary drive belt from the brush deck pulley.
5. Remove brush deck assembly by loosening the 4
mounting bolts that attach it to the linkage arms
(2) bolts on the right side and (2) on the left side).
With the brush deck assembly removed, detach
vacuum hose from the nozzle by loosening hose
clamp.
6. The secondary belt can now be accessed on the
right side of brush deck assembly by removing
the (4) screws that mount the drive housing
cover/plate.
7. Loosen nut on the belt tensioning bracket and
remove damaged/broken belt. Install new
secondary belt in the same configuration.
8. Apply tension to belt by pressing thumb tab on
belt tensioning bracket. Tighten the nut on belt
tensioning bracket until proper tension is
achieved. Test belt by spinning brushes. Brushes
should spin easily without excessive friction.
9. Replace drive housing cover/plate, reattach the
vacuum hose to nozzle, and reassemble brush
deck to machine by using the (4) mounting bolts
(2) on right side and (2) on left side.
10. Reattach primary drive belt to brush deck pulley
making sure the grooves line up properly. Apply
proper tension to primary drive belt and tighten
the (4) mounting bolts on brush motor
assembly.Reattach primary belt guard.
11. Plug machine into a power supply and turn it on
to assure the machine is running properly.
86400820 Operators Manual - NuWave

20
Maintenance
Remove Vac Motor And Filters
1. Unplug power cord.
2. Open cover.
3. Remove (6) screws from vacuum motor retaining
plate.
4. Remove (8) screws from vac motor brackets, (4)
each bracket.
5. Lift vacuum motors out of machine body.
Vacuum Motor Carbon Brushes
Replacement
If armature commutator is grooved, extremely pitted
or not concentric, the motor will need to be replaced
or sent to a qualified service center.
Important:
These brushes wear quicker as the length shortens
due to increased heat. Spring inside brush housing
will damage motor if brushes are allowed to wear
away completely.
Periodically check the length of the carbon brushes.
Replace both carbon brushes when either is less
than 3/8" (9.5mm) long.
3
8
[9.5mm]
86400820 Operators Manual - NuWave
Carbon
Brushes
Page is loading ...
Page is loading ...
Page is loading ...
Page is loading ...
Page is loading ...
Page is loading ...
Page is loading ...
Page is loading ...
Page is loading ...
Page is loading ...
Page is loading ...
Page is loading ...
Page is loading ...
Page is loading ...
Page is loading ...
Page is loading ...
Page is loading ...
Page is loading ...
Page is loading ...
Page is loading ...
Page is loading ...
Page is loading ...
Page is loading ...
Page is loading ...
Page is loading ...
Page is loading ...
Page is loading ...
Page is loading ...
Page is loading ...
Page is loading ...
-
 1
1
-
 2
2
-
 3
3
-
 4
4
-
 5
5
-
 6
6
-
 7
7
-
 8
8
-
 9
9
-
 10
10
-
 11
11
-
 12
12
-
 13
13
-
 14
14
-
 15
15
-
 16
16
-
 17
17
-
 18
18
-
 19
19
-
 20
20
-
 21
21
-
 22
22
-
 23
23
-
 24
24
-
 25
25
-
 26
26
-
 27
27
-
 28
28
-
 29
29
-
 30
30
-
 31
31
-
 32
32
-
 33
33
-
 34
34
-
 35
35
-
 36
36
-
 37
37
-
 38
38
-
 39
39
-
 40
40
-
 41
41
-
 42
42
-
 43
43
-
 44
44
-
 45
45
-
 46
46
-
 47
47
-
 48
48
-
 49
49
-
 50
50


Windsor NuWave Owner's manual
- Category
- Vacuum cleaners
- Type
- Owner's manual
Ask a question and I''ll find the answer in the document
Finding information in a document is now easier with AI
in other languages
- français: Windsor NuWave Le manuel du propriétaire
Related papers
-
Windsor NW 10125330 User manual
-
-
-
-
-
-
-
-
-
Other documents
-
SEVERIN BR7951 Datasheet
-
SEVERIN BR7953 Datasheet
-
-
SEVERIN BR7954 Datasheet
-
SEVERIN BR 7954 Datasheet
-
 Larson Electronics 1218OXMZE6G User guide
-
V7 V7N3C5E-14F-GRY Datasheet
-
Kmart 42950691 User manual
-
Canon Powershot S2 IS User manual
-
NuWave PIC Gold Manual & Complete Cookbook Owner's Manual, Recipes & Tips
