Page is loading ...

4
INHALT
Warnungen und wichtige Hinweise 2
Hinweise zur Verpackungsentsorgung 4
Gebrauch 5
Reinigung der Innenteile 5
Inbetriebnahme 5
Temperaturregelung 5
Einfrieren von frischen Lebensmitteln 5
Aufbewahrung der TiefkŸhlkost 5
EiswŸrfelbereitung 6
Auftauen 6
KŠlteakku 6
Klimadruckknopf 6
Hinweise zum richtigen KŸhlen 6
Hšhenverstellbare Abstellregale 6
Hšhenverstellung der TŸrablage 6
Tips 7
Tips fŸr das KŸhlen 7
Tips fŸr das Einfrieren 7
Tips fŸr TiefkŸhlkost 7
Wartung 8
RegelmŠ§ige Reinigung 8
Stillstandzeiten 8
Innenbeleuchtung 8
Abtauen 9
Stšrungen 9
Installation 10
Aufstellung 10
Hintere AbstandsstŸcke 10
Elektrischer Anschlu§ 10
TŸranschlagwechsel 11
Garantiebedingungen 12
HINWEISE ZUR VERPACKUNGSENTSORGUNG
Verpackungen und Packhilfsmittel unserer Elektro-
Gro§gerŠte sind mit Ausnahme von Holzwerkstoffen
recyclingfŠhig und sollen grundsŠtzlich der
Wiederverwertung zugefŸhrt werden.
Wir empfehlen Ihnen:
¥ Papier-, Pappe- und Wellpappeverpackungen
sollten in die entsprechenden SammelbehŠlter
gegeben werden.
¥ Kunststoffverpackungsteile sollten ebenfalls in
die dafŸr vorgesehenen SammelbehŠlter
gegeben werden. Solange solche in Ihrem
Wohngebiet noch nicht vorhanden sind, kšnnen
Sie diese Materialien zum HausmŸll geben.
Als Packhilfsmittel sind bei uns nur recyclingfŠhige
Kunststoffe zugelassen, z.B.:
In den Beispielen steht
PE fŸr PolyŠthylen** 02 = ^ PE-HD; 04 = ^ PE-LD
PP fŸr Polypropylen
PS fŸr Polystyrol
BESTANDTEILE AUS PLASTIK
Zur einfacheren Entsorgung und/oder Recycling ist
ein Gro§teil der Materialien dieses GerŠtes
gekennzeichnet, um ihre Identifizierung zu
ermšglichen.
PS
SAN
ABS
02**
PE
05
PP
06
PS
49
These guarantee terms are only valid for appliances purchased and used in Belgium. For exported appliances,
the user must first make sure that they satisfy the technical conditions (e.g.: voltage, frequency, installation
instructions, type of gas, etc.) for the country concerned, and that they can withstand the local climatic and
environmental conditions. For appliances purchased abroad, the user must first ensure that they meet the
qualifications required in Belgium. Non-essential or requested adjustments are not covered by the guarantee
and are not possible in all cases.
Our consumer services department is always at your disposal, even after the guarantee period has expired.
Address for our consumer services department:
ELECTROLUX HOME PRODUCTS BELGIUM
Bergensesteenweg, 719 Ð 1502 LEMBEEK
TeŽl. 02.3630444
Reinigung der Innenteile
Bevor Sie das GerŠt in Betrieb nehmen, beseitigen
Sie den typischen ÇNeugeruchÈ am besten durch
Auswaschen der Innenteile mit lauwarmem Wasser
und einem neutralen Reinigungsmittel SorgfŠltig
nachtrocknen.
Bitte keine Reinigungs- bzw. Scheuermittel
verwenden, die das GerŠt beschŠdigen
kšnnten.
Inbetriebnahme
Den Stecker in die Steckdose einsetzen.
KŸhlschranktŸr šffnen und Thermostatknopf von der
Stellung ÇOÈ (STOP) aus im Uhrzeigersinn drehen.
Das GerŠt ist eingeschaltet.
Temperaturregelung
Die Temperatur wird automatisch geregelt und kann
erhšht werden (wŠrmer) durch Drehen des Thermo-
statknopfes auf niedrigere Einstellungen oder
verringert (kŠlter) durch das Drehen auf hšhere
Zahlen.
Die richtige Einstellung erhŠlt man, unter
BerŸcksichtigung folgender, die Innentemperatur
beeinflussender Faktoren:
¥ Raumtemperatur,
¥ HŠufigkeit des TŸršffnens,
¥ Menge der eingelagerten Lebensmittel,
¥ Aufstellung des GerŠtes.
Die mittlere Einstellung ist meistens die
geeignetste.
Wichtig
Hšchste KŠlteeinstellung bei hoher
Raumtemperatur und erheblicher
Lebensmittelmenge kann fortdauernden
KŸhlschrank-Betrieb verursachen, dabei kann
sich eine Reif- oder Eisschicht an der hinteren
Innenwand bilden. In diesem Falle den
Thermostatknopf auf wŠrmere Temperaturen
stellen, damit das automatische Abtauen, mit
folglich geringerem Stromverbrauch,
gewŠhrleistet werden kann.
GEBRAUCH
5
Einfrieren von frischen
Lebensmitteln
Das 4 Sterne-Gefrierfach eignet sich zur
langfristigen Einlagerung von TiefkiIhlkost sowie
zum Einfrieren frischer Kost.
FŸr das Einfrieren von Lebensmitteln ist es nicht
nštig, die Thermostateinstellung zu Šndern.
WŸnscht man aber ein rasches Einfrieren, so mu§
der Thermostatknopf auf die hšchste Stellung
gedreht werden.
Sollte jedoch bei dieser Einstellung die Temperatur
im KŸhlraum unter 0¡C sinken, so mu§ eine
niedrigere Reglerstellung gewŠhlt werden.
Die einzufrierenden Lebensmittel in das oberste
Fach des GerŠtes legen, weil dies die kŠlteste Stelle
ist.
Aufbewahrung der TiefkŸhlkost
Nach einem lŠngeren Stillstand oder bei der ersten
Inbetriebnahme des GerŠtes mu§ vor der
Einlagerung der TiefkŸhlkost die hšchste Stellung
des Thermostatknopfes gewŠhlt werden. Nach ca 2
Std. kann dieser auf eine mittlere Stellung
zurŸckgedreht werden.
Um optimale Leistungen des GerŠtes zu erhalten,
sich vergewissern, sollen gro§e Mengen an
Lebensmitteln eingelagert werden, kšnnen alle
Laden oder Kšrbe herausgenommen und die
Lebensmittel direkt auf den gekŸhlten AbstellflŠchen
untergebracht werden. Darauf achten, das max.
Fassungsvermšgen nicht zu Ÿberschreiten,
das seitlich des Abteils angegeben ist (wo
vorgesehen).
Wichtig
Im Falle einer Stromunterbrechung wŠhrend der
Lagerung von TiefkŸhlkost bzw. von
eingefrorenen Lebensmitteln soll die TŸr des
Gefrierfaches nicht gešffnet werden. Die
TiefkŸhlkost verdirbt nicht, wenn es sich um
eine kurze Unterbrechung handelt (bis 6-8 Std.)
und das GerŠt voll ist. Wenn das nicht der Fall
ist, ist es nštig, die tiefgefrorenen Lebensmittel
innerhalb kurzer Zeit zu verbrauchen (eine
Temperaturerhšhung der TiefkŸhlkost verkŸrzt
die Aufbewahrungsdauer).
48
DECLARATION OF GUARANTEE TERMS
Our appliances are produced with the greatest of care. However, a defect may still occur. Our consumer
services department will repair this upon request, either during or after the guarantee period. The service life of
the appliance will not, however, be reduced as a result.
This declaration of guarantee terms is based on European Union Directive 99/44/EC and the provisions of the
CE Civil Code. The statutory rights that the consumer has under this legislation are not affected by this
declaration of guarantee terms.
This declaration does not affect the vendorÕs statutory warranty to the end user. The appliance is guaranteed
within the context of and in adherence with the following terms.
1. In accordance with provisions laid down in paragraphs 2 to 15, we will remedy free of charge any defect
that occurs within 24 months from the date the appliance is delivered to the first end user.
These guarantee terms do not apply in the event of use for professional or equivalent purposes.
2. Performing the guarantee means that the appliance is returned to the condition it was in before the defect
occurred. Defective parts are replaced or repaired. Parts replaced free of charge become our property.
3. So as to avoid more severe damage, the defect must be brought to our attention immediately.
4. Applying the guarantee is subject to the consumer providing proof of purchase showing the purchase and/or
delivery.
5. The guarantee will not apply if damage caused to delicate parts, such as glass, synthetic materials and
rubber, is the result ofles.
6. The guarantee cannot be called on for minor faults that do not affect the value or the overall reliability of the
appliance.
7. The statutory warranty does not apply when defects are caused by:
¥ a chemical or electrochemical reaction caused by water;
¥ abnormal environmental conditions in general;
¥ unsuitable operating conditions;
¥ contact with harsh substances.
8. The guarantee does not apply to defects due to transport which have occurred outside of our responsibility.
Nor will the guarantee cover those caused by inadequate installation or assembly, lack of maintenance or
failure to the assembly instructions or directions for use.
9. Defects that result from repairs or measures carried out by people who are not qualified or expert or defects
that result from the addition of non-original accessories or spare parts are not covered by the guarantee.
10.Appliances that are easy to transport may be delivered or sent to the consumer services department. Home
repairs are only anticipated for bulky appliances or built-in appliances .
11.If the appliances are built-in, built-under, fixed or suspended in such a way that removing and replacing
them in the place where they are fitted takes more than half an hour, the costs that result therefrom will be
charged for. Connected damage caused by these removal and replacement operations will be the
responsibility of the user.
12.If, during the guarantee period, repairing the same defect repeatedly is not conclusive, or if the repair costs
are considered disproportionate, in agreement with the consumer, the defective appliance may be replaced
with another appliance of the same value.
In this event, we reserve the right to ask for a financial contribution calculated according to the length of
time it has been used.
13.A repair under guarantee does not mean that the normal guarantee period will be extended nor that a new
guarantee period begins.
14.We give a twelve month guarantee for repairs, limited to the same.
15.Except in the event where liability is legally imposed, this declaration of guarantee terms excludes any
compensation for damage outside the appliance for which the consumer wishes to assert his right. In the
event of legally admitted liability, compensation will not exceed the purchase price paid for the appliance.
(B)
6
D338
Hšhenverstellbare Abstellregale
Der Abstand zwischen den verschiedenen
Abstellregalen kann je nach Wunsch geŠndert
werden. Dazu die Regale herausnehmen und auf
das gewŸnschte Niveau einsetzen.
Hšhenverstellung der
InnentŸrablagen
Zur Einlagerung von Lebensmittel-Packungen
verschiedener Grš§e, sind die Abstellregale der
InnentŸr hšhenverstellbar.
Hierzu wie folgt vorgehen:
das Abstellregal stufenweise in Pfeilrichtung drŸcken
bis es frei wird; dann in der gewŸnschten Hšhe
wieder anbringen.
PR260
Hinweise zum richtigen KŸhlen
von Lebensmitteln und GetrŠnken
Um die besten Leistungen des KŸhlschrankes zu
erreichen, beachten Sie bitte folgendes:
¥ Keine warmen Speisen oder dampfenden
FlŸssigkeiten in den KŸhlschrank einstellen.
¥ Geruchverbreitende Lebensmittel mŸssen
abgedeckt oder eingewickelt werden.
¥ Die Lebensmittel mŸssen so eingelagert werden,
da§ die KŠlte um sie frei zirkulieren kann.
Auftauen
Die eingefrorenen oder tiefgekŸhlten Lebensmittel
sollten vor dem Gebrauch aufgetaut werden, indem
man sie am besten im KŸhlabteil oder je nach der
zur VerfŸgung stehenden Zeit bei Raumtemperatur
auftaut. Kleine StŸcke kšnnen eingefroren gekocht
werden. SelbstverstŠndlich verlŠngert sich dabei die
Kochzeit.
EiswŸrfelbereitung
Das GerŠt hat eine oder mehrere EiswŸrfelschalen,
welche mit Wasser aufgefŸllt in das Gefrierfach
gestellt werden.
Bitte zur Entnahme der EiswŸrfelschalen keine
MetallgegenstŠnde benutzen!
Klimadruckknopf
Bei einer Raumtemperatur unter +16¡C mu§ der
Klimadruckknop gedrŸckt werden.
Die Kontrolleuchte (A) leuchtet auf.
D484
A
B
K
Šlteakku
Im Gefrierschrank befinden sich zwei kŠlteakku, die
die Aufbewahrungszeit der eingefrorenen
Lebensmittel bei Stromausfall bzw. Stšrungsfall
verlŠngern.
Aus TransportsicherungsgrŸnden werden diese
Akkus werkseitig in der unteren Schublade
eingelegt.
FŸr ihren richtigen Gebrauch mŸssen sie in der
oberen Schublade, auf dem Gefriergut, eingelegt
werden.
47
H
I
I
I
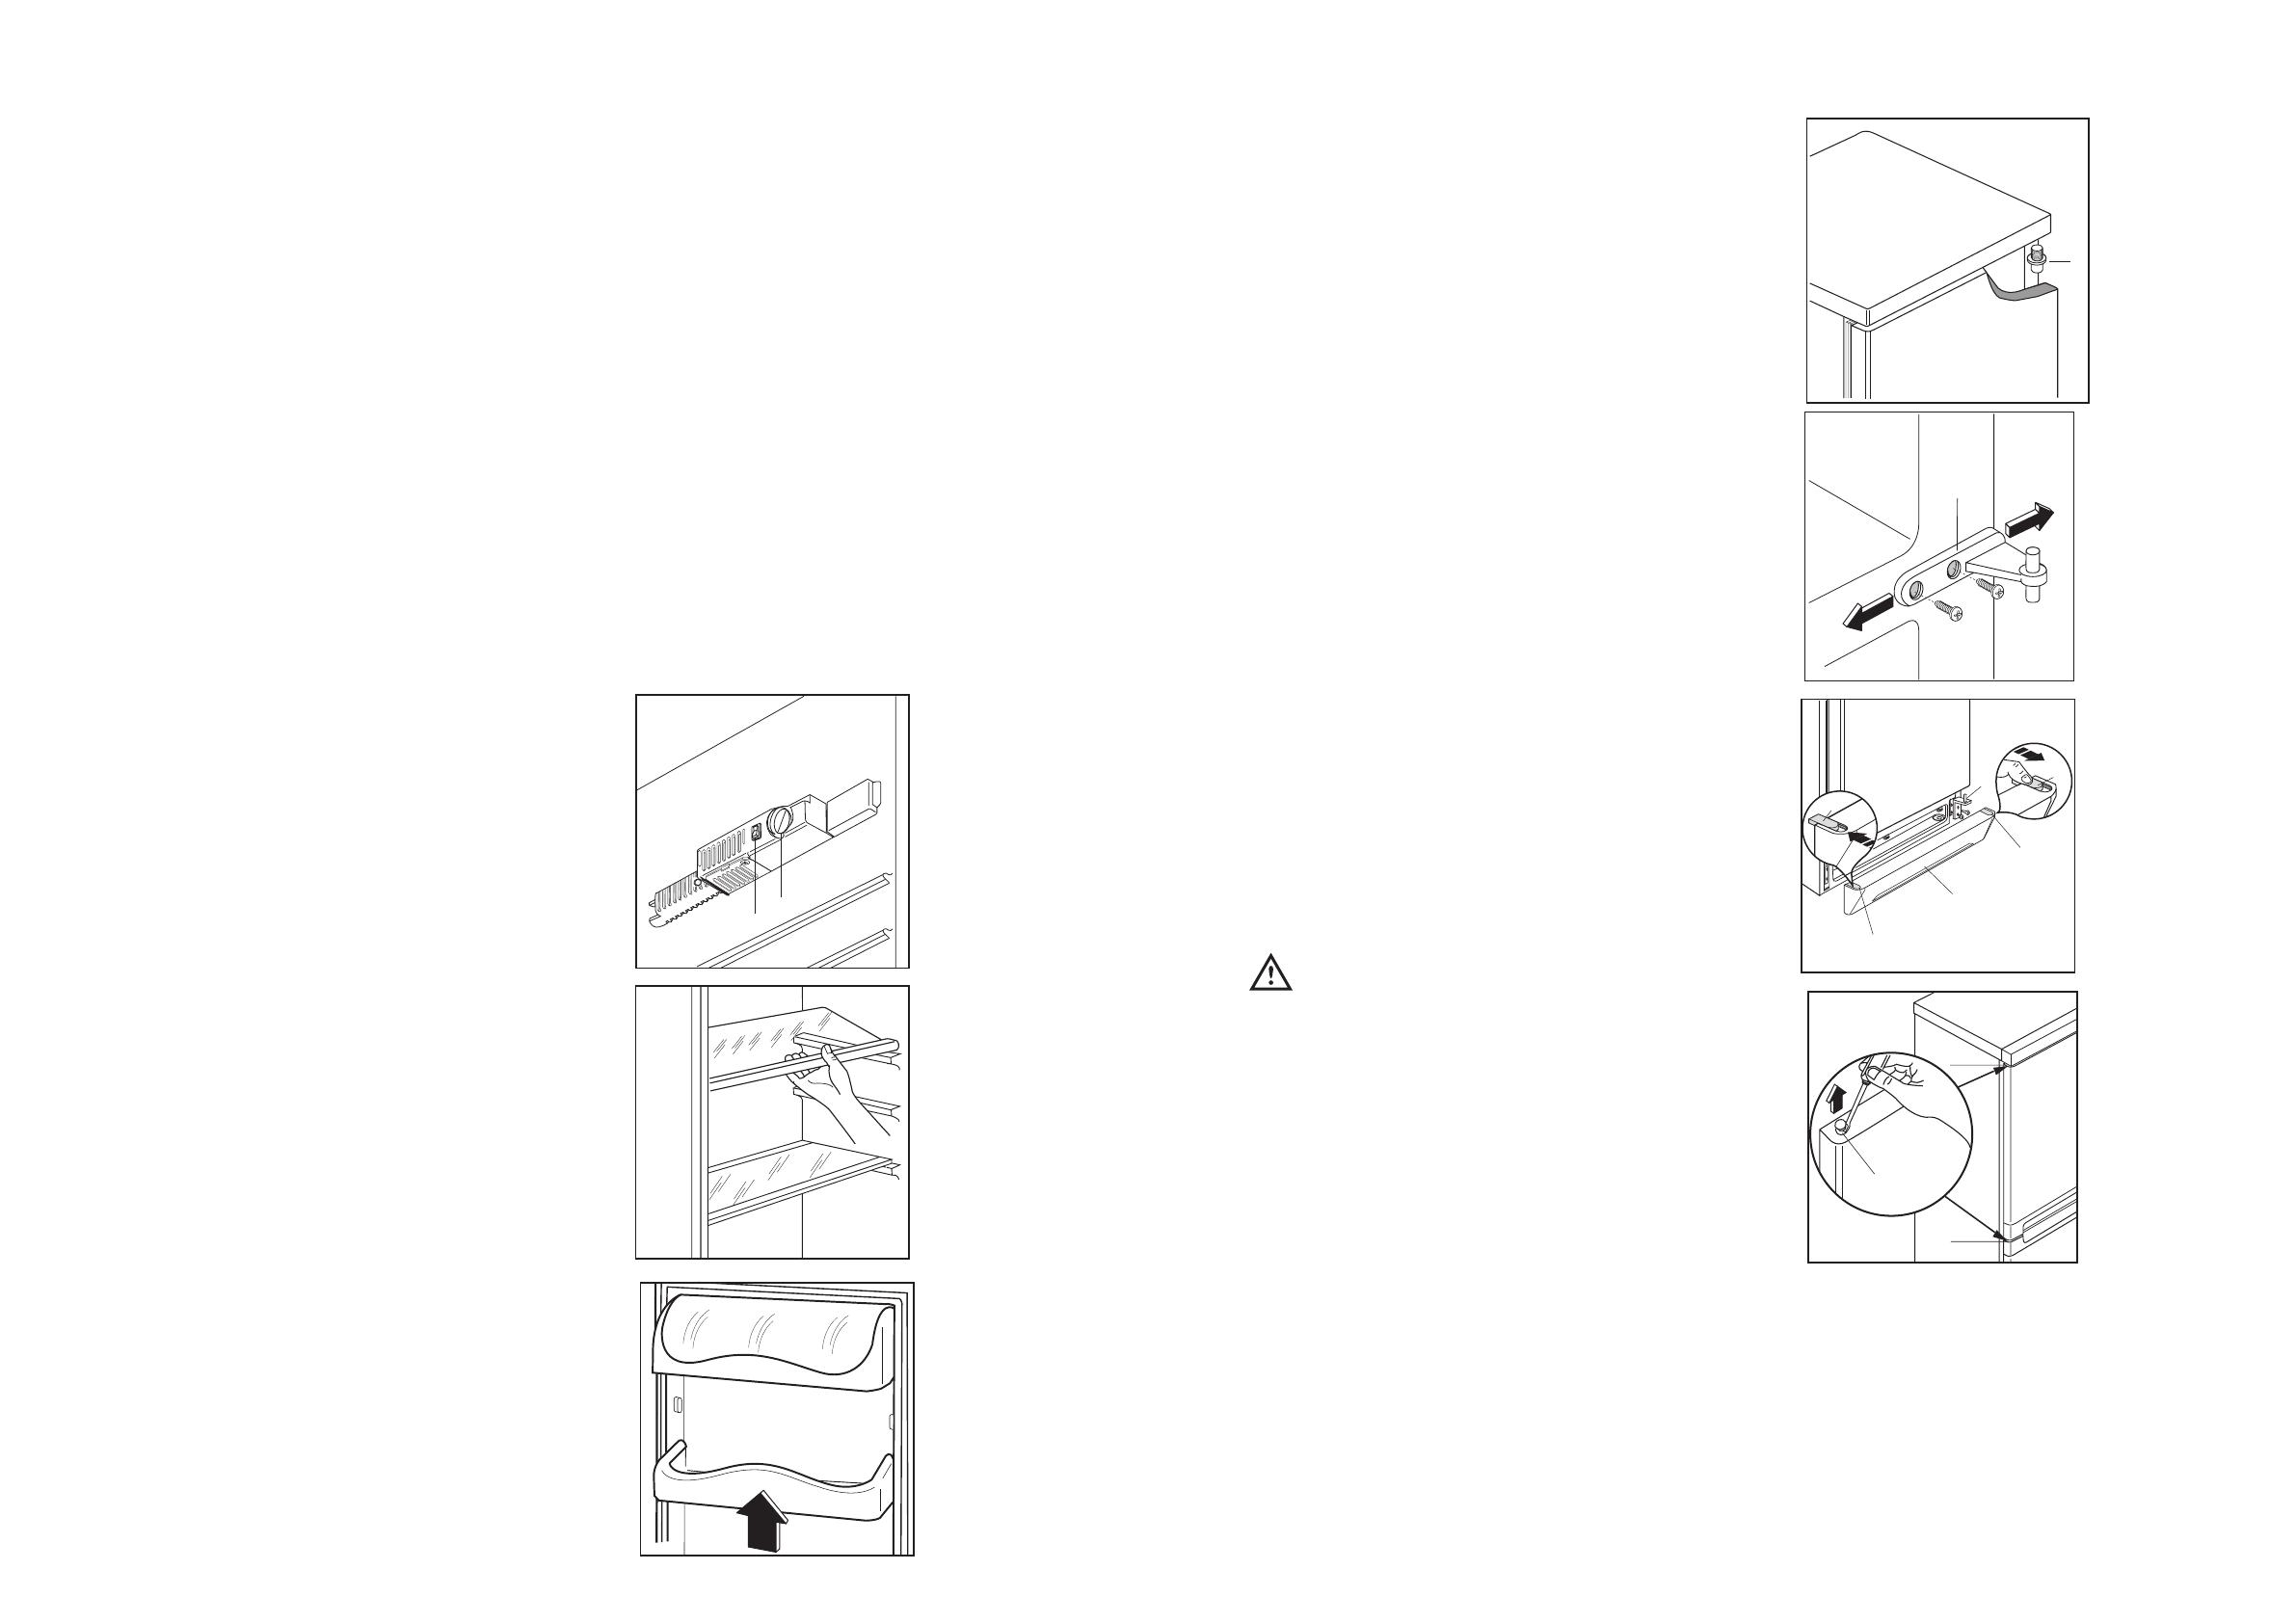
Door reversibility
1. Unplug the appliance from the power supply
before carrying out the below-mentioned
operations.
2. pull off the ventilation grille (D) which is clipped
into place;
3. remove the bottom hinge (E) by unscrewing its
fixing screws;
4. remove the lower door, sliding it out of the middle
hinge;
5. unscrew the middle hinge (H);
4. Remove the upper door by releasing it from the
top hinge pin (G).
5. Remove the pin (G) from the top hinge , then
mount these on the opposite side, after having
removed the plugs (I) which must be refitted on
the other side.
6. Replace the upper door.
7 Refit the middle hinge on the opposite side and
replace the bottom door.
8. reassemble the lower hinge (E) on the opposite
side, using the screws previously removed; slide
the hole cover (F) out of the ventilation grille (D)
by pushing it in the direction of the arrow and
reassemble it on the opposite side;
9. refit the ventilation grille (D), clipping it into
place.
To line up the doors, it is possible to adjust the
middle hinge (H) horizontally by means of a tool,
after slackening the two screws (see figure).
Warning:
After having reversed the opening direction of
the doors check that all the screws are properly
tightened and that the magnetic seal adheres to
the cabinet. If the ambient temperature is cold
(i.e. in Winter), the gasket may not fit perfectly to
the cabinet. In that case, wait for the natural
fitting of the gasket or accelerate this process by
heating up the part involved with a normal
hairdrier.
G
E
F
D
F
F
F

7
Tips fŸr das Einfrieren
FŸr ein einwandfreies Einfrieren der Lebensmittel
geben wir folgende RatschlŠge:
¥ Das Gefriervermšgen des Gefrierabteils (in 24
Std.) kann auf dem Typenschild abgelesen
werden.
¥ Der Gefriervorgang dauert ca. 24 Stunden. In
dieser Zeit sollte keine zusŠtzliche Ware in das
Gefrierabteil eingelegt werden.
¥ Nur erstklassige, frische und gut gesŠuberte
Produkte einfrieren.
¥ Die Nahrungsmittel vor dem Einfrieren in kleine
Portionen einteilen, damit der Gefriervorgang
beschleunigt wird; dies ermšglicht das spŠtere
Auftauen von kleineren Portionen.
¥ Die Lebensmittel in Alu- oder PolyŠthylenfolien
luftdicht verpacken.
¥ Es soll vermieden werden, da§ die
einzufrierenden Lebensmittel mit den bereits
eingefrorenen in BerŸhrung kommen, um eine
WŠrmeŸbertragung an diese zu verhindern.
¥ Es ist zu beachten, da§ mageres Fleisch besser
und lŠnger haltbar ist. Fetthaltiges Fleisch hat
eine geringere Lagerzeit. Ferner reduziert Salz
die Haltbarkeitsdauer.
¥ Speiseeis, direkt aus dem Gefrierfach
genommen, kann KŠlte-Brandwunden
verursachen.
TIPS
Tips fŸr das KŸhlen
Nachstehend einige praktische RatschlŠge:
Fleisch (alle Sorten) in Plastikfolie einpacken und
auf die Glasplatte, die sich Ÿber der GemŸseschale
(Ÿber den GemŸseschalen) befindet, legen.
In dieser Lage kann das Fleisch lŠngstens 1-2
Tage aufbewahrt werden.
Gekochte Nahrungsmittel, kalte Platten, usw.
zugedeckt aufbewahren. Sie kšnnen auf jeden
beliebigen Rost gelegt werden.
Obst und GemŸse: nach vorherigem SŠubern und
Waschen in der GemŸseschale (in den
GemŸseschalen) aufbewahren.
Butter und KŠse: in speziellen BehŠltern aufbe-
wahren oder in Alu- bzw. Plastikfolie einpacken, um
den Kontakt mit der Luft zu vermeiden.
Milch in Flaschen: gut verschlossen auf die Konsol
der InnentŸr stellen.
Wenn Bananen, Kartoffeln, Zwiebeln und
Knoblauch nicht verpackt sind, sollen sie nicht
in den KŸhlschrank gegeben werden.
¥ Es ist empfehlenswert, auf der Verpackung das
Einfrierdatum zu notieren, damit die
Aufbewahrungszeit eingehalten werden kann.
¥ Die Symbole auf den Schubladen zeigen
unterschiedliche Arten von TiefkŸhlgut.
Die Zahlen geben fŸr die jeweilige Art von
TiefkŸhlgut die Lagerzeit in Monaten an. Ob der
obere oder der untere Wert der angegebenen
Lagerzeiten gŸltig ist, hŠngt von der QualitŠt der
Lebensmittel und deren Vorbehandlung vor dem
Einfrieren ab.
¥ Es sollten keine kohlensŠurehaltigen
GetrŠnke in das Gefrierfach eingestellt
werden, da sie explodieren kšnnen.
Tips fŸr TiefkŸhlkost
Um optimale Leistungen des GerŠtes zu erhalten,
sich vergewissern,
¥ da§ die TiefkŸhlkost beim VerkŠufer gut
aufbewahrt wurde
¥ da§ der Transport vom VerkŠufer zum
Verbraucher in kurzer Zeit erfolgt.
¥ TŸr so wenig wie mšglich šffnen und nicht offen
lassen.
¥ Einmal aufgetaute Lebensmittel verderben
schnell und kšnnen kein ein zweites Mal
eingefroren werden.
¥ Das Haltbarkeitsdatum auf der
TiefkŸhlkostverpackung sollte nicht Ÿberschritten
werden.
46
Electrical connection
Before plugging in, ensure that the voltage and
frequency shown on the serial number plate
correspond to your domestic power supply. Voltage
can vary by ±6% of the rated voltage.
For operation with different voltages, a suitably sized
auto-transformer must be used.
The appliance must be earthed.
The power supply cable plug is provided with a
contact for this purpose.
If the domestic power supply socket is not earthed,
connect the appliance to a separate earth in
compliance with current regulations, consulting a
specialist technician.
The Manufacturer declines all responsibility if
the above safety precautions are not observed.
This appliance complies with the following
E.E.C. Directives:
- 87/308 EEC of 2/6/87 relative to radio interference
suppression.
- 73/23 EEC of 19.2.73 (Low Voltage Directive) and
subsequent modifications;
- 89/336 EEC of 3.5.89 (Electromagnetic
Compatibility Directive) and subsequent
modifications.
INSTALLATION
Location
The appliance should be installed well away from
sources of heat such as radiators, boilers, direct
sunlight etc.
For safety reasons, minimum ventilation must be as
shown in Fig.
Appliance positioned under overhanging kitchen wall
units (see Fig. A).
Appliance positioned without overhanging kitchen
wall units (see Fig. B).
Attention: keep ventilation openings clear of
obstruction.
Two adjustable feet at the cabinet base allow
accurate levelling of the appliance.
NP002
100 mm10 mm
10 mm
A
B
ATTENTION!
It must be possible to disconnect the appliance from
the mains power supply; the plug must therefore be
easily accessible after installation.
Rear spacers
In the bag with the documentation, there are two
spacers which must be fitted in the two top
corners.
Slacken the screws and insert the spacer under the
screw head, then re-tighten the screws.
D594
8
WARTUNG
Vor jeder Reinigungsarbeit immer den
Netzstecker aus der Steckdose ziehen.
Achtung
Dieses GerŠt enthŠlt im KŠltekreislauf Kohlen-
wasserstoff. Aus diesem Grund darf die Wartung
und das NachfŸllen aussschlie§lich von
autorisiertem Fachpersonal durchgefŸhrt werden.
RegelmŠ§ige Reinigung
Benutzen Sie nie MetallgegenstŠnde um das GerŠt
zu reinigen, da es beschŠdigt werden kšnnte.
Den Innenraum mit lauwarmem Wasser und Natron
und die lackierten Teile mit einem Poliermittel
reinigen.
Gut nachwaschen und sorgfŠltig trocknen.
Den Kondensator und den Motorkompressor mit
einer BŸrste oder einem Staubsauger reinigen. Dies
begŸnstigt den guten Betrieb mit folglicher
Stromersparnis.
Stillstandszeiten
Bei lŠngerem Stillstand des GerŠtes, mŸssen Sie
folgenderma§en vorgehen:
den Stecker aus der Steckdose ziehen;
alle Lebensmittel herausnehmen;
GerŠt abtauen, Innenraum und Zubehšrteile
reinigen; die TŸren offen lassen, um im Innern eine
gute Luftzirkulation zu gewŠhrleisten und somit
Geruchsbildung zu vermeiden.
Innenbeleuchtung
Die Innenbeleuchtungslampe im KŸhlabteil ist durch
folgende Arbeitsschritte zugŠnglich:
¥ Lšsen Sie die Befestigungsschraube der
Lampenabdeckung.
¥ Heben Sie den beweglichen Teil ab, indem Sie
wie in der Abbildung gezeigt darauf drŸcken.
Sollte sich die Beleuchtung beim …ffnen
der TŸre nicht einschalten, ist zu
ŸberprŸfen, ob die GlŸhbirne fest
eingeschraubt ist; wenn die Stšrung
dennoch bestehen bleibt, die defekte
GlŸhbirne durch eine neue Birne gleicher
Leistung ersetzen.
Die maximale Leistung ist am
Leuchtkšrper angegeben.
D731
45
CUSTOMER SERVICE AND SPARE PARTS
If the appliance is not functioning properly, check
that:
¥ the plug is firmly in the wall socket and the mains
power switch is on;
¥ there is an electricity supply (find out by plugging
in another appliance);
¥ the thermostat knob is in the correct position.
¥ If there are water drops on the bottom of the
cabinet, check that the defrost water drain
opening is not obstructed (see ÒDefrostingÓ
section).
¥ If your appliance is still not working properly after
making the above checks, contact the nearest
service centre.
To obtain fast service, it is essential that when you
apply for it you specify the model and serial number
of your appliance which can be found on the
guarantee certificate or on the rating plate located
inside the appliance, on the bottom left-hand side.
Defrosting
Frost is automatically eliminated from the evaporator
of the refrigerator compartment every time the motor
compressor stops, during normal use. The defrost
water drains out through a trough into a special
container at the back of the appliance, over the
motor compressor, where it evaporates.
It is important to periodically clean the defrost
water drain hole in the middle of the refrigerator
compartment channel to prevent the water
overflowing and dripping onto the food inside.
Use the special cleaner provided, which you will
find already inserted into the drain hole.
The freezer compartment, however, will become
progressively covered with frost. This should be
removed with the special plastic scraper provided,
whenever the thickness of the frost exceeds 4 mm.
During this operation it is not necessary to switch off
the power supply or to remove the foodstuffs.
Never use sharp metal tools to scrape off frost
from the evaporator as you could damage it.
However, when the ice becomes very thick on the
inner liner, complete defrosting should be carried out
as follows:
1. pull out the plug from the wall socket or turn the
thermostat knob to the ÇOÈ setting;
2. remove any stored food, wrap it in several layers
of newspaper and put it in a cool place;
3. leave the door open, and insert the plastic
scraper in the appropriate seating at the bottom
centre, placing a basin underneath to collect the
defrost water.
4. when defrosting is completed, dry the interior
thoroughly; keep the scraper for future use;
5. turn the thermostat knob back to the required
setting or replace the plug in the power socket.
6. After two or three hours, reload the previously
removed food into the compartment.
D068
Important:
Never use sharp metal tools to scrape off frost
from the evaporator as you could damage it.
Do not use a maechanical device or any artificial
means to speed up the thawing process other
than those recommended by the manufacturer.
A temperature rise of the frozen food packs,
during defrosting, may shorten their safe
storage life.
D037

9
ST…RUNGEN
Falls das GerŠt Stšrungen aufweisen sollte,
ŸberprŸfen Sie zuerst folgendes:
¥ Steckt der Netzstecker in der Steckdose?
¥ Befindet sich der Hauptschalter der elektrischen
Anlage in der richtigen Stellung?
¥ Ist die Stromzufuhr unterbrochen?
¥ Befindet sich der Thermostatknopf in richtiger
Stellung?
¥ WasserpfŸtze auf dem Boden des KŸhlfaches:
¥ Abtauwasserloch verstopft? (siehe Abschnitt
ÒAbtauenÓ)
Sollten Sie nach o.e. PrŸfungen zu keinem Resultat
kommen, so wenden Sie sich bitte an unseren
nŠchsten Kundendienst.
Um ein rasches Beheben des Schadens zu
ermšglichen, ist es beim Anruf an den
Kundendienst notwendig, die Modell- und
Seriennummer anzugeben, die Sie dem
Garantieschein oder dem Typenschild (Ð linke
Seite Ð unten) entnehmen kšnnen.
Abtauen
Die sich auf dem Verdampfer des KŸhlschrankes
bildende Reifschicht taut jedesmal in den Stillstand-
zeiten des Motorkompressors von selbst ab. Das
Tauwasser lŠuft durch eine Rinne in eine Plastik-
schale auf der RŸckseite des GerŠtes (Ÿber dem
Kompressor) und verdunstet dort.
Wir empfehlen, das in der Mitte der
Abtauwasserrinne des KŸhlraumes befindliche
Ablaufloch fŸr das Abtauwasser regelmŠ§ig zu
reinigen, um zu vermeiden, da§ das
Abtauwasser auf die eingelagerten Lebensmittel
tropft. Verwenden Sie den dafŸr vorgesehenen
Reiniger,der sich schon im Ablaufloch befindet.
Die sich im Gefrierfach bildende Reifschicht soll,
sobald diese eine StŠrke von 4 mm erreicht hat, mit
dem mitgelieferten Plastikschaber abgekratzt
werden. WŠhrend dieses Vorganges ist es nicht
nštig, das GerŠt auszuschalten und die
Nahrungsmittel herauszunehmen.
Wenn sich jedoch eine dicke Eisschicht bildet, mu§
man vollkommen abtauen. Um ein vollstŠndiges
Abtauen durchzufŸhren, geht man wie folgt vor:
1. Den Thermostatknopf auf ÇOÈ einstellen oder
den Stecker aus der Steckdose herausziehen.
2. Die eventuell im Frosterfach liegenden
Lebensmittel herausnehmen, sie in
Zeitungspapier einwickeln und sehr kŸhl
aufbewahren.
3. Die TŸr offen lassenund den Plastikschaber, der
als Rinne dient, am vorgesehenen Platz
einsetzen, soda§ das Abtauwasser in ein
geeignetes, darunter gestelltes GefŠ§ flie§en
kann.
4. Nach beendetem Abtauproze§ das Fach gut
trocknen. Plastikschaber fŸr spŠteren Gebrauch
aufbewahren.
5. Den Thermostatknopf wieder in die gewŸnschte
Stellung drehen bzw. den Stecker wieder
einstecken.
D037
D068
6. Nachdem das GerŠt fŸr 2-3 Std. in Betrieb
genommen wurde, kšnnen tiefgefrorene
Lebensmittel darin zurŸckgelegt
Achtung:
Benutzen Sie niemals MetallgegenstŠnde, um
die Reifschicht abzukratzen, damit eine
BeschŠdigungen des GerŠtes vermieden werden
kann.
Benutzen Sie kein mechanisches oder anderes
Mittel fŸr einen schnelleren Abtauproze§ mit
Ausnahme der vom Hersteller empfohlenen.
Ein Temperaturanstieg der TiefkŸhlkost wŠhrend
des Abtauens kšnnte die Aufbewahrungsdauer
verkŸrzen.
MAINTENANCE
Unplug the appliance before carrying out
any maintenance operation.
Warning
This appliance contains hydrocarbons in its cooling
unit; maintenance and recharging must therefore
only be carried out by authorized technicians.
Periodic cleaning
Clean the inside with warm water and bicarbonate of
soda.
Rinse and dry thoroughly.
Clean the condenser (black grill) and the
compressor at the back of the appliance with a
brush or a vacuum cleaner. This operation will
improve the performance of the appliance and save
electricity consumption.
Periods of non-operation
When the appliance is not in use for long periods, take
the following precautions:
remove the plug from the wall socket;
remove all food;
defrost and clean the interior and all accessories;
leave the door ajar to allow air to circulate to prevent
unpleasant smells.
Hints for storage of frozen food
To obtain the best performance from this appliance,
you should:
¥ be sure that frozen foodstuffs are transferred
from the foodstore to the freezer in the shortest
possible time;
¥ not open the door frequently or leave it open
longer than absolutely necessary.
¥ Once defrosted, food deteriorates rapidly and
cannot be refrozen.
Interior light
The light bulb inside the refrigerator compartment can be
reached as shown in the figure.
If the light does not come on when the door is
open, check that it is screwed into place
properly. If it still does not light up, change the
bulb. The rating is shown on the light bulb
cover.
D731
Hints for freezing
To help you make the most of the freezing process,
here are some important hints:
¥ the maximum quantity of food which can be
frozen in 24 hrs. is shown on the rating plate;
¥ the freezing process takes 24 hours. No further
food to be frozen should be added during this
period;
¥ prepare food in small portions to enable it to be
rapidly and completely frozen and to make it
possible subsequently to thaw only the quantity
required;
¥ wrap up the food in aluminium foil or polythene
and make sure that the packages are airtight;
¥ do not allow fresh, unfrozen food to touch food
which is already frozen, thus avoiding a rise in
temperature of the latter;
¥ water ices, if consumed immediately after
removal from the freezer compartment, can
possibly cause the skin to be freeze burnt;
¥ it is advisable to show the freezing-in date on
each individual pack to enable you to keep tab of
the storage time;
¥ The symbols on the drawers show different types
of frozen goods.
The numbers indicate storage times in months
for the appropriate types of frozen goods.
Whether the upper or lower value of the indicated
storage time is valid depends on the quality of
the foods and pre-treating before freezing.
¥ do not put carbonated liquids (fizzy drinks,
etc.) in the freezer compartment as they may
burst.
44
10
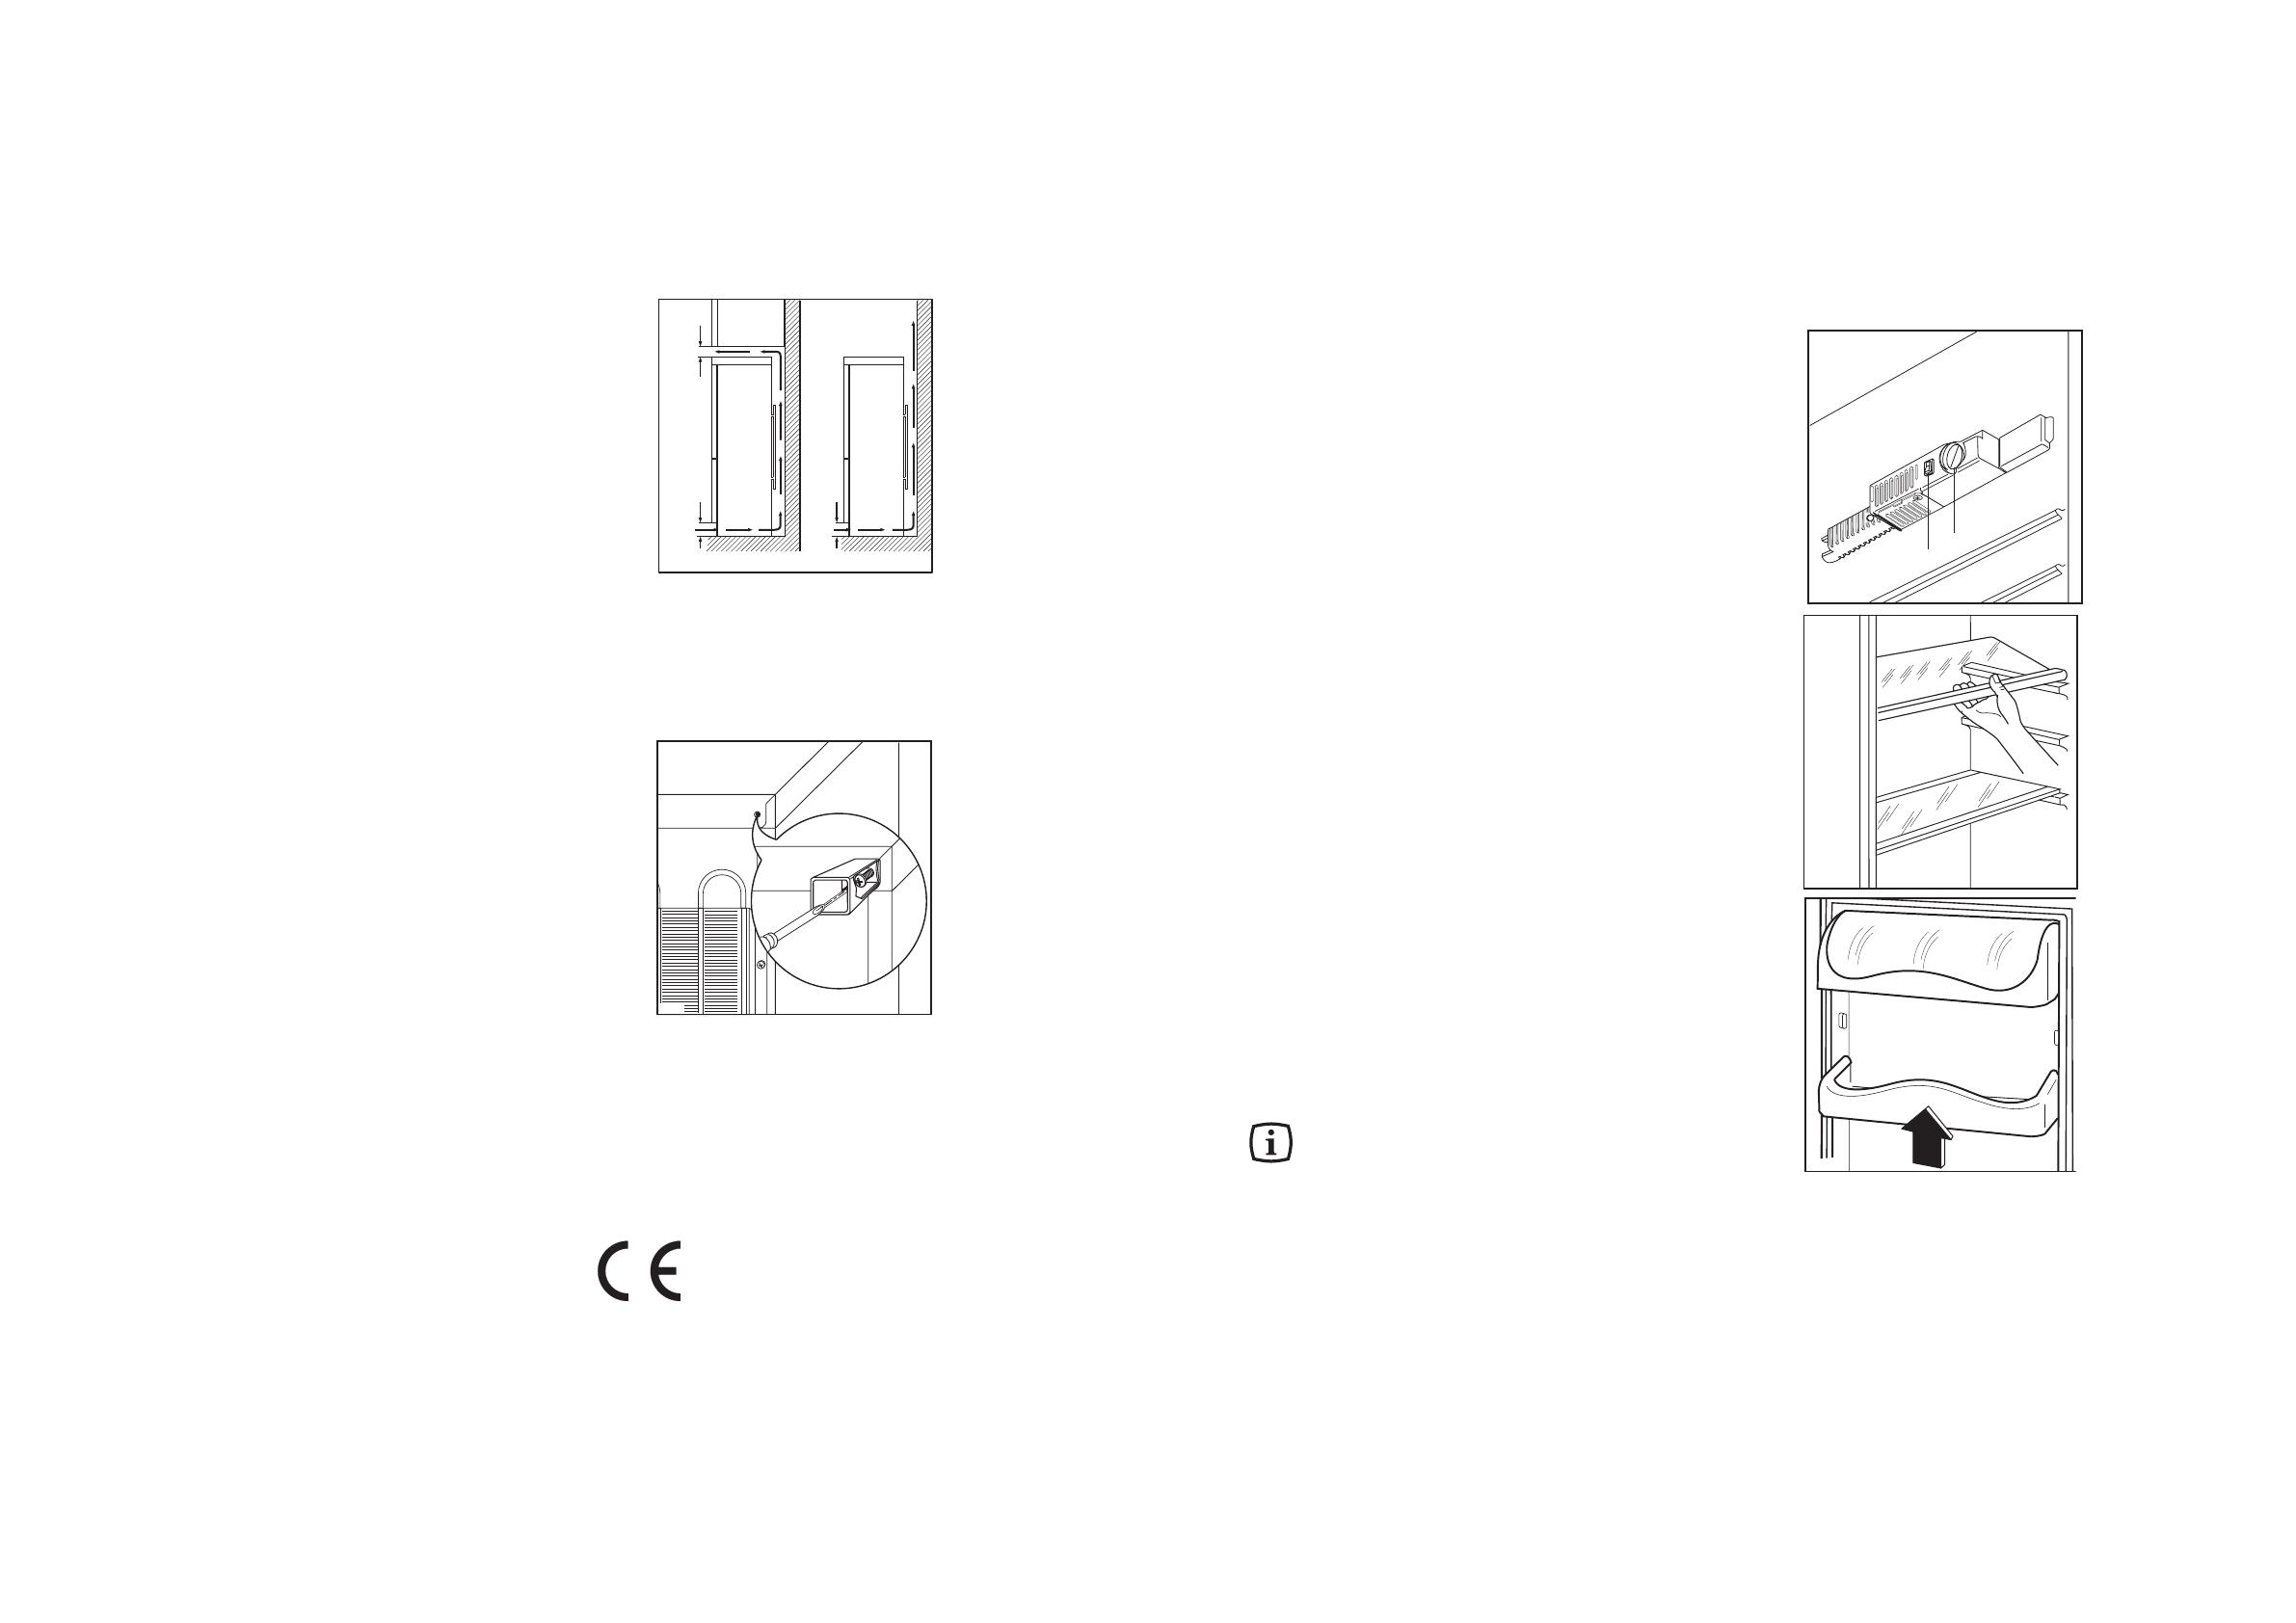
INSTALLATION
Aufstellung
Das GerŠt sollte nicht in der NŠhe von
WŠrmequellen wie Heizkšrpern oder …fen
aufgestellt und vor direkter Sonneneinstrahlung
geschŸtzt werden. Aus GrŸnden der Sicherheit mu§
eine MindestbelŸftung gesichert sein, wie aus der
Abb. hervorgeht.
Anordnung des GerŠtes unter den OberschrŠnken
der KŸche (siehe Abb. A).
Anordnung des GerŠtes ohne OberschrŠnke der
KŸche (siehe Abb. B).
Achtung: Die Ventilations - …ffnungen mŸssen
immer saubergehalten werden.
Die Nivellierung erfolgt durch Drehen der am
Unterteil des GerŠtes angebrachten
Nivellierf٤chen.
Elektrischer Anschlu§
Bevor Sie den Stecker in die Steckdose einstecken,
ŸberprŸfen Sie bitte, da§ die auf dem Typenschild
des GerŠtes angegebene Spannung sowie
Frequenz mit dem Anschlu§wert des Hauses
Ÿbereinstimmen. Eine Abweichung von ±6% von der
Nominalspannung ist zulŠssig. FŸr die Anpassung
des GerŠtes an andere Spannungen mu§ ein
Spartransformator angemessener Leistung
vorgeschaltet werden.
Das GerŠt mu§ unbedingt vorschriftsmŠ§ig geerdet
werden. Zu diesem Zweck ist der Stecker des
Speisekabels mit dem dafŸr vorgesehenen Kontakt
versehen. Sollte die Netzleitung im Haus nicht mit
einer Erdleitung versehen sein, so mu§ das GerŠt
an eine getrennte Erdleitung vorschriftsmŠ§ig und
unter Hinzuziehung eines Fachmanns
angeschlossen werden.
NP002
100 mm10 mm
10 mm
A
B
Die Erzeugerfirma lehnt jede Verantwortung ab,
falls diese UnfallverhŸtungsvorschrift nicht
beachtet wird.
Dieses GerŠt entspricht der folgende EWG
Richtlinie:
- 87/308 EWG vom 2.6.87 (Deutschland-
AusfŸhrung) bzw. der …VE-Richtlinie
Nr. F 61/84 (…sterreich-AusfŸhrung) bezŸglich
Funkentstšrung.
- 73/23 EWG vom 19/02/73 (Niederspannung) und
folgende €nderungen;
- 89/336 EWG vom 03/05/89 (Elektromagnetische
VertrŠglichkeit) und folgende €nderungen.
Achtung:
Es mu§ mšglich sein, das GerŠt vom Netz zu
trennen; nach der Installation mu§ sie Steckdose
daher zugŠnglich bleiben.
Hintere AbstandsstŸcke
Im Beipack sind 2 DistanzstŸcke enthalten, die an
der GerŠte-RŸckseite montiert werden mŸssen.
Lšsen Sie dazu etwas die Schrauben der
GehŠuseabdeckung. Schieben Sie das DistanzstŸck
unter den Schraubenkopf und ziehen Sie die
Schraube wieder fest.
D594
43
HINTS
Hints for refrigeration
Useful hints:
Meat (all types): wrap in polythene bags and place
on the glass shelf above the vegetable drawer.
For safety, store in this way only one or two days
at the most.
Cooked foods, cold dishes, etc..: these should be
covered and may be placed on any shelf.
Fruit and vegetables: these should be thoroughly
cleaned and placed in the special drawer(s)
Positioning the door shelves
To permit storage of food packages of various sizes,
the door shelves can be placed at different heights.
To make these adjustments proceed as follows:
Gradually pull the shelf in the direction of the arrows
until it comes free, then reposition as required.
D338
Movable shelves
The walls of the refrigerator are equipped with a
series of runners so that the shelves can be
positioned as desired.
provided.
Butter and cheese: these should be placed in
special airtight containers or wrapped in aluminium
foil or polythene bags to exclude as much air as
possible.
Milk bottles: these should have a cap and should
be stored in the bottle rack on the door.
Bananas, potatoes, onions and garlic, if not
packed, must not be kept in the refrigerator.
PR260
Ice-cube production
This appliance is equipped with one or more trays
for the production of ice-cubes. Fill these trays with
water, then put them in the freezer compartment.
Do not use metallic instruments to remove the
trays from the freezer.
D484
A
B
Ambient switch
With a room temperature lower than +16¡C, the
ambient switch must be depressed. Pilot light (A) will
come on.
Cold accumulators
The freezer contains two cold accumulators which
increase storage times in the event of a power cut or
breakdown.
For security reasons, during the transport of the
appliance, the cold accumulators are located in the
lower drawer.
The correct location of the accumulators is inside
the upper drawer, on top of the stored food.

11
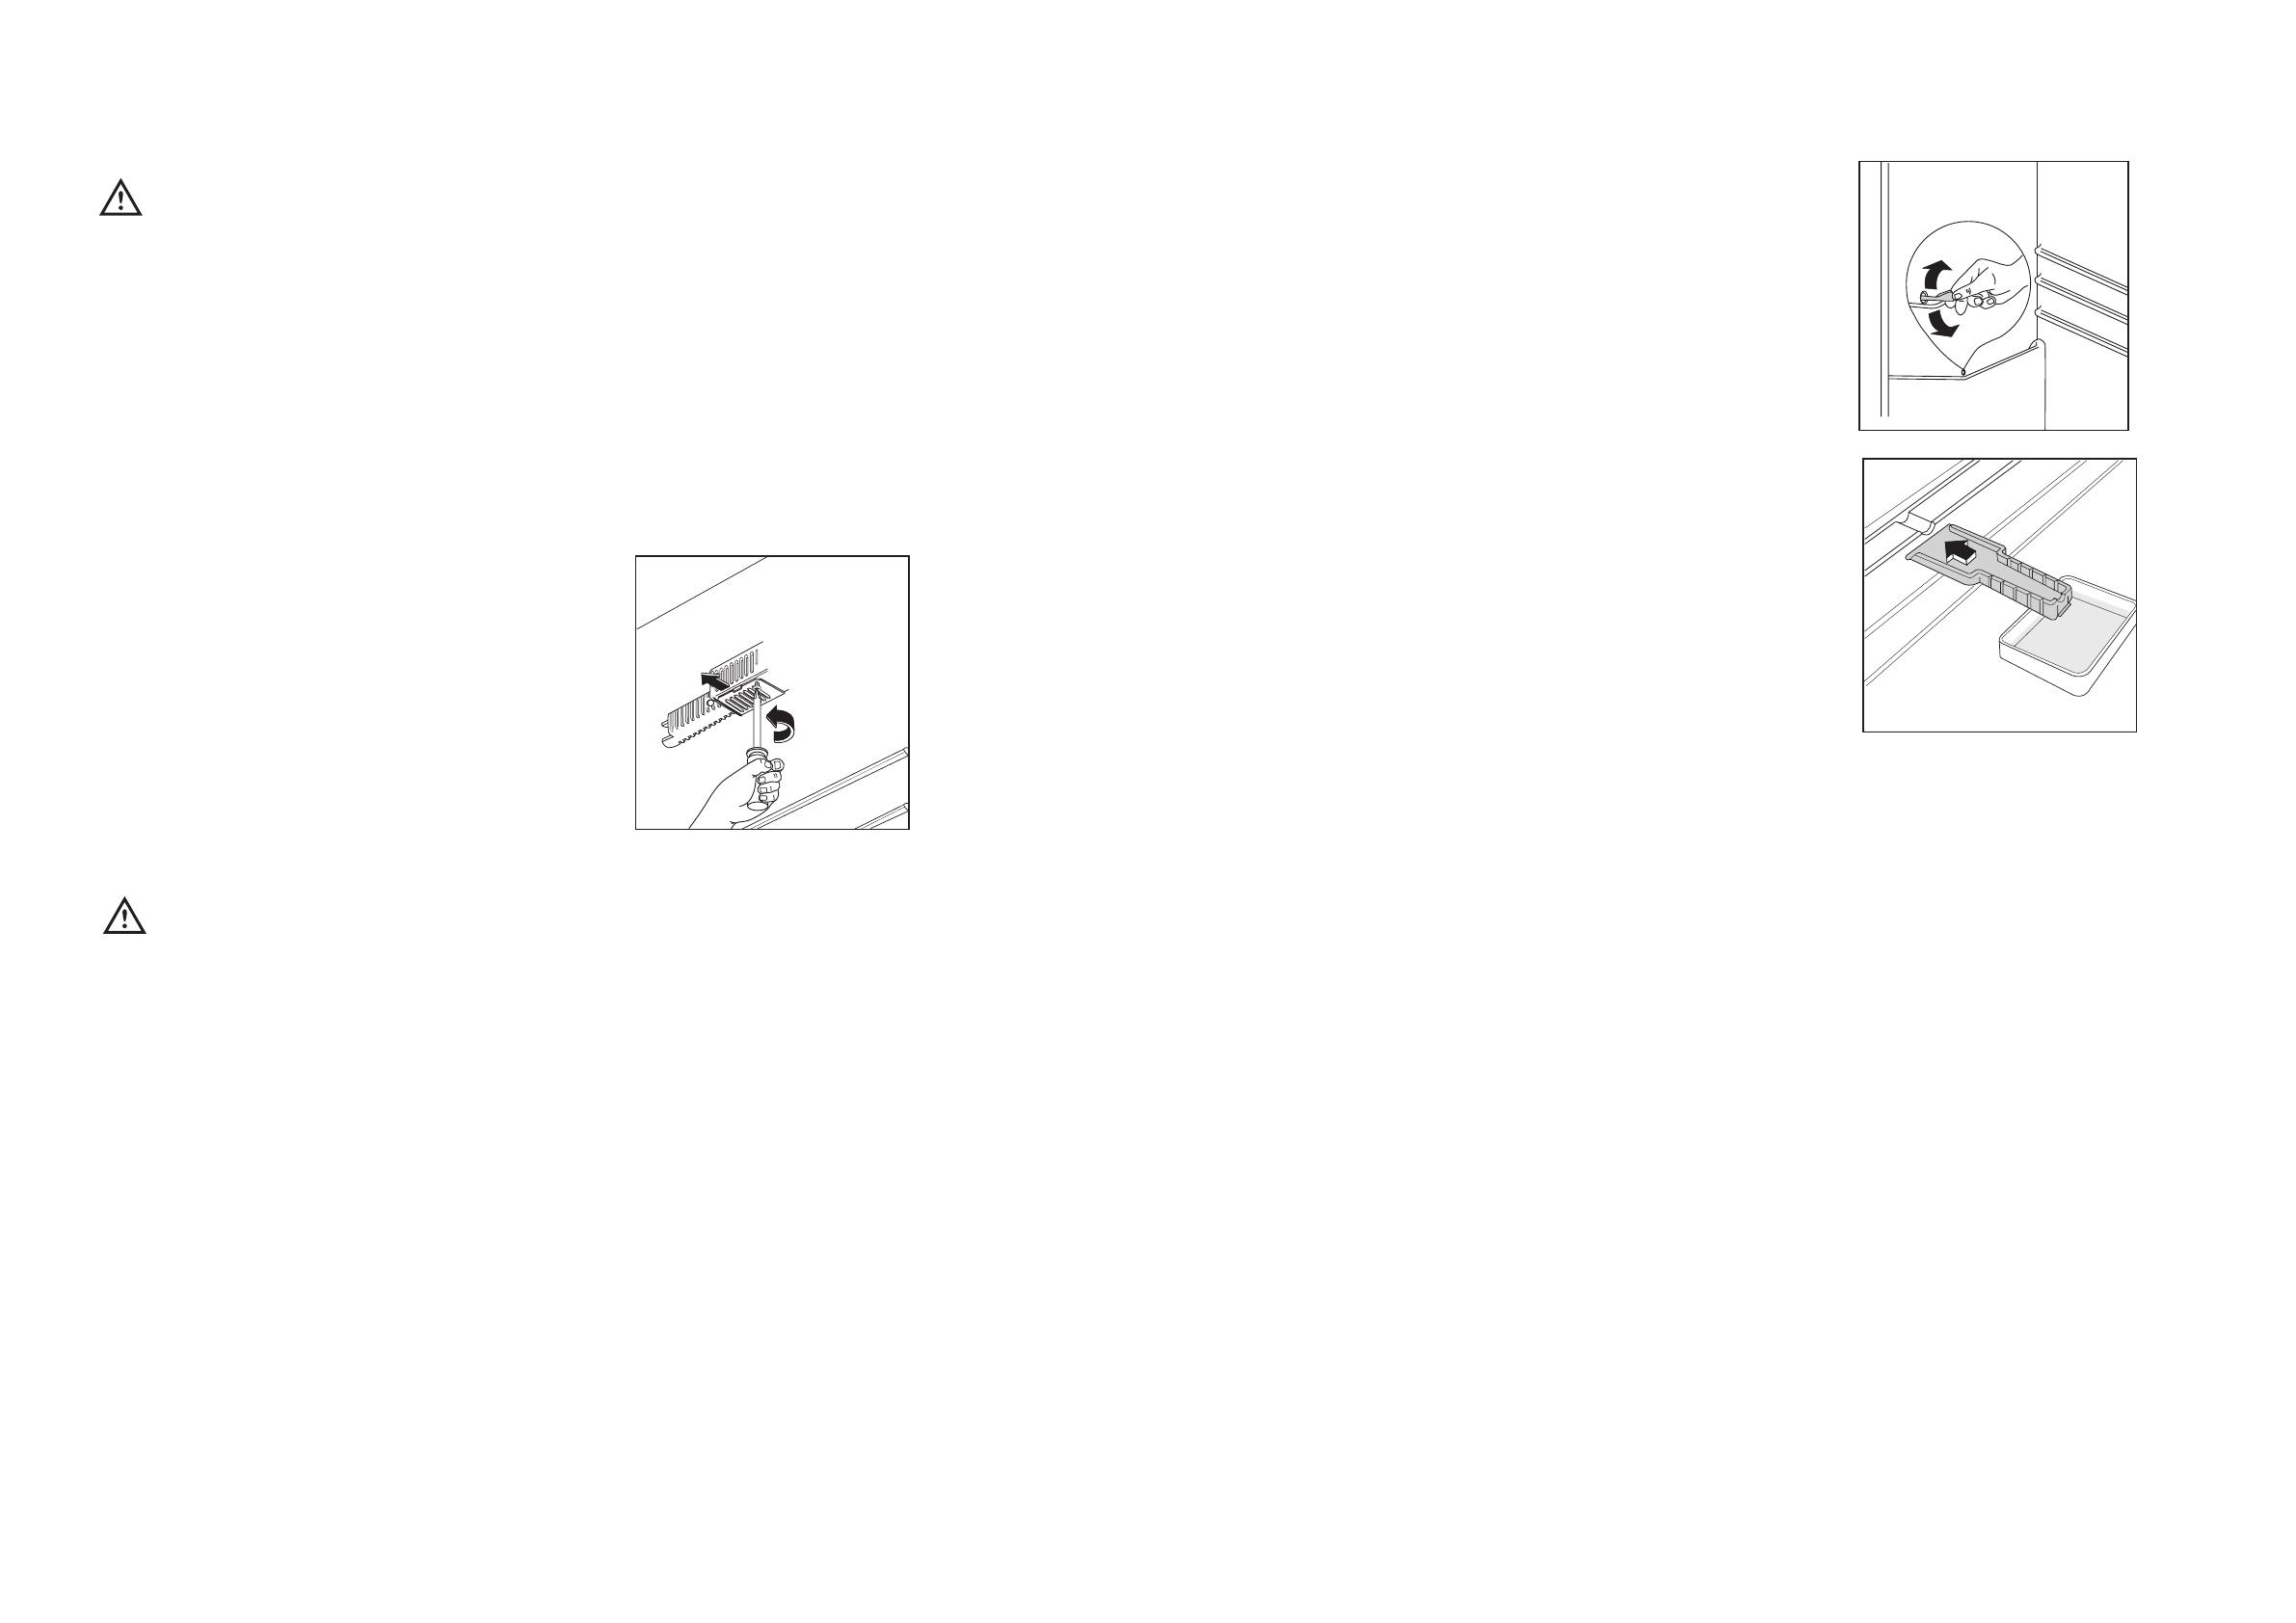
TŸranschlagwechsel
Bevor Sie nachstehende ArbeitsvorgŠnge
durchfŸhren, Netzstecker unbedingt aus der
Steckdose ziehen!
Den Wechsel auf folgende Weise ausfŸhren:
1. EntlŸftungsgitter (D) abnehmen.
2. Unteres Scharnier (E) abschrauben.
3. Untere TŸr vom mittleren Scharnier (H) abheben
und Scharnier abschrauben.
4. Obere TŸr vom oberen Stift (G) abnehmen.
5. Nachdem Sie die Stšpsel entternt haben, die auf
der gegenŸberliegenden Seite wieder
einzusetzen sind, nehmen Sie den oberen Stift
ab und montieren Sie es an der
gegenŸberliegenden Seite.
6. Obere TŸr wieder einsetzen. Mittleres Scharnier
an gegenŸberliegende Seite montieren.
7. Untere TŸr wieder einsetzen.
8. Unteres Scharnier (E) auf gegenŸberliegende
TŸrseite montieren und mittels der vorher
entnommenen Schrauben befestigen.
Abdeckung (F) vom EntlŸftungsgitter (D)
herausschieben und auf gegenŸberliegende
Seite montieren.
9. EntlŸftungsgitter wieder einsetzen.
Zur Ausrichtung der TŸren kann man auf das
mittlere Scharnier wirken.
Das mittlere Scharnier ist nach dem Lšsen der
beiden Schrauben mit Hilfe einer Vorrichtung
horizontal regulierbar.
Achtung
Vergewissern Sie sich nach AusfŸhrung des
Anschlagwechsels der TŸren, da§ alle
Schrauben fest angezogen sind und ŸberprŸfen
Sie auch, ob die Magnetdichtung am Mšbel
perfekt anliegt. Bei einer niedrigen
Raumtemperatur (z.B. im Winter) kann es
vorkommen, dass die Dichtung nicht perfekt am
Schrank haftet. Die Wiederherstellung der
Dichtung erfolgt automatisch nach gewisser
Zeit. Wollen Sie aber diesen Prozess
beschleunige, so genšgt es die Dichtung mit
einem Fšn zu erwŠrmen.
G
H
E
F
D
F
F
F
D419
42
Fresh food refrigeration
To obtain the best performance:
¥ do not store warm food or evaporating liquids in
the refrigerator;
¥ do cover or wrap the food, particularly if it has a
strong flavour.
¥ Position food so that air can circulate freely round
it.
Cleaning the interior
Before using the appliance for the first time, wash
the interior and all internal accessories with luke-
warm water and some neutral soap so as to remove
the typical smell of a brand-new product, then dry
thoroughly.
Do not use detergents or abrasive
powders, as these will damage the finish.
Temperature regulation
The temperature is automatically regulated and can
be increased to achieve a higher temperature
(warmer) by rotating the thermostat knob toward
lower settings or reduced (colder) rotating the knob
towards higher settings.
However, the exact setting should be chosen
keeping in mind that the temperature inside the
refrigerator depends on:
¥ room temperature;
¥ how often the door is opened;
¥ the quantity of food stored;
¥ location of appliance.
A medium setting is generally the most suitable.
Important
If the ambient temperature is high or the
appliance is fully loaded, and the appliance is
set to the lowest temperatures, it may run
continuously causing frost to form on the rear
wall. In this case the dial must be set to a higher
temperature to allow automatic defrosting and
therefore reduced energy consumption.
USE
Operation
Insert the plug into the wall socket.
Turn the thermostat knob ,clockwise, beyond the ÒOÓ
(STOP) position.
To stop operation, simply turn the thermostat knob to
position ÒOÓ.
Freezing fresh food
The 4-star compartment is suitable for
long term storage of commercially frozen food, and
for freezing fresh food.
To freeze fresh foods It is not necessary to change
the setting of the thermostatknob. However, for a
quicker freezing operation, turn the thermostat knob
to the coldest setting; but remeber that, in this
condition, the refrigerator compartment temperature
might drop below 0¡C. If this occurs reset thermostat
knob to a warmer setting.
Place the food to be frozen on the upper
compartment.
Thawing
Deep-frozen or frozen food, prior to being used, can
be thawed in the refrigerator compartment or at
room temperature, depending on the time available
for this operation.
Small pieces may even be cooked still frozen,
directly from the freezer: in this case, cooking will
take longer.
Storage of frozen food
When first starting-up or after a period out of use,
before putting the products in the compartment let
the appliance run at least two hours on the coldest
setting, then turn the thermostat knob to the normal
operating position.
To obtain the best performance from this appliance,
you should:
if large quantities of food are to be stored, remove
all drawers and baskets from appliance and place
food on cooling shelves.
if large quantities of food are to be stored, remove
all drawers and baskets from appliance and place
food on cooling shelves.
Pay careful attention not to exceed load limit stated
on the side of the upper section (where applicable).
Important
If there is a power failure when food is in the
freezer, do not open the door of the freezer
compartment. The frozen food will not be
affected if the power cut is of short duration (up
to 6-8 hours) and the freezer compartment is full,
otherwise, it is recommended that the food
should be used within a short time (a
temperature increase of the frozen food
shortens its safe storage period).

12
GARANTIEBEDINGUNGEN
Unsere GerŠte werden mit grš§ter Sorgfalt hergestellt. Trotzdem kann es einmal zu einem Defekt kommen.
Unser Kundendienst Ÿbernimmt auf Anfrage gerne die Reparatur, und zwar sowohl wŠhrend des
Garantiezeitraums als auch danach. So ist gewŠhrleistet, dass ein Defekt nicht zu einer VerkŸrzung der
Lebensdauer des GerŠts fŸhrt.
Die vorliegenden Garantiebedingungen beruhen auf der Richtlinie der EuropŠischen Union 99/44/EG sowie
den Bestimmungen des BŸrgerlichen Gesetzbuches. Die dem Kunden aufgrund dieser Gesetze zustehenden
Rechte kšnnen durch die vorliegenden Garantiebedingungen nicht geŠndert werden.
Diese Garantiebedingungen ziehen keine EinschrŠnkung der Garantieverpflichtungen des VerkŠufers
gegenŸber dem Endbenutzer nach sich. Die Garantie fŸr das GerŠt erfolgt im Rahmen und unter Beachtung
folgender Bedingungen:
1. Bei Beachtung der in den AbsŠtzen 2 bis 15 niedergelegten Bestimmungen beheben wir kostenlos jeden
Defekt, der wŠhrend eines Zeitraums von 24 Monaten ab dem Datum der †bergabe des GerŠts an den
ersten Endkunden auftritt.
Diese Garantiebedingungen gelten nicht im Falle einer Nutzung des GerŠts zu gewerblichen oder
vergleichbaren Zwecken.
2. Die Garantieleistung zielt auf eine Wiederherstellung des GerŠtezustands vor dem Auftreten des Defekts
ab. Die defekten Bestandteile werden ausgetauscht oder repariert. Kostenlos ausgetauschte Bestandteile
gehen in unser Eigentum Ÿber.
3. Um schwereren SchŠden vorzubeugen, mŸssen wir Ÿber den Defekt unverzŸglich in Kenntnis gesetzt
werden.
4. Bedingung fŸr die GewŠhrung der Garantieleistung ist, dass der Kunde die Kaufbelege mit dem Kauf-
und/oder †bergabedatum vorlegt.
5. Die Garantie greift nicht, wenn SchŠden an empfindlichen Bestandteilen, wie z.B. Glas (Glaskeramik),
Kunststoffen oder Gummi, auf unsachgemŠ§en Gebrauch zurŸckzufŸhren sind.
6. Eine Inanspruchnahme der Garantie ist nicht mšglich bei kleinen VerŠnderungen ohne Auswirkungen auf
Gesamtwert und -stabilitŠt des GerŠts.
7. Die Garantieverpflichtung erlischt, wenn der Defekt auf eine der folgenden Ursachen zurŸckzufŸhren ist:
¥ eine chemische oder elektrochemische Reaktion infolge von Wassereinwirkung,
¥ allgemein anomale Umweltbedingungen,
¥ unsachgemŠ§e Betriebsbedingungen,
¥ Kontakt mit aggressiven Substanzen.
8. Die Garantie erstreckt sich nicht auf au§erhalb unseres Verantwortungsbereichs auftretende
TransportschŠden. Auch SchŠden infolge unsachgemŠ§er Aufstellung oder Installation, mangelnder
Wartung, oder Nicht-Beachtung der Aufstellungs- und Installationshinweise sind durch die Garantie nicht
gedeckt.
9. Durch die Garantie nicht gedeckt sind ferner Defekte infolge von Reparaturen oder Eingriffen durch nicht-
qualifizierte oder nicht-kompetente Personen, oder infolge des Einbaus von nicht-originalen Zubehšr- oder
Ersatzteilen.
10.Leicht zu transportierende GerŠte mŸssen beim Kundendienst abgegeben bzw. dorthin geschickt werden.
Heimkundendienst kommt nur bei gro§en GerŠten oder bei EinbaugerŠten in Frage.
11.Bei Einbau- oder UnterbaugerŠten sowie bei GerŠten, die derart befestigt oder aufgehŠngt sind, dass fŸr
den Aus- und Wiedereinbau in die betreffende Einbaunische mehr als eine halbe Stunde erforderlich ist,
werden die anfallenden Zusatzleistungen in Rechnung gestellt. Etwaige SchŠden infolge derartiger Aus-
und Wiedereinbauarbeiten gehen zu Lasten des Kunden.
12.Wenn wŠhrend des Garantiezeitraums eine wiederholte Reparatur ein und desselben Defekts zu keinem
befriedigenden Ergebnis fŸhrt, oder bei unverhŠltnismŠ§ig hohen Reparaturkosten kann, in Abstimmung mit
dem Kunden, ein Austausch des defekten GerŠts durch ein gleichwertiges anderes erfolgen.
In diesem Fall behalten wir uns das Recht vor, vom Kunden eine finanzielle Beteiligung zu verlangen, die
anteilig zum verstrichenen Nutzungszeitraum berechnet wird.
13.Eine Reparatur im Rahmen der Garantie zieht weder eine VerlŠngerung des normalen Garantiezeitraums
noch den Beginn eines neuen Garantiezyklus nach sich.
14.Auf Reparaturen gewŠhren wir eine Garantie von 12 Monaten, unter BeschrŠnkung auf das
Wiederauftreten desselben Defekts.
(B)
41
CONTENTS
speed up the thawing process other than those
recommended by the manufacturer. Never use
metal objects for cleaning your appliance as it
may get damaged.
Installation
¥ During normal operation, the condenser and
compressor at the back of the appliance heat up
considerably. For safety reasons, minimum
ventilation must be as shown in the instructions.
Attention: keep ventilation openings clear of
obstruction.
¥ Care must be taken to ensure that the appliance
does not stand on the electrical supply cable.
Important: if the supply cord is damaged, it must
be replaced by a special cord or assembly availa-
ble from the manufacturer or its service agent.
¥ If the appliance is transported horizontally, it is
possible that the oil contained in the compressor
flows in the refrigerant circuit. It is advisable to
wait at least two hours before connecting the
appliance to allow the oil to flow back in the
compressor.
¥ There are working parts in this product which
heat up. Always ensure that there is adequate
ventilation as a failure to do this will result in
component failure and possible food loss. See
installation instructions.
¥ Parts which heat up should not be exposed.
Wherever possible the back of the product
should be against a wall.
Environment Protection
This appliance does not contain gasses which
could damage the ozone layer, in either its
refrigerant circuit or insulation materials. The
appliance shall not be discarded together with
the urban refuse and rubbish. Avoid damaging
the cooling unit, especially at the rear near the
heat exchanger. Information on your local
disposal sites may be obtained from municipal
authorities. The materials used on this appliance
marked by the symbol are recyclable.
Warnings 40
Use 42
Cleaning the interior 42
Operation 42
Temperature regulation 42
Fresh food refrigeration 42
Freezing fresh food 42
Storage of frozen food 42
Thawing 43
Ice-cube production 43
Cold accumulators 43
Movable shelves 43
Ambient switch 43
Positioning the door shelves 43
Hints 43
hints for refrigeration 43
Hints for freezing 44
Hints for storage of frozen food 44
Maintenance 44
Periodic cleaning 44
Periods of no operation 44
Interior light 44
Defrosting 45
Customer service and spare parts 45
Installation 46
Location 46
Rear spacers 46
Electrical connection 46
Door reversibility 47
Guarantee 48

13
15.Mit Ausnahme der FŠlle, in denen eine Haftung gesetzlich vorgeschrieben ist, wird durch die vorliegenden
Garantiebedingungen jede durch den Kunden u.U. geforderte EntschŠdigung fŸr Ÿber das GerŠt
hinausgehende SchŠden ausgeschlossen. Im Falle der gesetzlich niedergelegten Haftung erfolgt maximal
eine EntschŠdigung in Hšhe des Kaufpreises des GerŠts.
Diese Garantiebedingungen gelten ausschlie§lich fŸr in Belgien gekaufte und benutzte GerŠte. Bei GerŠten,
die exportiert werden, muss sich der Kunde zunŠchst vergewissern, dass sŠmtliche technischen Vorgaben
(z.B. Netzspannung und -frequenz, Anschlussvorschriften, Gasart usw.) fŸr das betreffende Land erfŸllt sind
und dass das GerŠt sich fŸr die Klima- und Umweltbedingungen vor Ort eignet. Bei im Ausland gekauften
GerŠten muss der Kunde sich zunŠchst vergewissern, dass sie die Vorschriften und Anforderungen fŸr Belgien
erfŸllen. Etwaige erforderliche oder gewŸnschte €nderungen sind durch die Garantie nicht abgedeckt und sind
nicht in allen FŠllen mšglich.
Der Kundendienst steht auch nach Ablauf des Garantiezeitraums jederzeit gerne zu Ihrer VerfŸgung.
Adresse unseres Kundendiensts:
ELECTROLUX HOME PRODUCTS BELGIUM
Bergensesteenweg, 719 Ð B-1502 LEMBEEK
Tel. 02.3630444
40
WARNINGS
It is most important that this instruction book should be retained with the appliance for future
reference. Should the appliance be sold or transferred to another owner, or should you move house
and leave the appliance, always ensure that the book is supplied with the appliance in order that the
new owner can be acquainted with the functioning of the appliance and the relevant warnings.
If this appliance featuring magnetic door seals is to replace an older appliance having a spring lock
(latch) on the door or lid, be sure to make that spring lock unusable before you discard the old
appliance. This will prevent it from becoming a death-trap for a child.
These warnings are provided in the interest of safety. You must read them carefully before installing or
using the appliance.
General Safety
¥ This appliance is designed to be operated by
adults. Children should not be allowed to tamper
with the controls or play with the product.
¥ It is dangerous to alter the specifications or
modify this product in any way.
¥ Before any cleaning or maintenance work is carried
out, be sure to switch off and unplug the appliance.
¥ This appliance is heavy. Care should be taken
when moving it
¥ Ice lollies can cause frost burns if consumed
straight from the appliance.
¥ Take utmost care when handling your
appliance so as not to cause any damages to
the cooling unit with consequent possible
fluid leakages.
¥ The appliance must not be located close to
radiators or gas cookers.
¥ Avoid prolonged exposure of the appliance to
direct sunlight.
¥ There must be adequate ventilation round the
back of the appliance and any damage to the
refrigerant circuit must be avoided.
¥ For freezers only (except built-in models): an
ideal location is the cellar or basement.
¥ Do not use other electrical appliances (such
as ice cream makers) inside of refrigerating
appliances.
Service/Repair
¥ Any electrical work required to install this
appliance should be carried out by a qualified
electrician or competent person
¥ This product should be serviced by an authorized
Service Centre, and only genuine spare parts
should be used.
¥ Under no circumstances should you attempt to
repair the appliance yourself. Repairs carried out
by inexperienced persons may cause injury or
more serious malfunctioning. Refer to your local
Service Centre, and always insist on genuine
spare parts.
¥ This appliance contains hydrocarbons in its
cooling unit; maintenance and recharging must
therefore only be carried out by authorized
technicians.
Use
¥ The domestic refrigerators and freezers are
designed to be used specifically for the storage
of edible foodstuffs only.
¥ Best performance is obtained with ambient
temperature between +18¡C and +43¡C (class
T); +18¡C and +38¡C (class ST); +16¡C and
+32¡C (class N); +10¡C and +32¡C (class SN).
The class of your appliance is shown on its rating
plate.
Warning: when the ambient temperature is not
included within the range indicated for the class
of this appliance, the following instructions must
be observed: when the ambient temperature
drops below the minimum level, the storage
temperature in the freezer compartment cannot
be guaranteed; therefore it is advisable to use
the food stored as soon as possible.
¥ Frozen food must not be re-frozen once it has
been thawed out.
¥ ManufacturersÕ storage recommendations should
be strictly adhered to. Refer to relevant
instructions.
¥ The inner lining of the appliance consists of
channels through which the refrigerant passes. If
these should be punctured this would damage the
appliance beyond repair and cause food loss. DO
NOT USE SHARP INSTRUMENTS to scrape off
frost or ice. Frost may be removed by using the
scraper provided. Under no circumstances should
solid ice be forced off the liner. Solid ice should be
allowed to thaw when defrosting the appliance.
¥ Do not place carbonated or fizzy drinks in the
freezer as it creates pressure on the container,
which may cause it to explode, resulting in
damage to the appliance. Do not use a
mechanical device or any artificial means to
/