
Bedienungsanleitung (D/A/CH)
Manuel d’utilisation (F/B/CH)
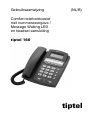
Gebruiksaanwijzing (NL/B)
Manual (English)
Εγχειρίδιο Χρήσης (GR)
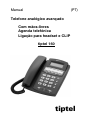
Manual (PT)
Brukerveiledning (NOR)
tiptel 160
tiptel
Page is loading ...
Page is loading ...
Page is loading ...
Page is loading ...
Page is loading ...
Page is loading ...
Page is loading ...
Page is loading ...
Page is loading ...
Page is loading ...
Page is loading ...
Page is loading ...
Page is loading ...
Page is loading ...
Page is loading ...
Page is loading ...
Page is loading ...
Page is loading ...
Page is loading ...
Page is loading ...
Page is loading ...
Page is loading ...
Page is loading ...
Page is loading ...
Page is loading ...
Page is loading ...
Page is loading ...
Page is loading ...
Page is loading ...
Page is loading ...
Page is loading ...
Page is loading ...
Page is loading ...
Page is loading ...
Page is loading ...
Page is loading ...
Page is loading ...
Page is loading ...
Page is loading ...
Page is loading ...
Page is loading ...
Page is loading ...
Page is loading ...
Page is loading ...
Page is loading ...
Page is loading ...
Page is loading ...
Page is loading ...
Page is loading ...
Page is loading ...
Page is loading ...
Page is loading ...
Page is loading ...
Page is loading ...
Page is loading ...
Page is loading ...
Page is loading ...
Page is loading ...
Page is loading ...
Page is loading ...
Page is loading ...
Page is loading ...
Page is loading ...
Page is loading ...

Inhoudsopgave
4
n
l
Message Waiting Indicatie (MWI) ..................................................................25
FSK.............................................................................................................. 25
Ompoling (PR1 / PR2) ................................................................................ 25
Hoge spanning (HV) ................................................................................... 26
SR belsignaalpuls MW................................................................................ 26
Bijlage ..............................................................................................................28
Service ........................................................................................................ 28
Garantie....................................................................................................... 28
Fabrieksinstellingen.................................................................................... 29
Conformiteit verklaring................................................................................ 29
CE-Keuring.................................................................................................. 29
Vastgesteld gebruik .................................................................................... 29
Copyright .................................................................................................... 30
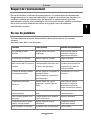
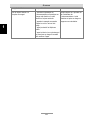
Problemen oplossen................................................................................... 30
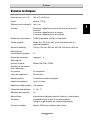
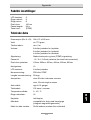
Technische gegevens................................................................................. 32
Page is loading ...
Page is loading ...
Page is loading ...
Page is loading ...
Page is loading ...
Page is loading ...
Page is loading ...
Page is loading ...
Page is loading ...
Page is loading ...
Page is loading ...
Page is loading ...
Page is loading ...
Page is loading ...
Page is loading ...
Page is loading ...
Page is loading ...
Page is loading ...
Page is loading ...
Page is loading ...
Page is loading ...
Page is loading ...
Page is loading ...
Page is loading ...
Page is loading ...
Page is loading ...
Page is loading ...
Page is loading ...

Manual (English)
Feature Phone
with hands-free operation
telephone book and
headset connector
tiptel 160
tiptel
Page is loading ...

Contents
3
e
n
g
Contents
Contents ..........................................................................................................3
Safety instructions ..........................................................................................5
Product features..............................................................................................6
Scope of delivery ........................................................................................ 6
Button allocation .............................................................................................7
Installation .......................................................................................................10
Function setup.................................................................................................11
Set the Language........................................................................................ 11
Set the Contrast .......................................................................................... 11
Set Year, Date and Time............................................................................. 11
Set Ext. No. (CO-line access) ..................................................................... 11
Set the Ring Melodies................................................................................. 12
Set the Ring Volume ................................................................................... 12
Set Flash Time ............................................................................................ 12
Set Pause Time........................................................................................... 12
Set DTMF or Pulse Mode............................................................................ 12
Operation.........................................................................................................13
Make a Call ................................................................................................. 13
Answer a Call .............................................................................................. 13
End a call .................................................................................................... 13
Switching between handset and speakerphone mode ............................. 13
Headset operation ...................................................................................... 13
Microphone mute........................................................................................ 14
Flash (R-key) / Transfer a call..................................................................... 14
Pre-dial ........................................................................................................ 14
Pause .......................................................................................................... 14
Redial / Auto redial...................................................................................... 14
Speed Dial Memories ................................................................................. 15
Caller ID list ................................................................................................. 15
Phone book................................................................................................. 16
Set Alarm Time............................................................................................ 17
Reset complete device back to factory settings ........................................ 17

Contents
4
e
n
g
Message Waiting Indication ...........................................................................18
FSK Message Waiting Indication................................................................ 18
Telephone line voltage polarity change MWI ............................................. 18
High voltage MWI........................................................................................ 18
SR burst ringing MWI.................................................................................. 18
Appendix..........................................................................................................20
Service ........................................................................................................ 20
Guarantee ................................................................................................... 20
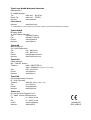
CE sign........................................................................................................ 21
Ecological information ................................................................................ 21
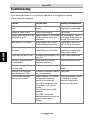
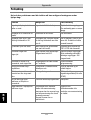
Troubleshooting.......................................................................................... 22
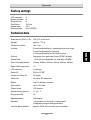
Factory settings........................................................................................... 23
Technical data............................................................................................. 23

Safety instructions
5
e
n
g
Safety instructions
When using your telephone equipment, basic safety precautions should always be
followed to reduce the risk of fire, electric shock and injury to persons, including the
following:
•
Read and understand all instructions.
•
Follow all warnings and instructions marked on the product.
•
Unplug this product from the wall outlet before cleaning. Do not use liquid
cleansers or aerosol cleansers. Use a damp cloth for cleaning.
•
Do not use this product near water, for example, near a bath tub, wash bowl,
kitchen sink, or laundry tub, in a wet basement, or near a swimming pool.
•
Do not place this product on an unstable cart, stand, or table. The producting
serious damage to the product.
•
Do not allow anything to rest on the telephone cord. Do not locate this product
where the cord will be abused by persons walking on it.
•
Never push objects of any kind into this product through cabinet slots as they
may touch dangerous voltage points or short out parts that could result in a risk
of fire or electric shock. Never spill liquid of any kind on the product.
•
To reduce the risk of electric shock, do not disassemble this product, but take it
to a qualified serviceman when service or repair work is voltages or other risks.
Incorrect reassembly can cause electric shock when the appliance is
subsequently used.
•
Unplug this product from the wall outlet and refer servicing to qualified service
personnel under the following conditions:
A. If liquid had been spilled into the product.
B. If the product does not operate normally by following the operating
instructions. Adjust only the controls, that are covered by the operating
instructions because improper adjustment of other controls may result in
damage and will often require extensive work by a qualified technician to
restore the product to normal operation.
C. If the product has been dropped or the cabinet has been damaged.
D. If the product exhibits a distinct change in performance.
•
Avoid using a telephone (other than a cordless type) during an electrical storm.
There may be a remote risk of electric shock from lighting.
•
Do not use the telephone in the vicinity of a gas leak.
•
Only attach accessories authorised by TIPTEL for this device.

Getting started
6
e
n
g
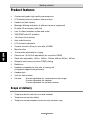
Product features
•
Commercial grade high-quality speakerphone
•
LCD displays phone numbers, date and time
•
Hands free (half duplex)
•
Message Waiting Indication (4 different versions supported)
•
60 caller ID memories (caller list)
•
Last 16 dialed numbers review and redial
•
FSK/DTMF caller ID available
•
135 phone book entries
•
Auto redial function
•
LCD contrast adjustable
•
Transfer function (R-key for use with a PABX)
•
Mute function
•
16 melodies selectable for ringing
•
Pause time 1.2/2.4/3.6s adjustable (for use with a PABX)
•
Flash time adjustable: 100ms, 200ms, 300ms, 400ms, 600ms, 900ms
•
Supports both pulse and tone (DTMF) dialing
•
Redial key
•
Handset compatible for use with a hearing aid
(integrated magnet field generator)
•
Headset jack
•
Jack for data modem
•
Volume: 8 levels adjustable for speakerphone and ringer
6 levels adjustable for headset
4 levels adjustable for handset receiver
Scope of delivery
•
Telephone device with coil cord and handset
•
Telephone connection cable
•
Telephone socket adapters (some country versions only)

Getting started
7
e
n
g
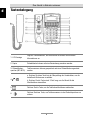
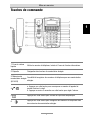
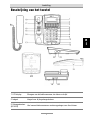
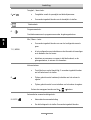
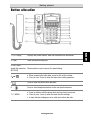
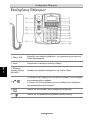
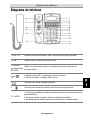
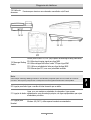
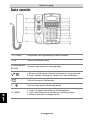
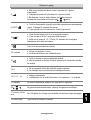
Button allocation
1. LCD Display Displays the phone number, date and time and other information.
2. Paper Label the speed dialing keys.
3. One-Touch
speed dial memories
(M1-M10)
Phone numbers may be stored for speed dialing.
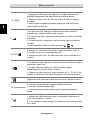
4. /
a. When reviewing the caller data, press to dial out the number.
b. Press for min. 3 secs to enter the alarm time setting operation.
5
.
Press to enter the phone book operation.
6.
Press to store telephone numbers in the one-touch memories.
7. X / MENU
a. Press to delete or edit the phone book and one-touch memories.
b. Press for min. 3 secs to enter the main function settings.
c. In main function settings press to enter and confirm the data.

Getting started
8
e
n
g
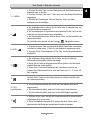
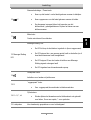
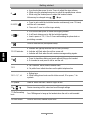
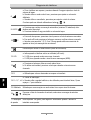
8.
a. In on-hook status press for min. 3 secs to adjust the ringer volume.
b. While using the speakerphone press to adjust the speakerphone volume.
c. While using the handset press to adjust the handset volume.
Volume may be changed using
keys.
9. AUTO /
a. Press to auto redial the last dialed number continuously (max. 15 times)
until the call is answered.
b. Press min. 3 secs to set the ringer melody.
10. / P
a. In on-hook status press to review the outgoing number.
b. In off-hook status press to dial the last dialed number.
c. Insert a pause of 1.2 / 2.4 or 3.6 secs while editing the phone book or
pre-dialing a number.
11. Press to mute the line (microphone mute).
12. LED indicator
a. Indicator will light up when the unit is in use (off-hook).
b. Indicator will flash when the unit has a new call.
c. Indicator will flash when the unit receives message waiting signals.
12.
a. Press for handsfree dialing and speak without lifting up the handset.
b. If a headset is used press to talk or end the call.
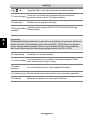
13. R
a. For PABX use, Recall, used to transfer calls
b. On public lines: initiate functions on the public telephone line
14. 0 – 9, *, #
a. Dialing keys.
b. While editing phone book used for letters as well, 0 for space, * for
symbols.
15. Speaker Used for hands-free calls, used for ringer as well
16. Review incoming call list, select and scroll through settings
17. Wall mounting
hook
Turn 180 degrees to hang up the handset when the unit is wall mounted.
18. Hook switch Press to end a call, handset on/off-hook

Getting started
9
e
n
g
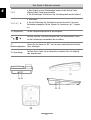
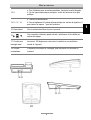
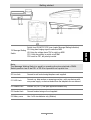
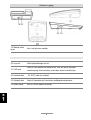
19. Message Waiting
Switch
Switch from SR/HV/PR1/PR2 (see chapter Message Waiting Indication)
SR: Using burst ringing signal to switch on MWI
HV: Using line voltage above 70V to switch on MWI
PR1: Using line polarity to switch on/off MWI
PR2: same as PR1, but polarity inverted
Note:
The Message Waiting Switch is good for operating the phone behind a PABX.
Switch position has to be PR1 or PR 2 for operation on a public line.
20. Line Jack Connect to wall socket using telephone cord supplied.
21. DATA Jack
Connect e.g. data modem or answering machine, solely use devices with
own power supply, no devices feeded from the telephone line are allowed
22. Headset Jack Western 4/4 (RJ11), use tiptel-approved headsets only
23. Handset Jack Connect handset using coil cord supplied.
24. Battery cover Use 4 x AA size batteries only (Alkaline)

Getting started
10
e
n
g
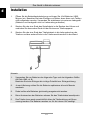
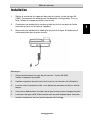
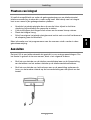
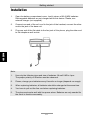
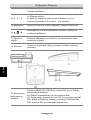
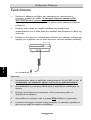
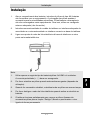
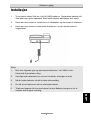
Installation
1. Open the battery compartment cover, load 4 pieces of AA (UM3) batteries.
Rechargeable batteries are not charged within this device. Please, use
external charger (not supplied).
2. Connect one end of the coil cord to the jack of the handset, connect the other
end to the jack of the base unit.
3. Plug one end of the flat cable to the line jack of this phone, plug the other end
to the telephone wall socket.
Note:
1. Use only the following type and size of batteries: AA cell UM3 x 4 pcs.
The proper polarity or direction must be observed.
2. Please, change your batteries every 8 months or longer (depends on usage).
3. When replacing batteries, all batteries should be changed at the same time.
4. You have to pull out the line cord when replacing batteries.
5. The phone set works well with line power alone. Batteries are only needed for
the clock to function accurately.

Setup
11
e
n
g
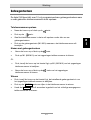
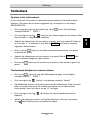
Function setup
Every function setup is available by using just a single key. In on-hook status, press
X/MENU for a minimum of 3 seconds to enter the function menu. Pressing the very
same key X/MENU repeatedly will show the different functions available one after
another. Please, refer to the list below for setting up each function. You may escape
the setting menu going off-hook for a second.
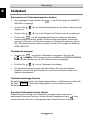
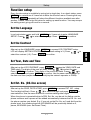
Set the Language
In on-hook status, press and hold X/MENU for 3 seconds to enter LANGUAGE
SETUP. Press to select the language. Press X/MENU to confirm.
Set the Contrast
After set up the LANGUAGE, press X/MENU to access LCD CONTRAST setup.
LCD will display SETTING CONTRAST (The default setting is 3.) Press to
select the contrast (1-5). Press X/MENU to confirm.
Set Year, Date and Time
After set up the LCD CONTRAST, press X/MENU to access the YEAR, DATE and
TIME setup. The digits of the year will flash. Press to select the year.
Press X/MENU to confirm. Then digits of the month will flash. Press
to
select the month and press X/MENU to confirm. Use the same method to set up
the date and time (maybe set automatically by the network operator or PABX).
Set Ext. No. (CO-line access)
After set up the YEAR, DATE & TIME, press X/MENU to access EXT. NO. setup.
The first digit will flash. Press to select the digit and press X/MENU to
save selection. Use the same method to continue setting other digits.
When the phone is operated behind a PBX, Ext. No. can be set for dialing outside
phone numbers and a pause will be added automatically between the Ext. No. and
the phone number you dialed. E.g.: If you set up the Ext. No. as 0 and dial from the
phone book, the number stored as 0021024280 will be practically dialed as 0,
pause, 021024280 (see: Set Pause Time).

Setup
12
e
n
g
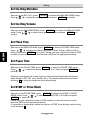
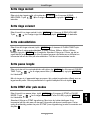
Set the Ring Melodies
After set up the EXT. NO., press X/MENU to access the RING MELODIES setup.
Press to select the melody (1-16) and press X/MENU to confirm.
Set the Ring Volume
After set up the RING MELODIES, press X/MENU to access the RING VOLUME
setup. Press to select the ring volume (1-8) and press X/MENU to
confirm.
Set Flash Time
After set up the RING VOLUME, press X/MENU to enter the FLASH TIME setup.
Press to select the flash time(100ms, 200ms, 300ms, 400ms, 600ms,
900ms) and press X/MENU to confirm. Please, ask your network provider or PBX
installer (in case this device is used behind a PBX) for the appropriate setting.
Set Pause Time
After set up the FLASH TIME, press X/MENU to enter the PAUSE TIME setup.
Press to select the pause time(1.2s, 2.4s, 3.6s) and press X/MENU to
confirm.
Dialing out the device will create a pause of the selected length after dialing the
digits stored in EXT. NO. (see: Set Ext. No.). This pause time will be used when
pressing P or using the telephone book accordingly.
Set DTMF or Pulse Mode
After set up the PAUSE TIME, press X/MENU to access the DTMF or PULSE
MODE setup. Press to select the mode(DTMF or PULSE) and press
X/MENU to confirm.
Please, ask your network provider or PBX installer (in case this device is used
behind a PBX) for the appropriate setting.
It is possible to temporarely switch from pulse to DTMF (tone dialing) mode during
a call pressing * .

Operation
13
e
n
g
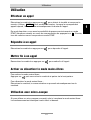
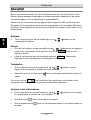
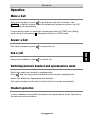
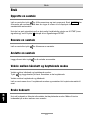
Operation
Make a Call
Pick up the handset or press to get dial tone and dial the number. Use
X/MENU to edit the number. When the called party answers the phone, the LCD
will time the call automatically.
In pulse dialing mode it is possible to temporarely switch to DTMF (tone dialing)
mode during a call pressing * . Afterwards dialing is in DTMF mode.
Answer a Call
Pick up the handset or press to answer the call.
End a call
Hang up the handset or press to end the call.
Switching between handset and speakerphone mode
Switch talk mode from handset to speakerphone:
Press
and then hang up the handset and talk using the speakerphone.
Switch Talk Mode from Speakerphone to handset:
Pick up the handset and the talk mode will switch to handset automatically.
Headset operation
In case a headset is connected this replaces the speakerphone mode. Operation is
the same as mentioned above.

Operation
14
e
n
g
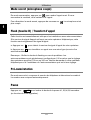
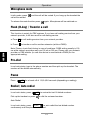
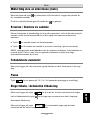
Microphone mute
In talk mode, press
and the call will be muted. If you hang up the handset the
call will be ended.
To release the mute function press
again. Microphone will be switched on.
Flash (R-key) / Transfer a call
This function is mainly for PBX systems. If you have call waiting service from your
network provider, it will also work for call waiting service.
a. Press R for call waiting service from your network provider.
b. Press R to transfer a call to another extension (within a PABX).
Note: Please, check flash timing in case of problems. PABX setting usually is 100
ms while network providers may use 100 ms or 300 ms. Please, ask your network
provider or PBX installer (in case this device is used behind a PABX) for the
appropriate setting.
Pre-dial
In on-hook status, type in the phone number and then pick up the handset. The
number will be dialed automatically.
Pause
Press / P for a break off of 1.2/2.4/3.6 seconds (depending on setting).
Redial / Auto redial
In on-hook status, press / P to review the last 16 dialed numbers.
Pick up the handset or press to dial the reviewed number.
Auto Redial
In on-hook status, press AUTO /
to auto redial the last dialed number
continuously until the phone is answered.

Operation
15
e
n
g
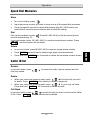
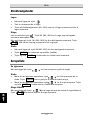
Speed Dial Memories
Store
•
In on-hook status, press
.
•
Input the phone number you wish to store as one of the speed dial memories.
•
Press the specific one-touch speed dial memory key (M1~M10) which you
would like to save the phone number with to finish the setting.
Dial
Pick up the handset or press . Press M1 (M2~M10) to dial the stored phone
number automatically. Or:
In on-hook status, press M1 (M2~M10) to see the stored phone number. Press
/ and the number will be dialed.
Delete
•
In on-hook status, press M1(M2~M10) to see the stored phone number.
•
Press X/MENU several times to delete single digits (from backwards).
•
Press and hold X/MENU for 3 seconds to delete the complete number shown.
Caller ID list
Review
In on-hook status, press to review the caller’s phone number and the
time they called .
Delete
•
When you check the incoming calls, press
to find the call you wish
to delete. Press X/MENU once shortly to delete a single call.
•
When you check the incoming calls, press
to go to any call data.
Press and hold X/MENU for 3 seconds to delete all calls.
Call Back
In on-hook status, press to select the call you wish to dial from the Caller
ID list. Press
/ and the number will be dialed.

Operation
16
e
n
g
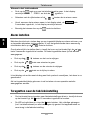
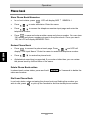
Phone book
Store Phone Book Memories
•
In on-hook status, press
. LCD will display ADD
↑
SEARCH
↓
•
Press
to enter edit status. Enter the name.
•
Press
to access the telephone number input page and enter the
telephone number.
•
Press
to save and enter another name and phone number. You can store
136 names and phone numbers at most in the phone book. Once you reach
136, the LCD will display MEMORY FULL.
Review Phone Book
•
Press
to access the phone book page. Press and LCD will
display “PLS Input Name”. Enter the name to review the telephone number.
•
Press
to review the phone book.
•
Alphabetical searching is supported. If you enter a letter then you can review
the phone book by the first letter of the name.
Delete Phone Book entries
In phone-book-review status, press and hold X/MENU for 3 seconds to delete the
name and number.
Dial from Phone Book
In on-hook status, when reviewing the phone book and finding the number you
wish to dial, press
or pick up the handset to dial the stored phone number.

Operation
17
e
n
g
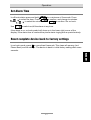
Set Alarm Time
In off-hook status press and hold / for a minimum of 3 seconds. Press
to select the hour. Press / to confirm and change to minutes.
Press to select the minutes. Press / to confirm. Go on-hook.
Use / to switch on/off the alarm at any time.
If the alarm is on, a clock-symbol will show up in the lower right corner of the
display. If the alarm time is reached the phone starts ringing with a special melody.
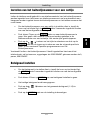
Reset complete device back to factory settings
In on-hook mode, press R for more than 8 seconds. This clears all memory (incl.
Phone Book) and all settings. The device is back to initial factory setting after some
seconds.

Message Waiting Indication
18
e
n
g
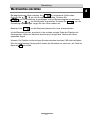
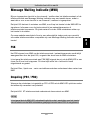
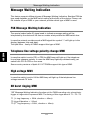
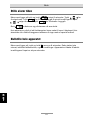
Message Waiting Indication
This device supports different types of Message Waiting Indication. Besides FSK the
type used depends on the MWI switch setting at the back of the device. Please, ask
the installer of your PABX or your network provider which type of MWI is used.
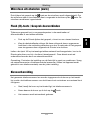
FSK Message Waiting Indication
The special coded caller-ID signal used to indicate message waiting will be
interpreted by the device all the time no matter what position the MWI-switch has.
In case the network provider sends a MWI-signal the symbol will light up in the
display (between time and date).
The tiptel 30xx – family of PABXs support this type of MWI.
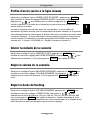
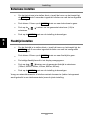
Telephone line voltage polarity change MWI
In case the switch is set to PR1 or PR2 the MWI-lamp will light up if the telephone
line voltage changes polarity. In case the MWI-lamp lights up unintentionally just
switch from PR1 to PR2 or vice versa.
Some country versions of tiptel 4011 XT PABXs support this type of MWI.
High voltage MWI
In case the switch is set to HV the MWI-lamp will light up if the telephone line
voltage exceeds 70 Volts.
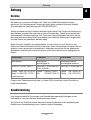
SR burst ringing MWI
“SR” Message Waiting Indication function suit for PABXs sending only a burst-train-
trigger of ringer which represent MWI. The timing of this ringer-burst is T1---T2---T3.
T1 (1
st
ring frequency = 50Hz ,duration = 40ms)
T2 (ring off duration = 110ms)
T3 (2
nd
ring frequency = 50Hz , duration = 40ms)

Message Waiting Indication
19
e
n
g
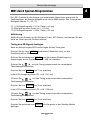
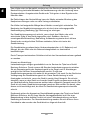
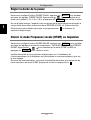
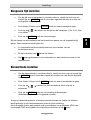
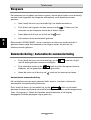
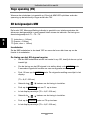
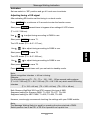
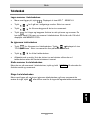
Activation
Set rear-switch to “SR” position and go off hook once to activate.
Adjusting timing of SR signal
After activating SR function set the timing in on-hook mode.
Press X/MENU for a minimum of 3 seconds to enter the function menu.
Short press X/MENU several times to bypass other settings till LCD shows
(T1= 6.6 * 006 ms).
Use
to adjust timing according to PABX in use.
Short press X/MENU to save T1.
The LCD shows (T2 = 6.6 * 017 ms) ,
Use
to adjust timing according to PABX in use.
Short press X/MENU to save T2.
The LCD shows (T3 = 6.6 * 006 ms) ,
Use
to adjust timing according to PABX in use.
Short press X/MENU to save T3.
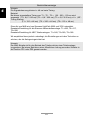
Press X/MENU several times until you are back to standby mode.
Note:
Signal recognition tolerates ± 46 ms in timing.
Example:
For the initial timing of T1—T2 – T3 = 150 – 330 – 150ms manual setting shows
(T1= 6.6 * 022 ms) (T2 = 6.6 * 050 ms) (T3 = 6.6 *0 22 ms) which mean SR-timing
tolerates
(T1= 150 ± 46 ms) (T2 = 350 ± 46 ms) (T3= 150 ± 46 ms)
Both Siemens HighPath 3550 and 3750 support this type of MWI.
Supposed setting for Siemens PABX: T1=006, T2=017, T3=006.
Supposed setting for NEC PABX: T1=022, T2=050, T3=022.
However, we strongly recommend checking the settings with your PABX installer.
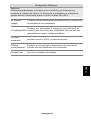
Note:
The Message Waiting Switch is good for operating the phone behind a PABX.
Switch position has to be PR1 or PR 2 for operation on a public line.
Page is loading ...
Page is loading ...
Page is loading ...
Page is loading ...
Page is loading ...
Page is loading ...
Page is loading ...
Page is loading ...
Page is loading ...
Page is loading ...
Page is loading ...
Page is loading ...
Page is loading ...
Page is loading ...
Page is loading ...
Page is loading ...
Page is loading ...
Page is loading ...
Page is loading ...
Page is loading ...
Page is loading ...
Page is loading ...
Page is loading ...
Page is loading ...
Page is loading ...
Page is loading ...
Page is loading ...
Page is loading ...
Page is loading ...
Page is loading ...
Page is loading ...
Page is loading ...
Page is loading ...
Page is loading ...
Page is loading ...
Page is loading ...
Page is loading ...
Page is loading ...
Page is loading ...
Page is loading ...
Page is loading ...
Page is loading ...
Page is loading ...
Page is loading ...
Page is loading ...
Page is loading ...
Page is loading ...
Page is loading ...
Page is loading ...
Page is loading ...
Page is loading ...
Page is loading ...
Page is loading ...
Page is loading ...
Page is loading ...
Page is loading ...
Page is loading ...
Page is loading ...
Page is loading ...
Page is loading ...
Page is loading ...
Page is loading ...
Page is loading ...
Page is loading ...
Page is loading ...
Page is loading ...
Page is loading ...
Page is loading ...
Page is loading ...
Page is loading ...
Page is loading ...
Page is loading ...
Page is loading ...
Page is loading ...
Page is loading ...
Page is loading ...
Page is loading ...
Page is loading ...
Page is loading ...
Page is loading ...
Page is loading ...
Page is loading ...
Page is loading ...
-
 1
1
-
 2
2
-
 3
3
-
 4
4
-
 5
5
-
 6
6
-
 7
7
-
 8
8
-
 9
9
-
 10
10
-
 11
11
-
 12
12
-
 13
13
-
 14
14
-
 15
15
-
 16
16
-
 17
17
-
 18
18
-
 19
19
-
 20
20
-
 21
21
-
 22
22
-
 23
23
-
 24
24
-
 25
25
-
 26
26
-
 27
27
-
 28
28
-
 29
29
-
 30
30
-
 31
31
-
 32
32
-
 33
33
-
 34
34
-
 35
35
-
 36
36
-
 37
37
-
 38
38
-
 39
39
-
 40
40
-
 41
41
-
 42
42
-
 43
43
-
 44
44
-
 45
45
-
 46
46
-
 47
47
-
 48
48
-
 49
49
-
 50
50
-
 51
51
-
 52
52
-
 53
53
-
 54
54
-
 55
55
-
 56
56
-
 57
57
-
 58
58
-
 59
59
-
 60
60
-
 61
61
-
 62
62
-
 63
63
-
 64
64
-
 65
65
-
 66
66
-
 67
67
-
 68
68
-
 69
69
-
 70
70
-
 71
71
-
 72
72
-
 73
73
-
 74
74
-
 75
75
-
 76
76
-
 77
77
-
 78
78
-
 79
79
-
 80
80
-
 81
81
-
 82
82
-
 83
83
-
 84
84
-
 85
85
-
 86
86
-
 87
87
-
 88
88
-
 89
89
-
 90
90
-
 91
91
-
 92
92
-
 93
93
-
 94
94
-
 95
95
-
 96
96
-
 97
97
-
 98
98
-
 99
99
-
 100
100
-
 101
101
-
 102
102
-
 103
103
-
 104
104
-
 105
105
-
 106
106
-
 107
107
-
 108
108
-
 109
109
-
 110
110
-
 111
111
-
 112
112
-
 113
113
-
 114
114
-
 115
115
-
 116
116
-
 117
117
-
 118
118
-
 119
119
-
 120
120
-
 121
121
-
 122
122
-
 123
123
-
 124
124
-
 125
125
-
 126
126
-
 127
127
-
 128
128
-
 129
129
-
 130
130
-
 131
131
-
 132
132
-
 133
133
-
 134
134
-
 135
135
-
 136
136
-
 137
137
-
 138
138
-
 139
139
-
 140
140
-
 141
141
-
 142
142
-
 143
143
-
 144
144
-
 145
145
-
 146
146
-
 147
147
-
 148
148
-
 149
149
-
 150
150
-
 151
151
-
 152
152
-
 153
153
-
 154
154
-
 155
155
-
 156
156
-
 157
157
-
 158
158
-
 159
159
-
 160
160
-
 161
161
-
 162
162
-
 163
163
-
 164
164
-
 165
165
-
 166
166
-
 167
167
-
 168
168
-
 169
169
-
 170
170
-
 171
171
-
 172
172
-
 173
173
-
 174
174
-
 175
175
-
 176
176
-
 177
177
-
 178
178
-
 179
179
-
 180
180
-
 181
181
-
 182
182
-
 183
183
-
 184
184
-
 185
185
-
 186
186
-
 187
187
-
 188
188
-
 189
189
-
 190
190
-
 191
191
-
 192
192
-
 193
193
-
 194
194
-
 195
195
-
 196
196


Ask a question and I''ll find the answer in the document
Finding information in a document is now easier with AI
in other languages
- français: Tiptel 160 Le manuel du propriétaire
- Deutsch: Tiptel 160 Bedienungsanleitung
- Nederlands: Tiptel 160 de handleiding
- português: Tiptel 160 Manual do proprietário
Related papers
Other documents
-
AGFEO T 18 Operating instructions
-
-
-
-
AGFEO T 15 eco Owner's manual
-
Gigaset AS690IP Owner's manual
-
-
-
-