Bryton Rider 15 User manual
- Category
- Bicycle accessories
- Type
- User manual
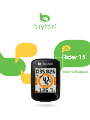
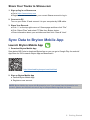
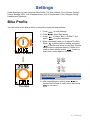
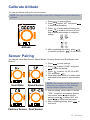
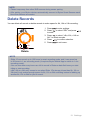
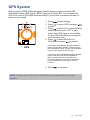
Bryton Rider 15 is a compact GPS cycling computer that provides a range of features to enhance your riding experience. With its easy-to-use interface and customizable settings, the Rider 15 is suitable for both casual and serious cyclists.
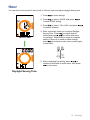
The Rider 15 comes equipped with a high-sensitivity GPS receiver that quickly acquires and maintains a strong signal, even in challenging conditions. This ensures accurate tracking of your rides, including distance, speed, altitude, and ride time. The device also features a built-in barometer that provides elevation data, allowing you to monitor your ascents and descents.
Bryton Rider 15 is a compact GPS cycling computer that provides a range of features to enhance your riding experience. With its easy-to-use interface and customizable settings, the Rider 15 is suitable for both casual and serious cyclists.
The Rider 15 comes equipped with a high-sensitivity GPS receiver that quickly acquires and maintains a strong signal, even in challenging conditions. This ensures accurate tracking of your rides, including distance, speed, altitude, and ride time. The device also features a built-in barometer that provides elevation data, allowing you to monitor your ascents and descents.


-
 1
1
-
 2
2
-
 3
3
-
 4
4
-
 5
5
-
 6
6
-
 7
7
-
 8
8
-
 9
9
-
 10
10
-
 11
11
-
 12
12
-
 13
13
-
 14
14
-
 15
15
-
 16
16
-
 17
17
-
 18
18
-
 19
19
-
 20
20
-
 21
21
-
 22
22
-
 23
23
-
 24
24
-
 25
25
-
 26
26
-
 27
27
-
 28
28
-
 29
29
-
 30
30


Bryton Rider 15 User manual
- Category
- Bicycle accessories
- Type
- User manual
Bryton Rider 15 is a compact GPS cycling computer that provides a range of features to enhance your riding experience. With its easy-to-use interface and customizable settings, the Rider 15 is suitable for both casual and serious cyclists.
The Rider 15 comes equipped with a high-sensitivity GPS receiver that quickly acquires and maintains a strong signal, even in challenging conditions. This ensures accurate tracking of your rides, including distance, speed, altitude, and ride time. The device also features a built-in barometer that provides elevation data, allowing you to monitor your ascents and descents.
Ask a question and I''ll find the answer in the document
Finding information in a document is now easier with AI
Related papers
Other documents
-
 QINGOR ELECTRIC SCOOTER User manual
-
Shenzhen HRM828 Heart Rate Monitor User manual
-
iGPSport iGS60 Owner's manual
-
BodyCraft DUAL PRO Owner's manual
-
 Kick.ai KICKAI-001 Important Product Information
-
 Terrain Dynamics Viiiiva Operating instructions
-
Lenco SPORTCAM-600 Datasheet
-
Magene C406 Smart GPS Bike Computer User manual
-
Cateye Stealth 50 [CC-GL50] Owner's manual
-
Actiiv Heart Rate Monitor User manual


