Page is loading ...

SIGNETMARINE
SL250 BASE MODULE
Instruction Manual
SIGNET MARINE
2315 1/2 Artesia Blvd
Redondo Beach, California 90278
(310) 320-4349 FAX (310) 320-5026
1-3402.090

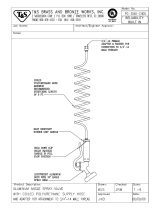
Paddlewheel Installation
and Loc at ion
Chapter 7 - Installation
Pa
g
e7-8
Transducer Installation
and Loc at ion
Chapter 7 - Installation
Page 7-12
Display Operati on
Chapter 3 - Basic Operati o n
Page 3-2
Display Installation
Chapter 7 - Installation
Page 7-25
Sensepak Installation
Chapter 7 - Instal lati o
n
Page 7-5

T ABLE OF C ONTENTS
INTRODUCTION.............................................................................. 1-1
1.1 BASIC SYSTEM - DESCRIPTIONS ................................ 1-1
1.2 EXTENDING THE SYSTEM ............................................ 1-3
1.3 SUBSTITUTION OF SENSEPAKS .................................. 1-5
LEARNING GUIDE .......................................................................... 2-1
2.1 TURNING ON YOUR SYSTEM ....................................... 2-1
2.2 MAIN MENU .................................................................... 2-3
2.3 SELECTING A PAGE OF INFO....................................... 2-4
2.4 CREATING A PAGE OF INFO......................................... 2-5
BASIC OPERATION ........................................................................ 3-1
3.1 BASE MODULE SL175 SENSEPAK CHANNELS........... 3-1
3.2 START-UP.............................................................. 3-2
3.3 MAIN MENU .................................................................... 3-3
3.3.1 OPTIONS............................................................. 3-3
3.3.2 KEYS .......................................................... 3-4
3.4 SELECT A PAGE OF INFO ............................................. 3-5
3.5 CREATE A PAGE OF INFO............................................. 3-5
3.6 TURN-ON PAGE ............................................................. 3-5
3.7 BEEPER .......................................................................... 3-6
3.8 UNITS .............................................................................. 3-7
3.9 TIME ................................................................................ 3-8
3.10 ELAPSED TIME.............................................................. 3-9
3.11 RACING START TIMER ................................................. 3-9
3.12 TRIP LOG ....................................................................... 3-10
ADVANCED OPERATION ............................................................... 4-1
4.1 ALARMS .......................................................................... 4-2
4.1.1 DEPTH ALARM ................................................... 4-2
4.1.2 RST ALARM ........................................................ 4-4
4.2 DEFAULT PAGES .......................................................... 4-5
CALIBRATION ................................................................................. 5-1
5.1 LOCK/UNLOCK FEATURE.............................................. 5-1
5.2 BOAT SPEED - PREFERRED CALIBRATION................ 5-2
5.2.1 BOAT SPEED - ALTERNATE CALIBRATION.....5-4
5.3 DEPTH............................................................................. 5-6
5.4 WATER TEMPERATURE................................................ 5-7
TROUBLESHOOTING ..................................................................... 6-1
6.1 SELF TEST...................................................................... 6-1

6.2 SIGBUS ........................................................................... 6-1
6.3 DATA INTERRUPTION.................................................... 6-2
6.4 BLANK SCREEN ............................................................. 6-2
INSTALLATION................................................................................ 7-1
7.1 UNPACKING.................................................................... 7-1
7.1.1 BASE MODULE SL175 SENSEPAK PARTS ...... 7-1
7.1.2 DISPLAY PARTS................................................. 7-2
7.2 SL175 SENSEPAK INSTALLATION................................ 7-3
7.2.1 PROCESSING BOX ............................................ 7-3
7.3 PADDLEWHEEL INSTALLATION ................................... 7-6
7.4 DEPTH TRANSDUCER INSTALLATION ........................ 7-9
7.5 DISPLAY INSTALLATIONS............................................. 7-17
7.5.1 BULKHEAD INSTALLATION............................... 7-17
7.5.2 INSTALLING WITH TILT MOUNT
BRACKETS ................................................................... 7-18
7.6 SYSTEM HOOK-UP ........................................................ 7-20
APPENDICES .................................................................................. 8-1
8.1 CHANNEL OPERATION TABLE ..................................... 8-1
8.2 DISPLAY SPECIFICATIONS........................................... 8-2
8.3 SL175 SENSEPAK SPECIFICATIONS ........................... 8-3
WARRANTY..................................................................................... 9-1

____________________________________________________________________________
____________________________________________________________________________
1 INTRODUCTION
____________________________________________________________________________
____________________________________________________________________________
1.1 BASIC SYSTEM - DESCRIPTIONS
The SignetMarine Smartpak Basic System consists
of a Display and the Base Module SL175 Sensepak
with its associated transducers and sensors. The
Sensepak is the main component which gathers
information from whatever transducers and sensors
are present. Data is collected and correlated by the
Sensepak, then sent to the Display(s) for your
evaluation. In other words, the Sensepak is the
brain in the System and the Display is your window
into that brain. Other Sensepaks or Displays can
easily be added to the BASIC SYSTEM for
enhancement of your System.
All Displays and Sensepaks are connected to a
data bus that is called SIGBUS. SIGBUS is a four
wire cable that interconnects all the components,
providing power and allowing data to move freely
between modules in the System. The operator
does not need to be concerned with what data is
coming from which module; all Sensepaks and
Displays automatically communicate with each
other.
Each Sensepak contains various data which are
viewed on the Display. These data are arranged in
"Channels". A "Channel" is the name given to
specific functions shown on a Display connected to
the System. For instance, some of the Channels
available in the Base Module SL175 Sensepak are
Speed, Depth, Water Temperature and Log. If you
add the Wind Module SL225 Sensepak, some of
the additional Channels available are Apparent
Wind Angle, True Wind Speed, VMG, etc.

INTRODUCTION - 1.1 BASIC SYSTEM DESCRIPTIONS
__________________________________________________________________________
For the present we will be concerned with only
those Channels available with the Base Module
SL175 Sensepak. Further information on the
Channels available through other Sensepaks is
contained on the last page in this manual, and in
the corresponding manuals for these Sensepak
modules.
The BASE MODULE (SL175 Sensepak) provides
the following data Channels (functions) to be
displayed:
SPD 1
Boat Speed
DEPTH
Water Depth
TEMP
Water Temperature
LOG 1
Log (Non-Resettable)
TIME 1
Time
RST
Racing Start Timer (Count-
down)
T LOG 1
Trip Log (Resettable)
EL TM
Elapsed Time
The Display unit(s) allow you to see the information
provided by the Sensepak. Each Display uses
easy-to-understand "menus" to configure
parameters and select Channels to be viewed. All
configurations and calibrations are stored in
permanent memory.
Many "Channels" of data are available for viewing
on the Display. Channels dealing with angles (such
as Heading) are presented in a digital format. If you
have a Base Module only, you will not have any
angular data available for displaying. A Display unit
may store up to 6 "pages" of Channels. This allows
you easy access from the Display to many different
combinations of data.

INTRODUCTION - 1.1 BASIC SYSTEM DESCRIPTIONS
__________________________________________________________________________
1.2 EXTENDING THE SYSTEM
A SMARTPAK SYSTEM can easily be enhanced by
acquiring additional Displays and compatible
Sensepaks. A club racer could easily have 6 or
more different Displays, allowing information access
on both tacks by the helmsman, navigator, skipper,
tactician and applicable crew. A full list of Channels
available on the various Sensepaks can be found
on the last page of this manual.
The Wind Module (SL225 Sensepak with
Masthead Transducer) includes Apparent Wind
Angle and Speed, True Wind Angle and Speed, as
well as Velocity Made Good (VMG).
The Performance Module (SL385 Sensepak with
Heel and Fluxgate Compass Sensors) offers a host
of racing-oriented features, as well as an electronic
compass and dead reckoning area navigation
system.
The Navigation Module (SL425 Sensepak)
provides for interface with GPS units, Lorans or
Satnavs, allowing any display station to access
Lat/Lon position, waypoint information, etc. The
NMEA-0183 and RS 232C ports of the SL425
Sensepak provide for 2-way commun-ication with
appropriate peripherals.
FOR MORE INFORMATION ON AVAILABLE
SENSEPAKS FROM
SIGNETMARINE
CALL (310) 320-4349.

INTRODUCTION - 1.2 EXTENDING THE SYSTEM
__________________________________________________________________________
BASIC SYSTEM COMPONENTS
Thru Hull w / Plu
g
M1532
Depth Sensor, Mushroom
1-2401.100
Paddlew heel
1-2200.100
SL175
De
p
th/S
p
eed Sense
p
ak
1-3400.100
Dis
p
la
y
SL250
Pow er/ Bus Cable
1-1701.260
Bus Cable, 1 0 '
1-1700.260-1
EX TENDED SY STEM
COMPONENTS
Thru Hull w/Plu
g
M1532
Depth Sensor, Mushroom
1-2401.100
Paddlewheel
1-2200.100
Mast Cable
1-1300.260
WP/WS Y-Cable
1-1301.260
WP/WS Sensor
M2430-4
Compass Sensor
1-2800.100
Heel Senso
r
1-2800.100
Paddlew heel
Y
-Cable
1-1311
.260
Loran./
SatNav
SL175 SL225 SL385 SL425
Depth/Speed Sensepak
1-3400.100
WP/WS Sensepak
1-3300.100
Performance Sensepak
1-3800.100
Navi
g
ation Sensepak
1-3801.100
Pow er/
Bus
Cable
1-1701
.260
Dis
p
la
y
SL250
Bus Cable, 10'
1
-
1700.260
-
1
Bus Cable, 10'
1
-
1700.260
-
1
Bus Cable, 2 '
1
-
1700.260
-
0
Bus Cable, 2 '
1
-
1700.260
-
0
Cable
1-1801.260
RS2 3 2
Cable
1-1500
.260

INTRODUCTION - 1.3 SUBSTITUTION OF SENSEPAKS
__________________________________________________________________________
1.3 SUBSTITUTION OF SENSEPAKS
As already stated, the BASIC SYSTEM includes the
Base Module SL175 Sensepak and an SL250
Display. This manual assumes that you have
acquired the standard BASIC SYSTEM with these
two components, as well as the associated wiring
and transducers. All examples, descriptions etc.,
refer to the "Channels" associated with the Base
Module SL175 Sensepak. If you have purchased a
System other than the Basic System, you should
substitute the "Channels", descriptions and
examples with the appropriate information, and
refer to the corresponding manuals for these
additional modules.

____________________________________________________________________________
____________________________________________________________________________
2 LEARNING GUIDE
____________________________________________________________________________
____________________________________________________________________________
The following chapter gives you detailed step-by-step
instructions for first time use of the BASIC SMARTPAK
SYSTEM. If you've used a SignetMarine Smartpak System
before, or you feel confident with data systems and you just
want to dig in on your own, you may wish to skip this chapter
and go on to Basic Operation and Advanced Operation.
However, for those who require a more detailed step-by step
guide, we recommend reading this chapter and following along
with your SMARTPAK SYSTEM.
After you've completed installing your System (for specific
instructions, see Chapter 7 - Installation) you're ready to start
up the SMARTPAK SYSTEM.
Each Sensepak in your System contains information organized
in Channels. You access these Channels through the Display.
In other words, think of the Sensepak as the CPU (computer)
and the Display as the monitor / keyboard.
2.1 TURNING ON YOUR SYSTEM
To start the System, turn on the 12 volt power that
feeds the SmartPak System. After this, all your
interaction with the SMARTPAK SYSTEM will be
through the Display unit.
NOTE: The SL250 display does not have an “on”
switch. This makes for easier start-up when the
System has more than one Display, and extends
the life of the membrane switch.

LEARNING GUIDE - 2.1 TURNING ON YOUR SYSTEM
__________________________________________________________________________
Once you have turned on the power, you will see a
series of messages appear briefly as the Display
runs through its "self check" sequences. A series
of dashes appears as the Display unit requests
each of the Sense-paks that are connected to the
SMARTPAK SYSTEM to identify themselves. The
Sensepaks are displayed as they respond. (Found
225, Found 175, etc.)
If a Sensepak that is known to be on the System is
not detected, either the Sensepak is inoperative, did
not respond to the SL250 Display, or the SL250 did
not recognize the Sensepak’s message. Power to
the System should be turned off and then on to
confirm the status of the Sensepak(s). Only
Channels (functions) on the Sensepaks found at
this time will be made available in the Main
Menu, such as calibration and Channel
selection.
Once the System is finished with the start-up
sequence, it will automatically display either: a) the
first factory- programmed Page (Depth and Speed)
or b) the last Page that was displayed before the
System was turned off. If either of these is the
desired Page, no further action is needed. The
SL250 will continue to output this information.
Further instructions on programming Pages, etc.
can be found in the following sections of this
manual.

LEARNING GUIDE - 2.2 MAIN MENU
__________________________________________________________________________
2.2 MAIN MENU
The SignetMarine Smartpak System uses a MAIN
MENU that lists the options that control the
Sensepaks and the SL250 Display. The "Main
Menu" is the starting point for most operations of
the Display unit and includes these options:
SELCT PAGE SELECT A PAGE
CREAT PAGE CREATE A PAGE
ENABL ALARM ENABLE ALARM
SET RESET SET / RESET
CAL CALIBRATE
BEEP SET BEEPER
ON/OFF
SELCT UNITS SELECT UNITS
DFALT PAGES DEFAULT PAGES
To scroll through the various options from a
displayed Page, press the Enter key once. This will
get you to the Main Menu, which will automatically
scroll to the first option, SELCT PAGE. To get to the
next option, press the Down key. Repeating this
will scroll down the line and then return to the first
option (SELCT PAGE).

LEARNING GUIDE - 2.3 SELECT A PAGE OF INFO
__________________________________________________________________________
2.3 SELECT A PAGE OF INFORMATION
The first thing we'll do is look at a Page of
Information. A Page contains two pieces of
information, known as Channels, such as DEPTH,
SPEED, TEMP, etc. You can program a Page with
any combination of information that is available
through the Sensepaks. We'll go through
programming a Page in the next section of this
chapter. First, we'll Select a Page of Information.
1. From the last displayed Page, press Enter to
get to the Main Menu.
2. The Display will automatically scroll to the
next option, which is SELCT PAGE (Select Page) .
3. Press the red Enter key when SELCT PAGE
is present, and the Channels on the first Page
(P 1) will be shown.
4. To show the Channels on the following
Pages, press the Up or Down keys to scroll
through the various Pages (P 1 - P 6).
5. To display the Channels on the Page you
have selected, press Enter.
6. After Page 6 and before Page 1, EXIT
MODE will appear. Pressing Enter when this
appears will return you to the Main Menu.
NOTE: Your SL250 Display comes factory
program-med with all 6 Pages of Channels set up
for basic functions. These are referred to as the
Default Pages. To customize these pages, refer to
the Create a Page section. (Sec 2.4)
To exit the Page of Information and return to the
"Main Menu", press the red Enter key.

LEARNING GUIDE - 2.4 CREATE A PAGE OF INFO
__________________________________________________________________________
2.4 CREATE A PAGE OF INFORMATION
So far you've been working with the Default Pages
that SignetMarine programmed as part of the final
test process. This section shows you how to create
your own Pages with any Channels you wish. We
will assume that you have purchased the BASIC
SYSTEM which includes the SL175 Sensepak. If
you have another Sensepak, you will need to
substitute the Channels in this manual with the
Channels you have available in the Sensepak(s)
you have acquired.
Your SL175 Sensepak includes these Channels:
SPD 1 Boat Speed
DEPTH Water Depth
TEMP Water Temperature
LOG 1 Log (Non-resettable)
TIME 1 Time
RST Racing Start Timer (Count Down)
T LOG 1 Trip Log (Re-settable)
EL TM Elapsed Time
You must start from the "Main Menu"
. If you're in a
Page, exit it by pressing the red Enter key, which
will return you to the "Main Menu".
1. From the "Main Menu", the Display will auto-
matically scroll to the first option, SELCT
PAGE. Use the Down key to move through
the Menu to the second option, CREAT
PAGE.
2. Accept the CREAT PAGE (Create a Page)
option by pressing the red Enter key.

LEARNING GUIDE - 2.4 CREATE A PAGE OF INFO
__________________________________________________________________________
3. The first Channel listed on the right is the one
that will display the selected Channel (Speed,
Temp, etc.) on the top portion of the Display.
To choose a Channel, scroll through the list
by pressing and holding the Up or Down
keys until you find the one you want, and
press Enter to accept this Channel. The list is
constructed in a loop, so you will return to the
beginning of it when you reach the last
Channel in the list.
4. The Display will now show the Channel on the
left which will appear in the lower portion of
the Display. Once again, scroll through the
various Channels until you find the one you
want, and press Enter to accept it.
5. Once the second Channel is accepted, the
Display will show P 1, which lists the
Channels on the first Page. You must select
which Page you want to replace with the
new Channels you have just created, by
scrolling through the list of 6 Pages until you
find the one you want to replace. Press Enter
and the new Page will be created in place of
the old one (a Default Page in the case of a
newly programmed System).
NOTE: If you have an extended System there may
be two Channels listed as Speed. One is named
SPD 1 and the other is SPD 3. Choose SPD 1.
There is a difference between these two Channels
which is explained in the SL385 manual.
6. The Display will automatically return to the
Main Menu after the above programming has
been completed.

LEARNING GUIDE - 2.4 CREATE A PAGE OF INFO
__________________________________________________________________________
7. To create another Page, repeat the process
above.
To select the Page and display it, follow the
previous instructions, using SELCT PAGE.
NOTE: As with the Speed Channel, if you have an
extended System there may be two Channels listed
as Time: TIME 1 and TIME 4. Choose TIME 1. The
difference between these two Channels is explained
in the SL425 manual.
From now on, until you reprogram a given Page,
these Channels are available to you through the
stored Pages of information. They have been
saved as part of the Smartpak System memory,
which is retained even when the power to the
System is turned off. Using the procedure above
you can reprogram any of the 6 Pages.
Congratulations! You should now have a basic grasp of the
SMARTPAK SYSTEM.
For more detailed explanations, descriptions, etc., carefully
read the next two chapters, Basic Operation and Advanced
Operation. Other descriptions and procedures are given for
features not presented here, such as Alarms and Timers. If you
have an extended System, the corresponding manuals give
further information on features and functions.

____________________________________________________________________________
____________________________________________________________________________
3 BASIC OPERATION
____________________________________________________________________________
____________________________________________________________________________
3.1 BASE MODULE SL175 SENSEPAK CHANNELS
The Base Module (SL175 Sensepak) provides
many Channels of data which may be selected for
viewing. The abbreviations used, and description of
the data are presented below:
SPD 1
Boat speed as received by the
paddlewheel sensor plugged into
the SL175 Sensepak.
DEPTH
Depth to the bottom. Calibration
allows an offset to be subtracted/
added to readings. High and low
alarms.
TEMP
Water Temperature
LOG 1
Total distance traveled (non-
resettable) associated with the
paddlewheel attached to the
SL175.
TIME 1
Time, 24-Hour clock, as received
from the SL175 Sensepak.
RST
Race Start (count down) Timer.
T LOG 1
Trip Log (distance traveled,
resettable) associated with the
paddlewheel attached to the
SL175.
EL TM
Elapsed Time since the System
was turned on, or the last time
the EL TM function was reset

BASIC OPERATION - 3.2 START-UP
__________________________________________________________________________
3.2 START-UP
3.2.1 SYSTEM POWER-UP
Turn on the 12 Volt power that feeds the
SMARTPAK SYSTEM for the Display(s) and
Sensepaks.
NOTE: The SL250 Display does not have an “on”
switch. This makes for easier start-up when the
System has more than one Display, and also
extends the life of the membrane switch.
The SL250 Display has hands-free start-up,
enabling the System to be used without
programming if the first Page shown is the desired
Page.

BASIC OPERATION - 3.3 MAIN MENU
__________________________________________________________________________
3.3 MAIN MENU
3.3.1 OPTIONS
The "Main Menu" is the starting point for most
operations. The following list provides short
descriptions of each option available. Detailed
descriptions and procedures are found throughout
the manual.
SELCT PAGE
Select a Page of information. A Page
contains two pieces of information
(Channels). You can program 6
Pages with any Channels available
through your Sensepak(s).
Programming a Page is accomplished
through the "CREAT PAGE" option of
the Main Menu.
CREAT PAGE
Creates a Page of information. Used
to reprogram any of the 6 Pages
available.
ENABL ALARM
Allows you to set any Alarms
applicable to the various Channels.
An example is setting an Alarm for
Depth.
SET / RESET
Used to Set and Reset Timers. (Time,
Race Timer, Elapsed Time and Trip
Log)
CAL
Calibration Mode. Used to calibrate
Channels such as Speed, Depth,
Temp.

BASIC OPERATION - 3.3 MAIN MENU
__________________________________________________________________________
BEEP
Allows you to turn on or off beepers
associated with different Channels and
features.
SELCT UNITS
Allows you to select the type of Units
you are most comfortable with such as
nautical miles or statute miles, feet or
meters.
DEFALT PAGES
Default Pages that are factory
programmed by SignetMarine. These
contain the most commonly used
Channels and allow for easy start-up.
3.3.2 KEYS
The keys on the front membrane switch are:
ENTER
Used to select the option
on the screen.
UP
Used to move through the
list of options in the Menu.
DOWN
Used to move through the
list of options in the Menu.
#
Units. When pressed
during display of a Page,
shows what Units the
Channels are in. Example:
°F and Knts for Temp and
Speed Channels.
/