Page is loading ...

T673-16” OWNER’S MANUAL CONTENTS
SENZA SERIES DISCLAIMER TERMS ............................................... 3
1. INTRODUCTION ............................................................................ 4
2. SAFETY PRECAUTIONS ............................................................. 5
3. WARNING LABEL POSITION ........................................................ 9
4. LIST OF PARTS ............................................................................. 10
5. ASSEMBLE THE PRODUCT ......................................................... 12
STEP 0 Preparation: Inspect the Walk Belt Placement...................... 12
STEP 1 Data Cable Installation ......................................................... 13
STEP 2 Left and Right Pedestals Installation .................................... 15
STEP 3 Display Panel Installation .................................................... 16
STEP 4 Left and Right Side Covers Installation .............................. 19
STEP 5 Move the Treadmill into Place for Use ................................ 20
STEP 6 Level the Treadmill ............................................................. 21
STEP 7 Align the Walk Belt................................................................ 22
STEP 8 Adjust the Walk Belt Tension .............................................. 23
STEP 9 TV Terminal and Network ................................................... 24
STEP 10 Power Cord Installation .................................................... 25
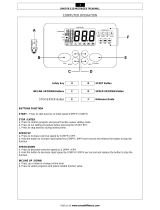
6. UNDERSTAND THE SENZA CONSOLE .......................................... 26
DISPLAY Overview ........................................................................... 26
DISPLAY Specications .................................................................. 27
DISPLAY Safety Mechanism .......................................................... 27
DISPLAY Button Function ............................................................... 28
7. SAFETY TIPS FOR USING TREADMILL ....................................... 29
SAFETY TIPS Guidelines on Safety Mechanism ............................ 29
SAFETY TIPS Safety Operating Area ............................................ 30
SAFETY TIPS Mounting and Dismounting Instructions .................. 31
8. OPERATE THE PRODUCT ............................................................. 32
OPERATION Start Screen ............................................................... 32
OPERATION Start your (GO) workout .............................................. 33
OPERATION Workout Programs ...................................................... 34
OPERATION During Exercise .......................................................... 36
OPERATION Select Entertainment .................................................. 38

T673-16” OWNER’S MANUAL CONTENTS
OPERATION View Entertainment .................................................... 39
OPERATION COOL DOWN ............................................................ 39
OPERATION Stop and Pause Exercise ........................................... 40
OPERATION Workout Summary ..................................................... 40
OPERATION SA WELL+ ................................................................ 41
OPERATION Energy Smart Function ............................................. 42
OPERATION Idle Mode .................................................................. 42
9. ABOUT HEART RATE DETECTION ................................................ 43
HEART RATE Telemetry ................................................................. 43
HEART RATE Contact .................................................................... 43
10. GUIDELINES FOR EXERCISE ...................................................... 44
11. MAINTENANCE ............................................................................. 45
MAINTENANCE Safety Precautions .............................................. 45
MAINTENANCE Error Messages .................................................... 46
MAINTENANCE Precautions .......................................................... 46
MAINTENANCE Circuit Breaker ...................................................... 47
MAINTENANCE Lubrication System ............................................... 48
MAINTENANCE Note ...................................................................... 51
MAINTENANCE Schedule ............................................................... 52
MAINTENANCE Task List ............................................................... 53
MAINTENANCE Maintenance Log .................................................. 54
12. ACCESSORIES ........................................................................... 55
ACCESSORIES Standard ............................................................. 55
ACCESSORIES Option ................................................................. 56
13. APPENDIXES ............................................................................... 58
APPENDIXES Technical Specications ......................................... 58
APPENDIXES Wiring Diagram ....................................................... 59
APPENDIXES Exploded Diagram .................................................. 60
*We reserve the right to revise this manual at any time without notice.

3
SENZA SERIES DISCLAIMER TERMS
A. Internet function:
A1. This machine provides only a web page browsing method for web page
and video browsing.
A2. For web page videos, we support only Youku and YouTube.
Note: Some videos may not be viewed due to restrictions resulting from
country policies, internal server rewalls, or video formats, etc.
A3. Strongly recommend good browsing environment when using the
internet, used wired network and the network bandwidth must be above
10Mbps.
B. IPTV:
1. Supports subnetwork streaming only, no external streaming.
2. Support wired network only, no wi network.
3. This function is Open IPTV, unable to read any encrypted stream
signals.
4. Supports HTTP and RTSP streaming only.
C. Standard USB audios and videos:
1. Not all USB ash drives can be read properly.
2. Not all audio and video formats can be played correctly.
D. Bluetooth functions:
D1. Bluetooth Music (AVRCP V1.5)
Due to the many varieties of, and rapid changes in, mobile phone models,
failure of a mobile phone to connect indicates that we currently do not
support that phone.
D2. Bluetooth BLE 4.0 Heart Rate Strap
We only support POLAR-compliant Bluetooth BLE 4.0 Heart Rate
Straps.
E. TV:
E1. This machine only supports viewing local free TV.
E2. This machine may be aected by the local environment, climate,
equipment, etc., which may cause poor quality in reception and
denition.
F. This machine does not support the installation of 3rd party APP.
G. Standard USB charger
Supports charging of GOOGLE-certied Android mobile phones, and Apple
iPhone, iPad, iPad air, and iPad mini.
H. ANYCast
ANYCast isn’t available to all the cellphone.

4
1. INTRODUCTION
Congratulations on the purchase of a high quality SportsArt product, the
T673 16” Senza Console treadmill. Constructed of high quality materials and
designed for years of reliable performance, this product was made for full
commercial use.
Before this product is assembled or operated, we recommend that you
familiarize yourself with this manual. Understanding the correct assembly
and operation of this product will help ensure that exercisers obtain their
tness goals safely and successfully.
849mm(33.4")
1462mm(57.6")
2116mm(83.3")

5
2. SAFETY PRECAUTIONS
This product was designed and built for optimum safety. However certain
precautions apply during the use of this product. Please note the following
safety precautions:
● To reduce the risk of personal injury, read and understand all the
instructions before using this product.
● Make sure the product is installed and operated as instructed in this
manual. Be careful when mounting and dismounting the unit. The
product shall be disconnected from its power source during service and
installed and when replacing parts.
● Use this product only for the intended use described in this manual.
● Check the product before every use. Make sure all parts are assembled,
and all fasteners are tightened. Do not use the product if it is
disassembled in any way.
● Do not leave your device unattended while in use.
● Assemble and operate the product on a solid, level surface. Do not use
outdoors or near water (including swimming pools and saunas) and
should not be used where aerosol (spray) products or oxygen are used.
Do not operate on a blanket or near ammable materials.
● Keep all air ventilation areas free of blockage. Never drop or insert into
any opening.
● Treadmills should be positioned away from walls to avoid injury due to
falls. Be sure that the back of the treadmill has at least six to seven feet
of clearance from a ledge, wall or window. The power supply and wiring
should be located away from walking paths or taped to prevent tripping
when stepping on or o of the running belt.
● Do not stand on the walk belt when starting the treadmill. Straddle the
belt with your feet on the right and left landing strips.
● Wear appropriate workout clothes, don’t wear loose clothing, tie all long
hair back, wear shoes with rubber or high traction soles, don’t wear
shoes with leather soles/high heels or barefoot use this product.
● Never place liquids of any type directly on the unit, except in a bottle
holder or accessory tray. Lidded containers are recommended.
● Always use the safety key when operating the product.
● Use the handrails whenever additional stability is required. In case of
emergency, such as tripping, the user should grab the handrails and
place his/her feet on the side platforms. The handrails may be held to
enhance stability as needed, but are not for continuous use.
● Keep away from moving parts. Moving parts may or may not stop
immediately if an object becomes caught or impedes normal motion.
● To Avoid Injury, use extreme caution when stepping onto or o of a
moving belt.
● Never operate this product if it has been damaged in any way. If it is not
working properly, if it has been dropped or damaged, or dropped into
water, contact a service technician for repairs.

6
2. SAFETY PRECAUTIONS (CONT.)
● Do not use accessories or parts that are not specically recommended
by the manufacturer (SportsArt). Such parts might cause injuries or
cause the unit to fail and void the warranty. We will not be responsible
for any safety issue that arises due to the misuse of accessories or
parts. At the same time, we will terminate the warranty terms of this
equipment.
● Keep all air ventilation areas free of blockage. Never drop or insert any
object into any opening.
● Unpack and verify contents of boxes according to the list of parts to
check if any parts are missing. If the product is damaged or missing,
contact your SportsArt representative to nd out all the materials
that were damaged during shipping. (Note: Transport damage is the
responsibility of the carrier.)
● This product is not intended for use by persons (including children 14
or younger) with reduced physical, sensory, or mental capabilities, or by
people who are otherwise decient in product knowledge or experience.
If such people use this product, they should be given training and be
supervised at all times by someone responsible for their safety.
● CAUTION : The heart rate system is for reference only, if you feel any
pain or any abnormal feeling, please stop Exercise and
consult your doctor immediately.
● Consult your physician before starting a workout or training program. It is
recommended that you undergo a complete physical examination. Have
your doctor review your training and diet programs to advise you of a
workout routine you should adopt.
● WORK within your recommended exercise level. DO NOT work to
exhaustion.
● Before using this equipment to exercise, always do stretching exercises
to properly warm up.
● Always unplug this appliance from the electrical outlet immediately after
using and before cleaning.
● WARNING! Only qualied technicians should be allowed to contact
electrical components such as circuit boards. Some components carry
an electrical charge even after use has been discontinued or the product
has been unplugged. For products with power cords, turn o unit power,
wait 10 minutes, then disconnect the power cord from the power socket.
For products without power cords, let the unit sit without use for 10
minutes. Only after taking such precautions should covers be removed
and electrical components be accessed.
● Do not attempt to drag or carry this unit by the power cord. Keep the
power cord away from heated surfaces.
● Do not attempt to modify the plug provided with this product. Proper
power supply must be provided. If the plug does not ft an outlet, contact
a qualied electrician to inspect or modify power in the facility.

7
2. SAFETY PRECAUTIONS (CONT.)
● This product must be grounded. If it should malfunction or breakdown,
Improper grounding can increase the risk of electric shock. The product
is equipped with a power cord having an equipment-grounding conductor
and a grounding plug. The plug must be inserted into an appropriate
outlet that is properly installed and grounded in accordance with all local
codes and ordinances. Check with a qualied electrician if you are in
doubt as to whether the power outlet is properly grounded.
● Noise emission under load is higher than without load.
● This equipment has been tested and found to comply with the limits for
a Class B digital device, pursuant to part 15 of the FCC Rules. These
limits are designed to provide reasonable protection against harmful
interference in a residential installation. This equipment generates, uses
and can radiate radio frequency energy and, if not installed and used
in accordance with the instructions, may cause harmful interference to
radio communications. However, there is no guarantee that interference
will not occur in a particular installation. If the user desires to correct the
interference, it is at the user’s own expense.
● In conformity with the European Union Machinery directive 2006/42/
EC, this equipment runs at sound pressure levels below 70 dB(A) at the
average operating speed of 12 km/hr.
● The recommended minimum operating temperature is 15 degree
Celsius.
● Weight Limit: You should not allow runners over 330 lb. (150 kg) or
walkers heavier than 450 lb. (205 kg) on the treadmill.
● At maximum speed, this product meets standards for users up to 100 kg,
220 lb.
If the product is used in a nominal 120V circuit and the rated current is less
than 15A with a grounding plug, use a plug like the one shown below:
GROUNDED
OUTLED
GROUNDING
PIN

8
2. SAFETY PRECAUTIONS (CONT.)
MARKINGS
CAUTION:
(Console)
● Read instruction manual before using.
● Do not let children on or near the product.
● To reduce the risk of injury, stand on side rails before starting treadmill.
● To reduce the risk of injury from moving parts or electric shock, unplug
before cleaning or servicing.
WARNING:
(Console)
● Heart rate monitoring system may be inaccurate.
● Over exercise may result in serious injury or death.
● If you feel faint, stop exercising immediately.
● Always attach clip to clothing before use.
(Safety key)
● Adjust the lanyard length if necessary.
● During use, clip safety key onto clothes securely in case of unexpected
falling.
● When not in use, remove safety key! Store safety key out of reach of
children.

9
3. WARNING LABEL POSITION
If you are in a Non-English speaking country, you can attach the warning
label to the console panel as shown, otherwise, you can also stick it on a
place where is clear and obvious. (please use the French version label in
French-Speaking areas in North America, and the label will not be included
in the other regions.)

10
4. LIST OF PARTS
A1
A2
A5
A4
A3a
A3
Assembly Parts
No. Name Qty. No. Name Qty.
A1 Display panel 1 A6 Hardware kit 1
A2 Handlebar assembly 1 A7 Owner’s manual 1
A3 Right pedestal 1 A8 Power cord 1
A3a Feeder cord 1
A4 Left pedestal 1
A5 Main frame 1

11
4. LIST OF PARTS (CONT.)
Components on the Product
No. Name Specication Notes
41
Flat washer D22*d8.5*t3.0
Spring washer M8
Inner hex screw M8*P1.25*L20
42
Toothed lock washer D18*d8.5*t2.0*19T
Spring washer M8
Inner hex screw M8*P1.25*L20
43
Inner hex screw M6*P1.0*L12
Flat washer D16*d6.3*t2
44
Hex socket at head cap screw M10*P1.5*L20
45 Mushroom top philips screw M4*L12
Hardware Kit
No. Name Qty. Specication Notes
Plastic fastener
POM primary color + foam
6
F0P2N-XX-01-
0000G
T-shaped Allen wrench 1 M5
Dual-Use screwdriver +black
shank
1
Flathead / Philips
head
T-shaped Allen wrench 1 M6*L108
Screw socket 4 SGN-07
Double open-ended wrench 1 22mm*24mm
L-shaped Allen wrench 1 M6*L133mm*W28

12
5. ASSEMBLE THE PRODUCT
Follow instructions below to assemble this product. Note that in this manual
the words “left” and “right” are used to refer to the product and its parts. As
such, these designations correspond to the “left” and “right” sides of a person
in position to exercise on this product. Also, for brevity, the word “screws” or
“nuts” is used where washers and other hardware may be involved.
STEP 0 Preparation: Inspect the Walk Belt Placement
Inspect the position of the walk belt in relation to the guide rollers. The walk
belt should be in the groove of the guide rollers (image V). Make sure that
the walk belt is not outside of the groove of the guide rollers (image X).
If the walk belt is in the wrong position, press the walk belt into the groove of
the guide rollers and adjust walk belt tension according to the instructions in
this manual.

13
STEP 1 Data Cable Installation
Remove the screws (41) from the left and right sides of the main frame (A5).
Note: DO NOT remove the screws and mounts in area A.
A5
41
a

14
STEP 1 Data Cable Installation (Cont.)
Follow steps (a) through (e) to thread the data cable into right pedestal (A3).
(a)Pull out the data cable from the right pedestal base. Cut the zip tie, and
uncurl the data cable.
(b)Place the right pedestal (A3) on the floor as shown, with the bottom end
facing the data cable. Detach the feeder cord (A3a) from the base of the
pedestal, and tie the low end of the feeder cord (A3a) onto the top of the
data cable.
(c)Disconnect the feeder cord at the top of right pedestal (A3).
(d)Pull the feeder cord (A3a) from the top of the right pedestal (A3) as shown,
thus threading the data cable through the right pedestal (A3).
(e)Once the data cable has been threaded through the pedestal, untie the
feeder cord (A3a) from the data cable.
Note: Repeat the same steps for the left pedestal.
A3
A3a
a
b
A4
A3a
a
b
A3
A3a
A3a
A3a
A3
A3a
A4
c
c
d
A4
A3a
d
e
A3a
e

15
STEP 2 Left and Right Pedestals Installation
Follow steps (a) through (b) to install left and right pedestals (A3)(A4).
(a) Attach left and right pedestals (A3)(A4) to the main frame (A5), and use
screws (41) to secure the assembly.
Note:Make sure the data cable is not pinched when installing the right
pedestal (A3).
(b) Remove screws (42)(44) from left and right pedestals (A3)(A4).
44
44
A3
A5
A4
(b)
(a)
(b)
42
42
41
41
(a)

16
STEP 3 Display Panel Installation
(a)Remove the left and right covers from the handlebar assembly (A2).
(b)Attach the handlebar assembly (A2) to the left and right pedestals (A3)
(A4), then mount screws (42) (44) in position. After all screws on the left and
right pedestals (A3)(A4) were mounted in position, fully tighten all mount-
ing screws to secure the assembly. (Note: Make sure the data cable is not
pinched.)
(c)Install the connectors in the handlebar assembly (A2) on the data cables
in the left and right pedestals (A3)(A4) as shown.
(a)
(b)
(c)
A2
A2
44
42
42
44
42
44
A3
A4

17
STEP 3 Display Panel Installation (Cont.)
(d)Remove screws (43) from the handlebar assembly (A2).
(e)Remove the rear cover of the display panel (A1), the screw cap (48), and
anti-slip pad (46), then loosen the screw (47).Unplug the data cable as shown
in the figure, and then remove the bottle holder (49).
(f)Insert the display panel into the 2 mounting brackets on the handlebar as-
sembly (A2), and secure the display panel (A1) with screw (43).Plug the data
cable back in and secure the bottle holder (49) with screw, then install the
screw cap (48) and anti-slip pad (46) in sequence.
(Note: Make sure the data cable is not pinched)
(e)
(
f
)
A1
(d)
43
43
A2
A1
A2
46
48
47
47
49
A1
46
48
47
47
43
43
A1
A1
49

18
STEP 3 Display Panel Installation (Cont.)
(g)Connect the display panel cables (A1) to the cables coming from the circuit
board and handlebar assembly (A2). Push cable bushing forward to cover the
connectors, and arrange all the cables neatly inside the display panel.
(h)Connect the cable connectors on the display panel (A1) to the cable
connectors coming from the circuit board and handlebar assembly (A2).
(i)Put the rear cover of the display panel (A1) back on.
(g)
(i)
(h)
A1
A2
A1
A2
A1

19
STEP 4 Left and Right Side Covers Installation
Tighten screws (41) that secure the pedestals to the mainframe, and secure
the switch protective cover (a) using screws (45). Put the left/right side covers
of the main frame (b), and left/right side covers of the handlebar (c) on.
Note: Be careful not to damage or destroy the fixing kit when assembly and
dismantling the side covers.
c
c
45
a
b
b
41

20
STEP 5 Move the Treadmill into Place for Use
Hold the rear of the walking deck in area A, and then lift the treadmill to roll
it into desired position.
Warning: Do not place the treadmill on a thick carpet or rug as it may interfere
with the walking belt. Place a wooden board on the carpet to keep carpet
fibers out of the treadmill if unavoidable.
A
R
L
/